Getting started
The easiest way to get started with WasmEdge is to use its command line tools (CLI). You can then run our example WebAssembly and JavaScript programs in the WasmEdge CLI. After that, you can create new programs for WasmEdge and run them in different host applications or frameworks.
Install
You can install WasmEdge using our one-line installer.
Your system should have git
and curl
as prerequisites.
curl -sSf https://raw.githubusercontent.com/WasmEdge/WasmEdge/master/utils/install.sh | bash
For Windows 10, you could use Windows Package Manager Client (aka winget.exe) to install WasmEdge with a single command in your terminal.
winget install wasmedge
If you would like to install WasmEdge with its Tensorflow and image processing extensions, please run the following command. It will attempt to install Tensorflow and image shared libraries on your system.
curl -sSf https://raw.githubusercontent.com/WasmEdge/WasmEdge/master/utils/install.sh | bash -s -- -e all
Run the following command to make the installed binary available in the current session.
source $HOME/.wasmedge/env
Use Docker
If you use Docker, you can simply run the WasmEdge application developer Docker images (x86 and arm64). Those images contain all the tooling you need for quick WasmEdge development.
$ docker pull wasmedge/appdev_x86_64:0.9.0
$ docker run --rm -v $(pwd):/app -it wasmedge/appdev_x86_64:0.9.0
(docker) #
WebAssembly examples
We have several WebAssembly bytecode program examples for you to try out on your newly installed WasmEdge CLI.
Hello world
The hello.wasm WebAssembly program contains a main()
function.
Checkout its Rust source code project.
It prints out hello
followed by the command line arguments.
$ wasmedge hello.wasm second state
hello
second
state
Call a function written in Rust
The add.wasm WebAssembly program contains an add()
function.
Checkout its Rust source code project.
We use WasmEdge in reactor mode to call the add()
with two integer input parameters.
$ wasmedge --reactor add.wasm add 2 2
4
Call a function written in WAT
We created the fibonacci.wat program by hand and used the wat2wasm compiler to build the fibonacci.wasm WebAssembly program.
It contains a fib()
function which takes a single integer as input parameter. We use wasmedge in reactor mode to call the exported function.
$ wasmedge --reactor fibonacci.wasm fib 10
89
With Statistics enabled
The CLI supports --enable-all-statistics
flags for the statistics and gas meter.
$ wasmedge --enable-all-statistics hello.wasm second state
hello
second
state
[2021-12-09 16:03:33.261] [info] ==================== Statistics ====================
[2021-12-09 16:03:33.261] [info] Total execution time: 268266 ns
[2021-12-09 16:03:33.261] [info] Wasm instructions execution time: 251610 ns
[2021-12-09 16:03:33.261] [info] Host functions execution time: 16656 ns
[2021-12-09 16:03:33.261] [info] Executed wasm instructions count: 20425
[2021-12-09 16:03:33.261] [info] Gas costs: 20425
[2021-12-09 16:03:33.261] [info] Instructions per second: 81177218
[2021-12-09 16:03:33.261] [info] ======================= End ======================
With gas-limit enabled
The CLI supports --gas-limit
flags for controlling the execution costs.
# cd <path/to/WasmEdge>
$ cd examples/wasm
# With enough gas
$ wasmedge --enable-all-statistics --gas-limit 20425 hello.wasm second state
hello
second
state
[2021-12-09 16:03:33.261] [info] ==================== Statistics ====================
[2021-12-09 16:03:33.261] [info] Total execution time: 268266 ns
[2021-12-09 16:03:33.261] [info] Wasm instructions execution time: 251610 ns
[2021-12-09 16:03:33.261] [info] Host functions execution time: 16656 ns
[2021-12-09 16:03:33.261] [info] Executed wasm instructions count: 20425
[2021-12-09 16:03:33.261] [info] Gas costs: 20425
[2021-12-09 16:03:33.261] [info] Instructions per second: 81177218
[2021-12-09 16:03:33.261] [info] ======================= End ======================
# Without enough gas
$ wasmedge --enable-all-statistics --gas-limit 20 hello.wasm second state
[2021-12-23 15:19:06.690] [error] Cost exceeded limit. Force terminate the execution.
[2021-12-23 15:19:06.690] [error] In instruction: ref.func (0xd2) , Bytecode offset: 0x00000000
[2021-12-23 15:19:06.690] [error] At AST node: expression
[2021-12-23 15:19:06.690] [error] At AST node: element segment
[2021-12-23 15:19:06.690] [error] At AST node: element section
[2021-12-23 15:19:06.690] [error] At AST node: module
[2021-12-23 15:19:06.690] [info] ==================== Statistics ====================
[2021-12-23 15:19:06.690] [info] Total execution time: 0 ns
[2021-12-23 15:19:06.690] [info] Wasm instructions execution time: 0 ns
[2021-12-23 15:19:06.690] [info] Host functions execution time: 0 ns
[2021-12-23 15:19:06.690] [info] Executed wasm instructions count: 21
[2021-12-23 15:19:06.690] [info] Gas costs: 20
JavaScript examples
It is possible to use WasmEdge as a high-performance, secure, extensible, easy to deploy, and Kubernetes-compliant JavaScript runtime.
The qjs.wasm program is a JavaScript interpreter compiled into WebAssembly. The hello.js file is a very simple JavaScript program.
$ wasmedge --dir .:. qjs.wasm hello.js 1 2 3
Hello 1 2 3
The qjs_tf.wasm is a JavaScript interpreter with WasmEdge Tensorflow extension compiled into WebAssembly.
To run qjs_tf.wasm, you must use the wasmedge-tensorflow-lite
CLI tool, which is a build of WasmEdge with Tensorflow extension built-in.
You can download a full Tensorflow-based JavaScript example to classify images.
# Download the Tensorflow example
$ wget https://raw.githubusercontent.com/second-state/wasmedge-quickjs/main/example_js/tensorflow_lite_demo/aiy_food_V1_labelmap.txt
$ wget https://raw.githubusercontent.com/second-state/wasmedge-quickjs/main/example_js/tensorflow_lite_demo/food.jpg
$ wget https://raw.githubusercontent.com/second-state/wasmedge-quickjs/main/example_js/tensorflow_lite_demo/lite-model_aiy_vision_classifier_food_V1_1.tflite
$ wget https://raw.githubusercontent.com/second-state/wasmedge-quickjs/main/example_js/tensorflow_lite_demo/main.js
$ wasmedge-tensorflow-lite --dir .:. qjs_tf.wasm main.js
label: Hot dog
confidence: 0.8941176470588236
Read on and continue your learning of WasmEdge.
- Install and uninstall WasmEdge
- Use the WasmEdge CLI
- WasmEdge use cases
- WasmEdge technical highlights
Install and uninstall WasmEdge
Quick install
The easiest way to install WasmEdge is to run the following command. Your system should have git
and curl
as prerequisites.
curl -sSf https://raw.githubusercontent.com/WasmEdge/WasmEdge/master/utils/install.sh | bash
For Windows 10, you could use Windows Package Manager Client (aka winget.exe) to install WasmEdge with a single command in your terminal.
winget install wasmedge
If you would like to install WasmEdge with its Tensorflow and image processing extensions, please run the following command. It will attempt to install Tensorflow and image shared libraries on your system.
curl -sSf https://raw.githubusercontent.com/WasmEdge/WasmEdge/master/utils/install.sh | bash -s -- -e all
Run the following command to make the installed binary available in the current session.
source $HOME/.wasmedge/env
That's it! You can now use WasmEdge from the CLI, or launch it from an application. To update WasmEdge to a new release, just re-run the above command to write over the old files.
Install for all users
By default, WasmEdge is installed in the $HOME/.wasmedge
directory. You can install it into a system directory, such as /usr/local
to make it available to all users. To specify an install directory, you can run the install.sh
script with the -p
flag. You will need to run the following commands as the root
user or sudo
since they write into system directories.
curl -sSf https://raw.githubusercontent.com/WasmEdge/WasmEdge/master/utils/install.sh | bash -s -- -p /usr/local
Or, with all extensions
curl -sSf https://raw.githubusercontent.com/WasmEdge/WasmEdge/master/utils/install.sh | bash -s -- -e all -p /usr/local
Install a specific version of WasmEdge
You could install specific versions of WasmEdge, including pre-releases or old releases by passing the -v
argument to the install script. Here is an example.
curl -sSf https://raw.githubusercontent.com/WasmEdge/WasmEdge/master/utils/install.sh | bash -s -- -e all -v 0.10.0
If you are interested in the latest builds from the HEAD
of the master
branch, which is basically WasmEdge's nightly builds, you can download the release package directly from our Github Action's CI artifact. Here is an example.
What's installed
After installation, you have the following directories and files. Here we assume that you installed into the $HOME/.wasmedge
directory. You could also change it to /usr/local
if you did a system-wide install.
If you used winget to install WasmEdge, files are located at C:\Program Files\WasmEdge
.
- The
$HOME/.wasmedge/bin
directory contains the WasmEdge Runtime CLI executable files. You can copy and move them around on your file system.- The
wasmedge
tool is the standard WasmEdge runtime. You can use it from the CLI.wasmedge --dir .:. app.wasm
- The
wasmedgec
tool is the AOT compiler to compile awasm
file into a nativeso
file.wasmedgec app.wasm app.so
Thewasmedge
can then execute theso
file.wasmedge --dir .:. app.so
- The
wasmedge-tensorflow
,wasmedge-tensorflow-lite
tools are runtimes that support the WasmEdge tensorflow SDK.
- The
- The
$HOME/.wasmedge/lib
directory contains WasmEdge shared libraries, as well as dependency libraries. They are useful for WasmEdge SDKs to launch WasmEdge programs and functions from host applications. - The
$HOME/.wasmedge/include
directory contains the WasmEdge header files. They are useful for WasmEdge SDKs.
Uninstall
To uninstall WasmEdge, you can run the following command.
bash <(curl -sSf https://raw.githubusercontent.com/WasmEdge/WasmEdge/master/utils/uninstall.sh)
If wasmedge
binary is not in PATH
and it wasn't installed in the default $HOME/.wasmedge
folder, then you must provide the installation path.
bash <(curl -sSf https://raw.githubusercontent.com/WasmEdge/WasmEdge/master/utils/uninstall.sh) -p /path/to/parent/folder
If you wish to uninstall uninteractively, you can pass in the --quick
or -q
flag.
bash <(curl -sSf https://raw.githubusercontent.com/WasmEdge/WasmEdge/master/utils/uninstall.sh) -q
If a parent folder of the
wasmedge
binary contains.wasmedge
, the folder will be considered for removal. For example, the script removes the default$HOME/.wasmedge
folder altogether.
If you used winget to install WasmEdge, run the following command.
winget uninstall wasmedge
Install WasmEdge for Node.js
WasmEdge can run WebAssembly functions emebedded in Node.js applications. To install the WasmEdge module in your Node.js environment is easy. Just use the npm
tool.
npm install -g wasmedge-core # Append --unsafe-perm if permission denied
To install WasmEdge with Tensorflow and other extensions.
npm install -g wasmedge-extensions # Append --unsafe-perm if permission denied
The Second State Functions is a WasmEdge-based FaaS service build on Node.js.
Use Docker for WasmEdge app development
The appdev
Docker images provide a complete WasmEdge application development environment. To use it, do the following.
On x86_64 machines
$ docker pull wasmedge/appdev_x86_64:0.9.0
$ docker run --rm -v $(pwd):/app -it wasmedge/appdev_x86_64:0.9.0
(docker) #
Here is the Dockerfile and Docker Hub image.
On arm64 machines
$ docker pull wasmedge/appdev_aarch64:0.9.0
$ docker run --rm -v $(pwd):/app -it wasmedge/appdev_aarch64:0.9.0
(docker) #
Here is the Dockerfile and Docker Hub image.
The WasmEdge application development Docker image installs the following components.
- WasmEdge CLI and shared libraries
- WasmEdge with Tensorflow extension CLI and libraries (x86_64 only)
- Golang
- Rust
- Node.js with WasmEdge addons
- Examples in the
/root/examples/
folder
Examples
Hello World. See more simple examples
$ wasmedge hello.wasm world
hello
world
Use AOT to run it much faster.
$ wasmedgec hello.wasm hello.wasm
$ wasmedge hello.wasm world
hello
world
Here are some JavaScript examples. See more
$ wasmedge --dir .:. qjs.wasm hello.js 1 2 3
Hello 1 2 3
$ wasmedge-tensorflow-lite --dir .:. qjs_tf.wasm tf_image_classify.js
label: Hot dog
confidence: 0.8941176470588236
Build and publish the appdev images
Run these commands to build and publish the appdev
Docker images.
Build on an x86_64 machine
docker build -t wasmedge/appdev_x86_64:0.9.0 -f Dockerfile.appdev_x86_64 ./
docker image push wasmedge/appdev_x86_64:0.9.0
Build on an ARM64 / aarch64 machine
docker build -t wasmedge/appdev_aarch64:0.9.0 -f Dockerfile.appdev_aarch64 ./
docker image push wasmedge/appdev_aarch64:0.9.0
WasmEdge command line tool (CLI)
After installing WasmEdge or starting the WasmEdge app dev Docker container, there are several ways to run compiled WebAssembly programs.
wasmedge
The wasmedge
binary file is a command line interface (CLI) program that runs WebAssembly bytecode programs.
- If the WebAssembly program contains a
main()
function,wasmedge
would execute it as a standalone program in the command mode. - If the WebAssembly program contains one or more public functions,
wasmedge
could execute individual functions in the reactor mode.
Command line options
The options and flags for the wasmedge
command are as follows.
- (Optional) Statistics information:
- Use
--enable-time-measuring
to show the execution time. - Use
--enable-gas-measuring
to show the amount of used gas. - Use
--enable-instruction-count
to display the number of executed instructions. - Or use
--enable-all-statistics
to enable all of the statistics options.
- Use
- (Optional) Resource limitation:
- Use
--gas-limit
to limit the execution cost. - Use
--memory-page-limit
to set the limitation of pages(as size of 64 KiB) in every memory instance.
- Use
- (Optional) Reactor mode: use
--reactor
to enable reactor mode. In the reactor mode,wasmedge
runs a specified function from the WebAssembly program.- WasmEdge will execute the function which name should be given in
ARG[0]
. - If there's exported function which names
_initialize
, the function will be executed with the empty parameter at first.
- WasmEdge will execute the function which name should be given in
- (Optional) Binding directories into WASI virtual filesystem.
- Each directory can be specified as
--dir guest_path:host_path
.
- Each directory can be specified as
- (Optional) Environ variables.
- Each variable can be specified as
--env NAME=VALUE
.
- Each variable can be specified as
- Wasm file (
/path/to/wasm/file
). - (Optional) Arguments.
- In reactor mode, the first argument will be the function name, and the arguments after
ARG[0]
will be parameters of wasm functionARG[0]
. - In command mode, the arguments will be parameters of function
_start
. They are also known as command line arguments for a standalone program.
- In reactor mode, the first argument will be the function name, and the arguments after
Once installed, you can review and run our examples.
wasmedgec
The wasmedgec
binary file is a program to compile WebAssembly bytecode programs into native machine code (i.e., the AOT compiler).
The compiled machine code could be stored in the original wasm
file, and the wasmedge
CLI will automatically choose to execute the native machine code whenever it is available.
The options and flags for the wasmedgec
are as follows.
- Input Wasm file(
/path/to/input/wasm/file
). - Output file name(
/path/to/output/file
).- By default, it will generate the universal Wasm binary format.
- Users can still generate native binary only by specifying the
.so
,.dylib
, or.dll
extensions.
# This is slow
wasmedge app.wasm
# AOT compile
wasmedgec app.wasm app.wasm
# This is now MUCH faster
wasmedge app.wasm
On Linux systems, it could generate a so
shared library file, which is then executed by the wasmedge
CLI.
wasmedgec app.wasm app.so
wasmedge app.so
Universal Wasm Binary Format
WasmEdge could wrap the AOT-compiled native binary into a custom section in the origin wasm file. We call this the universal wasm binary format.
The AOT-compiled wasm file is compatible with any wasm runtime. However, when this wasm file is executed by the WasmEdge runtime, WasmEdge will extract the native binary from the custom section and execute it.
Of course, the user still has the option to generate the native binary file with the wasmedgec
AOT compiler.
WasmEdge uses the output file extension to determine generated file format. For example, if you set the wasmedgec
output file extension to .so
, it will generate native binary in Linux shared library format. Otherwise, it will generate a universal wasm binary by default.
What is WasmEdge
WasmEdge is a lightweight, high-performance, and extensible WebAssembly runtime for cloud native, edge, and decentralized applications. It powers serverless apps, embedded functions, microservices, smart contracts, and IoT devices.
WasmEdge is a CNCF Sandbox project now.
Use cases
WasmEdge is a cloud-native WebAssembly runtime hosted by the CNCF. It is widely used in edge computing, automotive, Jamstack, serverless, SaaS, service mesh, and even blockchain applications. Featuring AOT compiler optimization, WasmEdge is one of the fastest WebAssembly runtimes on the market today.
-
Modern web apps feature rich UIs that are rendered in the browser and/or on the edge cloud. WasmEdge works with popular web UI frameworks, such as React, Vue, Yew, and Percy, to support isomorphic server-side rendering (SSR) functions on edge servers. It could also support server-side rendering of Unity3D animations and AI-generated interactive videos for web applications on the edge cloud.
-
WasmEdge provides a lighweight, secure and high-performance runtime for microservices. It is fully compatible with application service frameworks such as Dapr, and service orchestrators like Kubernetes. WasmEdge microservices can run on edge servers, and have access to distributed cache, to support both stateless and stateful business logic functions for modern web apps. Also related: Serverless function-as-a-service in public clouds.
-
Serverless SaaS functions enables users to extend and customize their SaaS experience without operating their own API callback servers. The serverless functions can be embedded into the SaaS or reside on edge servers next to the SaaS servers. Developers simply upload functions to respond to SaaS events or to connect SaaS APIs.
-
Smart device apps could embed WasmEdge as a middleware runtime to render interactive content on the UI, connect to native device drivers, and access specialized hardware features (i.e, the GPU for AI inference). The benefits of the WasmEdge runtime over native-compiled machine code include security, safety, portability, manageability, and developer productivity. WasmEdge runs on Android, OpenHarmony, and seL4 RTOS devices.
If you have any great ideas on WasmEdge, don't hesitate to open a GitHub issue to discuss together.
Rendering modern web UI on the edge
Traditional web applications follows the client-server model. In the past era of application servers, the entire UI is dynamically generated from the server. The browser is simply a thin client that displays the rendered web pages at real time. However, as the browser becomes more capable and sophisticated, the client can now take on more workload to improve application UX, performance, and security.
That gives rise to the era of Jamstack. There is now a clear separation between frontend and backend services. The frontend is a static web site (HTML + JavaScript + WebAssembly) generated from UI frameworks such as React.js, Vue.js, Yew or Percy, and the backend consists of microservices. Yet, as Jamstack gains popularity, the diversity of clients (both browsers and apps) makes it very difficult to achieve great performance across all use cases.
The solution is server-side rendering (SSR). That is to have edge servers run the "client side" UI code (ie the React generated JavaScript OR Percy generated WebAssembly), and send back the rendered HTML DOM objects to the browser. In this case, the edge server must execute the exact same code (ie JavaScript and WebAssembly) as the browser to render the UI. That is called isomorphic Jamstack applications. The WasmEdge runtime provides a lightweight, high performance, OCI complaint, and polyglot container to run all kinds of SSR functions on edge servers.
- React JS SSR function
- Vue JS SSR function (coming soon)
- Yew Rust compiled to WebAssembly SSR function (coming soon)
- Percy Rust compiled to WebAssembly SSR function
We also exploring ways to render more complex UI and interactions on WasmEdge-based edge servers, and then stream the rendered results to the client application. Potential examples include
- Render Unity3D animations on the edge server (based on WebAssembly rendering of Unity3D)
- Render interactive video (generated from AI) on the edge server
Of course, the edge cloud could grow well beyond SSR for UI components. It could also host high-performance microservices for business logic and serverless functions. Read on to the next chapter.
Microservice runtime
The edge cloud can run application logic microservices very close to the client device.
- The microservices could be stateless computational tasks, such as AI inference and stream data analysis, which offload computation from the client.
- The microservices could also interact with data cache services that sync with backend databases.
The edge cloud has advantages such as low latency, high security, and high performance. Operationally, WasmEdge can be embedded into cloud-native infrastructure via its SDKs in C, Go and Rust. It is also an OCI compliant runtime that can be directly managed by container tools as a lightweight and high-performance alternative to Linux containers. The following application frameworks have been tested to work with WasmEdge-based microservices.
Dapr (Distributed Application Runtime)
Service mesh (work in progress)
- Linkerd
- MOSN
- Envoy
Orchestration and management
Serverless functions for SaaS
WasmEdge can support customized SaaS extensions or applications using serverless functions instead of traditional network APIs. That dramatically improves SaaS users' and developers' productivity.
- WasmEdge could be embedded into SaaS products to execute user-defined functions. In this scenario, the WasmEdge function API replaces the SaaS web API. The embedded WasmEdge functions are much faster, safer, and easier to use than RPC functions over the web.
- Edge servers could provide WasmEdge-based containers to interact with existing SaaS or PaaS APIs without requiring the user to run his own servers (eg callback servers). The serverless API services can be co-located in the same networks as the SaaS to provide optimal performance and security.
The examples below showcase how WasmEdge-based serverless functions connect together SaaS APIs from different services, and process data flows across those SaaS APIs according each user's business logic.
Slack
Lark
It is also known as 飞书 aka the Chinese Slack. It is created by Byte Dance, the parent company of Tiktok.
Smart devices
Smart device apps could embed WasmEdge as a middleware runtime to render interactive content on the UI, connect to native device drivers, and access specialized hardware features (i.e, the GPU for AI inference). The benefits of the WasmEdge runtime over native-compiled machine code include security, safety, portability, manageability, OTA upgradability, and developer productivity. WasmEdge runs on the following device OSes.
With WasmEdge on both the device and the edge server, we can support isomorphic Server-Side Rendering (SSR) and microservices for rich-client mobile applications that is both portable and upgradable.
Features
- One of the fastest WebAssembly VMs on the market (based on LLVM AOT)
- WasmEdge feature extensions
- Network sockets (Rust and JavaScript SDKs)
- Async polling (for Rust Future and JS async)
- Tensorflow inference (Tutorial)
- Key value storage
- Database connector
- Gas meters for resource constraints
- JavaScript support
- ES6 module and std API support
- Implement JS APIs in Rust (Tutorial)
- Import C native shared library functions as JS functions (Tutorial)
- Cloud native management and orchestration
- CRI-O and Kubernetes compatibility
- Sidecar apps in Kubernetes-based service meshes
- Dapr microservices (Tutorial)
- Cross-platform support
- Linux OSes dated back to 2010 for both x86 and ARM CPUs
- Mac OS X for both x86 and m1 CPUs
- Windows
- Microkernel and RTOS (e.g., the highly secure seL4 microkernel)
- Easy extensibility
- Easy to embed into a host application
- Embed WasmEdge functions in C, Go, Rust, Node.js and Python host applications
- Embedded function runtime for service mesh proxies (e.g., proxy-wasm for Envoy and MOSN proxies)
WebAssembly standard extensions
WebAssembly proposals
WasmEdge supports the following WebAssembly proposals. Those proposals are likely to become official WebAssembly specifications in the future.
Proposal | WasmEdge CLI flag | WasmEdge C API enumeration | Default turning on | Interpreter mode | AOT mode |
---|---|---|---|---|---|
Import/Export of Mutable Globals | --disable-import-export-mut-globals | WasmEdge_Proposal_ImportExportMutGlobals | ✓ | ✓ | ✓ |
Non-trapping float-to-int conversions | --disable-non-trap-float-to-int | WasmEdge_Proposal_NonTrapFloatToIntConversions | ✓ | ✓ | ✓ |
Sign-extension operators | --disable-sign-extension-operators | WasmEdge_Proposal_SignExtensionOperators | ✓ | ✓ | ✓ |
Multi-value | --disable-multi-value | WasmEdge_Proposal_MultiValue | ✓ | ✓ | ✓ |
Reference Types | --disable-reference-types | WasmEdge_Proposal_ReferenceTypes | ✓ | ✓ | ✓ |
Bulk memory operations | --disable-bulk-memory | WasmEdge_Proposal_BulkMemoryOperations | ✓ | ✓ | ✓ |
Fixed-width SIMD | --disable-simd | WasmEdge_Proposal_SIMD | ✓ | ✓ | ✓ |
Tail call | --enable-tail-call | WasmEdge_Proposal_TailCall | ✓ | ✓ | |
Multiple memories | --enable-multi-memory | WasmEdge_Proposal_MultiMemories | ✓ | ✓ | |
Extended Constant Expressions | --enable-extended-const | WasmEdge_Proposal_ExtendedConst | ✓ | ✓ | |
Threads | --enable-threads | WasmEdge_Proposal_Threads | ✓ | ✓ |
WASI proposals
WasmEdge implements the following WASI proposals.
Proposal | Platforms |
---|---|
Sockets | |
Crypto | |
Machine Learning (wasi-nn) | x86_64 Linux (OpenVINO backend) |
proxy-wasm | x86_64 Linux (Interpreter only) |
WasmEdge extensions
A key differentiator of WasmEdge from other WebAssembly VMs is its support for non-standard extensions. The WASI spec provides a mechanism for developers to extend WebAssembly VMs efficiently and securely. The WasmEdge team created the following WASI-like extensions based on real-world customer demands.
- Tensorflow. Developers can write Tensorflow inference functions using a simple Rust API, and then run the function securely and at native speed inside WasmEdge.
- Other AI frameworks. Besides Tensorflow, the Second State team is building WASI-like extensions for AI frameworks such as ONNX and Tengine for WasmEdge.
- Image processing. WasmEdge uses native libraries to manipulate images for computer vision tasks.
- KV Storage. The WasmEdge storage interface allows WebAssembly programs to read and write a key value store.
- Network sockets. WasmEdge applications can access the network sockets for TCP and HTTP connections.
- Command interface. WasmEdge enables webassembly functions execute native commands in the host operating system. It supports passing arguments, environment variables, STDIN / STDOUT pipes, and security policies for host access.
- Ethereum. The WasmEdge Ewasm extension supports Ethereum smart contracts compiled to WebAssembly. It is a leading implementation for Ethereum flavored WebAssembly (Ewasm).
- Substrate. The Pallet allows WasmEdge to act as an Ethereum smart contract execution engine on any Substrate based blockchains.
WasmEdge integrations
WasmEdge is a "serverless" runtime for cloud native and edge computing applications. It allows developers safely embed third-party or "native" functions into a host application or a distributed computing framework.
Embed WasmEdge into a host application
A major use case of WasmEdge is to start an VM instance from a host application. Depending on your host application's programming language, you can use WasmEdge SDKs to start and call WasmEdge functions.
- Embed WasmEdge functions into a C-based application using the WasmEdge C API. Checkout the quick start guide.
- Embed WasmEdge functions into a Go application using the WasmEdge Go API. Here is a tutorial and are some examples!
- Embed WasmEdge functions into a Rust application using the WasmEdge Rust crate.
- Embed WasmEdge functions into a Node.js application using the NAPI. Here is a tutorial.
- Embed WasmEdge functions into any application by spawning a new process. See examples for Vercel Serverless Functions and AWS Lambda.
However, the WebAssembly spec only supports very limited data types as input parameters and return values for the WebAssembly bytecode functions. In order to pass complex data types, such as a string of an array, as call arguments into Rust-based WasmEdge function, you should use the bindgen solution provided by the rustwasmc toolchain. We currently supports bindgen in the Node.js and in Go. We are working on supporting interface types in place of bindgen for future releases.
Use WasmEdge as a Docker-like container
WasmEdge provides an OCI compliant interface. You can use container tools, such as CRI-O, Docker Hub, and Kubernetes, to orchestrate and manage WasmEdge runtimes.
Call native host functions from WasmEdge
A key feature of WasmEdge is its extensibility. WasmEdge APIs allow developers to register "host functions" from any shared library into a WasmEdge instance, and then call these functions from the WebAssembly bytecode program.
- The WasmEdge C API supports the C host functions.
- The WasmEdge Go API supports the Go host functions.
Here is an example of a JavaScript program in WasmEdge calling a C-based host function in the underlying OS.
The host functions break the Wasm sandbox to access the underly OS or hardware. But the sandbox breaking is done with explicit permission from the system’s operator.
FAQ abut WebAssembly and WasmEdge
Q: What's the relationship between WebAssembly and Docker?
A: Check out our infographic WebAssembly vs. Docker. WebAssembly runs side by side with Docker in cloud native and edge native applications.
Q: What's the difference for Native clients (NaCl), Application runtimes, and WebAssembly?
A: We created a handy table for comparison.
NaCl | Application runtimes (eg Node & Python) | Docker-like container | WebAssembly | |
---|---|---|---|---|
Performance | Great | Poor | OK | Great |
Resource footprint | Great | Poor | Poor | Great |
Isolation | Poor | OK | OK | Great |
Safety | Poor | OK | OK | Great |
Portability | Poor | Great | OK | Great |
Security | Poor | OK | OK | Great |
Language and framework choice | N/A | N/A | Great | OK |
Ease of use | OK | Great | Great | OK |
Manageability | Poor | Poor | Great | Great |
Q: What's the difference between WebAssembly and eBPF?
A: eBPF is the bytecode format for a Linux kernel space VM that is suitable for network or security related tasks. WebAssembly is the bytecode format for a user space VM that is suited for business applications. See details here
Develop a WasmEdge app
A key value proposition of WebAssembly is that it supports multiple programming languages. WebAssembly is a "managed runtime" for many programming languages including C/C++, Rust, Go, Swift, Kotlin, AssemblyScript, Grain and even JavaScript and Python.
- For compiled languages (e.g., C and Rust), WasmEdge WebAssembly provides a safe, secure, isolated, and containerized runtime as opposed to Native Client (NaCl).
- For interpreted or managed languages (e.g., JavaScript and Python), WasmEdge WebAssembly provides a secure, fast, lightweight, and containerized runtime as opposed to Docker + guest OS + native interpreter.
In this chapter, we will discuss how to compile and run programs in different languages in WasmEdge.
Rust
Rust is one of the "first-class citizen" programming languages in the WebAssembly ecosystem. All WasmEdge extensions to WebAssembly also come with Rust APIs for developers. In this chapter, we will show you how to compile your Rust applications to wasm bytecode and to run in the WasmEdge runtime.
Prerequisites
You need to install Rust and WasmEdge in order to get started.
You should also install the wasm32-wasi
target to the Rust toolchain.
rustup target add wasm32-wasi
Hello world
The Hello world example is a standalone Rust application that can be executed by the WasmEdge CLI. Its source code is available.
The full source code for the Rust main.rs file is as follows. It echoes the command line arguments passed to this program at runtime.
use std::env; fn main() { println!("hello"); for argument in env::args().skip(1) { println!("{}", argument); } }
Hello world: Build the WASM bytecode
cargo build --target wasm32-wasi
Hello world: Run the application from command line
We will use the wasmedge
command to run the program.
$ wasmedge target/wasm32-wasi/debug/hello.wasm second state
hello
second
state
A simple function
The add example is a Rust library function that can be executed by the WasmEdge CLI in the reactor mode.
The full source code for the Rust lib.rs file is as follows.
It provides a simple add()
function.
#![allow(unused)] fn main() { #[no_mangle] pub fn add(a: i32, b: i32) -> i32 { return a + b; } }
A simple function: Build the WASM bytecode
cargo build --target wasm32-wasi
A simple function: Run the application from command line
We will use wasmedge
in reactor mode to run the program. We pass the function name and its input parameters as command line arguments.
$ wasmedge --reactor target/wasm32-wasi/debug/add.wasm add 2 2
4
Pass complex call parameters
Of course, in most cases, you will not call functions using CLI arguments. Instead, you will probably need to use a language SDK from WasmEdge to call the function, pass call parameters, and receive return values. Below are some SDK examples for complex call parameters and return values.
Improve performance
To achieve native Rust performance for those applications, you
could use the wasmedgec
command to AOT compile the wasm
program,
and then run it with the wasmedge
command.
$ wasmedgec hello.wasm hello.wasm
$ wasmedge hello.wasm second state
hello
second
state
For the --reactor
mode,
$ wasmedgec add.wasm add.wasm
$ wasmedge --reactor add.wasm add 2 2
4
Further readings
- Access OS services via WASI shows how the WebAssembly program can access the underlying OS services, such as file system and environment variables.
- Tensorflow shows how to create Tensorflow-based AI inference applications for WebAssembly using the WasmEdge TensorFlow Rust SDK.
- Simple networking socket shows how to create simple HTTP client and server applications using the WasmEdge networking socket Rust SDK.
- Non-blocking networking socket shows how to create a high-performance non-blocking networking applications with concurrent open connections using the WasmEdge networking socket Rust SDK.
- Server-side rendering shows how to build an interactive web app with Rust, and then render the HTML DOM UI on the server using WasmEdge. The Rust source code is compiled to WebAssembly to render the HTML DOM in the browser or on the server.
- Command interface shows how to create native command applications for WebAssembly using the Wasmedge command interface Rust SDK.
Call Rust functions
If your Rust program has a main()
function, you could compile it into a WASM bytecode file, and run it using the wasmedge
CLI tool as a standalone application. However, a far more common use case is to compile a Rust function into a WASM bytecode file, and then call it from a host application. That is known as an embedded WASM function. The host application uses WasmEdge language SDKs (e.g., Go, Rust, C, Python and Node.js) to call those WASM functions compiled from Rust source code.
All the WasmEdge host language SDKs support simple function calls. However, the WASM spec only supports a few simple data types as call parameters and return values. The wasmedge-bindgen
crate would transform call parameters and return values of Rust functions into simple integer types when the Rust function is compiled into WASM. For example, a string is automatically converted into two integers, a memory address and a length, which can be handled by the standard WASM spec. It is very easy to do this in Rust source code. Just annotate your function with the #[wasmedge-bindgen]
macro. You can compile the annotated Rust code using the standard Rust compiler toolchain (e.g., the latest Cargo
).
#![allow(unused)] fn main() { use wasmedge_bindgen::*; use wasmedge_bindgen_macro::*; #[wasmedge_bindgen] pub fn say(s: String) -> Result<Vec<u8>, String> { let r = String::from("hello "); return Ok((r + s.as_str()).as_bytes().to_vec()); } }
Of course, once the above Rust code is compiled into WASM, the function say()
no longer takes the String
parameter nor returns the Vec<u8>
. So, the caller (i.e., the host application) must also deconstruct the call parameter into the memory pointer first before the call, and assemble the return value from the memory pointer after the call. These actions can be handled automagically by the WasmEdge language SDKs. To see a complete example, including the Rust WASM function and the Go host application, check out our tutorial in the Go SDK documentation.
A complete wasmedge-bindgen example in Rust (WASM) and Go (host)
Of course, the developer could choose to do wasmedge-bindgen
's work by hand and pass a memory pointer directly. If you are interested in this approach to call Rust compiled WASM functions, check out our examples in the Go SDK.
Access OS services
The WASI (WebAssembly Systems Interface) standard is designed to allow WebAssembly applications to access operating system services.
The wasm32-wasi
target in the Rust compiler supports WASI.
In this section, we will use an example project to show how to use Rust standard APIs to access operating system services.
Random numbers
The WebAssembly VM is a pure software construct. It does not have a hardware entropy source for random numbers. That's why WASI defines a function for WebAssembly programs to call its host operating system to get a random seed. As a Rust developer, all you need is to use the popular (de facto standard) rand
and/or getrandom
crates. With the wasm32-wasi
compiler backend, these crates generate the correct WASI calls in the WebAssembly bytecode. The Cargo.toml
dependencies are as follows.
[dependencies]
rand = "0.7.3"
getrandom = "0.1.14"
The Rust code to get random number from WebAssembly is this.
#![allow(unused)] fn main() { use rand::prelude::*; pub fn get_random_i32() -> i32 { let x: i32 = random(); return x; } pub fn get_random_bytes() -> Vec<u8> { let mut rng = thread_rng(); let mut arr = [0u8; 128]; rng.fill(&mut arr[..]); return arr.to_vec(); } }
Printing and debugging from Rust
The Rust println!
marco just works in WASI. The statements print to the STDOUT
of the process that runs the WasmEdge.
#![allow(unused)] fn main() { pub fn echo(content: &str) -> String { println!("Printed from wasi: {}", content); return content.to_string(); } }
Arguments and environment variables
It is possible to pass CLI arguments to and access OS environment variables in a WasmEdge application.
They are just env::args()
and env::vars()
arrays in Rust.
#![allow(unused)] fn main() { use std::env; pub fn print_env() { println!("The env vars are as follows."); for (key, value) in env::vars() { println!("{}: {}", key, value); } println!("The args are as follows."); for argument in env::args() { println!("{}", argument); } } }
Reading and writing files
WASI allows your Rust functions to access the host computer's file system through the standard Rust std::fs
API.
In the Rust program, you operate on files through a relative path. The relative
path's root is specified when you start the WasmEdge runtime.
#![allow(unused)] fn main() { use std::fs; use std::fs::File; use std::io::{Write, Read}; pub fn create_file(path: &str, content: &str) { let mut output = File::create(path).unwrap(); output.write_all(content.as_bytes()).unwrap(); } pub fn read_file(path: &str) -> String { let mut f = File::open(path).unwrap(); let mut s = String::new(); match f.read_to_string(&mut s) { Ok(_) => s, Err(e) => e.to_string(), } } pub fn del_file(path: &str) { fs::remove_file(path).expect("Unable to delete"); } }
A main() app
With a main()
function, the Rust program can be compiled into a
standalone WebAssembly program.
fn main() { println!("Random number: {}", get_random_i32()); println!("Random bytes: {:?}", get_random_bytes()); println!("{}", echo("This is from a main function")); print_env(); create_file("tmp.txt", "This is in a file"); println!("File content is {}", read_file("tmp.txt")); del_file("tmp.txt"); }
Use the command below to compile the Rust project.
cargo build --target wasm32-wasi
To run it in wasmedge
, do the following. The --dir
option maps the current
directory of the command shell to the file system current directory inside
the WebAssembly app.
$ wasmedge --dir .:. target/wasm32-wasi/debug/wasi.wasm hello
Random number: -68634548
Random bytes: [87, 117, 194, 122, 74, 189, 29, 1, 113, 26, 90, 6, 151, 20, 11, 169, 131, 212, 161, 220, 216, 190, 77, 234, 30, 10, 159, 7, 14, 89, 81, 111, 247, 136, 39, 195, 83, 90, 153, 225, 66, 16, 150, 217, 137, 172, 216, 203, 251, 37, 4, 27, 32, 57, 76, 237, 99, 147, 24, 175, 208, 157, 3, 220, 46, 224, 199, 153, 144, 96, 120, 89, 160, 38, 171, 239, 87, 218, 41, 184, 220, 78, 157, 57, 229, 198, 222, 72, 219, 118, 237, 27, 229, 28, 51, 116, 88, 101, 40, 139, 160, 51, 156, 102, 66, 233, 101, 50, 131, 9, 253, 186, 73, 148, 85, 36, 155, 254, 168, 202, 23, 96, 181, 99, 120, 136, 28, 147]
This is from a main function
The env vars are as follows.
... ...
The args are as follows.
target/wasm32-wasi/debug/wasi.wasm
hello
File content is This is in a file
Functions
As we have seen, you can create WebAssembly functions
in a Rust lib.rs
project. You can also use WASI functions in those functions.
However, an important caveat is that, without a main()
function, you
will need to explicitly call a helper function to initialize
environment for WASI functions to work properly.
In the Rust program, add a helper crate in Cargo.toml so that the WASI initialization code can be applied to your exported public library functions.
[dependencies]
... ...
wasmedge-wasi-helper = "=0.2.0"
In the Rust function, we need to call _initialize()
before we access any arguments and environment variables or operate any files.
#![allow(unused)] fn main() { pub fn print_env() -> i32 { _initialize(); ... ... } pub fn create_file(path: &str, content: &str) -> String { _initialize(); ... ... } pub fn read_file(path: &str) -> String { _initialize(); ... ... } pub fn del_file(path: &str) -> String { _initialize(); ... ... } }
Tensorflow
AI inference is a computationally intensive task that could benefit greatly from the speed of Rust and WebAssembly. However, the standard WebAssembly sandbox provides very limited access to the native OS and hardware, such as multi-core CPUs, GPU and specialized AI inference chips. It is not ideal for the AI workload.
The popular WebAssembly System Interface (WASI) provides a design pattern for sandboxed WebAssembly programs to securely access native host functions. The WasmEdge Runtime extends the WASI model to support access to native Tensorflow libraries from WebAssembly programs. The WasmEdge Tensorflow Rust SDK provides the security, portability, and ease-of-use of WebAssembly and native speed for Tensorflow.
If you are not familiar with Rust, you can try our experimental AI inference DSL or try our JavaScript examples.
Table of contents
A Rust example
Prerequisite
You need to install WasmEdge and Rust.
Build
Check out the example source code.
git clone https://github.com/second-state/wasm-learning/
cd cli/tflite
Use Rust Cargo
to build the WebAssembly target.
rustup target add wasm32-wasi
cargo build --target wasm32-wasi --release
Run
The wasmedge-tensorflow-lite
utility is the WasmEdge build that includes the Tensorflow and Tensorflow Lite extensions.
$ wasmedge-tensorflow-lite target/wasm32-wasi/release/classify.wasm < grace_hopper.jpg
It is very likely a <a href='https://www.google.com/search?q=military uniform'>military uniform</a> in the picture
Make it run faster
To make Tensorflow inference run much faster, you could AOT compile it down to machine native code, and then use WasmEdge sandbox to run the native code.
$ wasmedgec target/wasm32-wasi/release/classify.wasm classify.wasm
$ wasmedge-tensorflow-lite classify.wasm < grace_hopper.jpg
It is very likely a <a href='https://www.google.com/search?q=military uniform'>military uniform</a> in the picture
Code walkthrough
It is fairly straightforward to use the WasmEdge Tensorflow API. You can see the entire source code in main.rs.
First, it reads the trained TFLite model file (ImageNet) and its label file. The label file maps numeric output from the model to English names for the classified objects.
#![allow(unused)] fn main() { let model_data: &[u8] = include_bytes!("models/mobilenet_v1_1.0_224/mobilenet_v1_1.0_224_quant.tflite"); let labels = include_str!("models/mobilenet_v1_1.0_224/labels_mobilenet_quant_v1_224.txt"); }
Next, it reads the image from STDIN
and converts it to the size and RGB pixel arrangement required by the Tensorflow Lite model.
#![allow(unused)] fn main() { let mut buf = Vec::new(); io::stdin().read_to_end(&mut buf).unwrap(); let flat_img = wasmedge_tensorflow_interface::load_jpg_image_to_rgb8(&buf, 224, 224); }
Then, the program runs the TFLite model with its required input tensor (i.e., the flat image in this case), and receives the model output. In this case, the model output is an array of numbers. Each number corresponds to the probability of an object name in the label text file.
#![allow(unused)] fn main() { let mut session = wasmedge_tensorflow_interface::Session::new(&model_data, wasmedge_tensorflow_interface::ModelType::TensorFlowLite); session.add_input("input", &flat_img, &[1, 224, 224, 3]) .run(); let res_vec: Vec<u8> = session.get_output("MobilenetV1/Predictions/Reshape_1"); }
Let's find the object with the highest probability, and then look up the name in the labels file.
#![allow(unused)] fn main() { let mut i = 0; let mut max_index: i32 = -1; let mut max_value: u8 = 0; while i < res_vec.len() { let cur = res_vec[i]; if cur > max_value { max_value = cur; max_index = i as i32; } i += 1; } let mut label_lines = labels.lines(); for _i in 0..max_index { label_lines.next(); } }
Finally, it prints the result to STDOUT
.
#![allow(unused)] fn main() { let class_name = label_lines.next().unwrap().to_string(); if max_value > 50 { println!("It {} a <a href='https://www.google.com/search?q={}'>{}</a> in the picture", confidence.to_string(), class_name, class_name); } else { println!("It does not appears to be any food item in the picture."); } }
Deployment options
All the tutorials below use the WasmEdge Rust API for Tensorflow to create AI inference functions. Those Rust functions are then compiled to WebAssembly and deployed together with WasmEdge on the cloud.
Serverless functions
The following tutorials showcase how to deploy WebAssembly programs (written in Rust) on public cloud serverless platforms. The WasmEdge Runtime runs inside a Docker container on those platforms. Each serverless platform provides APIs to get data into and out of the WasmEdge runtime through STDIN and STDOUT.
Second Sate FaaS and Node.js
The following tutorials showcase how to deploy WebAssembly functions (written in Rust) on the Second State FaaS. Since the FaaS service is running on Node.js, you can follow the same tutorials for running those functions in your own Node.js server.
- Tensorflow: Image classification using the MobileNet models | Live demo
- Tensorflow: Face detection using the MTCNN models | Live demo
Service mesh
The following tutorials showcase how to deploy WebAssembly functions and programs (written in Rust) as sidecar microservices.
- The Dapr template shows how to build and deploy Dapr sidecars in Go and Rust languages. The sidecars then use the WasmEdge SDK to start WebAssembly programs to process workloads to the microservices.
Data streaming framework
The following tutorials showcase how to deploy WebAssembly functions (written in Rust) as embedded handler functions in data streaming frameworks for AIoT.
- The YoMo template starts the WasmEdge Runtime to process image data as the data streams in from a camera in a smart factory.
Simple networking sockets
The wasmedge_wasi_socket crate enables Rust developers to create networking applications and compile them into WebAssembly for WasmEdge Runtime. One of the key features of WasmEdge is that it supports non-blocking sockets. That allows even a single threaded WASM application to handle concurrent network requests. For example, while the program is waiting for data to stream in from one connection, it can start or handle another connection.
In this chapter, we will start with simple HTTP client and server examples. Then in the next chapter, we will cover the more complex non-blocking examples.
An HTTP client example
The source code for the HTTP client is available as follows.
use wasmedge_http_req::request; fn main() { let mut writer = Vec::new(); //container for body of a response let res = request::get("http://127.0.0.1:1234/get", &mut writer).unwrap(); println!("GET"); println!("Status: {} {}", res.status_code(), res.reason()); println!("Headers {}", res.headers()); println!("{}", String::from_utf8_lossy(&writer)); let mut writer = Vec::new(); //container for body of a response const BODY: &[u8; 27] = b"field1=value1&field2=value2"; // let res = request::post("https://httpbin.org/post", BODY, &mut writer).unwrap(); // no https , no dns let res = request::post("http://127.0.0.1:1234/post", BODY, &mut writer).unwrap(); println!("POST"); println!("Status: {} {}", res.status_code(), res.reason()); println!("Headers {}", res.headers()); println!("{}", String::from_utf8_lossy(&writer)); }
The following command compiles the Rust program.
cargo build --target wasm32-wasi --release
The following command runs the application in WasmEdge.
wasmedge target/wasm32-wasi/release/http_client.wasm
An HTTP server example
The source code for the HTTP server application is available as follows.
use bytecodec::DecodeExt; use httpcodec::{HttpVersion, ReasonPhrase, Request, RequestDecoder, Response, StatusCode}; use std::io::{Read, Write}; #[cfg(feature = "std")] use std::net::{Shutdown, TcpListener, TcpStream}; #[cfg(not(feature = "std"))] use wasmedge_wasi_socket::{Shutdown, TcpListener, TcpStream}; fn handle_http(req: Request<String>) -> bytecodec::Result<Response<String>> { Ok(Response::new( HttpVersion::V1_0, StatusCode::new(200)?, ReasonPhrase::new("")?, format!("echo: {}", req.body()), )) } fn handle_client(mut stream: TcpStream) -> std::io::Result<()> { let mut buff = [0u8; 1024]; let mut data = Vec::new(); loop { let n = stream.read(&mut buff)?; data.extend_from_slice(&buff[0..n]); if n < 1024 { break; } } let mut decoder = RequestDecoder::<httpcodec::BodyDecoder<bytecodec::bytes::Utf8Decoder>>::default(); let req = match decoder.decode_from_bytes(data.as_slice()) { Ok(req) => handle_http(req), Err(e) => Err(e), }; let r = match req { Ok(r) => r, Err(e) => { let err = format!("{:?}", e); Response::new( HttpVersion::V1_0, StatusCode::new(500).unwrap(), ReasonPhrase::new(err.as_str()).unwrap(), err.clone(), ) } }; let write_buf = r.to_string(); stream.write(write_buf.as_bytes())?; stream.shutdown(Shutdown::Both)?; Ok(()) } fn main() -> std::io::Result<()> { let port = std::env::var("PORT").unwrap_or(1234.to_string()); println!("new connection at {}", port); let listener = TcpListener::bind(format!("0.0.0.0:{}", port))?; loop { let _ = handle_client(listener.accept()?.0); } }
The following command compiles the Rust program.
cargo build --target wasm32-wasi --release
The following command runs the application in WasmEdge.
$ wasmedge target/wasm32-wasi/release/http_server.wasm
new connection at 1234
To test the HTTP server, you can submit a HTTP request to it via curl
.
$ curl -d "name=WasmEdge" -X POST http://127.0.0.1:1234
echo: name=WasmEdge
Non-blocking networking sockets
While the simple HTTP connections from the previous chapter are easy to implement, they are not ready for production use. If the program can only have one connection open at a time (e.g., blocking), the fast CPU would be waiting for the slow network. Non-blocking I/O means that the application program can keep multiple connections open at the same time, and process data in and out of those connections as they come in. The program can either alternatingly poll those open connections or wait for incoming data to trigger async functions. That allows I/O intensive programs to run much faster even in a single-threaded environment. In this chapter, we will cover both polling and async programming models.
A non-blocking HTTP client example
The source code for a non-blocking HTTP client application is available. The following main()
function starts two HTTP connections. The program keeps both connections open, and alternatingly checks for incoming data from them. In another word, the two connections are not blocking each other. Their data are handled concurrently (or alternatingly) as the data comes in.
use httparse::{Response, EMPTY_HEADER}; use std::io::{self, Read, Write}; use std::str::from_utf8; use wasmedge_wasi_socket::TcpStream; fn main() { let req = "GET / HTTP/1.0\n\n"; let mut first_connection = TcpStream::connect("127.0.0.1:80").unwrap(); first_connection.set_nonblocking(true).unwrap(); first_connection.write_all(req.as_bytes()).unwrap(); let mut second_connection = TcpStream::connect("127.0.0.1:80").unwrap(); second_connection.set_nonblocking(true).unwrap(); second_connection.write_all(req.as_bytes()).unwrap(); let mut first_buf = vec![0; 4096]; let mut first_bytes_read = 0; let mut second_buf = vec![0; 4096]; let mut second_bytes_read = 0; loop { let mut first_complete = false; let mut second_complete = false; if !first_complete { match read_data(&mut first_connection, &mut first_buf, first_bytes_read) { Ok((bytes_read, false)) => { first_bytes_read = bytes_read; } Ok((bytes_read, true)) => { println!("First connection completed"); if bytes_read != 0 { parse_data(&first_buf, bytes_read); } first_complete = true; } Err(e) => { println!("First connection error: {}", e); first_complete = true; } } } if !second_complete { match read_data(&mut second_connection, &mut second_buf, second_bytes_read) { Ok((bytes_read, false)) => { second_bytes_read = bytes_read; } Ok((bytes_read, true)) => { println!("Second connection completed"); if bytes_read != 0 { parse_data(&second_buf, bytes_read); } second_complete = true; } Err(e) => { println!("Second connection error: {}", e); second_complete = true; } } } if first_complete && second_complete { break; } } }
The following command compiles the Rust program.
cargo build --target wasm32-wasi --release
The following command runs the application in WasmEdge.
#![allow(unused)] fn main() { wasmedge target/wasm32-wasi/release/nonblock_http_client.wasm }
A non-blocking HTTP server example
The source code for a non-blocking HTTP server application is available. The following main()
function starts an HTTP server. It receives events from multiple open connections, and processes those events as they are received by calling the async handler functions registered to each connection. This server can process events from multiple open connections concurrently.
fn main() -> std::io::Result<()> { let mut poll = Poll::new(); let server = TcpListener::bind("127.0.0.1:1234", true)?; println!("Listening on 127.0.0.1:1234"); let mut connections = HashMap::new(); let mut handlers = HashMap::new(); const SERVER: Token = Token(0); let mut unique_token = Token(SERVER.0 + 1); poll.register(&server, SERVER, Interest::Read); loop { let events = poll.poll().unwrap(); for event in events { match event.token { SERVER => loop { let (connection, address) = match server.accept(FDFLAGS_NONBLOCK) { Ok((connection, address)) => (connection, address), Err(ref e) if e.kind() == std::io::ErrorKind::WouldBlock => break, Err(e) => panic!("accept error: {}", e), }; println!("Accepted connection from: {}", address); let token = unique_token.add(); poll.register(&connection, token, Interest::Read); connections.insert(token, connection); }, token => { let done = if let Some(connection) = connections.get_mut(&token) { let handler = match handlers.get_mut(&token) { Some(handler) => handler, None => { let handler = Handler::new(); handlers.insert(token, handler); handlers.get_mut(&token).unwrap() } }; handle_connection(&mut poll, connection, handler, &event)? } else { false }; if done { if let Some(connection) = connections.remove(&token) { connection.shutdown(Shutdown::Both)?; poll.unregister(&connection); handlers.remove(&token); } } } } } } }
The handle_connection()
function processes the data from those open connections. In this case, it just writes the request body into the response. It is also done asynchronously -- meaning that the handle_connection()
function creates an event for the response, and puts it in the queue. The main application loop processes the event and sends the response when it is waiting for data from other connections.
#![allow(unused)] fn main() { fn handle_connection( poll: &mut Poll, connection: &mut TcpStream, handler: &mut Handler, event: &Event, ) -> io::Result<bool> { if event.is_readable() { let mut connection_closed = false; let mut received_data = vec![0; 4096]; let mut bytes_read = 0; loop { match connection.read(&mut received_data[bytes_read..]) { Ok(0) => { connection_closed = true; break; } Ok(n) => { bytes_read += n; if bytes_read == received_data.len() { received_data.resize(received_data.len() + 1024, 0); } } Err(ref err) if would_block(err) => { if bytes_read != 0 { let received_data = &received_data[..bytes_read]; let mut bs: parsed::stream::ByteStream = match String::from_utf8(received_data.to_vec()) { Ok(s) => s, Err(_) => { continue; } } .into(); let req = match parsed::http::parse_http_request(&mut bs) { Some(req) => req, None => { break; } }; for header in req.headers.iter() { if header.name.eq("Conntent-Length") { let content_length = header.value.parse::<usize>().unwrap(); if content_length > received_data.len() { return Ok(true); } } } println!( "{:?} request: {:?} {:?}", connection.peer_addr().unwrap(), req.method, req.path ); let res = Response { protocol: "HTTP/1.1".to_string(), code: 200, message: "OK".to_string(), headers: vec![ Header { name: "Content-Length".to_string(), value: req.content.len().to_string(), }, Header { name: "Connection".to_string(), value: "close".to_string(), }, ], content: req.content, }; handler.response = Some(res.into()); poll.reregister(connection, event.token, Interest::Write); break; } else { println!("Empty request"); return Ok(true); } } Err(ref err) if interrupted(err) => continue, Err(err) => return Err(err), } } if connection_closed { println!("Connection closed"); return Ok(true); } } if event.is_writable() && handler.response.is_some() { let resp = handler.response.clone().unwrap(); match connection.write(resp.as_bytes()) { Ok(n) if n < resp.len() => return Err(io::ErrorKind::WriteZero.into()), Ok(_) => { return Ok(true); } Err(ref err) if would_block(err) => {} Err(ref err) if interrupted(err) => { return handle_connection(poll, connection, handler, event) } Err(err) => return Err(err), } } Ok(false) } }
The following command compiles the Rust program.
cargo build --target wasm32-wasi --release
The following command runs the application in WasmEdge.
$ wasmedge target/wasm32-wasi/release/poll_http_server.wasm
new connection at 1234
To test the HTTP server, you can submit a HTTP request to it via curl
.
$ curl -d "name=WasmEdge" -X POST http://127.0.0.1:1234
echo: name=WasmEdge
Server-side rendering
Frontend web frameworks allow developers to create web apps in a high level language and component model. The web app is built into a static web site to be rendered in the browser. While many frontend web frameworks are based on JavaScript, such as React and Vue, Rust-based frameworks are also emerging as the Rust language gains traction among developers. Those web frameworks render the HTML DOM UI using the WebAssembly, which is compiled from Rust source code. They use wasm-bindgen to tie the Rust to the HTML DOM.
While all of these frameworks send .wasm
files to the browser to render the UI on the client-side, some provide the additional choice for Server-side rendering. That is to run the WebAssembly code and build the HTML DOM UI on the server, and stream the HTML content to the browser for faster performance and startup time on slow devices and networks.
If you are interested in JavaScript-based Jamstack and SSR frameworks, such as React, please checkout our JavaScript SSR chapter.
This article will explore how to render the web UI on the server using WasmEdge. We pick Percy as our framework because it is relatively mature in SSR and Hydration. Percy already provides an example for SSR. It's highly recommended to read it first to understand how it works. The default SSR setup with Percy utilizes a native Rust web server. The Rust code is compiled to machine native code for the server. However, in order to host user applications on the server, we need a sandbox. While we could run native code inside a Linux container (Docker), a far more efficient (and safer) approach is to run the compiled code in a WebAssembly VM on the server, especially considerring the rendering code is already compiled into WebAssembly.
Now, let's go through the steps to run a Percy SSR service in a WasmEdge server.
Assuming we are in the examples/isomorphic
directory, make a new crate beside the existing server
.
cargo new server-wasmedge
You'll receive a warning to let you put the new crate into the workspace, so insert below into members
of [workspace]
. The file is ../../Cargo.toml
.
"examples/isomorphic/server-wasmedge"
With the file open, put these two lines in the bottom:
[patch.crates-io]
wasm-bindgen = { git = "https://github.com/KernelErr/wasm-bindgen.git", branch = "wasi-compat" }
Why do we need a forked
wasm-bindgen
? That is becausewasm-bindgen
is the required glue between Rust and HTML in the browser. On the server, however, we need to build the Rust code to thewasm32-wasi
target, which is incompatible withwasm-bindgen
. Our forkedwasm-bindgen
has conditional configs that removes browser-specific code in the generated.wasm
file for thewasm32-wasi
target.
Then replace the crate's Cargo.toml
with following content.
[package]
name = "isomorphic-server-wasmedge"
version = "0.1.0"
edition = "2021"
# See more keys and their definitions at https://doc.rust-lang.org/cargo/reference/manifest.html
[dependencies]
wasmedge_wasi_socket = "0"
querystring = "1.1.0"
parsed = { version = "0.3", features = ["http"] }
anyhow = "1"
serde = { version = "1.0", features = ["derive"] }
isomorphic-app = { path = "../app" }
The wasmedge_wasi_socket
crate is the socket API of WasmEdge. This project is under development. Next copy the index.html
file into the crate's root.
cp server/src/index.html server-wasmedge/src/
Then let's create some Rust code to start a web service in WasmEdge! The main.rs
program listens to the request and sends the response via the stream.
use std::io::Write; use wasmedge_wasi_socket::{Shutdown, TcpListener}; mod handler; mod mime; mod response; fn main() { let server = TcpListener::bind("127.0.0.1:3000", false).unwrap(); println!("Server listening on 127.0.0.1:3000"); // Simple single thread HTTP server // For server with Pool support, see https://github.com/second-state/wasmedge_wasi_socket/tree/main/examples/poll_http_server loop { let (mut stream, addr) = server.accept(0).unwrap(); println!("Accepted connection from {}", addr); match handler::handle_req(&mut stream, addr) { Ok((res, binary)) => { let res: String = res.into(); let bytes = res.as_bytes(); stream.write_all(bytes).unwrap(); if let Some(binary) = binary { stream.write_all(&binary).unwrap(); } } Err(e) => { println!("Error: {:?}", e); } }; stream.shutdown(Shutdown::Both).unwrap(); } }
The handler.rs
parses the received data to the path and query objects and return the corresponding response.
#![allow(unused)] fn main() { use crate::response; use anyhow::Result; use parsed::http::Response; use std::io::Read; use wasmedge_wasi_socket::{SocketAddr, TcpStream}; pub fn handle_req(stream: &mut TcpStream, addr: SocketAddr) -> Result<(Response, Option<Vec<u8>>)> { let mut buf = [0u8; 1024]; let mut received_data: Vec<u8> = Vec::new(); loop { let n = stream.read(&mut buf)?; received_data.extend_from_slice(&buf[..n]); if n < 1024 { break; } } let mut bs: parsed::stream::ByteStream = match String::from_utf8(received_data) { Ok(s) => s.into(), Err(_) => return Ok((response::bad_request(), None)), }; let req = match parsed::http::parse_http_request(&mut bs) { Some(req) => req, None => return Ok((response::bad_request(), None)), }; println!("{:?} request: {:?} {:?}", addr, req.method, req.path); let mut path_split = req.path.split("?"); let path = path_split.next().unwrap_or("/"); let query_str = path_split.next().unwrap_or(""); let query = querystring::querify(&query_str); let mut init_count: Option<u32> = None; for (k, v) in query { if k.eq("init") { match v.parse::<u32>() { Ok(v) => init_count = Some(v), Err(_) => return Ok((response::bad_request(), None)), } } } let (res, binary) = if path.starts_with("/static") { response::file(&path) } else { // render page response::ssr(&path, init_count) } .unwrap_or_else(|_| response::internal_error()); Ok((res, binary)) } }
The response.rs
program packs the response object for static assets and for server rendered content.
For the latter, you could see that SSR happens at app.render().to_string()
, the result string is put into HTML by replacing the placeholder text.
#![allow(unused)] fn main() { use crate::mime::MimeType; use anyhow::Result; use parsed::http::{Header, Response}; use std::fs::{read}; use std::path::Path; use isomorphic_app::App; const HTML_PLACEHOLDER: &str = "#HTML_INSERTED_HERE_BY_SERVER#"; const STATE_PLACEHOLDER: &str = "#INITIAL_STATE_JSON#"; pub fn ssr(path: &str, init: Option<u32>) -> Result<(Response, Option<Vec<u8>>)> { let html = format!("{}", include_str!("./index.html")); let app = App::new(init.unwrap_or(1001), path.to_string()); let state = app.store.borrow(); let html = html.replace(HTML_PLACEHOLDER, &app.render().to_string()); let html = html.replace(STATE_PLACEHOLDER, &state.to_json()); Ok((Response { protocol: "HTTP/1.0".to_string(), code: 200, message: "OK".to_string(), headers: vec![ Header { name: "content-type".to_string(), value: MimeType::from_ext("html").get(), }, Header { name: "content-length".to_string(), value: html.len().to_string(), }, ], content: html.into_bytes(), }, None)) } /// Get raw file content pub fn file(path: &str) -> Result<(Response, Option<Vec<u8>>)> { let path = Path::new(&path); if path.exists() { let content_type: MimeType = match path.extension() { Some(ext) => MimeType::from_ext(ext.to_str().get_or_insert("")), None => MimeType::from_ext(""), }; let content = read(path)?; Ok((Response { protocol: "HTTP/1.0".to_string(), code: 200, message: "OK".to_string(), headers: vec![ Header { name: "content-type".to_string(), value: content_type.get(), }, Header { name: "content-length".to_string(), value: content.len().to_string(), }, ], content: vec![], }, Some(content))) } else { Ok((Response { protocol: "HTTP/1.0".to_string(), code: 404, message: "Not Found".to_string(), headers: vec![], content: vec![], }, None)) } } /// Bad Request pub fn bad_request() -> Response { Response { protocol: "HTTP/1.0".to_string(), code: 400, message: "Bad Request".to_string(), headers: vec![], content: vec![], } } /// Internal Server Error pub fn internal_error() -> (Response, Option<Vec<u8>>) { (Response { protocol: "HTTP/1.0".to_owned(), code: 500, message: "Internal Server Error".to_owned(), headers: vec![], content: vec![], }, None) } }
The mime.rs
program is a map for assets' extension name and the Mime type.
#![allow(unused)] fn main() { pub struct MimeType { pub r#type: String, } impl MimeType { pub fn new(r#type: &str) -> Self { MimeType { r#type: r#type.to_string(), } } pub fn from_ext(ext: &str) -> Self { match ext { "html" => MimeType::new("text/html"), "css" => MimeType::new("text/css"), "map" => MimeType::new("application/json"), "js" => MimeType::new("application/javascript"), "json" => MimeType::new("application/json"), "svg" => MimeType::new("image/svg+xml"), "wasm" => MimeType::new("application/wasm"), _ => MimeType::new("text/plain"), } } pub fn get(self) -> String { self.r#type } } }
That's it! Now let's build and run the web application. If you have tested the original example, you probably have already built the client WebAssembly.
cd client
./build-wasm.sh
Next, build and run the server.
cd ../server-wasmedge
cargo build --target wasm32-wasi
OUTPUT_CSS="$(pwd)/../client/build/app.css" wasmedge --dir /static:../client/build ../../../target/wasm32-wasi/debug/isomorphic-server-wasmedge.wasm
Navigate to http://127.0.0.1:3000
and you will see the web application in action.
Furthermore, you can place all the steps into a shell script ../start-wasmedge.sh
.
#!/bin/bash
cd $(dirname $0)
cd ./client
./build-wasm.sh
cd ../server-wasmedge
OUTPUT_CSS="$(pwd)/../client/build/app.css" cargo run -p isomorphic-server-wasmedge
Add the following to the .cargo/config.toml
file.
[build]
target = "wasm32-wasi"
[target.wasm32-wasi]
runner = "wasmedge --dir /static:../client/build"
After that, a single CLI command ./start-wasmedge.sh
would perform all the tasks to build and run the web application!
We forked the Percy repository and made a ready-to-build server-wasmedge example project for you. Happy coding!
Command interface
WASI enables WebAssembly programs to call standard library functions in the host operating system. It does so through a fine-grained security model known as “capability-based security”. The WebAssembly VM owner can grant access to host system resources when the VM starts up. The program cannot access any resources (e.g., file folders) that are not explicitly allowed.
Now, why limit ourselves to standard library functions? The same approach can be used to call just any host functions from WebAssembly. WasmEdge provides a WASI-like extension to access any command line programs in the host operating system.
The command line program can
- Take input via command line arguments, as well as the
STDIN
stream. - Return value and data via the
STDOUT
stream.
Application developers for WasmEdge can use our Rust interface crate to access this functionality. In Cargo.toml
, make sure that you have this dependency.
[dependencies]
rust_process_interface_library = "0.1.3"
In the Rust application, you can now use the API methods to start a new process for the operating system command program, pass in arguments via the arg()
method as well as via the STDIN
, and receives the return values via the STDOUT
.
#![allow(unused)] fn main() { let mut cmd = Command::new("http_proxy"); cmd.arg("post") .arg("https://api.sendgrid.com/v3/mail/send") .arg(auth_header); cmd.stdin_u8vec(payload.to_string().as_bytes()); let out = cmd.output(); }
The Rust function is then compiled into WebAssembly and can run in the WasmEdge.
JavaScript
WebAssembly started as a "JavaScript alternative for browsers". The idea is to run high-performance applications compiled from languages like C/C++ or Rust safely in browsers. In the browser, WebAssembly runs side by side with JavaScript.
As WebAssembly is increasingly used in the cloud, it is now a universal runtime for cloud-native applications. Compared with Linux containers, WebAssembly runtimes achieve higher performance with lower resource consumption.
In cloud-native use cases, developers often want to use JavaScript to write business applications. That means we must now support JavaScript in WebAssembly. Furthermore, we should support calling C/C++ or Rust functions from JavaScript in a WebAssembly runtime to take advantage of WebAssembly's computational efficiency. The WasmEdge WebAssembly runtime allows you to do exactly that.
In this section, we will demonstrate how to run and enhance JavaScript in WasmEdge.
- Getting started demonstrates how to run simple JavaScript programs in WasmEdge.
- Networking sockets shows how to create non-blocking (async) HTTP client and server applications using the WasmEdge networking extension and its JavaScript API.
- Fetch shows how to use the popular
fetch
API to fetch content across the network asynchronously. - TensorFlow shows how to use WasmEdge's TensorFlow extension from its JavaScript API.
- React SSR shows example React SSR applications, including streaming SSR support.
- ES6 modules shows how to incorporate ES6 modules in WasmEdge.
- Node.js and NPM modules shows how to incorporate NPM modules in WasmEdge.
- Built-in modules shows how to add JavaScript functions into the WasmEdge runtime as built-in API functions.
- Use Rust to implement JS API discusses how to use Rust to implement and support a JavaScript API.
- Node.js compatibility demonstrates the ability to use Node.js APIs in WasmEdge QuickJS applications.
A note on v8
Now, the choice of QuickJS as our JavaScript engine might raise the question of performance. Isn't QuickJS a lot slower than v8 due to a lack of JIT support? Yes, but ...
First of all, QuickJS is a lot smaller than v8. In fact, it only takes 1/40 (or 2.5%) of the runtime resources v8 consumes. You can run a lot more QuickJS functions than v8 functions on a single physical machine.
Second, for most business logic applications, raw performance is not critical. The application may have computationally intensive tasks, such as AI inference on the fly. WasmEdge allows the QuickJS applications to drop to high-performance WebAssembly for these tasks while it is not so easy with v8 to add such extensions modules.
Third, WasmEdge is itself an OCI compliant container. It is secure by default, supports resource isolation, and can be managed by container tools to run side by side with Linux containers in a single k8s cluster.
Finally, v8 has a very large attack surface and requires major efforts to run securely in a public cloud environment. It is known that many JavaScript security issues arise from JIT. Maybe turning off JIT in the cloud-native environment is not such a bad idea!
In the end, running v8 in a cloud-native environment often requires a full stack of software tools consisting of "Linux container + guest OS + node or deno + v8", which makes it much heavier and slower than a simple WasmEdge + QuickJS container runtime.
Quick start with JavaScript on WasmEdge
First, let's build a WebAssembly-based JavaScript interpreter program for WasmEdge. It is based on QuickJS with WasmEdge extensions, such as network sockets and Tensorflow inference, incorporated into the interpreter as JavaScript APIs. You will need to install Rust to build the interpreter.
If you just want to use the interpreter to run JavaScript programs, you can skip this section. Make sure you have installed Rust and WasmEdge.
Fork or clone the wasmedge-quickjs Github repository to get started.
git clone https://github.com/second-state/wasmedge-quickjs
Following the instructions from that repo, you will be able to build a JavaScript interpreter for WasmEdge.
# Install GCC
sudo apt update
sudo apt install build-essential
# Install wasm32-wasi target for Rust
rustup target add wasm32-wasi
# Build the QuickJS JavaScript interpreter
cargo build --target wasm32-wasi --release
The WebAssembly-based JavaScript interpreter program is located in the build target directory. You can now try a simple "hello world" JavaScript program (example_js/hello.js), which prints out the command line arguments to the console.
import * as os from 'os';
import * as std from 'std';
args = args.slice(1);
print('Hello', ...args);
setTimeout(() => {
print('timeout 2s');
}, 2000);
Run the hello.js
file in WasmEdge’s QuickJS runtime as follows.
$ cd example_js
$ wasmedge --dir .:. ../target/wasm32-wasi/release/wasmedge_quickjs.wasm hello.js WasmEdge Runtime
Hello WasmEdge Runtime
Note: the
--dir .:.
on the command line is to givewasmedge
permission to read the local directory in the file system for thehello.js
file. We will use--dir .:.
in the following sections.
Make it faster
WasmEdge provides a wasmedgec
utility to compile and add a native machine code section to the wasm
file. You can use wasmedge
to run the natively instrumented wasm
file to get much faster performance.
wasmedgec ../../target/wasm32-wasi/release/wasmedge_quickjs.wasm wasmedge_quickjs.wasm
wasmedge --dir .:. wasmedge_quickjs.wasm hello.js
Next, we will discuss more advanced use case for JavaScript in WasmEdge.
Async networking apps
The QuickJS WasmEdge Runtime supports the WasmEdge networking socket extension so that the JavaScript programs can make HTTP connections to the Internet. This article will show you both HTTP Client and HTTP Server examples.
The networking API in WasmEdge is non-blocking and hence supports asynchronous I/O intensive applications. With this API, the JavaScript program can open multiple connections concurrently. It polls those connections, or registers async callback functions, to process data whenever data comes in, without waiting for any one connection to complete its data transfer. That allows the single-threaded application to handle multiple multiple concurrent requests.
A JavaScript networking client example
Below is an example of JavaScript running an async HTTP client. You could find the code in example_js/wasi_http_client.js. The code below shows how to make an async HTTP GET request.
async function get_test() {
try {
let ss = await net.WasiTcpConn.connect('152.136.235.225:80');
let req = new http.WasiRequest();
req.headers = { 'Host': '152.136.235.225' };
req.uri = '/get?a=123';
req.method = 'GET';
ss.write(req.encode());
print('wait get');
await handle_response(ss);
print('get end');
} catch (e) {
print('catch:', e);
}
}
The program can open multiple requests while waiting for the servers to respond. Once a server responds, the handle_response()
function is called asynchronously to process the response and to print out the content.
async function handle_response(s) {
let buf = new http.Buffer();
let resp = undefined;
while (true) {
buf.append(await s.read());
if (resp == undefined) {
resp = buf.parseResponse();
}
if (resp instanceof http.WasiResponse) {
let resp_length = resp.bodyLength;
if (typeof (resp_length) === "number") {
if (buf.length >= resp.bodyLength) {
print('resp.body');
print(newStringFromUTF8(buf.buffer));
break;
}
} else {
throw new Error('no support');
}
}
}
}
To run the JavaScript in the WasmEdge runtime, you can do this on the CLI.
cd example_js
wasmedge --dir .:. ../target/wasm32-wasi/release/wasmedge_quickjs.wasm wasi_http_client.js
The results printed to the console are as follows.
{
"args": {
"a": "123"
},
"data": "hello",
"files": {},
"form": {},
"headers": {
"Content-Length": "5",
"Host": "152.136.235.225"
},
"json": null,
"origin": "20.124.39.106",
"url": "http://152.136.235.225/post?a=123"
}
The demo app does two HTTP requests. One is GET
and the other is POST
. The app waits for the responses from those two requests asynchronously, and processes them as they come in. From the console log, you can see how the two request handlers are interweaved.
A JavaScript networking server example
Below is an example of JavaScript running a TCP server listening at port 8000. The incoming requests are handled asynchronously. You could find the code in example_js/wasi_net_echo.js.
import * as net from 'wasi_net';
async function handle_client(cs) {
try {
while (true) {
let d = await cs.read();
if (d == undefined || d.byteLength <= 0) {
break;
}
let s = newStringFromUTF8(d);
cs.write('echo:' + s);
}
} catch (e) {
print(e);
}
}
async function server_start() {
print('listen 8000 ...');
try {
let s = new net.WasiTcpServer(8000);
for (var i = 0; i < 100; i++) {
let cs = await s.accept();
handle_client(cs);
}
} catch (e) {
print(e)
}
}
server_start();
The server_start()
function starts the server at port 8000. When a request comes in, it accepts immediately and calls the handle_client()
function to process it asynchronously when the request data is received later. While the handle_client()
is waiting for the data to arrive from the network, the app could accept another request concurrently.
To run the JavaScript in the WasmEdge runtime, you can do this on the CLI. Since it is a server, you should run it in the background.
cd example_js
nohup wasmedge --dir .:. ../target/wasm32-wasi/release/wasmedge_quickjs.wasm wasi_net_echo.js &
Then you can test the server by querying it over the network.
$ curl -d "WasmEdge" -X POST http://localhost:8000
echo:WasmEdge
The wasi_net
package provides a flexible asynchronous networking stack for JavaScript applications in WasmEdge. We are wrap it in high-level APIs for more advanced use cases. In the next section, we will show you how to handle HTTP requests with ease. In the React SSR article, we will discuss how to create a React stream SSR server with the async networking API.
A JavaScript HTTP server example
If you already knew the server's requests and responses are in the HTTP protocol, there are additional helper functions to help you handle these requests. You could find the code in example_js/wasi_http_echo.js.
import * as http from 'wasi_http';
import * as net from 'wasi_net';
async function handle_client(cs, handler_req) {
let buffer = new http.Buffer();
while (true) {
try {
let d = await cs.read();
if (d.byteLength <= 0) {
return;
}
buffer.append(d);
let req = buffer.parseRequest();
if (req instanceof http.WasiRequest) {
handler_req(cs, req);
break;
}
} catch (e) {
print(e);
}
}
}
function handler_req(cs, req) {
print("version=", req.version);
print("uri=", req.uri);
print("method=", req.method);
print("headers=", Object.keys(req.headers));
print("body=", newStringFromUTF8(req.body));
let resp = new http.WasiResponse();
let body = 'echo:' + newStringFromUTF8(req.body);
let r = resp.encode(body);
cs.write(r);
}
async function server_start() {
try {
let s = new net.WasiTcpServer(8000);
for (var i = 0; i < 100; i++) {
let cs = await s.accept();
try {
handle_client(cs, handler_req);
} catch (e) {
print(e);
}
}
} catch (e) {
print(e);
}
}
server_start();
The server_start()
function starts the server at port 8000. When a request comes in, it accepts immediately and calls the handle_client()
async function to process the request data when the data is received later. Once the request is validated as an HTTP request, the handler function in turn calls handle_req()
to parse the fields in the HTTP request, compose a HTTP reponse, and then send the response back. While the program is waiting for the request data to arrive from the network, it can accept another request concurrently.
To run the JavaScript in the WasmEdge runtime, you can do this on the CLI. Since it is a server, you should run it in the background.
cd example_js
nohup wasmedge --dir .:. ../target/wasm32-wasi/release/wasmedge_quickjs.wasm wasi_http_echo.js &
Then you can test the server by querying it over the network.
$ curl -d "WasmEdge" -X POST http://localhost:8000
echo:WasmEdge
With async HTTP networking, developers can create I/O intensive applications, such as database-driven microservices, in JavaScript and run them safely and efficiently in WasmEdge.
The fetch
API
The fetch
API is widely used in browser and node-based JavaScript applications to fetch content over the network. Building on top of its non-blocking aysnc network socket API, the WasmEdge QuickJS runtime supports the fetch
API. That makes a lot of JS APIs and modules reusable out of the box.
The example_js/wasi_http_fetch.js example demonstrates how to use the fetch
API in WasmEdge. The code snippet below shows an async HTTP GET. While the program waits for and processes the GET content, it can start another request.
import { fetch } from 'http'
async function test_fetch() {
try {
let r = await fetch("http://152.136.235.225/get?id=1")
print('test_fetch\n', await r.text())
} catch (e) {
print(e)
}
}
test_fetch()
The code snippet below shows how to do an sync HTTP POST to a remote server.
async function test_fetch_post() {
try {
let r = await fetch("http://152.136.235.225/post", { method: 'post', 'body': 'post_body' })
print('test_fetch_post\n', await r.text())
} catch (e) {
print(e)
}
}
test_fetch_post()
An async HTTP PUT request is as follows.
async function test_fetch_put() {
try {
let r = await fetch("http://152.136.235.225/put",
{
method: "put",
body: JSON.stringify({ a: 1 }),
headers: { 'Context-type': 'application/json' }
})
print('test_fetch_put\n', await r.text())
} catch (e) {
print(e)
}
}
test_fetch_put()
To run those examples, use the following WasmEdge CLI command.
cd example_js
wasmedge --dir .:. ../target/wasm32-wasi/release/wasmedge_quickjs.wasm wasi_http_fetch.js
You can see the HTTP responses printed to the console.
TensorFlow
The interpreter supports the WasmEdge TensorFlow lite inference extension so that your JavaScript can run an ImageNet model for image classification. This article will show you how to use the TensorFlow Rust SDK for WasmEdge from your javascript program.
Here is an example of JavaScript. You could find the full code from example_js/tensorflow_lite_demo/.
import {Image} from 'image';
import * as std from 'std';
import {TensorflowLiteSession} from 'tensorflow_lite';
let img = new Image('food.jpg');
let img_rgb = img.to_rgb().resize(192, 192);
let rgb_pix = img_rgb.pixels();
let session = new TensorflowLiteSession(
'lite-model_aiy_vision_classifier_food_V1_1.tflite');
session.add_input('input', rgb_pix);
session.run();
let output = session.get_output('MobilenetV1/Predictions/Softmax');
let output_view = new Uint8Array(output);
let max = 0;
let max_idx = 0;
for (var i in output_view) {
let v = output_view[i];
if (v > max) {
max = v;
max_idx = i;
}
}
let label_file = std.open('aiy_food_V1_labelmap.txt', 'r');
let label = '';
for (var i = 0; i <= max_idx; i++) {
label = label_file.getline();
}
label_file.close();
print('label:');
print(label);
print('confidence:');
print(max / 255);
To run the JavaScript in the WasmEdge runtime, you can do the following on the CLI to re-build the QuickJS engine with TensorFlow and then run the JavaScript program with TensorFlow API.
$ cargo build --target wasm32-wasi --release --features=tensorflow
... ...
$ cd example_js/tensorflow_lite_demo
$ wasmedge-tensorflow-lite --dir .:. ../../target/wasm32-wasi/release/wasmedge_quickjs.wasm main.js
label:
Hot dog
confidence:
0.8941176470588236
Note: the
--dir .:.
on the command line is to give wasmedge permission to read the local directory in the file system for themain.js
file.
Note
- The
--features=tensorflow
compiler flag builds a version of the QuickJS engine with WasmEdge TensorFlow extensions. - The
wasmedge-tensorflow-lite
program is part of the WasmEdge package. It is the WasmEdge runtime with the Tensorflow extension built in.
You should now see the name of the food item recognized by the TensorFlow lite ImageNet model.
Make it faster
The above Tensorflow inference example takes 1–2 seconds to run. It is acceptable in web application scenarios but could be improved. Recall that WasmEdge is the fastest WebAssembly runtime today due to its AOT (Ahead-of-time compiler) optimization. WasmEdge provides a wasmedgec
utility to compile and add a native machine code section to the wasm
file for much faster performance.
The following example uses the extended versions to wasmedge
and wasmedgec
to support the WasmEdge Tensorflow extension.
$ cd example_js/tensorflow_lite_demo
$ wasmedgec-tensorflow ../../target/wasm32-wasi/release/wasmedge_quickjs.wasm wasmedge_quickjs.wasm
$ wasmedge-tensorflow-lite --dir .:. wasmedge_quickjs.wasm main.js
label:
Hot dog
confidence:
0.8941176470588236
You can see that the image classification task can be completed within 0.1s. It is at least 10x improvement!
React SSR
React is very popular JavaScript web UI framework. A React application is "compiled" into an HTML and JavaScript static web site. The web UI is rendered through the generated JavaScript code. However, it is often too slow and resource consuming to execute the complex generated JavaScript entirely in the browser to build the interactive HTML DOM objects. React Server Side Rendering (SSR) delegates the JavaScript UI rendering to a server, and have the server stream rendered HTML DOM objects to the browser. The WasmEdge JavaScript runtime provides a lightweight and high performance container to run React SSR functions on edge servers.
Server-side rendering (SSR) is a popular technique for rendering a client-side single page application (SPA) on the server and then sending a fully rendered page to the client. This allows for dynamic components to be served as static HTML markup. This approach can be useful for search engine optimization (SEO) when indexing does not handle JavaScript properly. It may also be beneficial in situations where downloading a large JavaScript bundle is impaired by a slow network. -- from Digital Ocean.
In this article, we will show you how to use the WasmEdge QuickJS runtime to implement a React SSR function. Compared with the Docker + Linux + nodejs + v8 approach, WasmEdge is much lighter (1% of the footprint) and safer, provides better resource isolation and management, and has similar non-JIT (safe) performance.
We will start from a complete tutorial to create and deploy a simple React SSR web application from the standard template. Then, we will discuss two modes of SSR: static and streaming rendering. Static rendering is easy to understand and implement. Streaming rendering, on the other hand, provides better user experience since the user can see partial results while waiting in front of the browser. We will walk through the key code snippets for both static and streaming rendering.
- Getting started
- Static rendering code example [GitHub Action | Log]
- Streaming rendering code example [GitHub Action | Log]
- A complete React 18 example [GitHub Action | Log]
Getting started
Step 1 — Create the React App
First, use npx
to create a new React app. Let’s name the app react-ssr-example
.
npx create-react-app react-ssr-example
Then, cd
into the directory for the newly created app.
cd react-ssr-example
Start the new app in order to verify the installation.
npm start
You should see the example React app displayed in your browser window. At this stage, the app is rendered in the browser. The browser runs the generated React JavaScript to build the HTML DOM UI.
Now in order to prepare for SSR, you will need to make some changes to the app's index.js
file. Change ReactDOM's render
method to hydrate
to indicate to the DOM renderer that you intend to rehydrate the app after it is rendered on the server.
Replace the contents of the index.js
file with the following.
import React from 'react';
import ReactDOM from 'react-dom';
import App from './App';
ReactDOM.hydrate(
<React.StrictMode>
<App />
</React.StrictMode>,
document.getElementById('root')
);
Note: you should import React
redundantly in the src/App.js
, so the server will recognize it.
import React from 'react';
//...
That concludes setting up the application, you can move on to setting up the server-side rendering functions.
Step 2 — Create an WasmEdge QuickJS Server and Render the App Component
Now that you have the app in place, let’s set up a server that will render the HTML DOM by running the React JavaScript and then send the rendered elements to the browser. We will use WasmEdge as a secure, high-performance and lightweight container to run React JavaScript.
Create a new server
directory in the project's root directory.
mkdir server
Then, inside the server
directory, create a new index.js
file with the server code.
import * as React from 'react';
import ReactDOMServer from 'react-dom/server';
import * as std from 'std';
import * as http from 'wasi_http';
import * as net from 'wasi_net';
import App from '../src/App.js';
async function handle_client(cs) {
print('open:', cs.peer());
let buffer = new http.Buffer();
while (true) {
try {
let d = await cs.read();
if (d == undefined || d.byteLength <= 0) {
return;
}
buffer.append(d);
let req = buffer.parseRequest();
if (req instanceof http.WasiRequest) {
handle_req(cs, req);
break;
}
} catch (e) {
print(e);
}
}
print('end:', cs.peer());
}
function enlargeArray(oldArr, newLength) {
let newArr = new Uint8Array(newLength);
oldArr && newArr.set(oldArr, 0);
return newArr;
}
async function handle_req(s, req) {
print('uri:', req.uri)
let resp = new http.WasiResponse();
let content = '';
if (req.uri == '/') {
const app = ReactDOMServer.renderToString(<App />);
content = std.loadFile('./build/index.html');
content = content.replace('<div id="root"></div>', `<div id="root">${app}</div>`);
} else {
let chunk = 1000; // Chunk size of each reading
let length = 0; // The whole length of the file
let byteArray = null; // File content as Uint8Array
// Read file into byteArray by chunk
let file = std.open('./build' + req.uri, 'r');
while (true) {
byteArray = enlargeArray(byteArray, length + chunk);
let readLen = file.read(byteArray.buffer, length, chunk);
length += readLen;
if (readLen < chunk) {
break;
}
}
content = byteArray.slice(0, length).buffer;
file.close();
}
let contentType = 'text/html; charset=utf-8';
if (req.uri.endsWith('.css')) {
contentType = 'text/css; charset=utf-8';
} else if (req.uri.endsWith('.js')) {
contentType = 'text/javascript; charset=utf-8';
} else if (req.uri.endsWith('.json')) {
contentType = 'text/json; charset=utf-8';
} else if (req.uri.endsWith('.ico')) {
contentType = 'image/vnd.microsoft.icon';
} else if (req.uri.endsWith('.png')) {
contentType = 'image/png';
}
resp.headers = {
'Content-Type': contentType
};
let r = resp.encode(content);
s.write(r);
}
async function server_start() {
print('listen 8002...');
try {
let s = new net.WasiTcpServer(8002);
for (var i = 0; ; i++) {
let cs = await s.accept();
handle_client(cs);
}
} catch (e) {
print(e);
}
}
server_start();
The server renders the <App>
component, and then sends the rendered HTML string back to the browser. Three important things are taking place here.
- ReactDOMServer's
renderToString
is used to render the<App/>
to an HTML string. - The
index.html
file from the app'sbuild
output directory is loaded as a template. The app's content is injected into the<div>
element with an id of"root"
. It is then sent back as HTTP response. - Other files from the
build
directory are read and served as needed at the requests of the browser.
Step 3 — Build and deploy
For the server code to work, you will need to bundle and transpile it. In this section, we will show you how to use webpack and Babel. In this next section, we will demonstrate an alternative (and potentially easier) approach using rollup.js.
Create a new Babel configuration file named .babelrc.json
in the project's root directory and add the env
and react-app
presets.
{
"presets": [
"@babel/preset-env",
"@babel/preset-react"
]
}
Create a webpack config for the server that uses Babel Loader to transpile the code. Start by creating the webpack.server.js
file in the project's root directory.
const path = require('path');
module.exports = {
entry: './server/index.js',
externals: [
{"wasi_http": "wasi_http"},
{"wasi_net": "wasi_net"},
{"std": "std"}
],
output: {
path: path.resolve('server-build'),
filename: 'index.js',
chunkFormat: "module",
library: {
type: "module"
},
},
experiments: {
outputModule: true
},
module: {
rules: [
{
test: /\.js$/,
use: 'babel-loader'
},
{
test: /\.css$/,
use: ["css-loader"]
},
{
test: /\.svg$/,
use: ["svg-url-loader"]
}
]
}
};
With this configuration, the transpiled server bundle will be output to the server-build
folder in a file called index.js
.
Next, add the svg-url-loader
package by entering the following commands in your terminal.
npm install svg-url-loader --save-dev
This completes the dependency installation and webpack and Babel configuration.
Now, revisit package.json
and add helper npm scripts. Add dev:build-server
, dev:start-server
scripts to the package.json
file to build and serve the SSR application.
"scripts": {
"dev:build-server": "NODE_ENV=development webpack --config webpack.server.js --mode=development",
"dev:start-server": "wasmedge --dir .:. wasmedge_quickjs.wasm ./server-build/index.js",
// ...
},
- The
dev:build-server
script sets the environment to"development"
and invokes webpack with the configuration file you created earlier. - The
dev:start-server
script runs the WasmEdge server from thewasmedge
CLI tool to serve the built output. Thewasmedge_quickjs.wasm
program contains the QuickJS runtime. Learn more
Now you can run the following commands to build the client-side app, bundle and transpile the server code, and start up the server on :8002
.
npm run build
npm run dev:build-server
npm run dev:start-server
Open http://localhost:8002/
in your web browser and observe your server-side rendered app.
Previously, the HTML source in the browser is simply the template with SSR placeholders.
Output
<div id="root"></div>
Now, with the SSR function running on the server, the HTML source in the browser is as follows.
Output
<div id="root"><div class="App" data-reactroot="">...</div></div>
Step 4 (alternative) -- build and deploy with rollup.js
Alternatively, you could use the rollup.js tool to package all application components and library modules into a single file for WasmEdge to execute.
Create a rollup config for the server that uses Babel Loader to transpile the code. Start by creating the rollup.config.js
file in the project's root directory.
const {babel} = require('@rollup/plugin-babel');
const nodeResolve = require('@rollup/plugin-node-resolve');
const commonjs = require('@rollup/plugin-commonjs');
const replace = require('@rollup/plugin-replace');
const globals = require('rollup-plugin-node-globals');
const builtins = require('rollup-plugin-node-builtins');
const plugin_async = require('rollup-plugin-async');
const css = require("rollup-plugin-import-css");
const svg = require('rollup-plugin-svg');
const babelOptions = {
babelrc: false,
presets: [
'@babel/preset-react'
],
babelHelpers: 'bundled'
};
module.exports = [
{
input: './server/index.js',
output: {
file: 'server-build/index.js',
format: 'esm',
},
external: [ 'std', 'wasi_net','wasi_http'],
plugins: [
plugin_async(),
babel(babelOptions),
nodeResolve({preferBuiltins: true}),
commonjs({ignoreDynamicRequires: false}),
css(),
svg({base64: true}),
globals(),
builtins(),
replace({
preventAssignment: true,
'process.env.NODE_ENV': JSON.stringify('production'),
'process.env.NODE_DEBUG': JSON.stringify(''),
}),
],
},
];
With this configuration, the transpiled server bundle will be output to the server-build
folder in a file called index.js
.
Next, add the dependent packages to the package.json
then install with npm
.
"devDependencies": {
//...
"@rollup/plugin-babel": "^5.3.0",
"@rollup/plugin-commonjs": "^21.0.1",
"@rollup/plugin-node-resolve": "^7.1.3",
"@rollup/plugin-replace": "^3.0.0",
"rollup": "^2.60.1",
"rollup-plugin-async": "^1.2.0",
"rollup-plugin-import-css": "^3.0.3",
"rollup-plugin-node-builtins": "^2.1.2",
"rollup-plugin-node-globals": "^1.4.0",
"rollup-plugin-svg": "^2.0.0"
}
npm install
This completes the dependency installation and rollup configuration.
Now, revisit package.json
and add helper npm scripts. Add dev:build-server
, dev:start-server
scripts to the package.json
file to build and serve the SSR application.
"scripts": {
"dev:build-server": "rollup -c rollup.config.js",
"dev:start-server": "wasmedge --dir .:. wasmedge_quickjs.wasm ./server-build/index.js",
// ...
},
- The
dev:build-server
script sets the environment to"development"
and invokes webpack with the configuration file you created earlier. - The
dev:start-server
script runs the WasmEdge server from thewasmedge
CLI tool to serve the built output. Thewasmedge_quickjs.wasm
program contains the QuickJS runtime. Learn more
Now you can run the following commands to build the client-side app, bundle and transpile the server code, and start up the server on :8002
.
npm run build
npm run dev:build-server
npm run dev:start-server
Open http://localhost:8002/
in your web browser and observe your server-side rendered app.
Previously, the HTML source in the browser is simply the template with SSR placeholders.
Output
<div id="root"></div>
Now, with the SSR function running on the server, the HTML source in the browser is as follows.
Output
<div id="root"><div class="App" data-reactroot="">...</div></div>
In the next two sections, we will dive deeper into the source code for two ready-made sample applications for static and streaming rendering of SSR.
Static rendering
The example_js/react_ssr folder in the GitHub repo contains the example's source code. It showcases how to compose HTML templates and render them into an HTML string in a JavaScript app running in WasmEdge.
The component/Home.jsx file is the main page template in React.
import React from 'react';
import Page from './Page.jsx';
class Home extends React.Component {
render() {
const { dataList = [] } = this.props;
return (
<div>
<div>This is home</div>
<Page></Page>
</div>
);
}
};
export default Home;
The Home.jpx
template includes a Page.jpx template for part of the page.
import React from 'react';
class Page extends React.Component {
render() {
const { dataList = [] } = this.props;
return (
<div>
<div>This is page</div>
</div>
);
}
};
export default Page;
The main.js file calls React to render the templates into HTML.
import React from 'react';
import {renderToString} from 'react-dom/server';
import Home from './component/Home.jsx';
const content = renderToString(React.createElement(Home));
console.log(content);
The rollup.config.js and package.json files are to build the React SSR dependencies and components into a bundled JavaScript file for WasmEdge. You should use the npm
command to build it.
The output is in the dist/main.js
file.
npm install
npm run build
To run the example, do the following on the CLI. You can see that the templates are successfully composed into an HTML string.
$ cd example_js/react_ssr
$ wasmedge --dir .:. ../../target/wasm32-wasi/release/wasmedge_quickjs.wasm dist/main.js
<div data-reactroot=""><div>This is home</div><div><div>This is page</div></div></div>
Note: the
--dir .:.
on the command line is to give wasmedge permission to read the local directory in the file system for thedist/main.js
file.
Streaming rendering
The example_js/react_ssr_stream folder in the GitHub repo contains the example's source code. It showcases how to streaming render an HTML string from templates in a JavaScript app running in WasmEdge.
The component/LazyHome.jsx file is the main page template in React. It "lazy" loads the inner page template after a 2s delay once the outer HTML is rendered and returned to the user.
import React, { Suspense } from 'react';
import * as LazyPage from './LazyPage.jsx';
async function sleep(ms) {
return new Promise((r, _) => {
setTimeout(() => r(), ms)
});
}
async function loadLazyPage() {
await sleep(2000);
return LazyPage
}
class LazyHome extends React.Component {
render() {
let LazyPage1 = React.lazy(() => loadLazyPage());
return (
<html lang="en">
<head>
<meta charSet="utf-8" />
<title>Title</title>
</head>
<body>
<div>
<div> This is LazyHome </div>
<Suspense fallback={<div> loading... </div>}>
<LazyPage1 />
</Suspense>
</div>
</body>
</html>
);
}
}
export default LazyHome;
The LazyPage.jsx is the inner page template. It is rendered 2s after the outer page is already returned to the user.
import React from 'react';
class LazyPage extends React.Component {
render() {
return (
<div>
<div>
This is lazy page
</div>
</div>
);
}
}
export default LazyPage;
The main.mjs
file starts a non-blocking HTTP server, and then renders the HTML page in multiple chuncks to the response. When a HTTP request comes in, the handle_client()
function is called to render the HTML and to send back the results through the stream.
import * as React from 'react';
import { renderToPipeableStream } from 'react-dom/server';
import * as http from 'wasi_http';
import * as net from 'wasi_net';
import LazyHome from './component/LazyHome.jsx';
async function handle_client(s) {
let resp = new http.WasiResponse();
resp.headers = {
"Content-Type": "text/html; charset=utf-8"
}
renderToPipeableStream(<LazyHome />).pipe(resp.chunk(s));
}
async function server_start() {
print('listen 8001...');
let s = new net.WasiTcpServer(8001);
for (var i = 0; i < 100; i++) {
let cs = await s.accept();
handle_client(cs);
}
}
server_start();
The rollup.config.js and package.json files are to build the React SSR dependencies and components into a bundled JavaScript file for WasmEdge. You should use the npm
command to build it.
The output is in the dist/main.mjs
file.
npm install
npm run build
To run the example, do the following on the CLI to start the server.
cd example_js/react_ssr_stream
nohup wasmedge --dir .:. ../../target/wasm32-wasi/release/wasmedge_quickjs.wasm dist/main.mjs &
Send the server a HTTP request via curl
or the browser.
curl http://localhost:8001
The results are as follows. The service first returns an HTML page with an empty inner section (i.e., the loading
section), and then 2s later, the HTML content for the inner section and the JavaScript to display it.
% Total % Received % Xferd Average Speed Time Time Time Current
Dload Upload Total Spent Left Speed
0 0 0 0 0 0 0 0 --:--:-- --:--:-- --:--:-- 0
100 211 0 211 0 0 1029 0 --:--:-- --:--:-- --:--:-- 1024
100 275 0 275 0 0 221 0 --:--:-- 0:00:01 --:--:-- 220
100 547 0 547 0 0 245 0 --:--:-- 0:00:02 --:--:-- 245
100 1020 0 1020 0 0 413 0 --:--:-- 0:00:02 --:--:-- 413
<!DOCTYPE html><html lang="en"><head><meta charSet="utf-8"/><title>Title</title></head><body><div><div> This is LazyHome </div><!--$?--><template id="B:0"></template><div> loading... </div><!--/$--></div></body></html><div hidden id="S:0"><template id="P:1"></template></div><div hidden id="S:1"><div><div>This is lazy page</div></div></div><script>function $RS(a,b){a=document.getElementById(a);b=document.getElementById(b);for(a.parentNode.removeChild(a);a.firstChild;)b.parentNode.insertBefore(a.firstChild,b);b.parentNode.removeChild(b)};$RS("S:1","P:1")</script><script>function $RC(a,b){a=document.getElementById(a);b=document.getElementById(b);b.parentNode.removeChild(b);if(a){a=a.previousSibling;var f=a.parentNode,c=a.nextSibling,e=0;do{if(c&&8===c.nodeType){var d=c.data;if("/$"===d)if(0===e)break;else e--;else"$"!==d&&"$?"!==d&&"$!"!==d||e++}d=c.nextSibling;f.removeChild(c);c=d}while(c);for(;b.firstChild;)f.insertBefore(b.firstChild,c);a.data="$";a._reactRetry&&a._reactRetry()}};$RC("B:0","S:0")</script>
React 18 SSR
In this section, we will demonstrate a complete React 18 SSR application. It renders the web UI through streaming SSR. The example_js/react18_ssr folder in the GitHub repo contains the example's source code. The component folder contains the entire React 18 application's source code, and the public folder contains the public resources (CSS and images) for the web application.
The main.mjs
file starts a non-blocking HTTP server, maps the main.css
and main.js
files in the public
folder to web URLs, and then renders the HTML page for each request in renderToPipeableStream()
.
import * as React from 'react';
import { renderToPipeableStream } from 'react-dom/server';
import * as http from 'wasi_http';
import * as net from 'wasi_net';
import * as std from 'std';
import App from './component/App.js';
import { DataProvider } from './component/data.js'
let assets = {
'main.js': '/main.js',
'main.css': '/main.css',
};
const css = std.loadFile('./public/main.css')
function createServerData() {
let done = false;
let promise = null;
return {
read() {
if (done) {
return;
}
if (promise) {
throw promise;
}
promise = new Promise(resolve => {
setTimeout(() => {
done = true;
promise = null;
resolve();
}, 2000);
});
throw promise;
},
};
}
async function handle_client(cs) {
print('open:', cs.peer());
let buffer = new http.Buffer();
while (true) {
try {
let d = await cs.read();
if (d == undefined || d.byteLength <= 0) {
return;
}
buffer.append(d);
let req = buffer.parseRequest();
if (req instanceof http.WasiRequest) {
handle_req(cs, req);
break;
}
} catch (e) {
print(e);
}
}
print('end:', cs.peer());
}
async function handle_req(s, req) {
print('uri:', req.uri)
let resp = new http.WasiResponse();
if (req.uri == '/main.css') {
resp.headers = {
"Content-Type": "text/css; charset=utf-8"
}
let r = resp.encode(css);
s.write(r);
} else {
resp.headers = {
"Content-Type": "text/html; charset=utf-8"
}
let data = createServerData()
renderToPipeableStream(
<DataProvider data={data}>
<App assets={assets} />
</DataProvider>
).pipe(resp.chunk(s));
}
}
async function server_start() {
print('listen 8002...');
try {
let s = new net.WasiTcpServer(8002);
for (var i = 0; ; i++) {
let cs = await s.accept();
handle_client(cs);
}
} catch (e) {
print(e)
}
}
server_start();
The rollup.config.js and package.json files are to build the React 18 SSR dependencies and components into a bundled JavaScript file for WasmEdge. You should use the npm
command to build it.
The output is in the dist/main.mjs
file.
npm install
npm run build
To run the example, do the following on the CLI to start the server.
cd example_js/react_ssr_stream
nohup wasmedge --dir .:. ../../target/wasm32-wasi/release/wasmedge_quickjs.wasm dist/main.mjs &
Send the server a HTTP request via curl
or the browser.
curl http://localhost:8002
The results are as follows. The service first returns an HTML page with an empty inner section (i.e., the loading
section), and then 2s later, the HTML content for the inner section and the JavaScript to display it.
% Total % Received % Xferd Average Speed Time Time Time Current
Dload Upload Total Spent Left Speed
0 0 0 0 0 0 0 0 --:--:-- --:--:-- --:--:-- 0
100 439 0 439 0 0 1202 0 --:--:-- --:--:-- --:--:-- 1199
100 2556 0 2556 0 0 1150 0 --:--:-- 0:00:02 --:--:-- 1150
100 2556 0 2556 0 0 926 0 --:--:-- 0:00:02 --:--:-- 926
100 2806 0 2806 0 0 984 0 --:--:-- 0:00:02 --:--:-- 984
<!DOCTYPE html><html lang="en"><head><meta charSet="utf-8"/><meta name="viewport" content="width=device-width, initial-scale=1"/><link rel="stylesheet" href="/main.css"/><title>Hello</title></head><body><noscript><b>Enable JavaScript to run this app.</b></noscript><!--$--><main><nav><a href="/">Home</a></nav><aside class="sidebar"><!--$?--><template id="B:0"></template><div class="spinner spinner--active" role="progressbar" aria-busy="true"></div><!--/$--></aside><article class="post"><!--$?--><template id="B:1"></template><div class="spinner spinner--active" role="progressbar" aria-busy="true"></div><!--/$--><section class="comments"><h2>Comments</h2><!--$?--><template id="B:2"></template><div class="spinner spinner--active" role="progressbar" aria-busy="true"></div><!--/$--></section><h2>Thanks for reading!</h2></article></main><!--/$--><script>assetManifest = {"main.js":"/main.js","main.css":"/main.css"};</script></body></html><div hidden id="S:0"><template id="P:3"></template></div><div hidden id="S:1"><template id="P:4"></template></div><div hidden id="S:2"><template id="P:5"></template></div><div hidden id="S:3"><h1>Archive</h1><ul><li>May 2021</li><li>April 2021</li><li>March 2021</li><li>February 2021</li><li>January 2021</li><li>December 2020</li><li>November 2020</li><li>October 2020</li><li>September 2020</li></ul></div><script>function $RS(a,b){a=document.getElementById(a);b=document.getElementById(b);for(a.parentNode.removeChild(a);a.firstChild;)b.parentNode.insertBefore(a.firstChild,b);b.parentNode.removeChild(b)};$RS("S:3","P:3")</script><script>function $RC(a,b){a=document.getElementById(a);b=document.getElementById(b);b.parentNode.removeChild(b);if(a){a=a.previousSibling;var f=a.parentNode,c=a.nextSibling,e=0;do{if(c&&8===c.nodeType){var d=c.data;if("/$"===d)if(0===e)break;else e--;else"$"!==d&&"$?"!==d&&"$!"!==d||e++}d=c.nextSibling;f.removeChild(c);c=d}while(c);for(;b.firstChild;)f.insertBefore(b.firstChild,c);a.data="$";a._reactRetry&&a._reactRetry()}};$RC("B:0","S:0")</script><div hidden id="S:4"><h1>Hello world</h1><p>This demo is <!-- --><b>artificially slowed down</b>. Open<!-- --> <!-- --><code>server/delays.js</code> to adjust how much different things are slowed down.<!-- --></p><p>Notice how HTML for comments "streams in" before the JS (or React) has loaded on the page.</p><p>Also notice that the JS for comments and sidebar has been code-split, but HTML for it is still included in the server output.</p></div><script>$RS("S:4","P:4")</script><script>$RC("B:1","S:1")</script><div hidden id="S:5"><p class="comment">Wait, it doesn't wait for React to load?</p><p class="comment">How does this even work?</p><p class="comment">I like marshmallows</p></div><script>$RS("S:5","P:5")</script><script>$RC("B:2","S:2")</script>
The streaming SSR examples make use of WasmEdge's unique asynchronous networking capabilities and ES6 module support (i.e., the rollup bundled JS file contains ES6 modules). You can learn more about async networking and ES6 in this book.
ES6 module support
The WasmEdge QuickJS runtime supports ES6 modules. In fact, the rollup commands we used in the React SSR examples convert and bundle CommonJS and NPM modules into ES6 modules so that they can be executed in WasmEdge QuickJS. This article will show you how to use ES6 module in WasmEdge.
We will take the example in example_js/es6_module_demo folder as an example. The module_def.js file defines and exports a simple JS function.
function hello(){
console.log('hello from module_def.js');
}
export {hello};
The module_def_async.js file defines and exports an aysnc function and a variable.
export async function hello() {
console.log('hello from module_def_async.js');
return 'module_def_async.js : return value';
}
export var something = 'async thing';
The demo.js file imports functions and variables from those modules and executes them.
import {hello as module_def_hello} from './module_def.js';
module_def_hello();
var f = async () => {
let {hello, something} = await import('./module_def_async.js');
await hello();
console.log('./module_def_async.js `something` is ', something);
};
f();
To run the example, you can do the following on the CLI.
$ cd example_js/es6_module_demo
$ wasmedge --dir .:. ../../target/wasm32-wasi/release/wasmedge_quickjs.wasm demo.js
hello from module_def.js
hello from module_def_async.js
./module_def_async.js `something` is async thing
Note: the
--dir .:.
on the command line is to give wasmedge permission to read the local directory in the file system for thedemo.js
file.
NodeJS and NPM module
With rollup.js, we can run CommonJS (CJS) and NodeJS (NPM) modules in WasmEdge too. The simple_common_js_demo/npm_main.js demo shows how it works. It utilizes the third-party md5
and mathjs
modules.
const md5 = require('md5');
console.log('md5(message)=', md5('message'));
const {sqrt} = require('mathjs');
console.log('sqrt(-4)=', sqrt(-4).toString());
In order to run it, we must first use the rollup.js tool to build all dependencies into a single file. In the process, rollup.js
converts CommonJS modules into WasmEdge-compatible ES6 modules. The build script is rollup.config.js.
const {babel} = require('@rollup/plugin-babel');
const nodeResolve = require('@rollup/plugin-node-resolve');
const commonjs = require('@rollup/plugin-commonjs');
const replace = require('@rollup/plugin-replace');
const globals = require('rollup-plugin-node-globals');
const builtins = require('rollup-plugin-node-builtins');
const plugin_async = require('rollup-plugin-async');
const babelOptions = {
'presets': ['@babel/preset-react']
};
module.exports = [
{
input: './npm_main.js',
output: {
inlineDynamicImports: true,
file: 'dist/npm_main.mjs',
format: 'esm',
},
external: ['process', 'wasi_net','std'],
plugins: [
plugin_async(),
nodeResolve(),
commonjs({ignoreDynamicRequires: false}),
babel(babelOptions),
globals(),
builtins(),
replace({
'process.env.NODE_ENV': JSON.stringify('production'),
'process.env.NODE_DEBUG': JSON.stringify(''),
}),
],
},
];
The package.json file specifies the rollup.js
dependencies and the command to build the npm_main.js demo program into a single bundle.
{
"dependencies": {
"mathjs": "^9.5.1",
"md5": "^2.3.0"
},
"devDependencies": {
"@babel/core": "^7.16.5",
"@babel/preset-env": "^7.16.5",
"@babel/preset-react": "^7.16.5",
"@rollup/plugin-babel": "^5.3.0",
"@rollup/plugin-commonjs": "^21.0.1",
"@rollup/plugin-node-resolve": "^7.1.3",
"@rollup/plugin-replace": "^3.0.0",
"rollup": "^2.60.1",
"rollup-plugin-babel": "^4.4.0",
"rollup-plugin-node-builtins": "^2.1.2",
"rollup-plugin-node-globals": "^1.4.0",
"rollup-plugin-async": "^1.2.0"
},
"scripts": {
"build": "rollup -c rollup.config.js"
}
}
Run the following NPM commands to build npm_main.js demo program into dist/npm_main.mjs
.
npm install
npm run build
Run the result JS file in WasmEdge CLI as follows.
$ wasmedge --dir .:. ../../target/wasm32-wasi/release/wasmedge_quickjs.wasm dist/npm_main.mjs
md5(message)= 78e731027d8fd50ed642340b7c9a63b3
sqrt(-4)= 2i
You can import and run any pure-JS NPM packages in WasmEdge this way.
System modules
The WasmEdge QuickJS runtime supports ES6 and NPM modules for application developers. However, those approaches are too cumbersome for system developers. They need an easier way to add multiple JavaScript modules and APIs into the runtime without having to go through build tools like rollup.js. The WasmEdge QuickJS modules system allow developers to just drop JavaScript files into a modules
folder, and have the JavaScript functions defined in the files immediately available to all JavaScript programs in the runtime. A good use case for this modules system is to support Node.js APIs in WasmEdge.
The module system is just a collection of JavaScript files in the modules
directory in the WasmEdge QuickJS distribution. To use the JavaScript functions and APIs defined in those modules, you just need to map this directory to the /modules
directory inside the WasmEdge Runtime instance. The following example shows how to do this on the WasmEdge CLI. You can do this with any of the host language SDKs that support embedded use of WasmEdge.
ls modules
buffer.js encoding.js events.js http.js
... JavaScript files for the modules ...
wasmedge --dir .:. target/wasm32-wasi/release/wasmedge_quickjs.wasm example_js/hello.js WasmEdge Runtime
The module_demo shows how you can use the modules system to add your own JavaScript APIs. To run the demo, first copy the two files in the demo's modules directory to your WasmEdge QuickJS's modules
directory.
cp example_js/module_demo/modules/* modules/
The two JavaScript files in the modules
directory provide two simple functions. Below is the modules/my_mod_1.js file.
export function hello_mod_1(){
console.log('hello from "my_mod_1.js"')
}
And the modules/my_mod_2.js file.
export function hello_mod_2(){
console.log('hello from "my_mod_2.js"')
}
Then, just run the demo.js file to call the two exported functions from the modules.
import { hello_mod_1 } from 'my_mod_1'
import { hello_mod_2 } from 'my_mod_2'
hello_mod_1()
hello_mod_2()
Here is the command to run the demo and the output.
wasmedge --dir .:. target/wasm32-wasi/release/wasmedge_quickjs.wasm example_js/module_demo/demo.js
hello from "my_mod_1.js"
hello from "my_mod_2.js"
Following the above tutorials, you can easily add third-party JavaScript functions and APIs into your WasmEdge QuickJS runtime. For the official distribution, we included JavaScript files to support Node.js APIs. You can use those files as further examples.
Use Rust to implement JS API
For JavaScript developers, incorporating Rust functions into JavaScript APIs is useful. That enables developers to write programs in "pure JavaScript" and yet still take advantage of the high performance Rust functions. With the WasmEdge Runtime, you can do exactly that.
The internal_module folder in the official WasmEdge QuickJS distribution provides Rust-based implementations of some built-in JavaScript API functions. Those functions typically require interactions with host functions in the WasmEdge runtime (e.g., networking and tensorflow), and hence cannot be accessed by pure JavaScript implementations in modules.
Check out the wasmedge-quickjs Github repo and change to the examples/embed_js
folder to follow along.
git clone https://github.com/second-state/wasmedge-quickjs
cd examples/embed_js
You must have Rust and WasmEdge installed to build and run the examples we show you.
The embed_js
demo showcases several different examples on how to embed JavaScript inside Rust. You can build and run all the examples as follows.
cargo build --target wasm32-wasi --release
wasmedge --dir .:. target/wasm32-wasi/release/embed_js.wasm
Note: The
--dir .:.
on the command line is to give wasmedge permission to read the local directory in the file system.
Create a JavaScript function API
The following code snippet defines a Rust function that can be incorporate into the JavaScript interpreter as an API.
#![allow(unused)] fn main() { fn run_rust_function(ctx: &mut Context) { struct HelloFn; impl JsFn for HelloFn { fn call(_ctx: &mut Context, _this_val: JsValue, argv: &[JsValue]) -> JsValue { println!("hello from rust"); println!("argv={:?}", argv); JsValue::UnDefined } } ... } }
The following code snippet shows how to add this Rust function into the JavaScript interpreter, give a name hi()
as its JavaScript API, and then call it from JavaScript code.
#![allow(unused)] fn main() { fn run_rust_function(ctx: &mut Context) { ... let f = ctx.new_function::<HelloFn>("hello"); ctx.get_global().set("hi", f.into()); let code = r#"hi(1,2,3)"#; let r = ctx.eval_global_str(code); println!("return value:{:?}", r); } }
The execution result is as follows.
hello from rust
argv=[Int(1), Int(2), Int(3)]
return value:UnDefined
Using this approach, you can create a JavaScript interpreter with customized API functions. The interpreter runs inside WasmEdge, and can execute JavaScript code, which calls such API functions, from CLI or the network.
Create a JavaScript object API
In the JavaScript API design, we sometimes need to provide an object that encapsulates both data and function. In the following example, we define a Rust function for the JavaScript API.
#![allow(unused)] fn main() { fn rust_new_object_and_js_call(ctx: &mut Context) { struct ObjectFn; impl JsFn for ObjectFn { fn call(_ctx: &mut Context, this_val: JsValue, argv: &[JsValue]) -> JsValue { println!("hello from rust"); println!("argv={:?}", argv); if let JsValue::Object(obj) = this_val { let obj_map = obj.to_map(); println!("this={:#?}", obj_map); } JsValue::UnDefined } } ... } }
We then create an "object" on the Rust side, set its data fields, and then register the Rust function as a JavaScript function associated with the objects.
#![allow(unused)] fn main() { let mut obj = ctx.new_object(); obj.set("a", 1.into()); obj.set("b", ctx.new_string("abc").into()); let f = ctx.new_function::<ObjectFn>("anything"); obj.set("f", f.into()); }
Next, we make the Rust "object" available as JavaScript object test_obj
in the JavaScript interpreter.
#![allow(unused)] fn main() { ctx.get_global().set("test_obj", obj.into()); }
In the JavaScript code, you can now directly use test_obj
as part of the API.
#![allow(unused)] fn main() { let code = r#" print('test_obj keys=',Object.keys(test_obj)) print('test_obj.a=',test_obj.a) print('test_obj.b=',test_obj.b) test_obj.f(1,2,3,"hi") "#; ctx.eval_global_str(code); }
The execution result is as follows.
test_obj keys= a,b,f
test_obj.a= 1
test_obj.b= abc
hello from rust
argv=[Int(1), Int(2), Int(3), String(JsString(hi))]
this=Ok(
{
"a": Int(
1,
),
"b": String(
JsString(
abc,
),
),
"f": Function(
JsFunction(
function anything() {
[native code]
},
),
),
},
)
A complete JavaScript object API
In the previous example, we demonstrated simple examples to create JavaScript APIs from Rust. In this example, we will create a complete Rust module and make it available as a JavaScript object API. The project is in the examples/embed_rust_module folder. You can build and run it as a standard Rust application in WasmEdge.
cargo build --target wasm32-wasi --release
wasmedge --dir .:. target/wasm32-wasi/release/embed_rust_module.wasm
The Rust implementation of the object is a module as follows. It has data fields, constructor, getters and setters, and functions.
#![allow(unused)] fn main() { mod point { use wasmedge_quickjs::*; #[derive(Debug)] struct Point(i32, i32); struct PointDef; impl JsClassDef<Point> for PointDef { const CLASS_NAME: &'static str = "Point\0"; const CONSTRUCTOR_ARGC: u8 = 2; fn constructor(_: &mut Context, argv: &[JsValue]) -> Option<Point> { println!("rust-> new Point {:?}", argv); let x = argv.get(0); let y = argv.get(1); if let ((Some(JsValue::Int(ref x)), Some(JsValue::Int(ref y)))) = (x, y) { Some(Point(*x, *y)) } else { None } } fn proto_init(p: &mut JsClassProto<Point, PointDef>) { struct X; impl JsClassGetterSetter<Point> for X { const NAME: &'static str = "x\0"; fn getter(_: &mut Context, this_val: &mut Point) -> JsValue { println!("rust-> get x"); this_val.0.into() } fn setter(_: &mut Context, this_val: &mut Point, val: JsValue) { println!("rust-> set x:{:?}", val); if let JsValue::Int(x) = val { this_val.0 = x } } } struct Y; impl JsClassGetterSetter<Point> for Y { const NAME: &'static str = "y\0"; fn getter(_: &mut Context, this_val: &mut Point) -> JsValue { println!("rust-> get y"); this_val.1.into() } fn setter(_: &mut Context, this_val: &mut Point, val: JsValue) { println!("rust-> set y:{:?}", val); if let JsValue::Int(y) = val { this_val.1 = y } } } struct FnPrint; impl JsMethod<Point> for FnPrint { const NAME: &'static str = "pprint\0"; const LEN: u8 = 0; fn call(_: &mut Context, this_val: &mut Point, _argv: &[JsValue]) -> JsValue { println!("rust-> pprint: {:?}", this_val); JsValue::Int(1) } } p.add_getter_setter(X); p.add_getter_setter(Y); p.add_function(FnPrint); } } struct PointModule; impl ModuleInit for PointModule { fn init_module(ctx: &mut Context, m: &mut JsModuleDef) { m.add_export("Point\0", PointDef::class_value(ctx)); } } pub fn init_point_module(ctx: &mut Context) { ctx.register_class(PointDef); ctx.register_module("point\0", PointModule, &["Point\0"]); } } }
In the interpreter implementation, we call point::init_point_module
first to register the Rust module with the JavaScript context, and then we can run a JavaScript program that simply use the point
object.
use wasmedge_quickjs::*; fn main() { let mut ctx = Context::new(); point::init_point_module(&mut ctx); let code = r#" import('point').then((point)=>{ let p0 = new point.Point(1,2) print("js->",p0.x,p0.y) p0.pprint() try{ let p = new point.Point() print("js-> p:",p) print("js->",p.x,p.y) p.x=2 p.pprint() } catch(e) { print("An error has been caught"); print(e) } }) "#; ctx.eval_global_str(code); ctx.promise_loop_poll(); }
The execution result from the above application is as follows.
rust-> new Point [Int(1), Int(2)]
rust-> get x
rust-> get y
js-> 1 2
rust-> pprint: Point(1, 2)
rust-> new Point []
js-> p: undefined
An error has been caught
TypeError: cannot read property 'x' of undefined
Code reuse
Using the Rust API, we could create JavaScript classes that inherit (or extend) from existing classes. That allows developers to create complex JavaScript APIs using Rust by building on existing solutions. You can see an example here.
Next, you can see the Rust code in the internal_module folder for more examples on how to implement common JavaScript build-in functions including Node.js APIs.
Node.js support
Although WasmEdge QuickJS already supports JavaScript ES6 and CJS modules, many existing apps simply use Node.js built-in APIs. Those APIs are provided by Node.js and do not have corresponding external JavaScript files to rollup into a bundle. In order to reuse existing Node.js apps, we are in the process of implementing many Node.JS APIs for WasmEdge QuickJS. The goal is to have Node.js programs running without change in WasmEdge QuickJS.
The progress of Node.js support in WasmEdge QuickJS is tracked in this issue.
There are two approaches for supporting Node.js APIs in WasmEdge QuickJS.
The JavaScript modules
Some Node.js functions can be implemented in pure JavaScript using the modules approach. For example,
- The querystring functions just perform string manipulations.
- The buffer functions manage and encode arrays and memory structures.
- The encoding and http functions provide a Node.js
fetch()
API wrapper around JavaScript functions implemented in Rust.
The Rust internal modules
Other Node.js functions must be implemented in Rust using the internal_module approach. There are two reasons for that. First, some Node.js API functions are CPU intensive (e.g., encoding) and is most efficiently implemented in Rust. Second, some Node.js API functions require access to the underlying system (e.g., networking and file system) through native host functions.
- The core module provides OS level functions such as
timeout
. - The encoding module provide high-performance encoding and decoding functions, which is in turn wrapped into Node.js encoding APIs.
- The wasi_net_module wraps the Rust-based socket networking API into JavaScript functions. It is then wrapped into a Node.js compliant HTTP fetch() function.
Node.js compatibility support in WasmEdge QuickJS is a work in progress. It is a great way for new developers to get familiar with WasmEdge QuickJS. Join us!
Go
The best way to run Go programs in WasmEdge is to compile Go source code to WebAssembly using TinyGo. In this article, we will show you how.
Install TinyGo
You must have Go already installed on your machine before installing TinyGo. Go v1.17 or above is recommended. For Ubuntu or other Debian-based Linux systems on x86 processors, you could use the following command line to install TinyGo. For other platforms, please refer to TinyGo docs.
wget https://github.com/tinygo-org/tinygo/releases/download/v0.21.0/tinygo_0.21.0_amd64.deb
sudo dpkg -i tinygo_0.21.0_amd64.deb`
Next, run the following command line to check out if the installation is successful.
$ tinygo version
tinygo version 0.21.0 linux/amd64 (using go version go1.16.7 and LLVM version 11.0.0)
Hello world
The simple Go app has a main()
function to print a message to the console.
The source code in main.go
file is as follows.
package main
func main() {
println("Hello TinyGo from WasmEdge!")
}
Inside the
main()
function, you can use Go standard API to read / write files, and access command line arguments andenv
variables.
Hello world: Compile and build
Next, compile the main.go
program to WebAssembly using TinyGo.
tinygo build -o hello.wasm -target wasi main.go
You will see a file named hello.wasm
in the same directory. This is a WebAssembly bytecode file.
Hello world: Run
You can run it with the WasmEdge CLI.
$ wasmedge hello.wasm
Hello TinyGo from WasmEdge!
A simple function
The second example is a Go function that takes a call parameter to compute a fibonacci number. However, in order for the Go application to set up proper access to the OS (e.g., to access the command line arguments), you must include an empty main()
function in the source code.
package main
func main(){
}
//export fibArray
func fibArray(n int32) int32{
arr := make([]int32, n)
for i := int32(0); i < n; i++ {
switch {
case i < 2:
arr[i] = i
default:
arr[i] = arr[i-1] + arr[i-2]
}
}
return arr[n-1]
}
A simple function: Compile and build
Next, compile the main.go
program to WebAssembly using TinyGo.
tinygo build -o fib.wasm -target wasi main.go
You will see a file named fib.wasm
in the same directory. This is a WebAssembly bytecode file.
A simple function: Run
You can run it with the WasmEdge CLI in its --reactor
mode.
The command line arguments that follow the wasm
file are the function name
and its call parameters.
$ wasmedge --reactor fib.wasm fibArray 10
34
Improve performance
To achieve native Go performance for those applications, you could use the wasmedgec
command to AOT compile the wasm
program, and then run it with the wasmedge
command.
$ wasmedgec hello.wasm hello.wasm
$ wasmedge hello.wasm
Hello TinyGo from WasmEdge!
For the --reactor
mode,
$ wasmedgec fib.wasm fib.wasm
$ wasmedge --reactor fib.wasm fibArray 10
34
Swift
The swiftwasm project compiles Swift source code to WebAssembly.
AssemblyScript
AssemblyScript is a TypeScript-like language designed for WebAssembly. AssemblyScript programs can be easily compiled into WebAssembly.
Kotlin
Check out how to compile Kotlin programs to WebAssembly
Grain
Grain is a strongly typed languages designed for WebAssembly. Checkout its Hello world example.
Python
There are already several different language implementations of the Python runtime, and some of them support WebAssembly. This document will describe how to run RustPython on WasmEdge to execute Python programs.
Compile RustPython
To compile RustPython, you should have the Rust toolchain installed on your machine. And wasm32-wasi
platform support should be enabled.
rustup target add wasm32-wasi
Then you could use the following command to clone and compile RustPython:
git clone https://github.com/RustPython/RustPython.git
cd RustPython
cargo build --release --target wasm32-wasi --features="freeze-stdlib"
freeze-stdlib
feature is enabled for including Python standard library inside the binary file. The output file should be able at target/wasm32-wasi/release/rustpython.wasm
.
AOT Compile
WasmEdge supports compiling WebAssembly bytecode programs into native machine code for better performance. It is highly recommended to compile the RustPython to native machine code before running.
wasmedgec ./target/wasm32-wasi/release/rustpython.wasm ./target/wasm32-wasi/release/rustpython.wasm
Since WasmEdge 0.9.0, the universal Wasm binary format has been introduced. So you could use the .wasm
extension for generating cross-runtime compatible format, or use .so
for Linux shared library format.
Run
wasmedge ./target/wasm32-wasi/release/rustpython.wasm
Then you could get a Python shell in WebAssembly!
Grant file system access
You can pre-open directories to let WASI programs have permission to read and write files stored on the real machine. The following command mounted the current working directory to the WASI virtual file system.
wasmedge --dir .:. ./target/wasm32-wasi/release/rustpython.wasm
Embed WasmEdge functions
A common use case for WasmEdge is to embed it in your own applications (called a host application). It allows you to support 3rd party plug-ins and extensions for your applications. Those plug-ins and extensions could be written in any of the languages WasmEdge supports, and by anyone as they are safely and securely executed in the WasmEdge sandbox.
In this chapter, we will discuss how to use WasmEdge SDKs to embed WasmEdge programs into C, Rust, Go, and Python host applications.
WasmEdge C SDK
The WasmEdge C API denotes an interface to embed the WasmEdge runtime into a C program. The followings are the quick start guides to working with the C APIs of WasmEdge. For the details of the WasmEdge C API, please refer to the full documentation.
The WasmEdge C API also the fundamental API for other languages' SDK.
Quick Start Guide for the WasmEdge runner
The following is an example for running a WASM file.
Assume that the WASM file fibonacci.wasm is copied into the current directory, and the C file test_wasmedge.c
is as following:
#include <wasmedge/wasmedge.h>
#include <stdio.h>
int main(int Argc, const char* Argv[]) {
/* Create the configure context and add the WASI support. */
/* This step is not necessary unless you need WASI support. */
WasmEdge_ConfigureContext *ConfCxt = WasmEdge_ConfigureCreate();
WasmEdge_ConfigureAddHostRegistration(ConfCxt, WasmEdge_HostRegistration_Wasi);
/* The configure and store context to the VM creation can be NULL. */
WasmEdge_VMContext *VMCxt = WasmEdge_VMCreate(ConfCxt, NULL);
/* The parameters and returns arrays. */
WasmEdge_Value Params[1] = { WasmEdge_ValueGenI32(32) };
WasmEdge_Value Returns[1];
/* Function name. */
WasmEdge_String FuncName = WasmEdge_StringCreateByCString("fib");
/* Run the WASM function from file. */
WasmEdge_Result Res = WasmEdge_VMRunWasmFromFile(VMCxt, Argv[1], FuncName, Params, 1, Returns, 1);
if (WasmEdge_ResultOK(Res)) {
printf("Get result: %d\n", WasmEdge_ValueGetI32(Returns[0]));
} else {
printf("Error message: %s\n", WasmEdge_ResultGetMessage(Res));
}
/* Resources deallocations. */
WasmEdge_VMDelete(VMCxt);
WasmEdge_ConfigureDelete(ConfCxt);
WasmEdge_StringDelete(FuncName);
return 0;
}
Then you can compile and run: (the 32th fibonacci number is 3524578 in 0-based index)
$ gcc test_wasmedge.c -lwasmedge_c -o test_wasmedge
$ ./test_wasmedge fibonacci.wasm
Get result: 3524578
Quick Start Guide for the WasmEdge AOT compiler
Assume that the WASM file fibonacci.wasm is copied into the current directory, and the C file test_wasmedge_compiler.c
is as following:
#include <wasmedge/wasmedge.h>
#include <stdio.h>
int main(int Argc, const char* Argv[]) {
/* Create the configure context. */
WasmEdge_ConfigureContext *ConfCxt = WasmEdge_ConfigureCreate();
/* ... Adjust settings in the configure context. */
/* Result. */
WasmEdge_Result Res;
/* Create the compiler context. The configure context can be NULL. */
WasmEdge_CompilerContext *CompilerCxt = WasmEdge_CompilerCreate(ConfCxt);
/* Compile the WASM file with input and output paths. */
Res = WasmEdge_CompilerCompile(CompilerCxt, Argv[1], Argv[2]);
if (!WasmEdge_ResultOK(Res)) {
printf("Compilation failed: %s\n", WasmEdge_ResultGetMessage(Res));
return 1;
}
WasmEdge_CompilerDelete(CompilerCxt);
WasmEdge_ConfigureDelete(ConfCxt);
return 0;
}
Then you can compile and run (the output file is fibonacci.wasm.so
):
$ gcc test_wasmedge_compiler.c -lwasmedge_c -o test_wasmedge_compiler
$ ./test_wasmedge_compiler fibonacci.wasm fibonacci.wasm.so
[2021-07-02 11:08:08.651] [info] compile start
[2021-07-02 11:08:08.653] [info] verify start
[2021-07-02 11:08:08.653] [info] optimize start
[2021-07-02 11:08:08.670] [info] codegen start
[2021-07-02 11:08:08.706] [info] compile done
The compiled-WASM file can be used as a WASM input for the WasmEdge runner. The following is the comparison of the interpreter mode and the AOT mode:
$ time ./test_wasmedge fibonacci.wasm
Get result: 5702887
real 0m2.715s
user 0m2.700s
sys 0m0.008s
$ time ./test_wasmedge fibonacci.wasm.so
Get result: 5702887
real 0m0.036s
user 0m0.022s
sys 0m0.011s
WasmEdge C 0.10.0 API Documentation
WasmEdge C API denotes an interface to access the WasmEdge runtime. The followings are the guides to working with the C APIs of WasmEdge.
This document is for the 0.10.0
version. For the older 0.9.1
version, please refer to the document here.
Developers can refer here to upgrade to 0.10.0.
Table of Contents
WasmEdge Installation
Download And Install
The easiest way to install WasmEdge is to run the following command. Your system should have git
and wget
as prerequisites.
curl -sSf https://raw.githubusercontent.com/WasmEdge/WasmEdge/master/utils/install.sh | bash -s -- -v 0.10.0
For more details, please refer to the Installation Guide for the WasmEdge installation.
Compile Sources
After the installation of WasmEdge, the following guide can help you to test for the availability of the WasmEdge C API.
-
Prepare the test C file (and assumed saved as
test.c
):#include <wasmedge/wasmedge.h> #include <stdio.h> int main() { printf("WasmEdge version: %s\n", WasmEdge_VersionGet()); return 0; }
-
Compile the file with
gcc
orclang
.gcc test.c -lwasmedge_c
-
Run and get the expected output.
$ ./a.out WasmEdge version: 0.10.0
WasmEdge Basics
In this part, we will introduce the utilities and concepts of WasmEdge shared library.
Version
The Version
related APIs provide developers to check for the WasmEdge shared library version.
#include <wasmedge/wasmedge.h>
printf("WasmEdge version: %s\n", WasmEdge_VersionGet());
printf("WasmEdge version major: %u\n", WasmEdge_VersionGetMajor());
printf("WasmEdge version minor: %u\n", WasmEdge_VersionGetMinor());
printf("WasmEdge version patch: %u\n", WasmEdge_VersionGetPatch());
Logging Settings
The WasmEdge_LogSetErrorLevel()
and WasmEdge_LogSetDebugLevel()
APIs can set the logging system to debug level or error level. By default, the error level is set, and the debug info is hidden.
Value Types
In WasmEdge, developers should convert the values to WasmEdge_Value
objects through APIs for matching to the WASM value types.
-
Number types:
i32
,i64
,f32
,f64
, andv128
for theSIMD
proposalWasmEdge_Value Val; Val = WasmEdge_ValueGenI32(123456); printf("%d\n", WasmEdge_ValueGetI32(Val)); /* Will print "123456" */ Val = WasmEdge_ValueGenI64(1234567890123LL); printf("%ld\n", WasmEdge_ValueGetI64(Val)); /* Will print "1234567890123" */ Val = WasmEdge_ValueGenF32(123.456f); printf("%f\n", WasmEdge_ValueGetF32(Val)); /* Will print "123.456001" */ Val = WasmEdge_ValueGenF64(123456.123456789); printf("%.10f\n", WasmEdge_ValueGetF64(Val)); /* Will print "123456.1234567890" */
-
Reference types:
funcref
andexternref
for theReference-Types
proposalWasmEdge_Value Val; void *Ptr; bool IsNull; uint32_t Num = 10; /* Genreate a externref to NULL. */ Val = WasmEdge_ValueGenNullRef(WasmEdge_RefType_ExternRef); IsNull = WasmEdge_ValueIsNullRef(Val); /* The `IsNull` will be `TRUE`. */ Ptr = WasmEdge_ValueGetExternRef(Val); /* The `Ptr` will be `NULL`. */ /* Get the function instance by creation or from module instance. */ const WasmEdge_FunctionInstanceContext *FuncCxt = ...; /* Genreate a funcref with the given function instance context. */ Val = WasmEdge_ValueGenFuncRef(FuncCxt); const WasmEdge_FunctionInstanceContext *GotFuncCxt = WasmEdge_ValueGetFuncRef(Val); /* The `GotFuncCxt` will be the same as `FuncCxt`. */ /* Genreate a externref to `Num`. */ Val = WasmEdge_ValueGenExternRef(&Num); Ptr = WasmEdge_ValueGetExternRef(Val); /* The `Ptr` will be `&Num`. */ printf("%u\n", *(uint32_t *)Ptr); /* Will print "10" */ Num += 55; printf("%u\n", *(uint32_t *)Ptr); /* Will print "65" */
Strings
The WasmEdge_String
object is for the instance names when invoking a WASM function or finding the contexts of instances.
-
Create a
WasmEdge_String
from a C string (const char *
with NULL termination) or a buffer with length.The content of the C string or buffer will be copied into the
WasmEdge_String
object.char Buf[4] = {50, 55, 60, 65}; WasmEdge_String Str1 = WasmEdge_StringCreateByCString("test"); WasmEdge_String Str2 = WasmEdge_StringCreateByBuffer(Buf, 4); /* The objects should be deleted by `WasmEdge_StringDelete()`. */ WasmEdge_StringDelete(Str1); WasmEdge_StringDelete(Str2);
-
Wrap a
WasmEdge_String
to a buffer with length.The content will not be copied, and the caller should guarantee the life cycle of the input buffer.
const char CStr[] = "test"; WasmEdge_String Str = WasmEdge_StringWrap(CStr, 4); /* The object should __NOT__ be deleted by `WasmEdge_StringDelete()`. */
-
String comparison
const char CStr[] = "abcd"; char Buf[4] = {0x61, 0x62, 0x63, 0x64}; WasmEdge_String Str1 = WasmEdge_StringWrap(CStr, 4); WasmEdge_String Str2 = WasmEdge_StringCreateByBuffer(Buf, 4); bool IsEq = WasmEdge_StringIsEqual(Str1, Str2); /* The `IsEq` will be `TRUE`. */ WasmEdge_StringDelete(Str2);
-
Convert to C string
char Buf[256]; WasmEdge_String Str = WasmEdge_StringCreateByCString("test_wasmedge_string"); uint32_t StrLength = WasmEdge_StringCopy(Str, Buf, sizeof(Buf)); /* StrLength will be 20 */ printf("String: %s\n", Buf); /* Will print "test_wasmedge_string". */
Results
The WasmEdge_Result
object specifies the execution status.
APIs about WASM execution will return the WasmEdge_Result
to denote the status.
WasmEdge_Result Res = WasmEdge_Result_Success;
bool IsSucceeded = WasmEdge_ResultOK(Res);
/* The `IsSucceeded` will be `TRUE`. */
uint32_t Code = WasmEdge_ResultGetCode(Res);
/* The `Code` will be 0. */
const char *Msg = WasmEdge_ResultGetMessage(Res);
/* The `Msg` will be "success". */
Contexts
The objects, such as VM
, Store
, and Function
, are composed of Context
s.
All of the contexts can be created by calling the corresponding creation APIs and should be destroyed by calling the corresponding deletion APIs. Developers have responsibilities to manage the contexts for memory management.
/* Create the configure context. */
WasmEdge_ConfigureContext *ConfCxt = WasmEdge_ConfigureCreate();
/* Delete the configure context. */
WasmEdge_ConfigureDelete(ConfCxt);
The details of other contexts will be introduced later.
WASM Data Structures
The WASM data structures are used for creating instances or can be queried from instance contexts. The details of instances creation will be introduced in the Instances.
-
Limit
The
WasmEdge_Limit
struct is defined in the header:/// Struct of WASM limit. typedef struct WasmEdge_Limit { /// Boolean to describe has max value or not. bool HasMax; /// Minimum value. uint32_t Min; /// Maximum value. Will be ignored if the `HasMax` is false. uint32_t Max; } WasmEdge_Limit;
Developers can initialize the struct by assigning it's value, and the
Max
value is needed to be larger or equal to theMin
value. The APIWasmEdge_LimitIsEqual()
is provided to compare with 2WasmEdge_Limit
structs. -
Function type context
The
Function Type
context is used for theFunction
creation, checking the value types of aFunction
instance, or getting the function type with function name from VM. Developers can use theFunction Type
context APIs to get the parameter or return value types information.enum WasmEdge_ValType ParamList[2] = { WasmEdge_ValType_I32, WasmEdge_ValType_I64 }; enum WasmEdge_ValType ReturnList[1] = { WasmEdge_ValType_FuncRef }; WasmEdge_FunctionTypeContext *FuncTypeCxt = WasmEdge_FunctionTypeCreate(ParamList, 2, ReturnList, 1); enum WasmEdge_ValType Buf[16]; uint32_t ParamLen = WasmEdge_FunctionTypeGetParametersLength(FuncTypeCxt); /* `ParamLen` will be 2. */ uint32_t GotParamLen = WasmEdge_FunctionTypeGetParameters(FuncTypeCxt, Buf, 16); /* `GotParamLen` will be 2, and `Buf[0]` and `Buf[1]` will be the same as `ParamList`. */ uint32_t ReturnLen = WasmEdge_FunctionTypeGetReturnsLength(FuncTypeCxt); /* `ReturnLen` will be 1. */ uint32_t GotReturnLen = WasmEdge_FunctionTypeGetReturns(FuncTypeCxt, Buf, 16); /* `GotReturnLen` will be 1, and `Buf[0]` will be the same as `ReturnList`. */ WasmEdge_FunctionTypeDelete(FuncTypeCxt);
-
Table type context
The
Table Type
context is used forTable
instance creation or getting information fromTable
instances.WasmEdge_Limit TabLim = {.HasMax = true, .Shared = false, .Min = 10, .Max = 20}; WasmEdge_TableTypeContext *TabTypeCxt = WasmEdge_TableTypeCreate(WasmEdge_RefType_ExternRef, TabLim); enum WasmEdge_RefType GotRefType = WasmEdge_TableTypeGetRefType(TabTypeCxt); /* `GotRefType` will be WasmEdge_RefType_ExternRef. */ WasmEdge_Limit GotTabLim = WasmEdge_TableTypeGetLimit(TabTypeCxt); /* `GotTabLim` will be the same value as `TabLim`. */ WasmEdge_TableTypeDelete(TabTypeCxt);
-
Memory type context
The
Memory Type
context is used forMemory
instance creation or getting information fromMemory
instances.WasmEdge_Limit MemLim = {.HasMax = true, .Shared = false, .Min = 10, .Max = 20}; WasmEdge_MemoryTypeContext *MemTypeCxt = WasmEdge_MemoryTypeCreate(MemLim); WasmEdge_Limit GotMemLim = WasmEdge_MemoryTypeGetLimit(MemTypeCxt); /* `GotMemLim` will be the same value as `MemLim`. */ WasmEdge_MemoryTypeDelete(MemTypeCxt)
-
Global type context
The
Global Type
context is used forGlobal
instance creation or getting information fromGlobal
instances.WasmEdge_GlobalTypeContext *GlobTypeCxt = WasmEdge_GlobalTypeCreate(WasmEdge_ValType_F64, WasmEdge_Mutability_Var); WasmEdge_ValType GotValType = WasmEdge_GlobalTypeGetValType(GlobTypeCxt); /* `GotValType` will be WasmEdge_ValType_F64. */ WasmEdge_Mutability GotValMut = WasmEdge_GlobalTypeGetMutability(GlobTypeCxt); /* `GotValMut` will be WasmEdge_Mutability_Var. */ WasmEdge_GlobalTypeDelete(GlobTypeCxt);
-
Import type context
The
Import Type
context is used for getting the imports information from a AST Module. Developers can get the external type (function
,table
,memory
, orglobal
), import module name, and external name from anImport Type
context. The details about queryingImport Type
contexts will be introduced in the AST Module.WasmEdge_ASTModuleContext *ASTCxt = ...; /* Assume that `ASTCxt` is returned by the `WasmEdge_LoaderContext` for the result of loading a WASM file. */ const WasmEdge_ImportTypeContext *ImpType = ...; /* Assume that `ImpType` is queried from the `ASTCxt` for the import. */ enum WasmEdge_ExternalType ExtType = WasmEdge_ImportTypeGetExternalType(ImpType); /* * The `ExtType` can be one of `WasmEdge_ExternalType_Function`, `WasmEdge_ExternalType_Table`, * `WasmEdge_ExternalType_Memory`, or `WasmEdge_ExternalType_Global`. */ WasmEdge_String ModName = WasmEdge_ImportTypeGetModuleName(ImpType); WasmEdge_String ExtName = WasmEdge_ImportTypeGetExternalName(ImpType); /* The `ModName` and `ExtName` should not be destroyed and the string buffers are binded into the `ASTCxt`. */ const WasmEdge_FunctionTypeContext *FuncTypeCxt = WasmEdge_ImportTypeGetFunctionType(ASTCxt, ImpType); /* If the `ExtType` is not `WasmEdge_ExternalType_Function`, the `FuncTypeCxt` will be NULL. */ const WasmEdge_TableTypeContext *TabTypeCxt = WasmEdge_ImportTypeGetTableType(ASTCxt, ImpType); /* If the `ExtType` is not `WasmEdge_ExternalType_Table`, the `TabTypeCxt` will be NULL. */ const WasmEdge_MemoryTypeContext *MemTypeCxt = WasmEdge_ImportTypeGetMemoryType(ASTCxt, ImpType); /* If the `ExtType` is not `WasmEdge_ExternalType_Memory`, the `MemTypeCxt` will be NULL. */ const WasmEdge_GlobalTypeContext *GlobTypeCxt = WasmEdge_ImportTypeGetGlobalType(ASTCxt, ImpType); /* If the `ExtType` is not `WasmEdge_ExternalType_Global`, the `GlobTypeCxt` will be NULL. */
-
Export type context
The
Export Type
context is used for getting the exports information from a AST Module. Developers can get the external type (function
,table
,memory
, orglobal
) and external name from anExport Type
context. The details about queryingExport Type
contexts will be introduced in the AST Module.WasmEdge_ASTModuleContext *ASTCxt = ...; /* Assume that `ASTCxt` is returned by the `WasmEdge_LoaderContext` for the result of loading a WASM file. */ const WasmEdge_ExportTypeContext *ExpType = ...; /* Assume that `ExpType` is queried from the `ASTCxt` for the export. */ enum WasmEdge_ExternalType ExtType = WasmEdge_ExportTypeGetExternalType(ExpType); /* * The `ExtType` can be one of `WasmEdge_ExternalType_Function`, `WasmEdge_ExternalType_Table`, * `WasmEdge_ExternalType_Memory`, or `WasmEdge_ExternalType_Global`. */ WasmEdge_String ExtName = WasmEdge_ExportTypeGetExternalName(ExpType); /* The `ExtName` should not be destroyed and the string buffer is binded into the `ASTCxt`. */ const WasmEdge_FunctionTypeContext *FuncTypeCxt = WasmEdge_ExportTypeGetFunctionType(ASTCxt, ExpType); /* If the `ExtType` is not `WasmEdge_ExternalType_Function`, the `FuncTypeCxt` will be NULL. */ const WasmEdge_TableTypeContext *TabTypeCxt = WasmEdge_ExportTypeGetTableType(ASTCxt, ExpType); /* If the `ExtType` is not `WasmEdge_ExternalType_Table`, the `TabTypeCxt` will be NULL. */ const WasmEdge_MemoryTypeContext *MemTypeCxt = WasmEdge_ExportTypeGetMemoryType(ASTCxt, ExpType); /* If the `ExtType` is not `WasmEdge_ExternalType_Memory`, the `MemTypeCxt` will be NULL. */ const WasmEdge_GlobalTypeContext *GlobTypeCxt = WasmEdge_ExportTypeGetGlobalType(ASTCxt, ExpType); /* If the `ExtType` is not `WasmEdge_ExternalType_Global`, the `GlobTypeCxt` will be NULL. */
Async
After calling the asynchronous execution APIs, developers will get the WasmEdge_Async
object.
Developers own the object and should call the WasmEdge_AsyncDelete()
API to destroy it.
-
Wait for the asynchronous execution
Developers can wait the execution until finished:
WasmEdge_Async *Async = ...; /* Ignored. Asynchronous execute a function. */ /* Blocking and waiting for the execution. */ WasmEdge_AsyncWait(Async); WasmEdge_AsyncDelete(Async);
Or developers can wait for a time limit. If the time limit exceeded, developers can choose to cancel the execution. For the interruptible execution in AOT mode, developers should set
TRUE
thourgh theWasmEdge_ConfigureCompilerSetInterruptible()
API into the configure context for the AOT compiler.WasmEdge_Async *Async = ...; /* Ignored. Asynchronous execute a function. */ /* Blocking and waiting for the execution for 1 second. */ bool IsEnd = WasmEdge_AsyncWaitFor(Async, 1000); if (IsEnd) { /* The execution finished. Developers can get the result. */ WasmEdge_Result Res = WasmEdge_AsyncGet(/* ... Ignored */); } else { /* The time limit exceeded. Developers can keep waiting or cancel the execution. */ WasmEdge_AsyncCancel(Async); WasmEdge_Result Res = WasmEdge_AsyncGet(Async, 0, NULL); /* The result error code will be `WasmEdge_ErrCode_Interrupted`. */ } WasmEdge_AsyncDelete(Async);
-
Get the execution result of the asynchronous execution
Developers can use the
WasmEdge_AsyncGetReturnsLength()
API to get the return value list length. This function will block and wait for the execution. If the execution has finished, this function will return the length immediately. If the execution failed, this function will return0
. This function can help the developers to create the buffer to get the return values. If developers have already known the buffer length, they can skip this function and use theWasmEdge_AsyncGet()
API to get the result.WasmEdge_Async *Async = ...; /* Ignored. Asynchronous execute a function. */ /* Blocking and waiting for the execution and get the return value list length. */ uint32_t Arity = WasmEdge_AsyncGetReturnsLength(Async); WasmEdge_AsyncDelete(Async);
The
WasmEdge_AsyncGet()
API will block and wait for the execution. If the execution has finished, this function will fill the return values into the buffer and return the execution result immediately.WasmEdge_Async *Async = ...; /* Ignored. Asynchronous execute a function. */ /* Blocking and waiting for the execution and get the return values. */ const uint32_t BUF_LEN = 256; WasmEdge_Value Buf[BUF_LEN]; WasmEdge_Result Res = WasmEdge_AsyncGet(Async, Buf, BUF_LEN); WasmEdge_AsyncDelete(Async);
Configurations
The configuration context, WasmEdge_ConfigureContext
, manages the configurations for Loader
, Validator
, Executor
, VM
, and Compiler
.
Developers can adjust the settings about the proposals, VM host pre-registrations (such as WASI
), and AOT compiler options, and then apply the Configure
context to create other runtime contexts.
-
Proposals
WasmEdge supports turning on or off the WebAssembly proposals. This configuration is effective in any contexts created with the
Configure
context.enum WasmEdge_Proposal { WasmEdge_Proposal_ImportExportMutGlobals = 0, WasmEdge_Proposal_NonTrapFloatToIntConversions, WasmEdge_Proposal_SignExtensionOperators, WasmEdge_Proposal_MultiValue, WasmEdge_Proposal_BulkMemoryOperations, WasmEdge_Proposal_ReferenceTypes, WasmEdge_Proposal_SIMD, WasmEdge_Proposal_TailCall, WasmEdge_Proposal_MultiMemories, WasmEdge_Proposal_Annotations, WasmEdge_Proposal_Memory64, WasmEdge_Proposal_ExceptionHandling, WasmEdge_Proposal_ExtendedConst, WasmEdge_Proposal_Threads, WasmEdge_Proposal_FunctionReferences };
Developers can add or remove the proposals into the
Configure
context./* * By default, the following proposals have turned on initially: * * Import/Export of mutable globals * * Non-trapping float-to-int conversions * * Sign-extension operators * * Multi-value returns * * Bulk memory operations * * Reference types * * Fixed-width SIMD * * For the current WasmEdge version, the following proposals are supported * (turned of by default) additionally: * * Tail-call * * Multiple memories * * Extended-const */ WasmEdge_ConfigureContext *ConfCxt = WasmEdge_ConfigureCreate(); WasmEdge_ConfigureAddProposal(ConfCxt, WasmEdge_Proposal_MultiMemories); WasmEdge_ConfigureRemoveProposal(ConfCxt, WasmEdge_Proposal_ReferenceTypes); bool IsBulkMem = WasmEdge_ConfigureHasProposal(ConfCxt, WasmEdge_Proposal_BulkMemoryOperations); /* The `IsBulkMem` will be `TRUE`. */ WasmEdge_ConfigureDelete(ConfCxt);
-
Host registrations
This configuration is used for the
VM
context to turn on theWASI
orwasmedge_process
supports and only effective inVM
contexts.enum WasmEdge_HostRegistration { WasmEdge_HostRegistration_Wasi = 0, WasmEdge_HostRegistration_WasmEdge_Process };
The details will be introduced in the preregistrations of VM context.
WasmEdge_ConfigureContext *ConfCxt = WasmEdge_ConfigureCreate(); bool IsHostWasi = WasmEdge_ConfigureHasHostRegistration(ConfCxt, WasmEdge_HostRegistration_Wasi); /* The `IsHostWasi` will be `FALSE`. */ WasmEdge_ConfigureAddHostRegistration(ConfCxt, WasmEdge_HostRegistration_Wasi); IsHostWasi = WasmEdge_ConfigureHasHostRegistration(ConfCxt, WasmEdge_HostRegistration_Wasi); /* The `IsHostWasi` will be `TRUE`. */ WasmEdge_ConfigureDelete(ConfCxt);
-
Maximum memory pages
Developers can limit the page size of memory instances by this configuration. When growing the page size of memory instances in WASM execution and exceeding the limited size, the page growing will fail. This configuration is only effective in the
Executor
andVM
contexts.WasmEdge_ConfigureContext *ConfCxt = WasmEdge_ConfigureCreate(); uint32_t PageSize = WasmEdge_ConfigureGetMaxMemoryPage(ConfCxt); /* By default, the maximum memory page size is 65536. */ WasmEdge_ConfigureSetMaxMemoryPage(ConfCxt, 1024); /* Limit the memory size of each memory instance with not larger than 1024 pages (64 MiB). */ PageSize = WasmEdge_ConfigureGetMaxMemoryPage(ConfCxt); /* The `PageSize` will be 1024. */ WasmEdge_ConfigureDelete(ConfCxt);
-
AOT compiler options
The AOT compiler options configure the behavior about optimization level, output format, dump IR, and generic binary.
enum WasmEdge_CompilerOptimizationLevel { // Disable as many optimizations as possible. WasmEdge_CompilerOptimizationLevel_O0 = 0, // Optimize quickly without destroying debuggability. WasmEdge_CompilerOptimizationLevel_O1, // Optimize for fast execution as much as possible without triggering // significant incremental compile time or code size growth. WasmEdge_CompilerOptimizationLevel_O2, // Optimize for fast execution as much as possible. WasmEdge_CompilerOptimizationLevel_O3, // Optimize for small code size as much as possible without triggering // significant incremental compile time or execution time slowdowns. WasmEdge_CompilerOptimizationLevel_Os, // Optimize for small code size as much as possible. WasmEdge_CompilerOptimizationLevel_Oz }; enum WasmEdge_CompilerOutputFormat { // Native dynamic library format. WasmEdge_CompilerOutputFormat_Native = 0, // WebAssembly with AOT compiled codes in custom section. WasmEdge_CompilerOutputFormat_Wasm };
These configurations are only effective in
Compiler
contexts.WasmEdge_ConfigureContext *ConfCxt = WasmEdge_ConfigureCreate(); /* By default, the optimization level is O3. */ WasmEdge_ConfigureCompilerSetOptimizationLevel(ConfCxt, WasmEdge_CompilerOptimizationLevel_O2); /* By default, the output format is universal WASM. */ WasmEdge_ConfigureCompilerSetOutputFormat(ConfCxt, WasmEdge_CompilerOutputFormat_Native); /* By default, the dump IR is `FALSE`. */ WasmEdge_ConfigureCompilerSetDumpIR(ConfCxt, TRUE); /* By default, the generic binary is `FALSE`. */ WasmEdge_ConfigureCompilerSetGenericBinary(ConfCxt, TRUE); /* By default, the interruptible is `FALSE`. /* Set this option to `TRUE` to support the interruptible execution in AOT mode. */ WasmEdge_ConfigureCompilerSetInterruptible(ConfCxt, TRUE); WasmEdge_ConfigureDelete(ConfCxt);
-
Statistics options
The statistics options configure the behavior about instruction counting, cost measuring, and time measuring in both runtime and AOT compiler. These configurations are effective in
Compiler
,VM
, andExecutor
contexts.WasmEdge_ConfigureContext *ConfCxt = WasmEdge_ConfigureCreate(); /* By default, the intruction counting is `FALSE` when running a compiled-WASM or a pure-WASM. */ WasmEdge_ConfigureStatisticsSetInstructionCounting(ConfCxt, TRUE); /* By default, the cost measurement is `FALSE` when running a compiled-WASM or a pure-WASM. */ WasmEdge_ConfigureStatisticsSetCostMeasuring(ConfCxt, TRUE); /* By default, the time measurement is `FALSE` when running a compiled-WASM or a pure-WASM. */ WasmEdge_ConfigureStatisticsSetTimeMeasuring(ConfCxt, TRUE); WasmEdge_ConfigureDelete(ConfCxt);
Statistics
The statistics context, WasmEdge_StatisticsContext
, provides the instruction counter, cost summation, and cost limitation at runtime.
Before using statistics, the statistics configuration must be set. Otherwise, the return values of calling statistics are undefined behaviour.
-
Instruction counter
The instruction counter can help developers to profile the performance of WASM running. Developers can retrieve the
Statistics
context from theVM
context, or create a new one for theExecutor
creation. The details will be introduced in the next partitions.WasmEdge_StatisticsContext *StatCxt = WasmEdge_StatisticsCreate(); /* * ... * After running the WASM functions with the `Statistics` context */ uint32_t Count = WasmEdge_StatisticsGetInstrCount(StatCxt); double IPS = WasmEdge_StatisticsGetInstrPerSecond(StatCxt); WasmEdge_StatisticsDelete(StatCxt);
-
Cost table
The cost table is to accumulate the cost of instructions with their weights. Developers can set the cost table array (the indices are the byte code value of instructions, and the values are the cost of instructions) into the
Statistics
context. If the cost limit value is set, the execution will return thecost limit exceeded
error immediately when exceeds the cost limit in runtime.WasmEdge_StatisticsContext *StatCxt = WasmEdge_StatisticsCreate(); uint64_t CostTable[16] = { 0, 0, 10, /* 0x02: Block */ 11, /* 0x03: Loop */ 12, /* 0x04: If */ 12, /* 0x05: Else */ 0, 0, 0, 0, 0, 0, 20, /* 0x0C: Br */ 21, /* 0x0D: Br_if */ 22, /* 0x0E: Br_table */ 0 }; /* Developers can set the costs of each instruction. The value not covered will be 0. */ WasmEdge_StatisticsSetCostTable(StatCxt, CostTable, 16); WasmEdge_StatisticsSetCostLimit(StatCxt, 5000000); /* * ... * After running the WASM functions with the `Statistics` context */ uint64_t Cost = WasmEdge_StatisticsGetTotalCost(StatCxt); WasmEdge_StatisticsDelete(StatCxt);
WasmEdge VM
In this partition, we will introduce the functions of WasmEdge_VMContext
object and show examples of executing WASM functions.
WASM Execution Example With VM Context
The following shows the example of running the WASM for getting the Fibonacci. This example uses the fibonacci.wasm, and the corresponding WAT file is at fibonacci.wat.
(module
(export "fib" (func $fib))
(func $fib (param $n i32) (result i32)
(if
(i32.lt_s (get_local $n)(i32.const 2))
(return (i32.const 1))
)
(return
(i32.add
(call $fib (i32.sub (get_local $n)(i32.const 2)))
(call $fib (i32.sub (get_local $n)(i32.const 1)))
)
)
)
)
-
Run WASM functions rapidly
Assume that the WASM file
fibonacci.wasm
is copied into the current directory, and the C filetest.c
is as following:#include <wasmedge/wasmedge.h> #include <stdio.h> int main() { /* Create the configure context and add the WASI support. */ /* This step is not necessary unless you need WASI support. */ WasmEdge_ConfigureContext *ConfCxt = WasmEdge_ConfigureCreate(); WasmEdge_ConfigureAddHostRegistration(ConfCxt, WasmEdge_HostRegistration_Wasi); /* The configure and store context to the VM creation can be NULL. */ WasmEdge_VMContext *VMCxt = WasmEdge_VMCreate(ConfCxt, NULL); /* The parameters and returns arrays. */ WasmEdge_Value Params[1] = { WasmEdge_ValueGenI32(5) }; WasmEdge_Value Returns[1]; /* Function name. */ WasmEdge_String FuncName = WasmEdge_StringCreateByCString("fib"); /* Run the WASM function from file. */ WasmEdge_Result Res = WasmEdge_VMRunWasmFromFile(VMCxt, "fibonacci.wasm", FuncName, Params, 1, Returns, 1); /* * Developers can run the WASM binary from buffer with the `WasmEdge_VMRunWasmFromBuffer()` API, * or from `WasmEdge_ASTModuleContext` object with the `WasmEdge_VMRunWasmFromASTModule()` API. */ if (WasmEdge_ResultOK(Res)) { printf("Get the result: %d\n", WasmEdge_ValueGetI32(Returns[0])); } else { printf("Error message: %s\n", WasmEdge_ResultGetMessage(Res)); } /* Resources deallocations. */ WasmEdge_VMDelete(VMCxt); WasmEdge_ConfigureDelete(ConfCxt); WasmEdge_StringDelete(FuncName); return 0; }
Then you can compile and run: (the 5th Fibonacci number is 8 in 0-based index)
$ gcc test.c -lwasmedge_c $ ./a.out Get the result: 8
-
Instantiate and run WASM functions manually
Besides the above example, developers can run the WASM functions step-by-step with
VM
context APIs:#include <wasmedge/wasmedge.h> #include <stdio.h> int main() { /* Create the configure context and add the WASI support. */ /* This step is not necessary unless you need the WASI support. */ WasmEdge_ConfigureContext *ConfCxt = WasmEdge_ConfigureCreate(); WasmEdge_ConfigureAddHostRegistration(ConfCxt, WasmEdge_HostRegistration_Wasi); /* The configure and store context to the VM creation can be NULL. */ WasmEdge_VMContext *VMCxt = WasmEdge_VMCreate(ConfCxt, NULL); /* The parameters and returns arrays. */ WasmEdge_Value Params[1] = { WasmEdge_ValueGenI32(10) }; WasmEdge_Value Returns[1]; /* Function name. */ WasmEdge_String FuncName = WasmEdge_StringCreateByCString("fib"); /* Result. */ WasmEdge_Result Res; /* Step 1: Load WASM file. */ Res = WasmEdge_VMLoadWasmFromFile(VMCxt, "fibonacci.wasm"); /* * Developers can load the WASM binary from buffer with the `WasmEdge_VMLoadWasmFromBuffer()` API, * or from `WasmEdge_ASTModuleContext` object with the `WasmEdge_VMLoadWasmFromASTModule()` API. */ if (!WasmEdge_ResultOK(Res)) { printf("Loading phase failed: %s\n", WasmEdge_ResultGetMessage(Res)); return 1; } /* Step 2: Validate the WASM module. */ Res = WasmEdge_VMValidate(VMCxt); if (!WasmEdge_ResultOK(Res)) { printf("Validation phase failed: %s\n", WasmEdge_ResultGetMessage(Res)); return 1; } /* Step 3: Instantiate the WASM module. */ Res = WasmEdge_VMInstantiate(VMCxt); /* * Developers can load, validate, and instantiate another WASM module to replace the * instantiated one. In this case, the old module will be cleared, but the registered * modules are still kept. */ if (!WasmEdge_ResultOK(Res)) { printf("Instantiation phase failed: %s\n", WasmEdge_ResultGetMessage(Res)); return 1; } /* Step 4: Execute WASM functions. You can execute functions repeatedly after instantiation. */ Res = WasmEdge_VMExecute(VMCxt, FuncName, Params, 1, Returns, 1); if (WasmEdge_ResultOK(Res)) { printf("Get the result: %d\n", WasmEdge_ValueGetI32(Returns[0])); } else { printf("Execution phase failed: %s\n", WasmEdge_ResultGetMessage(Res)); } /* Resources deallocations. */ WasmEdge_VMDelete(VMCxt); WasmEdge_ConfigureDelete(ConfCxt); WasmEdge_StringDelete(FuncName); return 0; }
Then you can compile and run: (the 10th Fibonacci number is 89 in 0-based index)
$ gcc test.c -lwasmedge_c $ ./a.out Get the result: 89
The following graph explains the status of the
VM
context.|========================| |------->| VM: Initiated | | |========================| | | | LoadWasm | | | v | |========================| |--------| VM: Loaded |<-------| | |========================| | | | ^ | | Validate | | Cleanup | LoadWasm | | v | LoadWasm | |========================| | |--------| VM: Validated | | | |========================| | | | ^ | | Instantiate | | | | RegisterModule | | v | | | |========================| | |--------| VM: Instantiated |--------| |========================| | ^ | | -------------- Instantiate, Execute, ExecuteRegistered
The status of the
VM
context would beInited
when created. After loading WASM successfully, the status will beLoaded
. After validating WASM successfully, the status will beValidated
. After instantiating WASM successfully, the status will beInstantiated
, and developers can invoke functions. Developers can register WASM or module instances in any status, but they should instantiate WASM again. Developers can also load WASM in any status, and they should validate and instantiate the WASM module before function invocation. When in theInstantiated
status, developers can instantiate the WASM module again to reset the old WASM runtime structures.
VM Creations
The VM
creation API accepts the Configure
context and the Store
context.
If developers only need the default settings, just pass NULL
to the creation API.
The details of the Store
context will be introduced in Store.
WasmEdge_ConfigureContext *ConfCxt = WasmEdge_ConfigureCreate();
WasmEdge_StoreContext *StoreCxt = WasmEdge_StoreCreate();
WasmEdge_VMContext *VMCxt = WasmEdge_VMCreate(ConfCxt, StoreCxt);
/* The caller should guarantee the life cycle if the store context. */
WasmEdge_StatisticsContext *StatCxt = WasmEdge_VMGetStatisticsContext(VMCxt);
/* The VM context already contains the statistics context and can be retrieved by this API. */
/*
* Note that the retrieved store and statistics contexts from the VM contexts by VM APIs
* should __NOT__ be destroyed and owned by the VM contexts.
*/
WasmEdge_VMDelete(VMCxt);
WasmEdge_StoreDelete(StoreCxt);
WasmEdge_ConfigureDelete(ConfCxt);
Preregistrations
WasmEdge provides the following built-in pre-registrations.
-
WASI (WebAssembly System Interface)
Developers can turn on the WASI support for VM in the
Configure
context.WasmEdge_ConfigureContext *ConfCxt = WasmEdge_ConfigureCreate(); WasmEdge_ConfigureAddHostRegistration(ConfCxt, WasmEdge_HostRegistration_Wasi); WasmEdge_VMContext *VMCxt = WasmEdge_VMCreate(ConfCxt, NULL); /* The following API can retrieve the pre-registration module instances from the VM context. */ /* This API will return `NULL` if the corresponding pre-registration is not set into the configuration. */ WasmEdge_ModuleInstanceContext *WasiModule = WasmEdge_VMGetImportModuleContext(VMCxt, WasmEdge_HostRegistration_Wasi); /* Initialize the WASI. */ WasmEdge_ModuleInstanceInitWASI(WasiModule, /* ... ignored */ ); WasmEdge_VMDelete(VMCxt); WasmEdge_ConfigureDelete(ConfCxt);
And also can create the WASI module instance from API. The details will be introduced in the Host Functions and the Host Module Registrations.
-
This pre-registration is for the process interface for WasmEdge on
Rust
sources. After turning on this pre-registration, the VM will support thewasmedge_process
host functions.WasmEdge_ConfigureContext *ConfCxt = WasmEdge_ConfigureCreate(); WasmEdge_ConfigureAddHostRegistration(ConfCxt, WasmEdge_HostRegistration_WasmEdge_Process); WasmEdge_VMContext *VMCxt = WasmEdge_VMCreate(ConfCxt, NULL); /* The following API can retrieve the pre-registration module instances from the VM context. */ /* This API will return `NULL` if the corresponding pre-registration is not set into the configuration. */ WasmEdge_ModuleInstanceContext *ProcModule = WasmEdge_VMGetImportModuleContext(VMCxt, WasmEdge_HostRegistration_WasmEdge_Process); /* Initialize the WasmEdge_Process. */ WasmEdge_ModuleInstanceInitWasmEdgeProcess(ProcModule, /* ... ignored */ ); WasmEdge_VMDelete(VMCxt); WasmEdge_ConfigureDelete(ConfCxt);
And also can create the WasmEdge_Process module instance from API. The details will be introduced in the Host Functions and the Host Module Registrations.
Host Module Registrations
Host functions are functions outside WebAssembly and passed to WASM modules as imports.
In WasmEdge, the host functions are composed into host modules as WasmEdge_ModuleInstanceContext
objects with module names.
Please refer to the Host Functions in WasmEdge Runtime for the details.
In this chapter, we show the example for registering the host modules into a VM
context.
WasmEdge_VMContext *VMCxt = WasmEdge_VMCreate(NULL, NULL);
WasmEdge_ModuleInstanceContext *WasiModule =
WasmEdge_ModuleInstanceCreateWASI( /* ... ignored ... */ );
/* You can also create and register the WASI host modules by this API. */
WasmEdge_Result Res = WasmEdge_VMRegisterModuleFromImport(VMCxt, WasiModule);
/* The result status should be checked. */
/* ... */
WasmEdge_ModuleInstanceDelete(WasiModule);
/* The created module instances should be deleted by the developers when the VM deallocation. */
WasmEdge_VMDelete(VMCxt);
WASM Registrations And Executions
In WebAssembly, the instances in WASM modules can be exported and can be imported by other WASM modules. WasmEdge VM provides APIs for developers to register and export any WASM modules, and execute the functions or host functions in the registered WASM modules.
-
Register the WASM modules with exported module names
Unless the module instances have already contained the module names, every WASM module should be named uniquely when registering. Assume that the WASM file
fibonacci.wasm
is copied into the current directory.WasmEdge_VMContext *VMCxt = WasmEdge_VMCreate(NULL, NULL); WasmEdge_String ModName = WasmEdge_StringCreateByCString("mod"); WasmEdge_Result Res = WasmEdge_VMRegisterModuleFromFile(VMCxt, ModName, "fibonacci.wasm"); /* * Developers can register the WASM module from buffer with the `WasmEdge_VMRegisterModuleFromBuffer()` API, * or from `WasmEdge_ASTModuleContext` object with the `WasmEdge_VMRegisterModuleFromASTModule()` API. */ /* * The result status should be checked. * The error will occur if the WASM module instantiation failed or the module name conflicts. */ WasmEdge_StringDelete(ModName); WasmEdge_VMDelete(VMCxt);
-
Execute the functions in registered WASM modules
Assume that the C file
test.c
is as follows:#include <wasmedge/wasmedge.h> #include <stdio.h> int main() { WasmEdge_VMContext *VMCxt = WasmEdge_VMCreate(NULL, NULL); /* The parameters and returns arrays. */ WasmEdge_Value Params[1] = { WasmEdge_ValueGenI32(20) }; WasmEdge_Value Returns[1]; /* Names. */ WasmEdge_String ModName = WasmEdge_StringCreateByCString("mod"); WasmEdge_String FuncName = WasmEdge_StringCreateByCString("fib"); /* Result. */ WasmEdge_Result Res; /* Register the WASM module into VM. */ Res = WasmEdge_VMRegisterModuleFromFile(VMCxt, ModName, "fibonacci.wasm"); /* * Developers can register the WASM module from buffer with the `WasmEdge_VMRegisterModuleFromBuffer()` API, * or from `WasmEdge_ASTModuleContext` object with the `WasmEdge_VMRegisterModuleFromASTModule()` API. */ if (!WasmEdge_ResultOK(Res)) { printf("WASM registration failed: %s\n", WasmEdge_ResultGetMessage(Res)); return 1; } /* * The function "fib" in the "fibonacci.wasm" was exported with the module name "mod". * As the same as host functions, other modules can import the function `"mod" "fib"`. */ /* * Execute WASM functions in registered modules. * Unlike the execution of functions, the registered functions can be invoked without * `WasmEdge_VMInstantiate()` because the WASM module was instantiated when registering. * Developers can also invoke the host functions directly with this API. */ Res = WasmEdge_VMExecuteRegistered(VMCxt, ModName, FuncName, Params, 1, Returns, 1); if (WasmEdge_ResultOK(Res)) { printf("Get the result: %d\n", WasmEdge_ValueGetI32(Returns[0])); } else { printf("Execution phase failed: %s\n", WasmEdge_ResultGetMessage(Res)); } WasmEdge_StringDelete(ModName); WasmEdge_StringDelete(FuncName); WasmEdge_VMDelete(VMCxt); return 0; }
Then you can compile and run: (the 20th Fibonacci number is 89 in 0-based index)
$ gcc test.c -lwasmedge_c $ ./a.out Get the result: 10946
Asynchronous Execution
-
Asynchronously run WASM functions rapidly
Assume that the WASM file
fibonacci.wasm
is copied into the current directory, and the C filetest.c
is as following:#include <wasmedge/wasmedge.h> #include <stdio.h> int main() { /* Create the VM context. */ WasmEdge_VMContext *VMCxt = WasmEdge_VMCreate(NULL, NULL); /* The parameters and returns arrays. */ WasmEdge_Value Params[1] = { WasmEdge_ValueGenI32(20) }; WasmEdge_Value Returns[1]; /* Function name. */ WasmEdge_String FuncName = WasmEdge_StringCreateByCString("fib"); /* Asynchronously run the WASM function from file and get the `WasmEdge_Async` object. */ WasmEdge_Async *Async = WasmEdge_VMAsyncRunWasmFromFile(VMCxt, "fibonacci.wasm", FuncName, Params, 1); /* * Developers can run the WASM binary from buffer with the `WasmEdge_VMAsyncRunWasmFromBuffer()` API, * or from `WasmEdge_ASTModuleContext` object with the `WasmEdge_VMAsyncRunWasmFromASTModule()` API. */ /* Wait for the execution. */ WasmEdge_AsyncWait(Async); /* * Developers can also use the `WasmEdge_AsyncGetReturnsLength()` or `WasmEdge_AsyncGet()` APIs * to wait for the asynchronous execution. These APIs will wait until the execution finished. */ /* Check the return values length. */ uint32_t Arity = WasmEdge_AsyncGetReturnsLength(Async); /* The `Arity` should be 1. Developers can skip this step if they have known the return arity. */ /* Get the result. */ WasmEdge_Result Res = WasmEdge_AsyncGet(Async, Returns, Arity); if (WasmEdge_ResultOK(Res)) { printf("Get the result: %d\n", WasmEdge_ValueGetI32(Returns[0])); } else { printf("Error message: %s\n", WasmEdge_ResultGetMessage(Res)); } /* Resources deallocations. */ WasmEdge_AsyncDelete(Async); WasmEdge_VMDelete(VMCxt); WasmEdge_StringDelete(FuncName); return 0; }
Then you can compile and run: (the 20th Fibonacci number is 10946 in 0-based index)
$ gcc test.c -lwasmedge_c $ ./a.out Get the result: 10946
-
Instantiate and asynchronously run WASM functions manually
Besides the above example, developers can run the WASM functions step-by-step with
VM
context APIs:#include <wasmedge/wasmedge.h> #include <stdio.h> int main() { /* Create the VM context. */ WasmEdge_VMContext *VMCxt = WasmEdge_VMCreate(NULL, NULL); /* The parameters and returns arrays. */ WasmEdge_Value Params[1] = { WasmEdge_ValueGenI32(25) }; WasmEdge_Value Returns[1]; /* Function name. */ WasmEdge_String FuncName = WasmEdge_StringCreateByCString("fib"); /* Result. */ WasmEdge_Result Res; /* Step 1: Load WASM file. */ Res = WasmEdge_VMLoadWasmFromFile(VMCxt, "fibonacci.wasm"); /* * Developers can load the WASM binary from buffer with the `WasmEdge_VMLoadWasmFromBuffer()` API, * or from `WasmEdge_ASTModuleContext` object with the `WasmEdge_VMLoadWasmFromASTModule()` API. */ if (!WasmEdge_ResultOK(Res)) { printf("Loading phase failed: %s\n", WasmEdge_ResultGetMessage(Res)); return 1; } /* Step 2: Validate the WASM module. */ Res = WasmEdge_VMValidate(VMCxt); if (!WasmEdge_ResultOK(Res)) { printf("Validation phase failed: %s\n", WasmEdge_ResultGetMessage(Res)); return 1; } /* Step 3: Instantiate the WASM module. */ Res = WasmEdge_VMInstantiate(VMCxt); /* * Developers can load, validate, and instantiate another WASM module to replace the * instantiated one. In this case, the old module will be cleared, but the registered * modules are still kept. */ if (!WasmEdge_ResultOK(Res)) { printf("Instantiation phase failed: %s\n", WasmEdge_ResultGetMessage(Res)); return 1; } /* Step 4: Asynchronously execute the WASM function and get the `WasmEdge_Async` object. */ WasmEdge_Async *Async = WasmEdge_VMAsyncExecute(VMCxt, FuncName, Params, 1); /* * Developers can execute functions repeatedly after instantiation. * For invoking the registered functions, you can use the `WasmEdge_VMAsyncExecuteRegistered()` API. */ /* Wait and check the return values length. */ uint32_t Arity = WasmEdge_AsyncGetReturnsLength(Async); /* The `Arity` should be 1. Developers can skip this step if they have known the return arity. */ /* Get the result. */ Res = WasmEdge_AsyncGet(Async, Returns, Arity); if (WasmEdge_ResultOK(Res)) { printf("Get the result: %d\n", WasmEdge_ValueGetI32(Returns[0])); } else { printf("Execution phase failed: %s\n", WasmEdge_ResultGetMessage(Res)); } /* Resources deallocations. */ WasmEdge_AsyncDelete(Async); WasmEdge_VMDelete(VMCxt); WasmEdge_StringDelete(FuncName); }
Then you can compile and run: (the 25th Fibonacci number is 121393 in 0-based index)
$ gcc test.c -lwasmedge_c $ ./a.out Get the result: 121393
Instance Tracing
Sometimes the developers may have requirements to get the instances of the WASM runtime.
The VM
context supplies the APIs to retrieve the instances.
-
Store
If the
VM
context is created without assigning aStore
context, theVM
context will allocate and own aStore
context.WasmEdge_VMContext *VMCxt = WasmEdge_VMCreate(NULL, NULL); WasmEdge_StoreContext *StoreCxt = WasmEdge_VMGetStoreContext(VMCxt); /* The object should __NOT__ be deleted by `WasmEdge_StoreDelete()`. */ WasmEdge_VMDelete(VMCxt);
Developers can also create the
VM
context with aStore
context. In this case, developers should guarantee the life cycle of theStore
context. Please refer to the Store Contexts for the details about theStore
context APIs.WasmEdge_StoreContext *StoreCxt = WasmEdge_StoreCreate(); WasmEdge_VMContext *VMCxt = WasmEdge_VMCreate(NULL, StoreCxt); WasmEdge_StoreContext *StoreCxtMock = WasmEdge_VMGetStoreContext(VMCxt); /* The `StoreCxt` and the `StoreCxtMock` are the same. */ WasmEdge_VMDelete(VMCxt); WasmEdge_StoreDelete(StoreCxt);
-
List exported functions
After the WASM module instantiation, developers can use the
WasmEdge_VMExecute()
API to invoke the exported WASM functions. For this purpose, developers may need information about the exported WASM function list. Please refer to the Instances in runtime for the details about the function types. Assume that the WASM filefibonacci.wasm
is copied into the current directory, and the C filetest.c
is as following:#include <wasmedge/wasmedge.h> #include <stdio.h> int main() { WasmEdge_StoreContext *StoreCxt = WasmEdge_StoreCreate(); WasmEdge_VMContext *VMCxt = WasmEdge_VMCreate(NULL, StoreCxt); WasmEdge_VMLoadWasmFromFile(VMCxt, "fibonacci.wasm"); WasmEdge_VMValidate(VMCxt); WasmEdge_VMInstantiate(VMCxt); /* List the exported functions. */ /* Get the number of exported functions. */ uint32_t FuncNum = WasmEdge_VMGetFunctionListLength(VMCxt); /* Create the name buffers and the function type buffers. */ const uint32_t BUF_LEN = 256; WasmEdge_String FuncNames[BUF_LEN]; WasmEdge_FunctionTypeContext *FuncTypes[BUF_LEN]; /* * Get the export function list. * If the function list length is larger than the buffer length, the overflowed data will be discarded. * The `FuncNames` and `FuncTypes` can be NULL if developers don't need them. */ uint32_t RealFuncNum = WasmEdge_VMGetFunctionList(VMCxt, FuncNames, FuncTypes, BUF_LEN); for (uint32_t I = 0; I < RealFuncNum && I < BUF_LEN; I++) { char Buf[BUF_LEN]; uint32_t Size = WasmEdge_StringCopy(FuncNames[I], Buf, sizeof(Buf)); printf("Get exported function string length: %u, name: %s\n", Size, Buf); /* * The function names should be __NOT__ destroyed. * The returned function type contexts should __NOT__ be destroyed. */ } return 0; }
Then you can compile and run: (the only exported function in
fibonacci.wasm
isfib
)$ gcc test.c -lwasmedge_c $ ./a.out Get exported function string length: 3, name: fib
If developers want to get the exported function names in the registered WASM modules, please retrieve the
Store
context from theVM
context and refer to the APIs of Store Contexts to list the registered functions by the module name. -
Get function types
The
VM
context provides APIs to find the function type by function name. Please refer to the Instances in runtime for the details about the function types./* * ... * Assume that a WASM module is instantiated in `VMCxt`. */ WasmEdge_String FuncName = WasmEdge_StringCreateByCString("fib"); const WasmEdge_FunctionTypeContext *FuncType = WasmEdge_VMGetFunctionType(VMCxt, FuncName); /* * Developers can get the function types of functions in the registered modules * via the `WasmEdge_VMGetFunctionTypeRegistered()` API with the module name. * If the function is not found, these APIs will return `NULL`. * The returned function type contexts should __NOT__ be destroyed. */ WasmEdge_StringDelete(FuncName);
-
Get the active module
After the WASM module instantiation, an anonymous module is instantiated and owned by the
VM
context. Developers may need to retrieve it to get the instances beyond the module. Then developers can use theWasmEdge_VMGetActiveModule()
API to get that anonymous module instance. Please refer to the Module instance for the details about the module instance APIs./* * ... * Assume that a WASM module is instantiated in `VMCxt`. */ const WasmEdge_ModuleInstanceContext *ModCxt = WasmEdge_VMGetActiveModule(VMCxt); /* * If there's no WASM module instantiated, this API will return `NULL`. * The returned module instance context should __NOT__ be destroyed. */
WasmEdge Runtime
In this partition, we will introduce the objects of WasmEdge runtime manually.
WASM Execution Example Step-By-Step
Besides the WASM execution through the VM
context, developers can execute the WASM functions or instantiate WASM modules step-by-step with the Loader
, Validator
, Executor
, and Store
contexts.
Assume that the WASM file fibonacci.wasm
is copied into the current directory, and the C file test.c
is as following:
#include <wasmedge/wasmedge.h>
#include <stdio.h>
int main() {
/* Create the configure context. This step is not necessary because we didn't adjust any setting. */
WasmEdge_ConfigureContext *ConfCxt = WasmEdge_ConfigureCreate();
/* Create the statistics context. This step is not necessary if the statistics in runtime is not needed. */
WasmEdge_StatisticsContext *StatCxt = WasmEdge_StatisticsCreate();
/* Create the store context. The store context is the object to link the modules for imports and exports. */
WasmEdge_StoreContext *StoreCxt = WasmEdge_StoreCreate();
/* Result. */
WasmEdge_Result Res;
/* Create the loader context. The configure context can be NULL. */
WasmEdge_LoaderContext *LoadCxt = WasmEdge_LoaderCreate(ConfCxt);
/* Create the validator context. The configure context can be NULL. */
WasmEdge_ValidatorContext *ValidCxt = WasmEdge_ValidatorCreate(ConfCxt);
/* Create the executor context. The configure context and the statistics context can be NULL. */
WasmEdge_ExecutorContext *ExecCxt = WasmEdge_ExecutorCreate(ConfCxt, StatCxt);
/* Load the WASM file or the compiled-WASM file and convert into the AST module context. */
WasmEdge_ASTModuleContext *ASTCxt = NULL;
Res = WasmEdge_LoaderParseFromFile(LoadCxt, &ASTCxt, "fibonacci.wasm");
if (!WasmEdge_ResultOK(Res)) {
printf("Loading phase failed: %s\n", WasmEdge_ResultGetMessage(Res));
return 1;
}
/* Validate the WASM module. */
Res = WasmEdge_ValidatorValidate(ValidCxt, ASTCxt);
if (!WasmEdge_ResultOK(Res)) {
printf("Validation phase failed: %s\n", WasmEdge_ResultGetMessage(Res));
return 1;
}
/* Instantiate the WASM module into store context. */
WasmEdge_ModuleInstanceContext *ModCxt = NULL;
Res = WasmEdge_ExecutorInstantiate(ExecCxt, &ModCxt, StoreCxt, ASTCxt);
if (!WasmEdge_ResultOK(Res)) {
printf("Instantiation phase failed: %s\n", WasmEdge_ResultGetMessage(Res));
return 1;
}
/* Try to list the exported functions of the instantiated WASM module. */
uint32_t FuncNum = WasmEdge_ModuleInstanceListFunctionLength(ModCxt);
/* Create the name buffers. */
const uint32_t BUF_LEN = 256;
WasmEdge_String FuncNames[BUF_LEN];
/* If the list length is larger than the buffer length, the overflowed data will be discarded. */
uint32_t RealFuncNum = WasmEdge_ModuleInstanceListFunction(ModCxt, FuncNames, BUF_LEN);
for (uint32_t I = 0; I < RealFuncNum && I < BUF_LEN; I++) {
char Buf[BUF_LEN];
uint32_t Size = WasmEdge_StringCopy(FuncNames[I], Buf, sizeof(Buf));
printf("Get exported function string length: %u, name: %s\n", Size, Buf);
/* The function names should __NOT__ be destroyed. */
}
/* The parameters and returns arrays. */
WasmEdge_Value Params[1] = { WasmEdge_ValueGenI32(18) };
WasmEdge_Value Returns[1];
/* Function name. */
WasmEdge_String FuncName = WasmEdge_StringCreateByCString("fib");
/* Find the exported function by function name. */
WasmEdge_FunctionInstanceContext *FuncCxt = WasmEdge_ModuleInstanceFindFunction(ModCxt, FuncName);
if (FuncCxt == NULL) {
printf("Function `fib` not found.\n");
return 1;
}
/* Invoke the WASM fnction. */
Res = WasmEdge_ExecutorInvoke(ExecCxt, FuncCxt, Params, 1, Returns, 1);
if (WasmEdge_ResultOK(Res)) {
printf("Get the result: %d\n", WasmEdge_ValueGetI32(Returns[0]));
} else {
printf("Execution phase failed: %s\n", WasmEdge_ResultGetMessage(Res));
}
/* Resources deallocations. */
WasmEdge_StringDelete(FuncName);
WasmEdge_ASTModuleDelete(ASTCxt);
WasmEdge_ModuleInstanceDelete(ModCxt);
WasmEdge_LoaderDelete(LoadCxt);
WasmEdge_ValidatorDelete(ValidCxt);
WasmEdge_ExecutorDelete(ExecCxt);
WasmEdge_ConfigureDelete(ConfCxt);
WasmEdge_StoreDelete(StoreCxt);
WasmEdge_StatisticsDelete(StatCxt);
return 0;
}
Then you can compile and run: (the 18th Fibonacci number is 4181 in 0-based index)
$ gcc test.c -lwasmedge_c
$ ./a.out
Get exported function string length: 3, name: fib
Get the result: 4181
Loader
The Loader
context loads the WASM binary from files or buffers.
Both the WASM and the compiled-WASM from the WasmEdge AOT Compiler are supported.
uint8_t Buf[4096];
/* ... Read the WASM code to the buffer. */
uint32_t FileSize = ...;
/* The `FileSize` is the length of the WASM code. */
/* Developers can adjust settings in the configure context. */
WasmEdge_ConfigureContext *ConfCxt = WasmEdge_ConfigureCreate();
/* Create the loader context. The configure context can be NULL. */
WasmEdge_LoaderContext *LoadCxt = WasmEdge_LoaderCreate(ConfCxt);
WasmEdge_ASTModuleContext *ASTCxt = NULL;
WasmEdge_Result Res;
/* Load WASM or compiled-WASM from the file. */
Res = WasmEdge_LoaderParseFromFile(LoadCxt, &ASTCxt, "fibonacci.wasm");
if (!WasmEdge_ResultOK(Res)) {
printf("Loading phase failed: %s\n", WasmEdge_ResultGetMessage(Res));
}
/* The output AST module context should be destroyed. */
WasmEdge_ASTModuleDelete(ASTCxt);
/* Load WASM or compiled-WASM from the buffer. */
Res = WasmEdge_LoaderParseFromBuffer(LoadCxt, &ASTCxt, Buf, FileSize);
if (!WasmEdge_ResultOK(Res)) {
printf("Loading phase failed: %s\n", WasmEdge_ResultGetMessage(Res));
}
/* The output AST module context should be destroyed. */
WasmEdge_ASTModuleDelete(ASTCxt);
WasmEdge_LoaderDelete(LoadCxt);
WasmEdge_ConfigureDelete(ConfCxt);
Validator
The Validator
context can validate the WASM module.
Every WASM module should be validated before instantiation.
/*
* ...
* Assume that the `ASTCxt` is the output AST module context from the loader context.
* Assume that the `ConfCxt` is the configure context.
*/
/* Create the validator context. The configure context can be NULL. */
WasmEdge_ValidatorContext *ValidCxt = WasmEdge_ValidatorCreate(ConfCxt);
WasmEdge_Result Res = WasmEdge_ValidatorValidate(ValidCxt, ASTCxt);
if (!WasmEdge_ResultOK(Res)) {
printf("Validation phase failed: %s\n", WasmEdge_ResultGetMessage(Res));
}
WasmEdge_ValidatorDelete(ValidCxt);
Executor
The Executor
context is the executor for both WASM and compiled-WASM.
This object should work base on the Store
context. For the details of the Store
context, please refer to the next chapter.
-
Instantiate and register an
AST module
as a namedModule
instanceAs the same of registering host modules or importing WASM modules in
VM
contexts, developers can instantiate and register anAST module
contexts into theStore
context as a namedModule
instance by theExecutor
APIs. After the registration, the resultModule
instance is exported with the given module name and can be linked when instantiating another module. For the details about theModule
instances APIs, please refer to the Instances./* * ... * Assume that the `ASTCxt` is the output AST module context from the loader context * and has passed the validation. * Assume that the `ConfCxt` is the configure context. */ /* Create the statistics context. This step is not necessary. */ WasmEdge_StatisticsContext *StatCxt = WasmEdge_StatisticsCreate(); /* Create the executor context. The configure and the statistics contexts can be NULL. */ WasmEdge_ExecutorContext *ExecCxt = WasmEdge_ExecutorCreate(ConfCxt, StatCxt); /* Create the store context. The store context is the object to link the modules for imports and exports. */ WasmEdge_StoreContext *StoreCxt = WasmEdge_StoreCreate(); /* Result. */ WasmEdge_Result Res; WasmEdge_String ModName = WasmEdge_StringCreateByCString("mod"); /* The output module instance. */ WasmEdge_ModuleInstanceContext *ModCxt = NULL; /* Register the WASM module into the store with the export module name "mod". */ Res = WasmEdge_ExecutorRegister(ExecCxt, &ModCxt, StoreCxt, ASTCxt, ModName); if (!WasmEdge_ResultOK(Res)) { printf("WASM registration failed: %s\n", WasmEdge_ResultGetMessage(Res)); return -1; } WasmEdge_StringDelete(ModName); /* ... */ /* After the execution, the resources should be released. */ WasmEdge_ExecutorDelete(ExecCxt); WasmEdge_StatisticsDelete(StatCxt); WasmEdge_StoreDelete(StoreCxt); WasmEdge_ModuleInstanceDelete(ModCxt);
-
Register an existing
Module
instance and export the module nameBesides instantiating and registering an
AST module
contexts, developers can register an existingModule
instance into the store with exporting the module name (which is in theModule
instance already). This case occurs when developers create aModule
instance for the host functions and want to register it for linking. For the details about the construction of host functions inModule
instances, please refer to the Host Functions./* * ... * Assume that the `ASTCxt` is the output AST module context from the loader context * and has passed the validation. * Assume that the `ConfCxt` is the configure context. */ /* Create the statistics context. This step is not necessary. */ WasmEdge_StatisticsContext *StatCxt = WasmEdge_StatisticsCreate(); /* Create the executor context. The configure and the statistics contexts can be NULL. */ WasmEdge_ExecutorContext *ExecCxt = WasmEdge_ExecutorCreate(ConfCxt, StatCxt); /* Create the store context. The store context is the object to link the modules for imports and exports. */ WasmEdge_StoreContext *StoreCxt = WasmEdge_StoreCreate(); /* Result. */ WasmEdge_Result Res; /* Create a module instance for host functions. */ WasmEdge_String ModName = WasmEdge_StringCreateByCString("host-module"); WasmEdge_ModuleInstanceContext *HostModCxt = WasmEdge_ModuleInstanceCreate(ModName); WasmEdge_StringDelete(ModName); /* * ... * Create and add the host functions, tables, memories, and globals into the module instance. */ /* Register the module instance into store with the exported module name. */ /* The export module name is in the module instance already. */ Res = WasmEdge_ExecutorRegisterImport(ExecCxt, StoreCxt, HostModCxt); if (!WasmEdge_ResultOK(Res)) { printf("WASM registration failed: %s\n", WasmEdge_ResultGetMessage(Res)); return -1; } /* ... */ /* After the execution, the resources should be released. */ WasmEdge_ExecutorDelete(ExecCxt); WasmEdge_StatisticsDelete(StatCxt); WasmEdge_StoreDelete(StoreCxt); WasmEdge_ModuleInstanceDelete(ModCxt);
-
Instantiate an
AST module
to an anonymousModule
instanceWASM or compiled-WASM modules should be instantiated before the function invocation. Before instantiating a WASM module, please check the import section for ensuring the imports are registered into the
Store
context for linking./* * ... * Assume that the `ASTCxt` is the output AST module context from the loader context * and has passed the validation. * Assume that the `ConfCxt` is the configure context. */ /* Create the statistics context. This step is not necessary. */ WasmEdge_StatisticsContext *StatCxt = WasmEdge_StatisticsCreate(); /* Create the executor context. The configure and the statistics contexts can be NULL. */ WasmEdge_ExecutorContext *ExecCxt = WasmEdge_ExecutorCreate(ConfCxt, StatCxt); /* Create the store context. The store context is the object to link the modules for imports and exports. */ WasmEdge_StoreContext *StoreCxt = WasmEdge_StoreCreate(); /* The output module instance. */ WasmEdge_ModuleInstanceContext *ModCxt = NULL; /* Instantiate the WASM module. */ WasmEdge_Result Res = WasmEdge_ExecutorInstantiate(ExecCxt, &ModCxt, StoreCxt, ASTCxt); if (!WasmEdge_ResultOK(Res)) { printf("WASM instantiation failed: %s\n", WasmEdge_ResultGetMessage(Res)); return -1; } /* ... */ /* After the execution, the resources should be released. */ WasmEdge_ExecutorDelete(ExecCxt); WasmEdge_StatisticsDelete(StatCxt); WasmEdge_StoreDelete(StoreCxt); WasmEdge_ModuleInstanceDelete(ModCxt);
-
Invoke functions
After registering or instantiating and get the result
Module
instance, developers can retrieve the exportedFunction
instances from theModule
instance for invocation. For the details about theModule
instances APIs, please refer to the Instances. Please refer to the example above for theFunction
instance invocation with theWasmEdge_ExecutorInvoke()
API.
AST Module
The AST Module
context presents the loaded structure from a WASM file or buffer. Developer will get this object after loading a WASM file or buffer from Loader.
Before instantiation, developers can also query the imports and exports of an AST Module
context.
WasmEdge_ASTModuleContext *ASTCxt = ...;
/* Assume that a WASM is loaded into an AST module context. */
/* Create the import type context buffers. */
const uint32_t BUF_LEN = 256;
const WasmEdge_ImportTypeContext *ImpTypes[BUF_LEN];
uint32_t ImportNum = WasmEdge_ASTModuleListImportsLength(ASTCxt);
/* If the list length is larger than the buffer length, the overflowed data will be discarded. */
uint32_t RealImportNum = WasmEdge_ASTModuleListImports(ASTCxt, ImpTypes, BUF_LEN);
for (uint32_t I = 0; I < RealImportNum && I < BUF_LEN; I++) {
/* Working with the import type `ImpTypes[I]` ... */
}
/* Create the export type context buffers. */
const WasmEdge_ExportTypeContext *ExpTypes[BUF_LEN];
uint32_t ExportNum = WasmEdge_ASTModuleListExportsLength(ASTCxt);
/* If the list length is larger than the buffer length, the overflowed data will be discarded. */
uint32_t RealExportNum = WasmEdge_ASTModuleListExports(ASTCxt, ExpTypes, BUF_LEN);
for (uint32_t I = 0; I < RealExportNum && I < BUF_LEN; I++) {
/* Working with the export type `ExpTypes[I]` ... */
}
WasmEdge_ASTModuleDelete(ASTCxt);
/* After deletion of `ASTCxt`, all data queried from the `ASTCxt` should not be accessed. */
Store
Store is the runtime structure for the representation of all global state that can be manipulated by WebAssembly programs.
The Store
context in WasmEdge is an object to provide the instance exporting and importing when instantiating WASM modules.
Developers can retrieve the named modules from the Store
context.
WasmEdge_StoreContext *StoreCxt = WasmEdge_StoreCreate();
/*
* ...
* Register a WASM module via the executor context.
*/
/* Try to list the registered WASM modules. */
uint32_t ModNum = WasmEdge_StoreListModuleLength(StoreCxt);
/* Create the name buffers. */
const uint32_t BUF_LEN = 256;
WasmEdge_String ModNames[BUF_LEN];
/* If the list length is larger than the buffer length, the overflowed data will be discarded. */
uint32_t RealModNum = WasmEdge_StoreListModule(StoreCxt, ModNames, BUF_LEN);
for (uint32_t I = 0; I < RealModNum && I < BUF_LEN; I++) {
/* Working with the module name `ModNames[I]` ... */
/* The module names should __NOT__ be destroyed. */
}
/* Find named module by name. */
WasmEdge_String ModName = WasmEdge_StringCreateByCString("module");
const WasmEdge_ModuleInstanceContext *ModCxt = WasmEdge_StoreFindModule(StoreCxt, ModName);
/* If the module with name not found, the `ModCxt` will be NULL. */
WasmEdge_StringDelete(ModName);
Instances
The instances are the runtime structures of WASM. Developers can retrieve the Module
instances from the Store
contexts, and retrieve the other instances from the Module
instances.
A single instance can be allocated by its creation function. Developers can construct instances into an Module
instance for registration. Please refer to the Host Functions for details.
The instances created by their creation functions should be destroyed by developers, EXCEPT they are added into an Module
instance.
-
Module instance
After instantiating or registering an
AST module
context, developers will get aModule
instance as the result, and have the responsibility to destroy it when not in use. AModule
instance can also be created for the host module. Please refer to the host function for the details.Module
instance provides APIs to list and find the exported instances in the module./* * ... * Instantiate a WASM module via the executor context and get the `ModCxt` as the output module instance. */ /* Try to list the exported instance of the instantiated WASM module. */ /* Take the function instances for example here. */ uint32_t FuncNum = WasmEdge_ModuleInstanceListFunctionLength(ModCxt); /* Create the name buffers. */ const uint32_t BUF_LEN = 256; WasmEdge_String FuncNames[BUF_LEN]; /* If the list length is larger than the buffer length, the overflowed data will be discarded. */ uint32_t RealFuncNum = WasmEdge_ModuleInstanceListFunction(ModCxt, FuncNames, BUF_LEN); for (uint32_t I = 0; I < RealFuncNum && I < BUF_LEN; I++) { /* Working with the function name `FuncNames[I]` ... */ /* The function names should __NOT__ be destroyed. */ } /* Try to find the exported instance of the instantiated WASM module. */ /* Take the function instances for example here. */ /* Function name. */ WasmEdge_String FuncName = WasmEdge_StringCreateByCString("fib"); WasmEdge_FunctionInstanceContext *FuncCxt = WasmEdge_ModuleInstanceFindFunction(ModCxt, FuncName); /* `FuncCxt` will be `NULL` if the function not found. */ /* The returned instance is owned by the module instance context and should __NOT__ be destroyed. */ WasmEdge_StringDelete(FuncName);
-
Function instance
Host functions are functions outside WebAssembly and passed to WASM modules as imports. In WasmEdge, developers can create the
Function
contexts for host functions and add them into anModule
instance context for registering into aVM
or aStore
. Developers can retrieve theFunction Type
from theFunction
contexts through the API. For the details of theHost Function
guide, please refer to the next chapter./* Retrieve the function instance from the module instance context. */ WasmEdge_FunctionInstanceContext *FuncCxt = ...; WasmEdge_FunctionTypeContext *FuncTypeCxt = WasmEdge_FunctionInstanceGetFunctionType(FuncCxt); /* The `FuncTypeCxt` is owned by the `FuncCxt` and should __NOT__ be destroyed. */ /* For the function instance creation, please refer to the `Host Function` guide. */
-
Table instance
In WasmEdge, developers can create the
Table
contexts and add them into anModule
instance context for registering into aVM
or aStore
. TheTable
contexts supply APIs to control the data in table instances.WasmEdge_Limit TabLimit = {.HasMax = true, .Shared = false, .Min = 10, .Max = 20}; /* Create the table type with limit and the `FuncRef` element type. */ WasmEdge_TableTypeContext *TabTypeCxt = WasmEdge_TableTypeCreate(WasmEdge_RefType_FuncRef, TabLimit); /* Create the table instance with table type. */ WasmEdge_TableInstanceContext *HostTable = WasmEdge_TableInstanceCreate(TabTypeCxt); /* Delete the table type. */ WasmEdge_TableTypeDelete(TabTypeCxt); WasmEdge_Result Res; WasmEdge_Value Data; TabTypeCxt = WasmEdge_TableInstanceGetTableType(HostTable); /* The `TabTypeCxt` got from table instance is owned by the `HostTable` and should __NOT__ be destroyed. */ enum WasmEdge_RefType RefType = WasmEdge_TableTypeGetRefType(TabTypeCxt); /* `RefType` will be `WasmEdge_RefType_FuncRef`. */ Data = WasmEdge_ValueGenFuncRef(5); Res = WasmEdge_TableInstanceSetData(HostTable, Data, 3); /* Set the function index 5 to the table[3]. */ /* * This will get an "out of bounds table access" error * because the position (13) is out of the table size (10): * Res = WasmEdge_TableInstanceSetData(HostTable, Data, 13); */ Res = WasmEdge_TableInstanceGetData(HostTable, &Data, 3); /* Get the FuncRef value of the table[3]. */ /* * This will get an "out of bounds table access" error * because the position (13) is out of the table size (10): * Res = WasmEdge_TableInstanceGetData(HostTable, &Data, 13); */ uint32_t Size = WasmEdge_TableInstanceGetSize(HostTable); /* `Size` will be 10. */ Res = WasmEdge_TableInstanceGrow(HostTable, 6); /* Grow the table size of 6, the table size will be 16. */ /* * This will get an "out of bounds table access" error because * the size (16 + 6) will reach the table limit(20): * Res = WasmEdge_TableInstanceGrow(HostTable, 6); */ WasmEdge_TableInstanceDelete(HostTable);
-
Memory instance
In WasmEdge, developers can create the
Memory
contexts and add them into anModule
instance context for registering into aVM
or aStore
. TheMemory
contexts supply APIs to control the data in memory instances.WasmEdge_Limit MemLimit = {.HasMax = true, .Shared = false, .Min = 1, .Max = 5}; /* Create the memory type with limit. The memory page size is 64KiB. */ WasmEdge_MemoryTypeContext *MemTypeCxt = WasmEdge_MemoryTypeCreate(MemLimit); /* Create the memory instance with memory type. */ WasmEdge_MemoryInstanceContext *HostMemory = WasmEdge_MemoryInstanceCreate(MemTypeCxt); /* Delete the memory type. */ WasmEdge_MemoryTypeDelete(MemTypeCxt); WasmEdge_Result Res; uint8_t Buf[256]; Buf[0] = 0xAA; Buf[1] = 0xBB; Buf[2] = 0xCC; Res = WasmEdge_MemoryInstanceSetData(HostMemory, Buf, 0x1000, 3); /* Set the data[0:2] to the memory[4096:4098]. */ /* * This will get an "out of bounds memory access" error * because [65535:65537] is out of 1 page size (65536): * Res = WasmEdge_MemoryInstanceSetData(HostMemory, Buf, 0xFFFF, 3); */ Buf[0] = 0; Buf[1] = 0; Buf[2] = 0; Res = WasmEdge_MemoryInstanceGetData(HostMemory, Buf, 0x1000, 3); /* Get the memory[4096:4098]. Buf[0:2] will be `{0xAA, 0xBB, 0xCC}`. */ /* * This will get an "out of bounds memory access" error * because [65535:65537] is out of 1 page size (65536): * Res = WasmEdge_MemoryInstanceSetData(HostMemory, Buf, 0xFFFF, 3); */ uint32_t PageSize = WasmEdge_MemoryInstanceGetPageSize(HostMemory); /* `PageSize` will be 1. */ Res = WasmEdge_MemoryInstanceGrowPage(HostMemory, 2); /* Grow the page size of 2, the page size of the memory instance will be 3. */ /* * This will get an "out of bounds memory access" error because * the page size (3 + 3) will reach the memory limit(5): * Res = WasmEdge_MemoryInstanceGrowPage(HostMemory, 3); */ WasmEdge_MemoryInstanceDelete(HostMemory);
-
Global instance
In WasmEdge, developers can create the
Global
contexts and add them into anModule
instance context for registering into aVM
or aStore
. TheGlobal
contexts supply APIs to control the value in global instances.WasmEdge_Value Val = WasmEdge_ValueGenI64(1000); /* Create the global type with value type and mutation. */ WasmEdge_GlobalTypeContext *GlobTypeCxt = WasmEdge_GlobalTypeCreate(WasmEdge_ValType_I64, WasmEdge_Mutability_Var); /* Create the global instance with value and global type. */ WasmEdge_GlobalInstanceContext *HostGlobal = WasmEdge_GlobalInstanceCreate(GlobTypeCxt, Val); /* Delete the global type. */ WasmEdge_GlobalTypeDelete(GlobTypeCxt); WasmEdge_Result Res; GlobTypeCxt = WasmEdge_GlobalInstanceGetGlobalType(HostGlobal); /* The `GlobTypeCxt` got from global instance is owned by the `HostGlobal` and should __NOT__ be destroyed. */ enum WasmEdge_ValType ValType = WasmEdge_GlobalTypeGetValType(GlobTypeCxt); /* `ValType` will be `WasmEdge_ValType_I64`. */ enum WasmEdge_Mutability ValMut = WasmEdge_GlobalTypeGetMutability(GlobTypeCxt); /* `ValMut` will be `WasmEdge_Mutability_Var`. */ WasmEdge_GlobalInstanceSetValue(HostGlobal, WasmEdge_ValueGenI64(888)); /* * Set the value u64(888) to the global. * This function will do nothing if the value type mismatched or * the global mutability is `WasmEdge_Mutability_Const`. */ WasmEdge_Value GlobVal = WasmEdge_GlobalInstanceGetValue(HostGlobal); /* Get the value (888 now) of the global context. */ WasmEdge_GlobalInstanceDelete(HostGlobal);
Host Functions
Host functions are functions outside WebAssembly and passed to WASM modules as imports.
In WasmEdge, developers can create the Function
, Memory
, Table
, and Global
contexts and add them into an Module
instance context for registering into a VM
or a Store
.
-
Host function allocation
Developers can define C functions with the following function signature as the host function body:
typedef WasmEdge_Result (*WasmEdge_HostFunc_t)( void *Data, WasmEdge_MemoryInstanceContext *MemCxt, const WasmEdge_Value *Params, WasmEdge_Value *Returns);
The example of an
add
host function to add 2i32
values:WasmEdge_Result Add(void *, WasmEdge_MemoryInstanceContext *, const WasmEdge_Value *In, WasmEdge_Value *Out) { /* * Params: {i32, i32} * Returns: {i32} * Developers should take care about the function type. */ /* Retrieve the value 1. */ int32_t Val1 = WasmEdge_ValueGetI32(In[0]); /* Retrieve the value 2. */ int32_t Val2 = WasmEdge_ValueGetI32(In[1]); /* Output value 1 is Val1 + Val2. */ Out[0] = WasmEdge_ValueGenI32(Val1 + Val2); /* Return the status of success. */ return WasmEdge_Result_Success; }
Then developers can create
Function
context with the host function body and the function type:enum WasmEdge_ValType ParamList[2] = { WasmEdge_ValType_I32, WasmEdge_ValType_I32 }; enum WasmEdge_ValType ReturnList[1] = { WasmEdge_ValType_I32 }; /* Create a function type: {i32, i32} -> {i32}. */ HostFType = WasmEdge_FunctionTypeCreate(ParamList, 2, ReturnList, 1); /* * Create a function context with the function type and host function body. * The `Cost` parameter can be 0 if developers do not need the cost measuring. */ WasmEdge_FunctionInstanceContext *HostFunc = WasmEdge_FunctionInstanceCreate(HostFType, Add, NULL, 0); /* * The third parameter is the pointer to the additional data. * Developers should guarantee the life cycle of the data, and it can be * `NULL` if the external data is not needed. */ /* If the function instance is not added into a module instance context, it should be deleted. */ WasmEdge_FunctionInstanceDelete(HostFunc);
-
Construct a module instance with host instances
Besides creating a
Module
instance by registering or instantiating a WASM module, developers can create aModule
instance with a module name and add theFunction
,Memory
,Table
, andGlobal
instances into it with their exporting names./* Host function body definition. */ WasmEdge_Result Add(void *Data, WasmEdge_MemoryInstanceContext *MemCxt, const WasmEdge_Value *In, WasmEdge_Value *Out) { int32_t Val1 = WasmEdge_ValueGetI32(In[0]); int32_t Val2 = WasmEdge_ValueGetI32(In[1]); Out[0] = WasmEdge_ValueGenI32(Val1 + Val2); return WasmEdge_Result_Success; } /* Create a module instance. */ WasmEdge_String ExportName = WasmEdge_StringCreateByCString("module"); WasmEdge_ModuleInstanceContext *HostModCxt = WasmEdge_ModuleInstanceCreate(ExportName); WasmEdge_StringDelete(ExportName); /* Create and add a function instance into the module instance. */ enum WasmEdge_ValType ParamList[2] = { WasmEdge_ValType_I32, WasmEdge_ValType_I32 }; enum WasmEdge_ValType ReturnList[1] = { WasmEdge_ValType_I32 }; WasmEdge_FunctionTypeContext *HostFType = WasmEdge_FunctionTypeCreate(ParamList, 2, ReturnList, 1); WasmEdge_FunctionInstanceContext *HostFunc = WasmEdge_FunctionInstanceCreate(HostFType, Add, NULL, 0); /* * The third parameter is the pointer to the additional data object. * Developers should guarantee the life cycle of the data, and it can be * `NULL` if the external data is not needed. */ WasmEdge_FunctionTypeDelete(HostFType); WasmEdge_String FuncName = WasmEdge_StringCreateByCString("add"); WasmEdge_ModuleInstanceAddFunction(HostModCxt, FuncName, HostFunc); WasmEdge_StringDelete(FuncName); /* Create and add a table instance into the import object. */ WasmEdge_Limit TableLimit = {.HasMax = true, .Shared = false, .Min = 10, .Max = 20}; WasmEdge_TableTypeContext *HostTType = WasmEdge_TableTypeCreate(WasmEdge_RefType_FuncRef, TableLimit); WasmEdge_TableInstanceContext *HostTable = WasmEdge_TableInstanceCreate(HostTType); WasmEdge_TableTypeDelete(HostTType); WasmEdge_String TableName = WasmEdge_StringCreateByCString("table"); WasmEdge_ModuleInstanceAddTable(HostModCxt, TableName, HostTable); WasmEdge_StringDelete(TableName); /* Create and add a memory instance into the import object. */ WasmEdge_Limit MemoryLimit = {.HasMax = true, .Shared = false, .Min = 1, .Max = 2}; WasmEdge_MemoryTypeContext *HostMType = WasmEdge_MemoryTypeCreate(MemoryLimit); WasmEdge_MemoryInstanceContext *HostMemory = WasmEdge_MemoryInstanceCreate(HostMType); WasmEdge_MemoryTypeDelete(HostMType); WasmEdge_String MemoryName = WasmEdge_StringCreateByCString("memory"); WasmEdge_ModuleInstanceAddMemory(HostModCxt, MemoryName, HostMemory); WasmEdge_StringDelete(MemoryName); /* Create and add a global instance into the module instance. */ WasmEdge_GlobalTypeContext *HostGType = WasmEdge_GlobalTypeCreate(WasmEdge_ValType_I32, WasmEdge_Mutability_Var); WasmEdge_GlobalInstanceContext *HostGlobal = WasmEdge_GlobalInstanceCreate(HostGType, WasmEdge_ValueGenI32(666)); WasmEdge_GlobalTypeDelete(HostGType); WasmEdge_String GlobalName = WasmEdge_StringCreateByCString("global"); WasmEdge_ModuleInstanceAddGlobal(HostModCxt, GlobalName, HostGlobal); WasmEdge_StringDelete(GlobalName); /* * The module instance should be deleted. * Developers should __NOT__ destroy the instances added into the module instance contexts. */ WasmEdge_ModuleInstanceDelete(HostModCxt);
-
Specified module instance
WasmEdge_ModuleInstanceCreateWASI()
API can create and initialize theWASI
module instance.WasmEdge_ModuleInstanceCreateWasmEdgeProcess()
API can create and initialize thewasmedge_process
module instance. Developers can create these module instance contexts and register them into theStore
orVM
contexts rather than adjust the settings in theConfigure
contexts.WasmEdge_ModuleInstanceContext *WasiModCxt = WasmEdge_ModuleInstanceCreateWASI( /* ... ignored */ ); WasmEdge_ModuleInstanceContext *ProcModCxt = WasmEdge_ModuleInstanceCreateWasmEdgeProcess( /* ... ignored */ ); WasmEdge_VMContext *VMCxt = WasmEdge_VMCreate(NULL, NULL); /* Register the WASI and WasmEdge_Process into the VM context. */ WasmEdge_VMRegisterModuleFromImport(VMCxt, WasiModCxt); WasmEdge_VMRegisterModuleFromImport(VMCxt, ProcModCxt); /* Get the WASI exit code. */ uint32_t ExitCode = WasmEdge_ModuleInstanceWASIGetExitCode(WasiModCxt); /* * The `ExitCode` will be EXIT_SUCCESS if the execution has no error. * Otherwise, it will return with the related exit code. */ WasmEdge_VMDelete(VMCxt); /* The module instances should be deleted. */ WasmEdge_ModuleInstanceDelete(WasiModCxt); WasmEdge_ModuleInstanceDelete(ProcModCxt);
-
Example
Assume that a simple WASM from the WAT as following:
(module (type $t0 (func (param i32 i32) (result i32))) (import "extern" "func-add" (func $f-add (type $t0))) (func (export "addTwo") (param i32 i32) (result i32) local.get 0 local.get 1 call $f-add) )
And the
test.c
as following:#include <wasmedge/wasmedge.h> #include <stdio.h> /* Host function body definition. */ WasmEdge_Result Add(void *Data, WasmEdge_MemoryInstanceContext *MemCxt, const WasmEdge_Value *In, WasmEdge_Value *Out) { int32_t Val1 = WasmEdge_ValueGetI32(In[0]); int32_t Val2 = WasmEdge_ValueGetI32(In[1]); printf("Host function \"Add\": %d + %d\n", Val1, Val2); Out[0] = WasmEdge_ValueGenI32(Val1 + Val2); return WasmEdge_Result_Success; } int main() { /* Create the VM context. */ WasmEdge_VMContext *VMCxt = WasmEdge_VMCreate(NULL, NULL); /* The WASM module buffer. */ uint8_t WASM[] = { /* WASM header */ 0x00, 0x61, 0x73, 0x6D, 0x01, 0x00, 0x00, 0x00, /* Type section */ 0x01, 0x07, 0x01, /* function type {i32, i32} -> {i32} */ 0x60, 0x02, 0x7F, 0x7F, 0x01, 0x7F, /* Import section */ 0x02, 0x13, 0x01, /* module name: "extern" */ 0x06, 0x65, 0x78, 0x74, 0x65, 0x72, 0x6E, /* extern name: "func-add" */ 0x08, 0x66, 0x75, 0x6E, 0x63, 0x2D, 0x61, 0x64, 0x64, /* import desc: func 0 */ 0x00, 0x00, /* Function section */ 0x03, 0x02, 0x01, 0x00, /* Export section */ 0x07, 0x0A, 0x01, /* export name: "addTwo" */ 0x06, 0x61, 0x64, 0x64, 0x54, 0x77, 0x6F, /* export desc: func 0 */ 0x00, 0x01, /* Code section */ 0x0A, 0x0A, 0x01, /* code body */ 0x08, 0x00, 0x20, 0x00, 0x20, 0x01, 0x10, 0x00, 0x0B }; /* Create the module instance. */ WasmEdge_String ExportName = WasmEdge_StringCreateByCString("extern"); WasmEdge_ModuleInstanceContext *HostModCxt = WasmEdge_ModuleInstanceCreate(ExportName); enum WasmEdge_ValType ParamList[2] = { WasmEdge_ValType_I32, WasmEdge_ValType_I32 }; enum WasmEdge_ValType ReturnList[1] = { WasmEdge_ValType_I32 }; WasmEdge_FunctionTypeContext *HostFType = WasmEdge_FunctionTypeCreate(ParamList, 2, ReturnList, 1); WasmEdge_FunctionInstanceContext *HostFunc = WasmEdge_FunctionInstanceCreate(HostFType, Add, NULL, 0); WasmEdge_FunctionTypeDelete(HostFType); WasmEdge_String HostFuncName = WasmEdge_StringCreateByCString("func-add"); WasmEdge_ModuleInstanceAddFunction(HostModCxt, HostFuncName, HostFunc); WasmEdge_StringDelete(HostFuncName); WasmEdge_VMRegisterModuleFromImport(VMCxt, HostModCxt); /* The parameters and returns arrays. */ WasmEdge_Value Params[2] = { WasmEdge_ValueGenI32(1234), WasmEdge_ValueGenI32(5678) }; WasmEdge_Value Returns[1]; /* Function name. */ WasmEdge_String FuncName = WasmEdge_StringCreateByCString("addTwo"); /* Run the WASM function from file. */ WasmEdge_Result Res = WasmEdge_VMRunWasmFromBuffer( VMCxt, WASM, sizeof(WASM), FuncName, Params, 2, Returns, 1); if (WasmEdge_ResultOK(Res)) { printf("Get the result: %d\n", WasmEdge_ValueGetI32(Returns[0])); } else { printf("Error message: %s\n", WasmEdge_ResultGetMessage(Res)); } /* Resources deallocations. */ WasmEdge_VMDelete(VMCxt); WasmEdge_StringDelete(FuncName); WasmEdge_ModuleInstanceDelete(HostModCxt); return 0; }
Then you can compile and run: (the result of 1234 + 5678 is 6912)
$ gcc test.c -lwasmedge_c $ ./a.out Host function "Add": 1234 + 5678 Get the result: 6912
-
Host Data Example
Developers can set a external data object to the
Function
context, and access to the object in the function body. Assume that a simple WASM from the WAT as following:(module (type $t0 (func (param i32 i32) (result i32))) (import "extern" "func-add" (func $f-add (type $t0))) (func (export "addTwo") (param i32 i32) (result i32) local.get 0 local.get 1 call $f-add) )
And the
test.c
as following:#include <wasmedge/wasmedge.h> #include <stdio.h> /* Host function body definition. */ WasmEdge_Result Add(void *Data, WasmEdge_MemoryInstanceContext *MemCxt, const WasmEdge_Value *In, WasmEdge_Value *Out) { int32_t Val1 = WasmEdge_ValueGetI32(In[0]); int32_t Val2 = WasmEdge_ValueGetI32(In[1]); printf("Host function \"Add\": %d + %d\n", Val1, Val2); Out[0] = WasmEdge_ValueGenI32(Val1 + Val2); /* Also set the result to the data. */ int32_t *DataPtr = (int32_t *)Data; *DataPtr = Val1 + Val2; return WasmEdge_Result_Success; } int main() { /* Create the VM context. */ WasmEdge_VMContext *VMCxt = WasmEdge_VMCreate(NULL, NULL); /* The WASM module buffer. */ uint8_t WASM[] = { /* WASM header */ 0x00, 0x61, 0x73, 0x6D, 0x01, 0x00, 0x00, 0x00, /* Type section */ 0x01, 0x07, 0x01, /* function type {i32, i32} -> {i32} */ 0x60, 0x02, 0x7F, 0x7F, 0x01, 0x7F, /* Import section */ 0x02, 0x13, 0x01, /* module name: "extern" */ 0x06, 0x65, 0x78, 0x74, 0x65, 0x72, 0x6E, /* extern name: "func-add" */ 0x08, 0x66, 0x75, 0x6E, 0x63, 0x2D, 0x61, 0x64, 0x64, /* import desc: func 0 */ 0x00, 0x00, /* Function section */ 0x03, 0x02, 0x01, 0x00, /* Export section */ 0x07, 0x0A, 0x01, /* export name: "addTwo" */ 0x06, 0x61, 0x64, 0x64, 0x54, 0x77, 0x6F, /* export desc: func 0 */ 0x00, 0x01, /* Code section */ 0x0A, 0x0A, 0x01, /* code body */ 0x08, 0x00, 0x20, 0x00, 0x20, 0x01, 0x10, 0x00, 0x0B }; /* The external data object: an integer. */ int32_t Data; /* Create the module instance. */ WasmEdge_String ExportName = WasmEdge_StringCreateByCString("extern"); WasmEdge_ModuleInstanceContext *HostModCxt = WasmEdge_ModuleInstanceCreate(ExportName); enum WasmEdge_ValType ParamList[2] = { WasmEdge_ValType_I32, WasmEdge_ValType_I32 }; enum WasmEdge_ValType ReturnList[1] = { WasmEdge_ValType_I32 }; WasmEdge_FunctionTypeContext *HostFType = WasmEdge_FunctionTypeCreate(ParamList, 2, ReturnList, 1); WasmEdge_FunctionInstanceContext *HostFunc = WasmEdge_FunctionInstanceCreate(HostFType, Add, &Data, 0); WasmEdge_FunctionTypeDelete(HostFType); WasmEdge_String HostFuncName = WasmEdge_StringCreateByCString("func-add"); WasmEdge_ModuleInstanceAddFunction(HostModCxt, HostFuncName, HostFunc); WasmEdge_StringDelete(HostFuncName); WasmEdge_VMRegisterModuleFromImport(VMCxt, HostModCxt); /* The parameters and returns arrays. */ WasmEdge_Value Params[2] = { WasmEdge_ValueGenI32(1234), WasmEdge_ValueGenI32(5678) }; WasmEdge_Value Returns[1]; /* Function name. */ WasmEdge_String FuncName = WasmEdge_StringCreateByCString("addTwo"); /* Run the WASM function from file. */ WasmEdge_Result Res = WasmEdge_VMRunWasmFromBuffer( VMCxt, WASM, sizeof(WASM), FuncName, Params, 2, Returns, 1); if (WasmEdge_ResultOK(Res)) { printf("Get the result: %d\n", WasmEdge_ValueGetI32(Returns[0])); } else { printf("Error message: %s\n", WasmEdge_ResultGetMessage(Res)); } printf("Data value: %d\n", Data); /* Resources deallocations. */ WasmEdge_VMDelete(VMCxt); WasmEdge_StringDelete(FuncName); WasmEdge_ModuleInstanceDelete(HostModCxt); return 0; }
Then you can compile and run: (the result of 1234 + 5678 is 6912)
$ gcc test.c -lwasmedge_c $ ./a.out Host function "Add": 1234 + 5678 Get the result: 6912 Data value: 6912
WasmEdge AOT Compiler
In this partition, we will introduce the WasmEdge AOT compiler and the options.
WasmEdge runs the WASM files in interpreter mode, and WasmEdge also supports the AOT (ahead-of-time) mode running without modifying any code. The WasmEdge AOT (ahead-of-time) compiler compiles the WASM files for running in AOT mode which is much faster than interpreter mode. Developers can compile the WASM files into the compiled-WASM files in shared library format for universal WASM format for the AOT mode execution.
Compilation Example
Assume that the WASM file fibonacci.wasm
is copied into the current directory, and the C file test.c
is as following:
#include <wasmedge/wasmedge.h>
#include <stdio.h>
int main() {
/* Create the configure context. */
WasmEdge_ConfigureContext *ConfCxt = WasmEdge_ConfigureCreate();
/* ... Adjust settings in the configure context. */
/* Result. */
WasmEdge_Result Res;
/* Create the compiler context. The configure context can be NULL. */
WasmEdge_CompilerContext *CompilerCxt = WasmEdge_CompilerCreate(ConfCxt);
/* Compile the WASM file with input and output paths. */
Res = WasmEdge_CompilerCompile(CompilerCxt, "fibonacci.wasm", "fibonacci.wasm.so");
if (!WasmEdge_ResultOK(Res)) {
printf("Compilation failed: %s\n", WasmEdge_ResultGetMessage(Res));
return 1;
}
WasmEdge_CompilerDelete(CompilerCxt);
WasmEdge_ConfigureDelete(ConfCxt);
return 0;
}
Then you can compile and run (the output file is "fibonacci.wasm.so"):
$ gcc test.c -lwasmedge_c
$ ./a.out
[2021-07-02 11:08:08.651] [info] compile start
[2021-07-02 11:08:08.653] [info] verify start
[2021-07-02 11:08:08.653] [info] optimize start
[2021-07-02 11:08:08.670] [info] codegen start
[2021-07-02 11:08:08.706] [info] compile done
Compiler Options
Developers can set options for AOT compilers such as optimization level and output format:
/// AOT compiler optimization level enumeration.
enum WasmEdge_CompilerOptimizationLevel {
/// Disable as many optimizations as possible.
WasmEdge_CompilerOptimizationLevel_O0 = 0,
/// Optimize quickly without destroying debuggability.
WasmEdge_CompilerOptimizationLevel_O1,
/// Optimize for fast execution as much as possible without triggering
/// significant incremental compile time or code size growth.
WasmEdge_CompilerOptimizationLevel_O2,
/// Optimize for fast execution as much as possible.
WasmEdge_CompilerOptimizationLevel_O3,
/// Optimize for small code size as much as possible without triggering
/// significant incremental compile time or execution time slowdowns.
WasmEdge_CompilerOptimizationLevel_Os,
/// Optimize for small code size as much as possible.
WasmEdge_CompilerOptimizationLevel_Oz
};
/// AOT compiler output binary format enumeration.
enum WasmEdge_CompilerOutputFormat {
/// Native dynamic library format.
WasmEdge_CompilerOutputFormat_Native = 0,
/// WebAssembly with AOT compiled codes in custom sections.
WasmEdge_CompilerOutputFormat_Wasm
};
Please refer to the AOT compiler options configuration for details.
WasmEdge 0.9.1 C API Documentation
WasmEdge C API denotes an interface to access the WasmEdge runtime at version 0.9.1
. The followings are the guides to working with the C APIs of WasmEdge.
Developers can refer here to upgrade to 0.10.0.
Table of Contents
WasmEdge Installation
Download And Install
The easiest way to install WasmEdge is to run the following command. Your system should have git
and wget
as prerequisites.
curl -sSf https://raw.githubusercontent.com/WasmEdge/WasmEdge/master/utils/install.sh | bash -s -- -v 0.9.1
For more details, please refer to the Installation Guide for the WasmEdge installation.
Compile Sources
After the installation of WasmEdge, the following guide can help you to test for the availability of the WasmEdge C API.
-
Prepare the test C file (and assumed saved as
test.c
):#include <wasmedge/wasmedge.h> #include <stdio.h> int main() { printf("WasmEdge version: %s\n", WasmEdge_VersionGet()); return 0; }
-
Compile the file with
gcc
orclang
.gcc test.c -lwasmedge_c
-
Run and get the expected output.
$ ./a.out WasmEdge version: 0.9.1
WasmEdge Basics
In this part, we will introduce the utilities and concepts of WasmEdge shared library.
Version
The Version
related APIs provide developers to check for the WasmEdge shared library version.
#include <wasmedge/wasmedge.h>
printf("WasmEdge version: %s\n", WasmEdge_VersionGet());
printf("WasmEdge version major: %u\n", WasmEdge_VersionGetMajor());
printf("WasmEdge version minor: %u\n", WasmEdge_VersionGetMinor());
printf("WasmEdge version patch: %u\n", WasmEdge_VersionGetPatch());
Logging Settings
The WasmEdge_LogSetErrorLevel()
and WasmEdge_LogSetDebugLevel()
APIs can set the logging system to debug level or error level. By default, the error level is set, and the debug info is hidden.
Value Types
In WasmEdge, developers should convert the values to WasmEdge_Value
objects through APIs for matching to the WASM value types.
-
Number types:
i32
,i64
,f32
,f64
, andv128
for theSIMD
proposalWasmEdge_Value Val; Val = WasmEdge_ValueGenI32(123456); printf("%d\n", WasmEdge_ValueGetI32(Val)); /* Will print "123456" */ Val = WasmEdge_ValueGenI64(1234567890123LL); printf("%ld\n", WasmEdge_ValueGetI64(Val)); /* Will print "1234567890123" */ Val = WasmEdge_ValueGenF32(123.456f); printf("%f\n", WasmEdge_ValueGetF32(Val)); /* Will print "123.456001" */ Val = WasmEdge_ValueGenF64(123456.123456789); printf("%.10f\n", WasmEdge_ValueGetF64(Val)); /* Will print "123456.1234567890" */
-
Reference types:
funcref
andexternref
for theReference-Types
proposalWasmEdge_Value Val; void *Ptr; bool IsNull; uint32_t Num = 10; /* Genreate a externref to NULL. */ Val = WasmEdge_ValueGenNullRef(WasmEdge_RefType_ExternRef); IsNull = WasmEdge_ValueIsNullRef(Val); /* The `IsNull` will be `TRUE`. */ Ptr = WasmEdge_ValueGetExternRef(Val); /* The `Ptr` will be `NULL`. */ /* Genreate a funcref with function index 20. */ Val = WasmEdge_ValueGenFuncRef(20); uint32_t FuncIdx = WasmEdge_ValueGetFuncIdx(Val); /* The `FuncIdx` will be 20. */ /* Genreate a externref to `Num`. */ Val = WasmEdge_ValueGenExternRef(&Num); Ptr = WasmEdge_ValueGetExternRef(Val); /* The `Ptr` will be `&Num`. */ printf("%u\n", *(uint32_t *)Ptr); /* Will print "10" */ Num += 55; printf("%u\n", *(uint32_t *)Ptr); /* Will print "65" */
Strings
The WasmEdge_String
object is for the instance names when invoking a WASM function or finding the contexts of instances.
-
Create a
WasmEdge_String
from a C string (const char *
with NULL termination) or a buffer with length.The content of the C string or buffer will be copied into the
WasmEdge_String
object.char Buf[4] = {50, 55, 60, 65}; WasmEdge_String Str1 = WasmEdge_StringCreateByCString("test"); WasmEdge_String Str2 = WasmEdge_StringCreateByBuffer(Buf, 4); /* The objects should be deleted by `WasmEdge_StringDelete()`. */ WasmEdge_StringDelete(Str1); WasmEdge_StringDelete(Str2);
-
Wrap a
WasmEdge_String
to a buffer with length.The content will not be copied, and the caller should guarantee the life cycle of the input buffer.
const char CStr[] = "test"; WasmEdge_String Str = WasmEdge_StringWrap(CStr, 4); /* The object should __NOT__ be deleted by `WasmEdge_StringDelete()`. */
-
String comparison
const char CStr[] = "abcd"; char Buf[4] = {0x61, 0x62, 0x63, 0x64}; WasmEdge_String Str1 = WasmEdge_StringWrap(CStr, 4); WasmEdge_String Str2 = WasmEdge_StringCreateByBuffer(Buf, 4); bool IsEq = WasmEdge_StringIsEqual(Str1, Str2); /* The `IsEq` will be `TRUE`. */ WasmEdge_StringDelete(Str2);
-
Convert to C string
char Buf[256]; WasmEdge_String Str = WasmEdge_StringCreateByCString("test_wasmedge_string"); uint32_t StrLength = WasmEdge_StringCopy(Str, Buf, sizeof(Buf)); /* StrLength will be 20 */ printf("String: %s\n", Buf); /* Will print "test_wasmedge_string". */
Results
The WasmEdge_Result
object specifies the execution status.
APIs about WASM execution will return the WasmEdge_Result
to denote the status.
WasmEdge_Result Res = WasmEdge_Result_Success;
bool IsSucceeded = WasmEdge_ResultOK(Res);
/* The `IsSucceeded` will be `TRUE`. */
uint32_t Code = WasmEdge_ResultGetCode(Res);
/* The `Code` will be 0. */
const char *Msg = WasmEdge_ResultGetMessage(Res);
/* The `Msg` will be "success". */
Contexts
The objects, such as VM
, Store
, and Function
, are composed of Context
s.
All of the contexts can be created by calling the corresponding creation APIs and should be destroyed by calling the corresponding deletion APIs. Developers have responsibilities to manage the contexts for memory management.
/* Create the configure context. */
WasmEdge_ConfigureContext *ConfCxt = WasmEdge_ConfigureCreate();
/* Delete the configure context. */
WasmEdge_ConfigureDelete(ConfCxt);
The details of other contexts will be introduced later.
WASM Data Structures
The WASM data structures are used for creating instances or can be queried from instance contexts. The details of instances creation will be introduced in the Instances.
-
Limit
The
WasmEdge_Limit
struct is defined in the header:/// Struct of WASM limit. typedef struct WasmEdge_Limit { /// Boolean to describe has max value or not. bool HasMax; /// Minimum value. uint32_t Min; /// Maximum value. Will be ignored if the `HasMax` is false. uint32_t Max; } WasmEdge_Limit;
Developers can initialize the struct by assigning it's value, and the
Max
value is needed to be larger or equal to theMin
value. The APIWasmEdge_LimitIsEqual()
is provided to compare with 2WasmEdge_Limit
structs. -
Function type context
The
Function Type
context is used for theFunction
creation, checking the value types of aFunction
instance, or getting the function type with function name from VM. Developers can use theFunction Type
context APIs to get the parameter or return value types information.enum WasmEdge_ValType ParamList[2] = { WasmEdge_ValType_I32, WasmEdge_ValType_I64 }; enum WasmEdge_ValType ReturnList[1] = { WasmEdge_ValType_FuncRef }; WasmEdge_FunctionTypeContext *FuncTypeCxt = WasmEdge_FunctionTypeCreate(ParamList, 2, ReturnList, 1); enum WasmEdge_ValType Buf[16]; uint32_t ParamLen = WasmEdge_FunctionTypeGetParametersLength(FuncTypeCxt); /* `ParamLen` will be 2. */ uint32_t GotParamLen = WasmEdge_FunctionTypeGetParameters(FuncTypeCxt, Buf, 16); /* `GotParamLen` will be 2, and `Buf[0]` and `Buf[1]` will be the same as `ParamList`. */ uint32_t ReturnLen = WasmEdge_FunctionTypeGetReturnsLength(FuncTypeCxt); /* `ReturnLen` will be 1. */ uint32_t GotReturnLen = WasmEdge_FunctionTypeGetReturns(FuncTypeCxt, Buf, 16); /* `GotReturnLen` will be 1, and `Buf[0]` will be the same as `ReturnList`. */ WasmEdge_FunctionTypeDelete(FuncTypeCxt);
-
Table type context
The
Table Type
context is used forTable
instance creation or getting information fromTable
instances.WasmEdge_Limit TabLim = {.HasMax = true, .Min = 10, .Max = 20}; WasmEdge_TableTypeContext *TabTypeCxt = WasmEdge_TableTypeCreate(WasmEdge_RefType_ExternRef, TabLim); enum WasmEdge_RefType GotRefType = WasmEdge_TableTypeGetRefType(TabTypeCxt); /* `GotRefType` will be WasmEdge_RefType_ExternRef. */ WasmEdge_Limit GotTabLim = WasmEdge_TableTypeGetLimit(TabTypeCxt); /* `GotTabLim` will be the same value as `TabLim`. */ WasmEdge_TableTypeDelete(TabTypeCxt);
-
Memory type context
The
Memory Type
context is used forMemory
instance creation or getting information fromMemory
instances.WasmEdge_Limit MemLim = {.HasMax = true, .Min = 10, .Max = 20}; WasmEdge_MemoryTypeContext *MemTypeCxt = WasmEdge_MemoryTypeCreate(MemLim); WasmEdge_Limit GotMemLim = WasmEdge_MemoryTypeGetLimit(MemTypeCxt); /* `GotMemLim` will be the same value as `MemLim`. */ WasmEdge_MemoryTypeDelete(MemTypeCxt)
-
Global type context
The
Global Type
context is used forGlobal
instance creation or getting information fromGlobal
instances.WasmEdge_GlobalTypeContext *GlobTypeCxt = WasmEdge_GlobalTypeCreate(WasmEdge_ValType_F64, WasmEdge_Mutability_Var); WasmEdge_ValType GotValType = WasmEdge_GlobalTypeGetValType(GlobTypeCxt); /* `GotValType` will be WasmEdge_ValType_F64. */ WasmEdge_Mutability GotValMut = WasmEdge_GlobalTypeGetMutability(GlobTypeCxt); /* `GotValMut` will be WasmEdge_Mutability_Var. */ WasmEdge_GlobalTypeDelete(GlobTypeCxt);
-
Import type context
The
Import Type
context is used for getting the imports information from a AST Module. Developers can get the external type (function
,table
,memory
, orglobal
), import module name, and external name from anImport Type
context. The details about queryingImport Type
contexts will be introduced in the AST Module.WasmEdge_ASTModuleContext *ASTCxt = ...; /* Assume that `ASTCxt` is returned by the `WasmEdge_LoaderContext` for the result of loading a WASM file. */ const WasmEdge_ImportTypeContext *ImpType = ...; /* Assume that `ImpType` is queried from the `ASTCxt` for the import. */ enum WasmEdge_ExternalType ExtType = WasmEdge_ImportTypeGetExternalType(ImpType); /* * The `ExtType` can be one of `WasmEdge_ExternalType_Function`, `WasmEdge_ExternalType_Table`, * `WasmEdge_ExternalType_Memory`, or `WasmEdge_ExternalType_Global`. */ WasmEdge_String ModName = WasmEdge_ImportTypeGetModuleName(ImpType); WasmEdge_String ExtName = WasmEdge_ImportTypeGetExternalName(ImpType); /* The `ModName` and `ExtName` should not be destroyed and the string buffers are binded into the `ASTCxt`. */ const WasmEdge_FunctionTypeContext *FuncTypeCxt = WasmEdge_ImportTypeGetFunctionType(ASTCxt, ImpType); /* If the `ExtType` is not `WasmEdge_ExternalType_Function`, the `FuncTypeCxt` will be NULL. */ const WasmEdge_TableTypeContext *TabTypeCxt = WasmEdge_ImportTypeGetTableType(ASTCxt, ImpType); /* If the `ExtType` is not `WasmEdge_ExternalType_Table`, the `TabTypeCxt` will be NULL. */ const WasmEdge_MemoryTypeContext *MemTypeCxt = WasmEdge_ImportTypeGetMemoryType(ASTCxt, ImpType); /* If the `ExtType` is not `WasmEdge_ExternalType_Memory`, the `MemTypeCxt` will be NULL. */ const WasmEdge_GlobalTypeContext *GlobTypeCxt = WasmEdge_ImportTypeGetGlobalType(ASTCxt, ImpType); /* If the `ExtType` is not `WasmEdge_ExternalType_Global`, the `GlobTypeCxt` will be NULL. */
-
Export type context
The
Export Type
context is used for getting the exports information from a AST Module. Developers can get the external type (function
,table
,memory
, orglobal
) and external name from anExport Type
context. The details about queryingExport Type
contexts will be introduced in the AST Module.WasmEdge_ASTModuleContext *ASTCxt = ...; /* Assume that `ASTCxt` is returned by the `WasmEdge_LoaderContext` for the result of loading a WASM file. */ const WasmEdge_ExportTypeContext *ExpType = ...; /* Assume that `ExpType` is queried from the `ASTCxt` for the export. */ enum WasmEdge_ExternalType ExtType = WasmEdge_ExportTypeGetExternalType(ExpType); /* * The `ExtType` can be one of `WasmEdge_ExternalType_Function`, `WasmEdge_ExternalType_Table`, * `WasmEdge_ExternalType_Memory`, or `WasmEdge_ExternalType_Global`. */ WasmEdge_String ExtName = WasmEdge_ExportTypeGetExternalName(ExpType); /* The `ExtName` should not be destroyed and the string buffer is binded into the `ASTCxt`. */ const WasmEdge_FunctionTypeContext *FuncTypeCxt = WasmEdge_ExportTypeGetFunctionType(ASTCxt, ExpType); /* If the `ExtType` is not `WasmEdge_ExternalType_Function`, the `FuncTypeCxt` will be NULL. */ const WasmEdge_TableTypeContext *TabTypeCxt = WasmEdge_ExportTypeGetTableType(ASTCxt, ExpType); /* If the `ExtType` is not `WasmEdge_ExternalType_Table`, the `TabTypeCxt` will be NULL. */ const WasmEdge_MemoryTypeContext *MemTypeCxt = WasmEdge_ExportTypeGetMemoryType(ASTCxt, ExpType); /* If the `ExtType` is not `WasmEdge_ExternalType_Memory`, the `MemTypeCxt` will be NULL. */ const WasmEdge_GlobalTypeContext *GlobTypeCxt = WasmEdge_ExportTypeGetGlobalType(ASTCxt, ExpType); /* If the `ExtType` is not `WasmEdge_ExternalType_Global`, the `GlobTypeCxt` will be NULL. */
Async
After calling the asynchronous execution APIs, developers will get the WasmEdge_Async
object.
Developers own the object and should call the WasmEdge_AsyncDelete()
API to destroy it.
-
Wait for the asynchronous execution
Developers can wait the execution until finished:
WasmEdge_Async *Async = ...; /* Ignored. Asynchronous execute a function. */ /* Blocking and waiting for the execution. */ WasmEdge_AsyncWait(Async); WasmEdge_AsyncDelete(Async);
Or developers can wait for a time limit. If the time limit exceeded, developers can choose to cancel the execution. For the interruptible execution in AOT mode, developers should set
TRUE
thourgh theWasmEdge_ConfigureCompilerSetInterruptible()
API into the configure context for the AOT compiler.WasmEdge_Async *Async = ...; /* Ignored. Asynchronous execute a function. */ /* Blocking and waiting for the execution for 1 second. */ bool IsEnd = WasmEdge_AsyncWaitFor(Async, 1000); if (IsEnd) { /* The execution finished. Developers can get the result. */ WasmEdge_Result Res = WasmEdge_AsyncGet(/* ... Ignored */); } else { /* The time limit exceeded. Developers can keep waiting or cancel the execution. */ WasmEdge_AsyncCancel(Async); WasmEdge_Result Res = WasmEdge_AsyncGet(Async, 0, NULL); /* The result error code will be `WasmEdge_ErrCode_Interrupted`. */ } WasmEdge_AsyncDelete(Async);
-
Get the execution result of the asynchronous execution
Developers can use the
WasmEdge_AsyncGetReturnsLength()
API to get the return value list length. This function will block and wait for the execution. If the execution has finished, this function will return the length immediately. If the execution failed, this function will return0
. This function can help the developers to create the buffer to get the return values. If developers have already known the buffer length, they can skip this function and use theWasmEdge_AsyncGet()
API to get the result.WasmEdge_Async *Async = ...; /* Ignored. Asynchronous execute a function. */ /* Blocking and waiting for the execution and get the return value list length. */ uint32_t Arity = WasmEdge_AsyncGetReturnsLength(Async); WasmEdge_AsyncDelete(Async);
The
WasmEdge_AsyncGet()
API will block and wait for the execution. If the execution has finished, this function will fill the return values into the buffer and return the execution result immediately.WasmEdge_Async *Async = ...; /* Ignored. Asynchronous execute a function. */ /* Blocking and waiting for the execution and get the return values. */ const uint32_t BUF_LEN = 256; WasmEdge_Value Buf[BUF_LEN]; WasmEdge_Result Res = WasmEdge_AsyncGet(Async, Buf, BUF_LEN); WasmEdge_AsyncDelete(Async);
Configurations
The configuration context, WasmEdge_ConfigureContext
, manages the configurations for Loader
, Validator
, Executor
, VM
, and Compiler
.
Developers can adjust the settings about the proposals, VM host pre-registrations (such as WASI
), and AOT compiler options, and then apply the Configure
context to create other runtime contexts.
-
Proposals
WasmEdge supports turning on or off the WebAssembly proposals. This configuration is effective in any contexts created with the
Configure
context.enum WasmEdge_Proposal { WasmEdge_Proposal_ImportExportMutGlobals = 0, WasmEdge_Proposal_NonTrapFloatToIntConversions, WasmEdge_Proposal_SignExtensionOperators, WasmEdge_Proposal_MultiValue, WasmEdge_Proposal_BulkMemoryOperations, WasmEdge_Proposal_ReferenceTypes, WasmEdge_Proposal_SIMD, WasmEdge_Proposal_TailCall, WasmEdge_Proposal_MultiMemories, WasmEdge_Proposal_Annotations, WasmEdge_Proposal_Memory64, WasmEdge_Proposal_ExceptionHandling, WasmEdge_Proposal_Threads, WasmEdge_Proposal_FunctionReferences };
Developers can add or remove the proposals into the
Configure
context./* * By default, the following proposals have turned on initially: * * Import/Export of mutable globals * * Non-trapping float-to-int conversions * * Sign-extension operators * * Multi-value returns * * Bulk memory operations * * Reference types * * Fixed-width SIMD */ WasmEdge_ConfigureContext *ConfCxt = WasmEdge_ConfigureCreate(); WasmEdge_ConfigureAddProposal(ConfCxt, WasmEdge_Proposal_MultiMemories); WasmEdge_ConfigureRemoveProposal(ConfCxt, WasmEdge_Proposal_ReferenceTypes); bool IsBulkMem = WasmEdge_ConfigureHasProposal(ConfCxt, WasmEdge_Proposal_BulkMemoryOperations); /* The `IsBulkMem` will be `TRUE`. */ WasmEdge_ConfigureDelete(ConfCxt);
-
Host registrations
This configuration is used for the
VM
context to turn on theWASI
orwasmedge_process
supports and only effective inVM
contexts.enum WasmEdge_HostRegistration { WasmEdge_HostRegistration_Wasi = 0, WasmEdge_HostRegistration_WasmEdge_Process };
The details will be introduced in the preregistrations of VM context.
WasmEdge_ConfigureContext *ConfCxt = WasmEdge_ConfigureCreate(); bool IsHostWasi = WasmEdge_ConfigureHasHostRegistration(ConfCxt, WasmEdge_HostRegistration_Wasi); /* The `IsHostWasi` will be `FALSE`. */ WasmEdge_ConfigureAddHostRegistration(ConfCxt, WasmEdge_HostRegistration_Wasi); IsHostWasi = WasmEdge_ConfigureHasHostRegistration(ConfCxt, WasmEdge_HostRegistration_Wasi); /* The `IsHostWasi` will be `TRUE`. */ WasmEdge_ConfigureDelete(ConfCxt);
-
Maximum memory pages
Developers can limit the page size of memory instances by this configuration. When growing the page size of memory instances in WASM execution and exceeding the limited size, the page growing will fail. This configuration is only effective in the
Executor
andVM
contexts.WasmEdge_ConfigureContext *ConfCxt = WasmEdge_ConfigureCreate(); uint32_t PageSize = WasmEdge_ConfigureGetMaxMemoryPage(ConfCxt); /* By default, the maximum memory page size is 65536. */ WasmEdge_ConfigureSetMaxMemoryPage(ConfCxt, 1024); /* Limit the memory size of each memory instance with not larger than 1024 pages (64 MiB). */ PageSize = WasmEdge_ConfigureGetMaxMemoryPage(ConfCxt); /* The `PageSize` will be 1024. */ WasmEdge_ConfigureDelete(ConfCxt);
-
AOT compiler options
The AOT compiler options configure the behavior about optimization level, output format, dump IR, and generic binary.
enum WasmEdge_CompilerOptimizationLevel { /// Disable as many optimizations as possible. WasmEdge_CompilerOptimizationLevel_O0 = 0, /// Optimize quickly without destroying debuggability. WasmEdge_CompilerOptimizationLevel_O1, /// Optimize for fast execution as much as possible without triggering /// significant incremental compile time or code size growth. WasmEdge_CompilerOptimizationLevel_O2, /// Optimize for fast execution as much as possible. WasmEdge_CompilerOptimizationLevel_O3, /// Optimize for small code size as much as possible without triggering /// significant incremental compile time or execution time slowdowns. WasmEdge_CompilerOptimizationLevel_Os, /// Optimize for small code size as much as possible. WasmEdge_CompilerOptimizationLevel_Oz }; enum WasmEdge_CompilerOutputFormat { /// Native dynamic library format. WasmEdge_CompilerOutputFormat_Native = 0, /// WebAssembly with AOT compiled codes in custom section. WasmEdge_CompilerOutputFormat_Wasm };
These configurations are only effective in
Compiler
contexts.WasmEdge_ConfigureContext *ConfCxt = WasmEdge_ConfigureCreate(); /* By default, the optimization level is O3. */ WasmEdge_ConfigureCompilerSetOptimizationLevel(ConfCxt, WasmEdge_CompilerOptimizationLevel_O2); /* By default, the output format is universal WASM. */ WasmEdge_ConfigureCompilerSetOutputFormat(ConfCxt, WasmEdge_CompilerOutputFormat_Native); /* By default, the dump IR is `FALSE`. */ WasmEdge_ConfigureCompilerSetDumpIR(ConfCxt, TRUE); /* By default, the generic binary is `FALSE`. */ WasmEdge_ConfigureCompilerSetGenericBinary(ConfCxt, TRUE); /* By default, the interruptible is `FALSE`. /* Set this option to `TRUE` to support the interruptible execution in AOT mode. */ WasmEdge_ConfigureCompilerSetInterruptible(ConfCxt, TRUE); WasmEdge_ConfigureDelete(ConfCxt);
-
Statistics options
The statistics options configure the behavior about instruction counting, cost measuring, and time measuring in both runtime and AOT compiler. These configurations are effective in
Compiler
,VM
, andExecutor
contexts.WasmEdge_ConfigureContext *ConfCxt = WasmEdge_ConfigureCreate(); /* By default, the intruction counting is `FALSE` when running a compiled-WASM or a pure-WASM. */ WasmEdge_ConfigureStatisticsSetInstructionCounting(ConfCxt, TRUE); /* By default, the cost measurement is `FALSE` when running a compiled-WASM or a pure-WASM. */ WasmEdge_ConfigureStatisticsSetCostMeasuring(ConfCxt, TRUE); /* By default, the time measurement is `FALSE` when running a compiled-WASM or a pure-WASM. */ WasmEdge_ConfigureStatisticsSetTimeMeasuring(ConfCxt, TRUE); WasmEdge_ConfigureDelete(ConfCxt);
Statistics
The statistics context, WasmEdge_StatisticsContext
, provides the instruction counter, cost summation, and cost limitation at runtime.
Before using statistics, the statistics configuration must be set. Otherwise, the return values of calling statistics are undefined behaviour.
-
Instruction counter
The instruction counter can help developers to profile the performance of WASM running. Developers can retrieve the
Statistics
context from theVM
context, or create a new one for theExecutor
creation. The details will be introduced in the next partitions.WasmEdge_StatisticsContext *StatCxt = WasmEdge_StatisticsCreate(); /* .... * After running the WASM functions with the `Statistics` context */ uint32_t Count = WasmEdge_StatisticsGetInstrCount(StatCxt); double IPS = WasmEdge_StatisticsGetInstrPerSecond(StatCxt); WasmEdge_StatisticsDelete(StatCxt);
-
Cost table
The cost table is to accumulate the cost of instructions with their weights. Developers can set the cost table array (the indices are the byte code value of instructions, and the values are the cost of instructions) into the
Statistics
context. If the cost limit value is set, the execution will return thecost limit exceeded
error immediately when exceeds the cost limit in runtime.WasmEdge_StatisticsContext *StatCxt = WasmEdge_StatisticsCreate(); uint64_t CostTable[16] = { 0, 0, 10, /* 0x02: Block */ 11, /* 0x03: Loop */ 12, /* 0x04: If */ 12, /* 0x05: Else */ 0, 0, 0, 0, 0, 0, 20, /* 0x0C: Br */ 21, /* 0x0D: Br_if */ 22, /* 0x0E: Br_table */ 0 }; /* Developers can set the costs of each instruction. The value not covered will be 0. */ WasmEdge_StatisticsSetCostTable(StatCxt, CostTable, 16); WasmEdge_StatisticsSetCostLimit(StatCxt, 5000000); /* .... * After running the WASM functions with the `Statistics` context */ uint64_t Cost = WasmEdge_StatisticsGetTotalCost(StatCxt); WasmEdge_StatisticsDelete(StatCxt);
WasmEdge VM
In this partition, we will introduce the functions of WasmEdge_VMContext
object and show examples of executing WASM functions.
WASM Execution Example With VM Context
The following shows the example of running the WASM for getting the Fibonacci. This example uses the fibonacci.wasm, and the corresponding WAT file is at fibonacci.wat.
(module
(export "fib" (func $fib))
(func $fib (param $n i32) (result i32)
(if
(i32.lt_s (get_local $n)(i32.const 2))
(return (i32.const 1))
)
(return
(i32.add
(call $fib (i32.sub (get_local $n)(i32.const 2)))
(call $fib (i32.sub (get_local $n)(i32.const 1)))
)
)
)
)
-
Run WASM functions rapidly
Assume that the WASM file
fibonacci.wasm
is copied into the current directory, and the C filetest.c
is as following:#include <wasmedge/wasmedge.h> #include <stdio.h> int main() { /* Create the configure context and add the WASI support. */ /* This step is not necessary unless you need WASI support. */ WasmEdge_ConfigureContext *ConfCxt = WasmEdge_ConfigureCreate(); WasmEdge_ConfigureAddHostRegistration(ConfCxt, WasmEdge_HostRegistration_Wasi); /* The configure and store context to the VM creation can be NULL. */ WasmEdge_VMContext *VMCxt = WasmEdge_VMCreate(ConfCxt, NULL); /* The parameters and returns arrays. */ WasmEdge_Value Params[1] = { WasmEdge_ValueGenI32(5) }; WasmEdge_Value Returns[1]; /* Function name. */ WasmEdge_String FuncName = WasmEdge_StringCreateByCString("fib"); /* Run the WASM function from file. */ WasmEdge_Result Res = WasmEdge_VMRunWasmFromFile(VMCxt, "fibonacci.wasm", FuncName, Params, 1, Returns, 1); /* * Developers can run the WASM binary from buffer with the `WasmEdge_VMRunWasmFromBuffer()` API, * or from `WasmEdge_ASTModuleContext` object with the `WasmEdge_VMRunWasmFromASTModule()` API. */ if (WasmEdge_ResultOK(Res)) { printf("Get the result: %d\n", WasmEdge_ValueGetI32(Returns[0])); } else { printf("Error message: %s\n", WasmEdge_ResultGetMessage(Res)); } /* Resources deallocations. */ WasmEdge_VMDelete(VMCxt); WasmEdge_ConfigureDelete(ConfCxt); WasmEdge_StringDelete(FuncName); return 0; }
Then you can compile and run: (the 5th Fibonacci number is 8 in 0-based index)
$ gcc test.c -lwasmedge_c $ ./a.out Get the result: 8
-
Instantiate and run WASM functions manually
Besides the above example, developers can run the WASM functions step-by-step with
VM
context APIs:#include <wasmedge/wasmedge.h> #include <stdio.h> int main() { /* Create the configure context and add the WASI support. */ /* This step is not necessary unless you need the WASI support. */ WasmEdge_ConfigureContext *ConfCxt = WasmEdge_ConfigureCreate(); WasmEdge_ConfigureAddHostRegistration(ConfCxt, WasmEdge_HostRegistration_Wasi); /* The configure and store context to the VM creation can be NULL. */ WasmEdge_VMContext *VMCxt = WasmEdge_VMCreate(ConfCxt, NULL); /* The parameters and returns arrays. */ WasmEdge_Value Params[1] = { WasmEdge_ValueGenI32(10) }; WasmEdge_Value Returns[1]; /* Function name. */ WasmEdge_String FuncName = WasmEdge_StringCreateByCString("fib"); /* Result. */ WasmEdge_Result Res; /* Step 1: Load WASM file. */ Res = WasmEdge_VMLoadWasmFromFile(VMCxt, "fibonacci.wasm"); /* * Developers can load the WASM binary from buffer with the `WasmEdge_VMLoadWasmFromBuffer()` API, * or from `WasmEdge_ASTModuleContext` object with the `WasmEdge_VMLoadWasmFromASTModule()` API. */ if (!WasmEdge_ResultOK(Res)) { printf("Loading phase failed: %s\n", WasmEdge_ResultGetMessage(Res)); return 1; } /* Step 2: Validate the WASM module. */ Res = WasmEdge_VMValidate(VMCxt); if (!WasmEdge_ResultOK(Res)) { printf("Validation phase failed: %s\n", WasmEdge_ResultGetMessage(Res)); return 1; } /* Step 3: Instantiate the WASM module. */ Res = WasmEdge_VMInstantiate(VMCxt); /* * Developers can load, validate, and instantiate another WASM module to replace the * instantiated one. In this case, the old module will be cleared, but the registered * modules are still kept. */ if (!WasmEdge_ResultOK(Res)) { printf("Instantiation phase failed: %s\n", WasmEdge_ResultGetMessage(Res)); return 1; } /* Step 4: Execute WASM functions. You can execute functions repeatedly after instantiation. */ Res = WasmEdge_VMExecute(VMCxt, FuncName, Params, 1, Returns, 1); if (WasmEdge_ResultOK(Res)) { printf("Get the result: %d\n", WasmEdge_ValueGetI32(Returns[0])); } else { printf("Execution phase failed: %s\n", WasmEdge_ResultGetMessage(Res)); } /* Resources deallocations. */ WasmEdge_VMDelete(VMCxt); WasmEdge_ConfigureDelete(ConfCxt); WasmEdge_StringDelete(FuncName); return 0; }
Then you can compile and run: (the 10th Fibonacci number is 89 in 0-based index)
$ gcc test.c -lwasmedge_c $ ./a.out Get the result: 89
The following graph explains the status of the
VM
context.|========================| |------->| VM: Initiated | | |========================| | | | LoadWasm | | | v | |========================| |--------| VM: Loaded |<-------| | |========================| | | | ^ | | Validate | | Cleanup | LoadWasm | | v | LoadWasm | |========================| | |--------| VM: Validated | | | |========================| | | | ^ | | Instantiate | | | | RegisterModule | | v | | | |========================| | |--------| VM: Instantiated |--------| |========================| | ^ | | -------------- Instantiate, Execute, ExecuteRegistered
The status of the
VM
context would beInited
when created. After loading WASM successfully, the status will beLoaded
. After validating WASM successfully, the status will beValidated
. After instantiating WASM successfully, the status will beInstantiated
, and developers can invoke functions. Developers can register WASM or import objects in any status, but they should instantiate WASM again. Developers can also load WASM in any status, and they should validate and instantiate the WASM module before function invocation. When in theInstantiated
status, developers can instantiate the WASM module again to reset the old WASM runtime structures.
VM Creations
The VM
creation API accepts the Configure
context and the Store
context.
If developers only need the default settings, just pass NULL
to the creation API.
The details of the Store
context will be introduced in Store.
WasmEdge_ConfigureContext *ConfCxt = WasmEdge_ConfigureCreate();
WasmEdge_StoreContext *StoreCxt = WasmEdge_StoreCreate();
WasmEdge_VMContext *VMCxt = WasmEdge_VMCreate(ConfCxt, StoreCxt);
/* The caller should guarantee the life cycle if the store context. */
WasmEdge_StatisticsContext *StatCxt = WasmEdge_VMGetStatisticsContext(VMCxt);
/* The VM context already contains the statistics context and can be retrieved by this API. */
/*
* Note that the retrieved store and statistics contexts from the VM contexts by VM APIs
* should __NOT__ be destroyed and owned by the VM contexts.
*/
WasmEdge_VMDelete(VMCxt);
WasmEdge_StoreDelete(StoreCxt);
WasmEdge_ConfigureDelete(ConfCxt);
Preregistrations
WasmEdge provides the following built-in pre-registrations.
-
WASI (WebAssembly System Interface)
Developers can turn on the WASI support for VM in the
Configure
context.WasmEdge_ConfigureContext *ConfCxt = WasmEdge_ConfigureCreate(); WasmEdge_ConfigureAddHostRegistration(ConfCxt, WasmEdge_HostRegistration_Wasi); WasmEdge_VMContext *VMCxt = WasmEdge_VMCreate(ConfCxt, NULL); /* The following API can retrieve the pre-registration import objects from the VM context. */ /* This API will return `NULL` if the corresponding pre-registration is not set into the configuration. */ WasmEdge_ImportObjectContext *WasiObject = WasmEdge_VMGetImportModuleContext(VMCxt, WasmEdge_HostRegistration_Wasi); /* Initialize the WASI. */ WasmEdge_ImportObjectInitWASI(WasiObject, /* ... ignored */ ); WasmEdge_VMDelete(VMCxt); WasmEdge_ConfigureDelete(ConfCxt);
And also can create the WASI import object from API. The details will be introduced in the Host Functions and the Host Module Registrations.
-
This pre-registration is for the process interface for WasmEdge on
Rust
sources. After turning on this pre-registration, the VM will support thewasmedge_process
host functions.WasmEdge_ConfigureContext *ConfCxt = WasmEdge_ConfigureCreate(); WasmEdge_ConfigureAddHostRegistration(ConfCxt, WasmEdge_HostRegistration_WasmEdge_Process); WasmEdge_VMContext *VMCxt = WasmEdge_VMCreate(ConfCxt, NULL); /* The following API can retrieve the pre-registration import objects from the VM context. */ /* This API will return `NULL` if the corresponding pre-registration is not set into the configuration. */ WasmEdge_ImportObjectContext *ProcObject = WasmEdge_VMGetImportModuleContext(VMCxt, WasmEdge_HostRegistration_WasmEdge_Process); /* Initialize the WasmEdge_Process. */ WasmEdge_ImportObjectInitWasmEdgeProcess(ProcObject, /* ... ignored */ ); WasmEdge_VMDelete(VMCxt); WasmEdge_ConfigureDelete(ConfCxt);
And also can create the WasmEdge_Process import object from API. The details will be introduced in the Host Functions and the Host Module Registrations.
Host Module Registrations
Host functions are functions outside WebAssembly and passed to WASM modules as imports.
In WasmEdge, the host functions are composed into host modules as WasmEdge_ImportObjectContext
objects with module names.
Please refer to the Host Functions in WasmEdge Runtime for the details.
In this chapter, we show the example for registering the host modules into a VM
context.
WasmEdge_VMContext *VMCxt = WasmEdge_VMCreate(NULL, NULL);
WasmEdge_ImportObjectContext *WasiObject =
WasmEdge_ImportObjectCreateWASI( /* ... ignored ... */ );
/* You can also create and register the WASI host modules by this API. */
WasmEdge_Result Res = WasmEdge_VMRegisterModuleFromImport(VMCxt, WasiObject);
/* The result status should be checked. */
WasmEdge_ImportObjectDelete(WasiObject);
/* The created import objects should be deleted. */
WasmEdge_VMDelete(VMCxt);
WASM Registrations And Executions
In WebAssembly, the instances in WASM modules can be exported and can be imported by other WASM modules. WasmEdge VM provides APIs for developers to register and export any WASM modules, and execute the functions or host functions in the registered WASM modules.
-
Register the WASM modules with exported module names
Unless the import objects have already contained the module names, every WASM module should be named uniquely when registering. Assume that the WASM file
fibonacci.wasm
is copied into the current directory.WasmEdge_VMContext *VMCxt = WasmEdge_VMCreate(NULL, NULL); WasmEdge_String ModName = WasmEdge_StringCreateByCString("mod"); WasmEdge_Result Res = WasmEdge_VMRegisterModuleFromFile(VMCxt, ModName, "fibonacci.wasm"); /* * Developers can register the WASM module from buffer with the `WasmEdge_VMRegisterModuleFromBuffer()` API, * or from `WasmEdge_ASTModuleContext` object with the `WasmEdge_VMRegisterModuleFromASTModule()` API. */ /* * The result status should be checked. * The error will occur if the WASM module instantiation failed or the module name conflicts. */ WasmEdge_StringDelete(ModName); WasmEdge_VMDelete(VMCxt);
-
Execute the functions in registered WASM modules
Assume that the C file
test.c
is as follows:#include <wasmedge/wasmedge.h> #include <stdio.h> int main() { WasmEdge_VMContext *VMCxt = WasmEdge_VMCreate(NULL, NULL); /* The parameters and returns arrays. */ WasmEdge_Value Params[1] = { WasmEdge_ValueGenI32(20) }; WasmEdge_Value Returns[1]; /* Names. */ WasmEdge_String ModName = WasmEdge_StringCreateByCString("mod"); WasmEdge_String FuncName = WasmEdge_StringCreateByCString("fib"); /* Result. */ WasmEdge_Result Res; /* Register the WASM module into VM. */ Res = WasmEdge_VMRegisterModuleFromFile(VMCxt, ModName, "fibonacci.wasm"); /* * Developers can register the WASM module from buffer with the `WasmEdge_VMRegisterModuleFromBuffer()` API, * or from `WasmEdge_ASTModuleContext` object with the `WasmEdge_VMRegisterModuleFromASTModule()` API. */ if (!WasmEdge_ResultOK(Res)) { printf("WASM registration failed: %s\n", WasmEdge_ResultGetMessage(Res)); return 1; } /* * The function "fib" in the "fibonacci.wasm" was exported with the module name "mod". * As the same as host functions, other modules can import the function `"mod" "fib"`. */ /* * Execute WASM functions in registered modules. * Unlike the execution of functions, the registered functions can be invoked without * `WasmEdge_VMInstantiate()` because the WASM module was instantiated when registering. * Developers can also invoke the host functions directly with this API. */ Res = WasmEdge_VMExecuteRegistered(VMCxt, ModName, FuncName, Params, 1, Returns, 1); if (WasmEdge_ResultOK(Res)) { printf("Get the result: %d\n", WasmEdge_ValueGetI32(Returns[0])); } else { printf("Execution phase failed: %s\n", WasmEdge_ResultGetMessage(Res)); } WasmEdge_StringDelete(ModName); WasmEdge_StringDelete(FuncName); WasmEdge_VMDelete(VMCxt); return 0; }
Then you can compile and run: (the 20th Fibonacci number is 89 in 0-based index)
$ gcc test.c -lwasmedge_c $ ./a.out Get the result: 10946
Asynchronous Execution
-
Asynchronously run WASM functions rapidly
Assume that the WASM file
fibonacci.wasm
is copied into the current directory, and the C filetest.c
is as following:#include <wasmedge/wasmedge.h> #include <stdio.h> int main() { /* Create the VM context. */ WasmEdge_VMContext *VMCxt = WasmEdge_VMCreate(NULL, NULL); /* The parameters and returns arrays. */ WasmEdge_Value Params[1] = { WasmEdge_ValueGenI32(20) }; WasmEdge_Value Returns[1]; /* Function name. */ WasmEdge_String FuncName = WasmEdge_StringCreateByCString("fib"); /* Asynchronously run the WASM function from file and get the `WasmEdge_Async` object. */ WasmEdge_Async *Async = WasmEdge_VMAsyncRunWasmFromFile(VMCxt, "fibonacci.wasm", FuncName, Params, 1); /* * Developers can run the WASM binary from buffer with the `WasmEdge_VMAsyncRunWasmFromBuffer()` API, * or from `WasmEdge_ASTModuleContext` object with the `WasmEdge_VMAsyncRunWasmFromASTModule()` API. */ /* Wait for the execution. */ WasmEdge_AsyncWait(Async); /* * Developers can also use the `WasmEdge_AsyncGetReturnsLength()` or `WasmEdge_AsyncGet()` APIs * to wait for the asynchronous execution. These APIs will wait until the execution finished. */ /* Check the return values length. */ uint32_t Arity = WasmEdge_AsyncGetReturnsLength(Async); /* The `Arity` should be 1. Developers can skip this step if they have known the return arity. */ /* Get the result. */ WasmEdge_Result Res = WasmEdge_AsyncGet(Async, Returns, Arity); if (WasmEdge_ResultOK(Res)) { printf("Get the result: %d\n", WasmEdge_ValueGetI32(Returns[0])); } else { printf("Error message: %s\n", WasmEdge_ResultGetMessage(Res)); } /* Resources deallocations. */ WasmEdge_AsyncDelete(Async); WasmEdge_VMDelete(VMCxt); WasmEdge_StringDelete(FuncName); return 0; }
Then you can compile and run: (the 20th Fibonacci number is 10946 in 0-based index)
$ gcc test.c -lwasmedge_c $ ./a.out Get the result: 10946
-
Instantiate and asynchronously run WASM functions manually
Besides the above example, developers can run the WASM functions step-by-step with
VM
context APIs:#include <wasmedge/wasmedge.h> #include <stdio.h> int main() { /* Create the VM context. */ WasmEdge_VMContext *VMCxt = WasmEdge_VMCreate(NULL, NULL); /* The parameters and returns arrays. */ WasmEdge_Value Params[1] = { WasmEdge_ValueGenI32(25) }; WasmEdge_Value Returns[1]; /* Function name. */ WasmEdge_String FuncName = WasmEdge_StringCreateByCString("fib"); /* Result. */ WasmEdge_Result Res; /* Step 1: Load WASM file. */ Res = WasmEdge_VMLoadWasmFromFile(VMCxt, "fibonacci.wasm"); /* * Developers can load the WASM binary from buffer with the `WasmEdge_VMLoadWasmFromBuffer()` API, * or from `WasmEdge_ASTModuleContext` object with the `WasmEdge_VMLoadWasmFromASTModule()` API. */ if (!WasmEdge_ResultOK(Res)) { printf("Loading phase failed: %s\n", WasmEdge_ResultGetMessage(Res)); return 1; } /* Step 2: Validate the WASM module. */ Res = WasmEdge_VMValidate(VMCxt); if (!WasmEdge_ResultOK(Res)) { printf("Validation phase failed: %s\n", WasmEdge_ResultGetMessage(Res)); return 1; } /* Step 3: Instantiate the WASM module. */ Res = WasmEdge_VMInstantiate(VMCxt); /* * Developers can load, validate, and instantiate another WASM module to replace the * instantiated one. In this case, the old module will be cleared, but the registered * modules are still kept. */ if (!WasmEdge_ResultOK(Res)) { printf("Instantiation phase failed: %s\n", WasmEdge_ResultGetMessage(Res)); return 1; } /* Step 4: Asynchronously execute the WASM function and get the `WasmEdge_Async` object. */ WasmEdge_Async *Async = WasmEdge_VMAsyncExecute(VMCxt, FuncName, Params, 1); /* * Developers can execute functions repeatedly after instantiation. * For invoking the registered functions, you can use the `WasmEdge_VMAsyncExecuteRegistered()` API. */ /* Wait and check the return values length. */ uint32_t Arity = WasmEdge_AsyncGetReturnsLength(Async); /* The `Arity` should be 1. Developers can skip this step if they have known the return arity. */ /* Get the result. */ Res = WasmEdge_AsyncGet(Async, Returns, Arity); if (WasmEdge_ResultOK(Res)) { printf("Get the result: %d\n", WasmEdge_ValueGetI32(Returns[0])); } else { printf("Execution phase failed: %s\n", WasmEdge_ResultGetMessage(Res)); } /* Resources deallocations. */ WasmEdge_AsyncDelete(Async); WasmEdge_VMDelete(VMCxt); WasmEdge_StringDelete(FuncName); }
Then you can compile and run: (the 25th Fibonacci number is 121393 in 0-based index)
$ gcc test.c -lwasmedge_c $ ./a.out Get the result: 121393
Instance Tracing
Sometimes the developers may have requirements to get the instances of the WASM runtime.
The VM
context supplies the APIs to retrieve the instances.
-
Store
If the
VM
context is created without assigning aStore
context, theVM
context will allocate and own aStore
context.WasmEdge_VMContext *VMCxt = WasmEdge_VMCreate(NULL, NULL); WasmEdge_StoreContext *StoreCxt = WasmEdge_VMGetStoreContext(VMCxt); /* The object should __NOT__ be deleted by `WasmEdge_StoreDelete()`. */ WasmEdge_VMDelete(VMCxt);
Developers can also create the
VM
context with aStore
context. In this case, developers should guarantee the life cycle of theStore
context. Please refer to the Store Contexts for the details about theStore
context APIs.WasmEdge_StoreContext *StoreCxt = WasmEdge_StoreCreate(); WasmEdge_VMContext *VMCxt = WasmEdge_VMCreate(NULL, StoreCxt); WasmEdge_StoreContext *StoreCxtMock = WasmEdge_VMGetStoreContext(VMCxt); /* The `StoreCxt` and the `StoreCxtMock` are the same. */ WasmEdge_VMDelete(VMCxt); WasmEdge_StoreDelete(StoreCxt);
-
List exported functions
After the WASM module instantiation, developers can use the
WasmEdge_VMExecute()
API to invoke the exported WASM functions. For this purpose, developers may need information about the exported WASM function list. Please refer to the Instances in runtime for the details about the function types. Assume that the WASM filefibonacci.wasm
is copied into the current directory, and the C filetest.c
is as following:#include <wasmedge/wasmedge.h> #include <stdio.h> int main() { WasmEdge_StoreContext *StoreCxt = WasmEdge_StoreCreate(); WasmEdge_VMContext *VMCxt = WasmEdge_VMCreate(NULL, StoreCxt); WasmEdge_VMLoadWasmFromFile(VMCxt, "fibonacci.wasm"); WasmEdge_VMValidate(VMCxt); WasmEdge_VMInstantiate(VMCxt); /* List the exported functions. */ /* Get the number of exported functions. */ uint32_t FuncNum = WasmEdge_VMGetFunctionListLength(VMCxt); /* Create the name buffers and the function type buffers. */ const uint32_t BUF_LEN = 256; WasmEdge_String FuncNames[BUF_LEN]; WasmEdge_FunctionTypeContext *FuncTypes[BUF_LEN]; /* * Get the export function list. * If the function list length is larger than the buffer length, the overflowed data will be discarded. * The `FuncNames` and `FuncTypes` can be NULL if developers don't need them. */ uint32_t RealFuncNum = WasmEdge_VMGetFunctionList(VMCxt, FuncNames, FuncTypes, BUF_LEN); for (uint32_t I = 0; I < RealFuncNum && I < BUF_LEN; I++) { char Buf[BUF_LEN]; uint32_t Size = WasmEdge_StringCopy(FuncNames[I], Buf, sizeof(Buf)); printf("Get exported function string length: %u, name: %s\n", Size, Buf); /* * The function names should be __NOT__ destroyed. * The returned function type contexts should __NOT__ be destroyed. */ } return 0; }
Then you can compile and run: (the only exported function in
fibonacci.wasm
isfib
)$ gcc test.c -lwasmedge_c $ ./a.out Get exported function string length: 3, name: fib
If developers want to get the exported function names in the registered WASM modules, please retrieve the
Store
context from theVM
context and refer to the APIs of Store Contexts to list the registered functions by the module name. -
Get function types
The
VM
context provides APIs to find the function type by function name. Please refer to the Instances in runtime for the details about the function types./* * ... * Assume that a WASM module is instantiated in `VMCxt`. */ WasmEdge_String FuncName = WasmEdge_StringCreateByCString("fib"); const WasmEdge_FunctionTypeContext *FuncType = WasmEdge_VMGetFunctionType(VMCxt, FuncName); /* * Developers can get the function types of functions in the registered modules * via the `WasmEdge_VMGetFunctionTypeRegistered()` API with the module name. * If the function is not found, these APIs will return `NULL`. * The returned function type contexts should __NOT__ be destroyed. */ WasmEdge_StringDelete(FuncName);
WasmEdge Runtime
In this partition, we will introduce the objects of WasmEdge runtime manually.
WASM Execution Example Step-By-Step
Besides the WASM execution through the VM
context, developers can execute the WASM functions or instantiate WASM modules step-by-step with the Loader
, Validator
, Executor
, and Store
contexts.
Assume that the WASM file fibonacci.wasm
is copied into the current directory, and the C file test.c
is as following:
#include <wasmedge/wasmedge.h>
#include <stdio.h>
int main() {
/* Create the configure context. This step is not necessary because we didn't adjust any setting. */
WasmEdge_ConfigureContext *ConfCxt = WasmEdge_ConfigureCreate();
/* Create the statistics context. This step is not necessary if the statistics in runtime is not needed. */
WasmEdge_StatisticsContext *StatCxt = WasmEdge_StatisticsCreate();
/* Create the store context. The store context is the WASM runtime structure core. */
WasmEdge_StoreContext *StoreCxt = WasmEdge_StoreCreate();
/* Result. */
WasmEdge_Result Res;
/* Create the loader context. The configure context can be NULL. */
WasmEdge_LoaderContext *LoadCxt = WasmEdge_LoaderCreate(ConfCxt);
/* Create the validator context. The configure context can be NULL. */
WasmEdge_ValidatorContext *ValidCxt = WasmEdge_ValidatorCreate(ConfCxt);
/* Create the executor context. The configure context and the statistics context can be NULL. */
WasmEdge_ExecutorContext *ExecCxt = WasmEdge_ExecutorCreate(ConfCxt, StatCxt);
/* Load the WASM file or the compiled-WASM file and convert into the AST module context. */
WasmEdge_ASTModuleContext *ASTCxt = NULL;
Res = WasmEdge_LoaderParseFromFile(LoadCxt, &ASTCxt, "fibonacci.wasm");
if (!WasmEdge_ResultOK(Res)) {
printf("Loading phase failed: %s\n", WasmEdge_ResultGetMessage(Res));
return 1;
}
/* Validate the WASM module. */
Res = WasmEdge_ValidatorValidate(ValidCxt, ASTCxt);
if (!WasmEdge_ResultOK(Res)) {
printf("Validation phase failed: %s\n", WasmEdge_ResultGetMessage(Res));
return 1;
}
/* Instantiate the WASM module into store context. */
Res = WasmEdge_ExecutorInstantiate(ExecCxt, StoreCxt, ASTCxt);
if (!WasmEdge_ResultOK(Res)) {
printf("Instantiation phase failed: %s\n", WasmEdge_ResultGetMessage(Res));
return 1;
}
/* Try to list the exported functions of the instantiated WASM module. */
uint32_t FuncNum = WasmEdge_StoreListFunctionLength(StoreCxt);
/* Create the name buffers. */
const uint32_t BUF_LEN = 256;
WasmEdge_String FuncNames[BUF_LEN];
/* If the list length is larger than the buffer length, the overflowed data will be discarded. */
uint32_t RealFuncNum = WasmEdge_StoreListFunction(StoreCxt, FuncNames, BUF_LEN);
for (uint32_t I = 0; I < RealFuncNum && I < BUF_LEN; I++) {
char Buf[BUF_LEN];
uint32_t Size = WasmEdge_StringCopy(FuncNames[I], Buf, sizeof(Buf));
printf("Get exported function string length: %u, name: %s\n", Size, Buf);
/* The function names should __NOT__ be destroyed. */
}
/* The parameters and returns arrays. */
WasmEdge_Value Params[1] = { WasmEdge_ValueGenI32(18) };
WasmEdge_Value Returns[1];
/* Function name. */
WasmEdge_String FuncName = WasmEdge_StringCreateByCString("fib");
/* Invoke the WASM fnction. */
Res = WasmEdge_ExecutorInvoke(ExecCxt, StoreCxt, FuncName, Params, 1, Returns, 1);
if (WasmEdge_ResultOK(Res)) {
printf("Get the result: %d\n", WasmEdge_ValueGetI32(Returns[0]));
} else {
printf("Execution phase failed: %s\n", WasmEdge_ResultGetMessage(Res));
}
/* Resources deallocations. */
WasmEdge_StringDelete(FuncName);
WasmEdge_ASTModuleDelete(ASTCxt);
WasmEdge_LoaderDelete(LoadCxt);
WasmEdge_ValidatorDelete(ValidCxt);
WasmEdge_ExecutorDelete(ExecCxt);
WasmEdge_ConfigureDelete(ConfCxt);
WasmEdge_StoreDelete(StoreCxt);
WasmEdge_StatisticsDelete(StatCxt);
return 0;
}
Then you can compile and run: (the 18th Fibonacci number is 4181 in 0-based index)
$ gcc test.c -lwasmedge_c
$ ./a.out
Get exported function string length: 3, name: fib
Get the result: 4181
Loader
The Loader
context loads the WASM binary from files or buffers.
Both the WASM and the compiled-WASM from the WasmEdge AOT Compiler are supported.
uint8_t Buf[4096];
/* ... Read the WASM code to the buffer. */
uint32_t FileSize = ...;
/* The `FileSize` is the length of the WASM code. */
/* Developers can adjust settings in the configure context. */
WasmEdge_ConfigureContext *ConfCxt = WasmEdge_ConfigureCreate();
/* Create the loader context. The configure context can be NULL. */
WasmEdge_LoaderContext *LoadCxt = WasmEdge_LoaderCreate(ConfCxt);
WasmEdge_ASTModuleContext *ASTCxt = NULL;
WasmEdge_Result Res;
/* Load WASM or compiled-WASM from the file. */
Res = WasmEdge_LoaderParseFromFile(LoadCxt, &ASTCxt, "fibonacci.wasm");
if (!WasmEdge_ResultOK(Res)) {
printf("Loading phase failed: %s\n", WasmEdge_ResultGetMessage(Res));
}
/* The output AST module context should be destroyed. */
WasmEdge_ASTModuleDelete(ASTCxt);
/* Load WASM or compiled-WASM from the buffer. */
Res = WasmEdge_LoaderParseFromBuffer(LoadCxt, &ASTCxt, Buf, FileSize);
if (!WasmEdge_ResultOK(Res)) {
printf("Loading phase failed: %s\n", WasmEdge_ResultGetMessage(Res));
}
/* The output AST module context should be destroyed. */
WasmEdge_ASTModuleDelete(ASTCxt);
WasmEdge_LoaderDelete(LoadCxt);
WasmEdge_ConfigureDelete(ConfCxt);
Validator
The Validator
context can validate the WASM module.
Every WASM module should be validated before instantiation.
/*
* ...
* Assume that the `ASTCxt` is the output AST module context from the loader context.
* Assume that the `ConfCxt` is the configure context.
*/
/* Create the validator context. The configure context can be NULL. */
WasmEdge_ValidatorContext *ValidCxt = WasmEdge_ValidatorCreate(ConfCxt);
WasmEdge_Result Res = WasmEdge_ValidatorValidate(ValidCxt, ASTCxt);
if (!WasmEdge_ResultOK(Res)) {
printf("Validation phase failed: %s\n", WasmEdge_ResultGetMessage(Res));
}
WasmEdge_ValidatorDelete(ValidCxt);
Executor
The Executor
context is the executor for both WASM and compiled-WASM.
This object should work base on the Store
context. For the details of the Store
context, please refer to the next chapter.
-
Register modules
As the same of registering host modules or importing WASM modules in
VM
context, developers can registerImport Object
orAST module
contexts into theStore
context by theExecutor
APIs. For the details of import objects, please refer to the Host Functions./* * ... * Assume that the `ASTCxt` is the output AST module context from the loader context * and has passed the validation. * Assume that the `ConfCxt` is the configure context. */ /* Create the statistics context. This step is not necessary. */ WasmEdge_StatisticsContext *StatCxt = WasmEdge_StatisticsCreate(); /* Create the executor context. The configure and the statistics contexts can be NULL. */ WasmEdge_ExecutorContext *ExecCxt = WasmEdge_ExecutorCreate(ConfCxt, StatCxt); /* Create the store context. The store context is the WASM runtime structure core. */ WasmEdge_StoreContext *StoreCxt = WasmEdge_StoreCreate(); /* Result. */ WasmEdge_Result Res; /* Register the WASM module into store with the export module name "mod". */ WasmEdge_String ModName = WasmEdge_StringCreateByCString("mod"); Res = WasmEdge_ExecutorRegisterModule(ExecCxt, StoreCxt, ASTCxt, ModName); if (!WasmEdge_ResultOK(Res)) { printf("WASM registration failed: %s\n", WasmEdge_ResultGetMessage(Res)); } WasmEdge_StringDelete(ModName); /* * Assume that the `ImpCxt` is the import object context for host functions. */ WasmEdge_ImportObjectContext *ImpCxt = ...; /* The import module context has already contained the export module name. */ Res = WasmEdge_ExecutorRegisterImport(ExecCxt, StoreCxt, ImpCxt); if (!WasmEdge_ResultOK(Res)) { printf("Import object registration failed: %s\n", WasmEdge_ResultGetMessage(Res)); } WasmEdge_ImportObjectDelete(ImpCxt); WasmEdge_ExecutorDelete(ExecCxt); WasmEdge_StatisticsDelete(StatCxt); WasmEdge_StoreDelete(StoreCxt);
-
Instantiate modules
WASM or compiled-WASM modules should be instantiated before the function invocation. Note that developers can only instantiate one module into the
Store
context, and in that case, the old instantiated module will be cleaned. Before instantiating a WASM module, please check the import section for ensuring the imports are registered into theStore
context./* * ... * Assume that the `ASTCxt` is the output AST module context from the loader context * and has passed the validation. * Assume that the `ConfCxt` is the configure context. */ /* Create the statistics context. This step is not necessary. */ WasmEdge_StatisticsContext *StatCxt = WasmEdge_StatisticsCreate(); /* Create the executor context. The configure and the statistics contexts can be NULL. */ WasmEdge_ExecutorContext *ExecCxt = WasmEdge_ExecutorCreate(ConfCxt, StatCxt); /* Create the store context. The store context is the WASM runtime structure core. */ WasmEdge_StoreContext *StoreCxt = WasmEdge_StoreCreate(); /* Instantiate the WASM module. */ WasmEdge_Result Res = WasmEdge_ExecutorInstantiate(ExecCxt, StoreCxt, ASTCxt); if (!WasmEdge_ResultOK(Res)) { printf("WASM instantiation failed: %s\n", WasmEdge_ResultGetMessage(Res)); } WasmEdge_ExecutorDelete(ExecCxt); WasmEdge_StatisticsDelete(StatCxt); WasmEdge_StoreDelete(StoreCxt);
-
Invoke functions
As the same as function invocation via the
VM
context, developers can invoke the functions of the instantiated or registered modules. The APIs,WasmEdge_ExecutorInvoke()
andWasmEdge_ExecutorInvokeRegistered()
, are similar as the APIs of theVM
context. Please refer to the VM context workflows for details.
AST Module
The AST Module
context presents the loaded structure from a WASM file or buffer. Developer will get this object after loading a WASM file or buffer from Loader.
Before instantiation, developers can also query the imports and exports of an AST Module
context.
WasmEdge_ASTModuleContext *ASTCxt = ...;
/* Assume that a WASM is loaded into an AST module context. */
/* Create the import type context buffers. */
const uint32_t BUF_LEN = 256;
const WasmEdge_ImportTypeContext *ImpTypes[BUF_LEN];
uint32_t ImportNum = WasmEdge_ASTModuleListImportsLength(ASTCxt);
/* If the list length is larger than the buffer length, the overflowed data will be discarded. */
uint32_t RealImportNum = WasmEdge_ASTModuleListImports(ASTCxt, ImpTypes, BUF_LEN);
for (uint32_t I = 0; I < RealImportNum && I < BUF_LEN; I++) {
/* Working with the import type `ImpTypes[I]` ... */
}
/* Create the export type context buffers. */
const WasmEdge_ExportTypeContext *ExpTypes[BUF_LEN];
uint32_t ExportNum = WasmEdge_ASTModuleListExportsLength(ASTCxt);
/* If the list length is larger than the buffer length, the overflowed data will be discarded. */
uint32_t RealExportNum = WasmEdge_ASTModuleListExports(ASTCxt, ExpTypes, BUF_LEN);
for (uint32_t I = 0; I < RealExportNum && I < BUF_LEN; I++) {
/* Working with the export type `ExpTypes[I]` ... */
}
WasmEdge_ASTModuleDelete(ASTCxt);
/* After deletion of `ASTCxt`, all data queried from the `ASTCxt` should not be accessed. */
Store
Store is the runtime structure for the representation of all instances of Function
s, Table
s, Memory
s, and Global
s that have been allocated during the lifetime of the abstract machine.
The Store
context in WasmEdge provides APIs to list the exported instances with their names or find the instances by exported names. For adding instances into Store
contexts, please instantiate or register WASM modules or Import Object
contexts via the Executor
context.
-
List instances
WasmEdge_StoreContext *StoreCxt = WasmEdge_StoreCreate(); /* ... Instantiate a WASM module via the executor context. */ ... /* Try to list the exported functions of the instantiated WASM module. */ /* Take the function instances for example here. */ uint32_t FuncNum = WasmEdge_StoreListFunctionLength(StoreCxt); /* Create the name buffers. */ const uint32_t BUF_LEN = 256; WasmEdge_String FuncNames[BUF_LEN]; /* If the list length is larger than the buffer length, the overflowed data will be discarded. */ uint32_t RealFuncNum = WasmEdge_StoreListFunction(StoreCxt, FuncNames, BUF_LEN); for (uint32_t I = 0; I < RealFuncNum && I < BUF_LEN; I++) { /* Working with the function name `FuncNames[I]` ... */ /* The function names should __NOT__ be destroyed. */ }
Developers can list the function instance exported names of the registered modules via the
WasmEdge_StoreListFunctionRegisteredLength()
and theWasmEdge_StoreListFunctionRegistered()
APIs with the module name. -
Find instances
WasmEdge_StoreContext *StoreCxt = WasmEdge_StoreCreate(); /* ... Instantiate a WASM module via the executor context. */ ... /* Try to find the exported instance of the instantiated WASM module. */ /* Take the function instances for example here. */ /* Function name. */ WasmEdge_String FuncName = WasmEdge_StringCreateByCString("fib"); WasmEdge_FunctionInstanceContext *FuncCxt = WasmEdge_StoreFindFunction(StoreCxt, FuncName); /* `FuncCxt` will be `NULL` if the function not found. */ /* The returned instance is owned by the store context and should __NOT__ be destroyed. */ WasmEdge_StringDelete(FuncName);
Developers can retrieve the exported function instances of the registered modules via the
WasmEdge_StoreFindFunctionRegistered()
API with the module name. -
List registered modules
With the module names, developers can list the exported instances of the registered modules with their names.
WasmEdge_StoreContext *StoreCxt = WasmEdge_StoreCreate(); /* ... Register a WASM module via the executor context. */ ... /* Try to list the registered WASM modules. */ uint32_t ModNum = WasmEdge_StoreListModuleLength(StoreCxt); /* Create the name buffers. */ const uint32_t BUF_LEN = 256; WasmEdge_String ModNames[BUF_LEN]; /* If the list length is larger than the buffer length, the overflowed data will be discarded. */ uint32_t RealModNum = WasmEdge_StoreListModule(StoreCxt, ModNames, BUF_LEN); for (uint32_t I = 0; I < RealModNum && I < BUF_LEN; I++) { /* Working with the module name `ModNames[I]` ... */ /* The module names should __NOT__ be destroyed. */ }
Instances
The instances are the runtime structures of WASM. Developers can retrieve the instances from the Store
contexts.
The Store
contexts will allocate instances when a WASM module or Import Object
is registered or instantiated through the Executor
.
A single instance can be allocated by its creation function. Developers can construct instances into an Import Object
for registration. Please refer to the Host Functions for details.
The instances created by their creation functions should be destroyed, EXCEPT they are added into an Import Object
context.
-
Function instance
Host functions are functions outside WebAssembly and passed to WASM modules as imports. In WasmEdge, developers can create the
Function
contexts for host functions and add them into anImport Object
context for registering into aVM
or aStore
. For both host functions and the functions get fromStore
, developers can retrieve theFunction Type
from theFunction
contexts. For the details of theHost Function
guide, please refer to the next chapter./* Retrieve the function instance from the store context. */ WasmEdge_FunctionInstanceContext *FuncCxt = ...; WasmEdge_FunctionTypeContext *FuncTypeCxt = WasmEdge_FunctionInstanceGetFunctionType(FuncCxt); /* The `FuncTypeCxt` is owned by the `FuncCxt` and should __NOT__ be destroyed. */
-
Table instance
In WasmEdge, developers can create the
Table
contexts and add them into anImport Object
context for registering into aVM
or aStore
. TheTable
contexts supply APIs to control the data in table instances.WasmEdge_Limit TabLimit = {.HasMax = true, .Min = 10, .Max = 20}; /* Create the table type with limit and the `FuncRef` element type. */ WasmEdge_TableTypeContext *TabTypeCxt = WasmEdge_TableTypeCreate(WasmEdge_RefType_FuncRef, TabLimit); /* Create the table instance with table type. */ WasmEdge_TableInstanceContext *HostTable = WasmEdge_TableInstanceCreate(TabTypeCxt); /* Delete the table type. */ WasmEdge_TableTypeDelete(TabTypeCxt); WasmEdge_Result Res; WasmEdge_Value Data; TabTypeCxt = WasmEdge_TableInstanceGetTableType(HostTable); /* The `TabTypeCxt` got from table instance is owned by the `HostTable` and should __NOT__ be destroyed. */ enum WasmEdge_RefType RefType = WasmEdge_TableTypeGetRefType(TabTypeCxt); /* `RefType` will be `WasmEdge_RefType_FuncRef`. */ Data = WasmEdge_ValueGenFuncRef(5); Res = WasmEdge_TableInstanceSetData(HostTable, Data, 3); /* Set the function index 5 to the table[3]. */ /* * This will get an "out of bounds table access" error * because the position (13) is out of the table size (10): * Res = WasmEdge_TableInstanceSetData(HostTable, Data, 13); */ Res = WasmEdge_TableInstanceGetData(HostTable, &Data, 3); /* Get the FuncRef value of the table[3]. */ /* * This will get an "out of bounds table access" error * because the position (13) is out of the table size (10): * Res = WasmEdge_TableInstanceGetData(HostTable, &Data, 13); */ uint32_t Size = WasmEdge_TableInstanceGetSize(HostTable); /* `Size` will be 10. */ Res = WasmEdge_TableInstanceGrow(HostTable, 6); /* Grow the table size of 6, the table size will be 16. */ /* * This will get an "out of bounds table access" error because * the size (16 + 6) will reach the table limit(20): * Res = WasmEdge_TableInstanceGrow(HostTable, 6); */ WasmEdge_TableInstanceDelete(HostTable);
-
Memory instance
In WasmEdge, developers can create the
Memory
contexts and add them into anImport Object
context for registering into aVM
or aStore
. TheMemory
contexts supply APIs to control the data in memory instances.WasmEdge_Limit MemLimit = {.HasMax = true, .Min = 1, .Max = 5}; /* Create the memory type with limit. The memory page size is 64KiB. */ WasmEdge_MemoryTypeContext *MemTypeCxt = WasmEdge_MemoryTypeCreate(MemLimit); /* Create the memory instance with memory type. */ WasmEdge_MemoryInstanceContext *HostMemory = WasmEdge_MemoryInstanceCreate(MemTypeCxt); /* Delete the memory type. */ WasmEdge_MemoryTypeDelete(MemTypeCxt); WasmEdge_Result Res; uint8_t Buf[256]; Buf[0] = 0xAA; Buf[1] = 0xBB; Buf[2] = 0xCC; Res = WasmEdge_MemoryInstanceSetData(HostMemory, Buf, 0x1000, 3); /* Set the data[0:2] to the memory[4096:4098]. */ /* * This will get an "out of bounds memory access" error * because [65535:65537] is out of 1 page size (65536): * Res = WasmEdge_MemoryInstanceSetData(HostMemory, Buf, 0xFFFF, 3); */ Buf[0] = 0; Buf[1] = 0; Buf[2] = 0; Res = WasmEdge_MemoryInstanceGetData(HostMemory, Buf, 0x1000, 3); /* Get the memory[4096:4098]. Buf[0:2] will be `{0xAA, 0xBB, 0xCC}`. */ /* * This will get an "out of bounds memory access" error * because [65535:65537] is out of 1 page size (65536): * Res = WasmEdge_MemoryInstanceSetData(HostMemory, Buf, 0xFFFF, 3); */ uint32_t PageSize = WasmEdge_MemoryInstanceGetPageSize(HostMemory); /* `PageSize` will be 1. */ Res = WasmEdge_MemoryInstanceGrowPage(HostMemory, 2); /* Grow the page size of 2, the page size of the memory instance will be 3. */ /* * This will get an "out of bounds memory access" error because * the page size (3 + 3) will reach the memory limit(5): * Res = WasmEdge_MemoryInstanceGrowPage(HostMemory, 3); */ WasmEdge_MemoryInstanceDelete(HostMemory);
-
Global instance
In WasmEdge, developers can create the
Global
contexts and add them into anImport Object
context for registering into aVM
or aStore
. TheGlobal
contexts supply APIs to control the value in global instances.WasmEdge_Value Val = WasmEdge_ValueGenI64(1000); /* Create the global type with value type and mutation. */ WasmEdge_GlobalTypeContext *GlobTypeCxt = WasmEdge_GlobalTypeCreate(WasmEdge_ValType_I64, WasmEdge_Mutability_Var); /* Create the global instance with value and global type. */ WasmEdge_GlobalInstanceContext *HostGlobal = WasmEdge_GlobalInstanceCreate(GlobTypeCxt, Val); /* Delete the global type. */ WasmEdge_GlobalTypeDelete(GlobTypeCxt); WasmEdge_Result Res; GlobTypeCxt = WasmEdge_GlobalInstanceGetGlobalType(HostGlobal); /* The `GlobTypeCxt` got from global instance is owned by the `HostGlobal` and should __NOT__ be destroyed. */ enum WasmEdge_ValType ValType = WasmEdge_GlobalTypeGetValType(GlobTypeCxt); /* `ValType` will be `WasmEdge_ValType_I64`. */ enum WasmEdge_Mutability ValMut = WasmEdge_GlobalTypeGetMutability(GlobTypeCxt); /* `ValMut` will be `WasmEdge_Mutability_Var`. */ WasmEdge_GlobalInstanceSetValue(HostGlobal, WasmEdge_ValueGenI64(888)); /* * Set the value u64(888) to the global. * This function will do nothing if the value type mismatched or * the global mutability is `WasmEdge_Mutability_Const`. */ WasmEdge_Value GlobVal = WasmEdge_GlobalInstanceGetValue(HostGlobal); /* Get the value (888 now) of the global context. */ WasmEdge_GlobalInstanceDelete(HostGlobal);
Host Functions
Host functions are functions outside WebAssembly and passed to WASM modules as imports.
In WasmEdge, developers can create the Function
, Memory
, Table
, and Global
contexts and add them into an Import Object
context for registering into a VM
or a Store
.
-
Host function allocation
Developers can define C functions with the following function signature as the host function body:
typedef WasmEdge_Result (*WasmEdge_HostFunc_t)( void *Data, WasmEdge_MemoryInstanceContext *MemCxt, const WasmEdge_Value *Params, WasmEdge_Value *Returns);
The example of an
add
host function to add 2i32
values:WasmEdge_Result Add(void *, WasmEdge_MemoryInstanceContext *, const WasmEdge_Value *In, WasmEdge_Value *Out) { /* * Params: {i32, i32} * Returns: {i32} * Developers should take care about the function type. */ /* Retrieve the value 1. */ int32_t Val1 = WasmEdge_ValueGetI32(In[0]); /* Retrieve the value 2. */ int32_t Val2 = WasmEdge_ValueGetI32(In[1]); /* Output value 1 is Val1 + Val2. */ Out[0] = WasmEdge_ValueGenI32(Val1 + Val2); /* Return the status of success. */ return WasmEdge_Result_Success; }
Then developers can create
Function
context with the host function body and function type:enum WasmEdge_ValType ParamList[2] = { WasmEdge_ValType_I32, WasmEdge_ValType_I32 }; enum WasmEdge_ValType ReturnList[1] = { WasmEdge_ValType_I32 }; /* Create a function type: {i32, i32} -> {i32}. */ HostFType = WasmEdge_FunctionTypeCreate(ParamList, 2, ReturnList, 1); /* * Create a function context with the function type and host function body. * The `Cost` parameter can be 0 if developers do not need the cost measuring. */ WasmEdge_FunctionInstanceContext *HostFunc = WasmEdge_FunctionInstanceCreate(HostFType, Add, NULL, 0); /* * The third parameter is the pointer to the additional data. * Developers should guarantee the life cycle of the data, and it can be * `NULL` if the external data is not needed. */ /* If the function instance is not added into an import object context, it should be deleted. */ WasmEdge_FunctionInstanceDelete(HostFunc);
-
Import object context
The
Import Object
context holds an exporting module name and the instances. Developers can add theFunction
,Memory
,Table
, andGlobal
instances with their exporting names./* Host function body definition. */ WasmEdge_Result Add(void *Data, WasmEdge_MemoryInstanceContext *MemCxt, const WasmEdge_Value *In, WasmEdge_Value *Out) { int32_t Val1 = WasmEdge_ValueGetI32(In[0]); int32_t Val2 = WasmEdge_ValueGetI32(In[1]); Out[0] = WasmEdge_ValueGenI32(Val1 + Val2); return WasmEdge_Result_Success; } /* Create the import object. */ WasmEdge_String ExportName = WasmEdge_StringCreateByCString("module"); WasmEdge_ImportObjectContext *ImpObj = WasmEdge_ImportObjectCreate(ExportName); WasmEdge_StringDelete(ExportName); /* Create and add a function instance into the import object. */ enum WasmEdge_ValType ParamList[2] = { WasmEdge_ValType_I32, WasmEdge_ValType_I32 }; enum WasmEdge_ValType ReturnList[1] = { WasmEdge_ValType_I32 }; WasmEdge_FunctionTypeContext *HostFType = WasmEdge_FunctionTypeCreate(ParamList, 2, ReturnList, 1); WasmEdge_FunctionInstanceContext *HostFunc = WasmEdge_FunctionInstanceCreate(HostFType, Add, NULL, 0); /* * The third parameter is the pointer to the additional data object. * Developers should guarantee the life cycle of the data, and it can be * `NULL` if the external data is not needed. */ WasmEdge_FunctionTypeDelete(HostFType); WasmEdge_String FuncName = WasmEdge_StringCreateByCString("add"); WasmEdge_ImportObjectAddFunction(ImpObj, FuncName, HostFunc); WasmEdge_StringDelete(FuncName); /* Create and add a table instance into the import object. */ WasmEdge_Limit TableLimit = {.HasMax = true, .Min = 10, .Max = 20}; WasmEdge_TableTypeContext *HostTType = WasmEdge_TableTypeCreate(WasmEdge_RefType_FuncRef, TableLimit); WasmEdge_TableInstanceContext *HostTable = WasmEdge_TableInstanceCreate(HostTType); WasmEdge_TableTypeDelete(HostTType); WasmEdge_String TableName = WasmEdge_StringCreateByCString("table"); WasmEdge_ImportObjectAddTable(ImpObj, TableName, HostTable); WasmEdge_StringDelete(TableName); /* Create and add a memory instance into the import object. */ WasmEdge_Limit MemoryLimit = {.HasMax = true, .Min = 1, .Max = 2}; WasmEdge_MemoryTypeContext *HostMType = WasmEdge_MemoryTypeCreate(MemoryLimit); WasmEdge_MemoryInstanceContext *HostMemory = WasmEdge_MemoryInstanceCreate(HostMType); WasmEdge_MemoryTypeDelete(HostMType); WasmEdge_String MemoryName = WasmEdge_StringCreateByCString("memory"); WasmEdge_ImportObjectAddMemory(ImpObj, MemoryName, HostMemory); WasmEdge_StringDelete(MemoryName); /* Create and add a global instance into the import object. */ WasmEdge_GlobalTypeContext *HostGType = WasmEdge_GlobalTypeCreate(WasmEdge_ValType_I32, WasmEdge_Mutability_Var); WasmEdge_GlobalInstanceContext *HostGlobal = WasmEdge_GlobalInstanceCreate(HostGType, WasmEdge_ValueGenI32(666)); WasmEdge_GlobalTypeDelete(HostGType); WasmEdge_String GlobalName = WasmEdge_StringCreateByCString("global"); WasmEdge_ImportObjectAddGlobal(ImpObj, GlobalName, HostGlobal); WasmEdge_StringDelete(GlobalName); /* * The import objects should be deleted. * Developers should __NOT__ destroy the instances added into the import object contexts. */ WasmEdge_ImportObjectDelete(ImpObj);
-
Specified import object
WasmEdge_ImportObjectCreateWASI()
API can create and initialize theWASI
import object.WasmEdge_ImportObjectCreateWasmEdgeProcess()
API can create and initialize thewasmedge_process
import object. Developers can create these import object contexts and register them into theStore
orVM
contexts rather than adjust the settings in theConfigure
contexts.WasmEdge_ImportObjectContext *WasiObj = WasmEdge_ImportObjectCreateWASI( /* ... ignored */ ); WasmEdge_ImportObjectContext *ProcObj = WasmEdge_ImportObjectCreateWasmEdgeProcess( /* ... ignored */ ); WasmEdge_VMContext *VMCxt = WasmEdge_VMCreate(NULL, NULL); /* Register the WASI and WasmEdge_Process into the VM context. */ WasmEdge_VMRegisterModuleFromImport(VMCxt, WasiObj); WasmEdge_VMRegisterModuleFromImport(VMCxt, ProcObj); /* Get the WASI exit code. */ uint32_t ExitCode = WasmEdge_ImportObjectWASIGetExitCode(WasiObj); /* * The `ExitCode` will be EXIT_SUCCESS if the execution has no error. * Otherwise, it will return with the related exit code. */ WasmEdge_VMDelete(VMCxt); /* The import objects should be deleted. */ WasmEdge_ImportObjectDelete(WasiObj); WasmEdge_ImportObjectDelete(ProcObj);
-
Example
Assume that a simple WASM from the WAT as following:
(module (type $t0 (func (param i32 i32) (result i32))) (import "extern" "func-add" (func $f-add (type $t0))) (func (export "addTwo") (param i32 i32) (result i32) local.get 0 local.get 1 call $f-add) )
And the
test.c
as following:#include <wasmedge/wasmedge.h> #include <stdio.h> /* Host function body definition. */ WasmEdge_Result Add(void *Data, WasmEdge_MemoryInstanceContext *MemCxt, const WasmEdge_Value *In, WasmEdge_Value *Out) { int32_t Val1 = WasmEdge_ValueGetI32(In[0]); int32_t Val2 = WasmEdge_ValueGetI32(In[1]); printf("Host function \"Add\": %d + %d\n", Val1, Val2); Out[0] = WasmEdge_ValueGenI32(Val1 + Val2); return WasmEdge_Result_Success; } int main() { /* Create the VM context. */ WasmEdge_VMContext *VMCxt = WasmEdge_VMCreate(NULL, NULL); /* The WASM module buffer. */ uint8_t WASM[] = { /* WASM header */ 0x00, 0x61, 0x73, 0x6D, 0x01, 0x00, 0x00, 0x00, /* Type section */ 0x01, 0x07, 0x01, /* function type {i32, i32} -> {i32} */ 0x60, 0x02, 0x7F, 0x7F, 0x01, 0x7F, /* Import section */ 0x02, 0x13, 0x01, /* module name: "extern" */ 0x06, 0x65, 0x78, 0x74, 0x65, 0x72, 0x6E, /* extern name: "func-add" */ 0x08, 0x66, 0x75, 0x6E, 0x63, 0x2D, 0x61, 0x64, 0x64, /* import desc: func 0 */ 0x00, 0x00, /* Function section */ 0x03, 0x02, 0x01, 0x00, /* Export section */ 0x07, 0x0A, 0x01, /* export name: "addTwo" */ 0x06, 0x61, 0x64, 0x64, 0x54, 0x77, 0x6F, /* export desc: func 0 */ 0x00, 0x01, /* Code section */ 0x0A, 0x0A, 0x01, /* code body */ 0x08, 0x00, 0x20, 0x00, 0x20, 0x01, 0x10, 0x00, 0x0B }; /* Create the import object. */ WasmEdge_String ExportName = WasmEdge_StringCreateByCString("extern"); WasmEdge_ImportObjectContext *ImpObj = WasmEdge_ImportObjectCreate(ExportName); enum WasmEdge_ValType ParamList[2] = { WasmEdge_ValType_I32, WasmEdge_ValType_I32 }; enum WasmEdge_ValType ReturnList[1] = { WasmEdge_ValType_I32 }; WasmEdge_FunctionTypeContext *HostFType = WasmEdge_FunctionTypeCreate(ParamList, 2, ReturnList, 1); WasmEdge_FunctionInstanceContext *HostFunc = WasmEdge_FunctionInstanceCreate(HostFType, Add, NULL, 0); WasmEdge_FunctionTypeDelete(HostFType); WasmEdge_String HostFuncName = WasmEdge_StringCreateByCString("func-add"); WasmEdge_ImportObjectAddFunction(ImpObj, HostFuncName, HostFunc); WasmEdge_StringDelete(HostFuncName); WasmEdge_VMRegisterModuleFromImport(VMCxt, ImpObj); /* The parameters and returns arrays. */ WasmEdge_Value Params[2] = { WasmEdge_ValueGenI32(1234), WasmEdge_ValueGenI32(5678) }; WasmEdge_Value Returns[1]; /* Function name. */ WasmEdge_String FuncName = WasmEdge_StringCreateByCString("addTwo"); /* Run the WASM function from file. */ WasmEdge_Result Res = WasmEdge_VMRunWasmFromBuffer( VMCxt, WASM, sizeof(WASM), FuncName, Params, 2, Returns, 1); if (WasmEdge_ResultOK(Res)) { printf("Get the result: %d\n", WasmEdge_ValueGetI32(Returns[0])); } else { printf("Error message: %s\n", WasmEdge_ResultGetMessage(Res)); } /* Resources deallocations. */ WasmEdge_VMDelete(VMCxt); WasmEdge_StringDelete(FuncName); WasmEdge_ImportObjectDelete(ImpObj); return 0; }
Then you can compile and run: (the result of 1234 + 5678 is 6912)
$ gcc test.c -lwasmedge_c $ ./a.out Host function "Add": 1234 + 5678 Get the result: 6912
-
Host Data Example
Developers can set a external data object to the function context, and access to the object in the function body. Assume that a simple WASM from the WAT as following:
(module (type $t0 (func (param i32 i32) (result i32))) (import "extern" "func-add" (func $f-add (type $t0))) (func (export "addTwo") (param i32 i32) (result i32) local.get 0 local.get 1 call $f-add) )
And the
test.c
as following:#include <wasmedge/wasmedge.h> #include <stdio.h> /* Host function body definition. */ WasmEdge_Result Add(void *Data, WasmEdge_MemoryInstanceContext *MemCxt, const WasmEdge_Value *In, WasmEdge_Value *Out) { int32_t Val1 = WasmEdge_ValueGetI32(In[0]); int32_t Val2 = WasmEdge_ValueGetI32(In[1]); printf("Host function \"Add\": %d + %d\n", Val1, Val2); Out[0] = WasmEdge_ValueGenI32(Val1 + Val2); /* Also set the result to the data. */ int32_t *DataPtr = (int32_t *)Data; *DataPtr = Val1 + Val2; return WasmEdge_Result_Success; } int main() { /* Create the VM context. */ WasmEdge_VMContext *VMCxt = WasmEdge_VMCreate(NULL, NULL); /* The WASM module buffer. */ uint8_t WASM[] = { /* WASM header */ 0x00, 0x61, 0x73, 0x6D, 0x01, 0x00, 0x00, 0x00, /* Type section */ 0x01, 0x07, 0x01, /* function type {i32, i32} -> {i32} */ 0x60, 0x02, 0x7F, 0x7F, 0x01, 0x7F, /* Import section */ 0x02, 0x13, 0x01, /* module name: "extern" */ 0x06, 0x65, 0x78, 0x74, 0x65, 0x72, 0x6E, /* extern name: "func-add" */ 0x08, 0x66, 0x75, 0x6E, 0x63, 0x2D, 0x61, 0x64, 0x64, /* import desc: func 0 */ 0x00, 0x00, /* Function section */ 0x03, 0x02, 0x01, 0x00, /* Export section */ 0x07, 0x0A, 0x01, /* export name: "addTwo" */ 0x06, 0x61, 0x64, 0x64, 0x54, 0x77, 0x6F, /* export desc: func 0 */ 0x00, 0x01, /* Code section */ 0x0A, 0x0A, 0x01, /* code body */ 0x08, 0x00, 0x20, 0x00, 0x20, 0x01, 0x10, 0x00, 0x0B }; /* The external data object: an integer. */ int32_t Data; /* Create the import object. */ WasmEdge_String ExportName = WasmEdge_StringCreateByCString("extern"); WasmEdge_ImportObjectContext *ImpObj = WasmEdge_ImportObjectCreate(ExportName); enum WasmEdge_ValType ParamList[2] = { WasmEdge_ValType_I32, WasmEdge_ValType_I32 }; enum WasmEdge_ValType ReturnList[1] = { WasmEdge_ValType_I32 }; WasmEdge_FunctionTypeContext *HostFType = WasmEdge_FunctionTypeCreate(ParamList, 2, ReturnList, 1); WasmEdge_FunctionInstanceContext *HostFunc = WasmEdge_FunctionInstanceCreate(HostFType, Add, &Data, 0); WasmEdge_FunctionTypeDelete(HostFType); WasmEdge_String HostFuncName = WasmEdge_StringCreateByCString("func-add"); WasmEdge_ImportObjectAddFunction(ImpObj, HostFuncName, HostFunc); WasmEdge_StringDelete(HostFuncName); WasmEdge_VMRegisterModuleFromImport(VMCxt, ImpObj); /* The parameters and returns arrays. */ WasmEdge_Value Params[2] = { WasmEdge_ValueGenI32(1234), WasmEdge_ValueGenI32(5678) }; WasmEdge_Value Returns[1]; /* Function name. */ WasmEdge_String FuncName = WasmEdge_StringCreateByCString("addTwo"); /* Run the WASM function from file. */ WasmEdge_Result Res = WasmEdge_VMRunWasmFromBuffer( VMCxt, WASM, sizeof(WASM), FuncName, Params, 2, Returns, 1); if (WasmEdge_ResultOK(Res)) { printf("Get the result: %d\n", WasmEdge_ValueGetI32(Returns[0])); } else { printf("Error message: %s\n", WasmEdge_ResultGetMessage(Res)); } printf("Data value: %d\n", Data); /* Resources deallocations. */ WasmEdge_VMDelete(VMCxt); WasmEdge_StringDelete(FuncName); WasmEdge_ImportObjectDelete(ImpObj); return 0; }
Then you can compile and run: (the result of 1234 + 5678 is 6912)
$ gcc test.c -lwasmedge_c $ ./a.out Host function "Add": 1234 + 5678 Get the result: 6912 Data value: 6912
WasmEdge AOT Compiler
In this partition, we will introduce the WasmEdge AOT compiler and the options.
WasmEdge runs the WASM files in interpreter mode, and WasmEdge also supports the AOT (ahead-of-time) mode running without modifying any code. The WasmEdge AOT (ahead-of-time) compiler compiles the WASM files for running in AOT mode which is much faster than interpreter mode. Developers can compile the WASM files into the compiled-WASM files in shared library format for universal WASM format for the AOT mode execution.
Compilation Example
Assume that the WASM file fibonacci.wasm
is copied into the current directory, and the C file test.c
is as following:
#include <wasmedge/wasmedge.h>
#include <stdio.h>
int main() {
/* Create the configure context. */
WasmEdge_ConfigureContext *ConfCxt = WasmEdge_ConfigureCreate();
/* ... Adjust settings in the configure context. */
/* Result. */
WasmEdge_Result Res;
/* Create the compiler context. The configure context can be NULL. */
WasmEdge_CompilerContext *CompilerCxt = WasmEdge_CompilerCreate(ConfCxt);
/* Compile the WASM file with input and output paths. */
Res = WasmEdge_CompilerCompile(CompilerCxt, "fibonacci.wasm", "fibonacci.wasm.so");
if (!WasmEdge_ResultOK(Res)) {
printf("Compilation failed: %s\n", WasmEdge_ResultGetMessage(Res));
return 1;
}
WasmEdge_CompilerDelete(CompilerCxt);
WasmEdge_ConfigureDelete(ConfCxt);
return 0;
}
Then you can compile and run (the output file is "fibonacci.wasm.so"):
$ gcc test.c -lwasmedge_c
$ ./a.out
[2021-07-02 11:08:08.651] [info] compile start
[2021-07-02 11:08:08.653] [info] verify start
[2021-07-02 11:08:08.653] [info] optimize start
[2021-07-02 11:08:08.670] [info] codegen start
[2021-07-02 11:08:08.706] [info] compile done
Compiler Options
Developers can set options for AOT compilers such as optimization level and output format:
/// AOT compiler optimization level enumeration.
enum WasmEdge_CompilerOptimizationLevel {
/// Disable as many optimizations as possible.
WasmEdge_CompilerOptimizationLevel_O0 = 0,
/// Optimize quickly without destroying debuggability.
WasmEdge_CompilerOptimizationLevel_O1,
/// Optimize for fast execution as much as possible without triggering
/// significant incremental compile time or code size growth.
WasmEdge_CompilerOptimizationLevel_O2,
/// Optimize for fast execution as much as possible.
WasmEdge_CompilerOptimizationLevel_O3,
/// Optimize for small code size as much as possible without triggering
/// significant incremental compile time or execution time slowdowns.
WasmEdge_CompilerOptimizationLevel_Os,
/// Optimize for small code size as much as possible.
WasmEdge_CompilerOptimizationLevel_Oz
};
/// AOT compiler output binary format enumeration.
enum WasmEdge_CompilerOutputFormat {
/// Native dynamic library format.
WasmEdge_CompilerOutputFormat_Native = 0,
/// WebAssembly with AOT compiled codes in custom sections.
WasmEdge_CompilerOutputFormat_Wasm
};
Please refer to the AOT compiler options configuration for details.
Upgrade to WasmEdge 0.10.0
Due to the WasmEdge C API breaking changes, this document shows the guideline of programming with WasmEdge C API to upgrade from the 0.9.1
to the 0.10.0
version.
Concepts
-
Merged the
WasmEdge_ImportObjectContext
into theWasmEdge_ModuleInstanceContext
.The
WasmEdge_ImportObjectContext
which is for the host functions is merged intoWasmEdge_ModuleInstanceContext
. Developers can use the related APIs to construct host modules.WasmEdge_ImportObjectCreate()
is changed toWasmEdge_ModuleInstanceCreate()
.WasmEdge_ImportObjectDelete()
is changed toWasmEdge_ModuleInstanceDelete()
.WasmEdge_ImportObjectAddFunction()
is changed toWasmEdge_ModuleInstanceAddFunction()
.WasmEdge_ImportObjectAddTable()
is changed toWasmEdge_ModuleInstanceAddTable()
.WasmEdge_ImportObjectAddMemory()
is changed toWasmEdge_ModuleInstanceAddMemory()
.WasmEdge_ImportObjectAddGlobal()
is changed toWasmEdge_ModuleInstanceAddGlobal()
.WasmEdge_ImportObjectCreateWASI()
is changed toWasmEdge_ModuleInstanceCreateWASI()
.WasmEdge_ImportObjectCreateWasmEdgeProcess()
is changed toWasmEdge_ModuleInstanceCreateWasmEdgeProcess()
.WasmEdge_ImportObjectInitWASI()
is changed toWasmEdge_ModuleInstanceInitWASI()
.WasmEdge_ImportObjectInitWasmEdgeProcess()
is changed toWasmEdge_ModuleInstanceInitWasmEdgeProcess()
.
For the new host function examples, please refer to the example below.
-
Used the pointer to
WasmEdge_FunctionInstanceContext
instead of the index in theFuncRef
value type.For the better performance and security, the
FuncRef
related APIs used theconst WasmEdge_FunctionInstanceContext *
for the parameters and returns.WasmEdge_ValueGenFuncRef()
is changed to use theconst WasmEdge_FunctionInstanceContext *
as it's argument.WasmEdge_ValueGetFuncRef()
is changed to return theconst WasmEdge_FunctionInstanceContext *
.
-
Supported multiple anonymous WASM module instantiation.
In the version before
0.9.1
, WasmEdge only supports 1 anonymous WASM module to be instantiated at one time. If developers instantiate a new WASM module, the old one will be replaced. After the0.10.0
version, developers can instantiate multiple anonymous WASM module byExecutor
and get theModule
instance. But for the source code using theVM
APIs, the behavior is not changed. For the new examples of instantiating multiple anonymous WASM modules, please refer to the example below. -
Behavior changed of
WasmEdge_StoreContext
.The
Function
,Table
,Memory
, andGlobal
instances retrievement from theStore
is moved to theModule
instance. TheStore
only manage the module linking when instantiation and the named module searching after the0.10.0
version.WasmEdge_StoreListFunctionLength()
andWasmEdge_StoreListFunctionRegisteredLength()
is replaced byWasmEdge_ModuleInstanceListFunctionLength()
.WasmEdge_StoreListTableLength()
andWasmEdge_StoreListTableRegisteredLength()
is replaced byWasmEdge_ModuleInstanceListTableLength()
.WasmEdge_StoreListMemoryLength()
andWasmEdge_StoreListMemoryRegisteredLength()
is replaced byWasmEdge_ModuleInstanceListMemoryLength()
.WasmEdge_StoreListGlobalLength()
andWasmEdge_StoreListGlobalRegisteredLength()
is replaced byWasmEdge_ModuleInstanceListGlobalLength()
.WasmEdge_StoreListFunction()
andWasmEdge_StoreListFunctionRegistered()
is replaced byWasmEdge_ModuleInstanceListFunction()
.WasmEdge_StoreListTable()
andWasmEdge_StoreListTableRegistered()
is replaced byWasmEdge_ModuleInstanceListTable()
.WasmEdge_StoreListMemory()
andWasmEdge_StoreListMemoryRegistered()
is replaced byWasmEdge_ModuleInstanceListMemory()
.WasmEdge_StoreListGlobal()
andWasmEdge_StoreListGlobalRegistered()
is replaced byWasmEdge_ModuleInstanceListGlobal()
.WasmEdge_StoreFindFunction()
andWasmEdge_StoreFindFunctionRegistered()
is replaced byWasmEdge_ModuleInstanceFindFunction()
.WasmEdge_StoreFindTable()
andWasmEdge_StoreFindTableRegistered()
is replaced byWasmEdge_ModuleInstanceFindTable()
.WasmEdge_StoreFindMemory()
andWasmEdge_StoreFindMemoryRegistered()
is replaced byWasmEdge_ModuleInstanceFindMemory()
.WasmEdge_StoreFindGlobal()
andWasmEdge_StoreFindGlobalRegistered()
is replaced byWasmEdge_ModuleInstanceFindGlobal()
.
For the new examples of retrieving instances, please refer to the example below.
-
The
WasmEdge_ModuleInstanceContext
-based resource management.Except the creation of
Module
instance for the host functons, theExecutor
will output aModule
instance after instantiation. No matter the anonymous or named modules, developers have the responsibility to destroy them byWasmEdge_ModuleInstanceDelete()
API. TheStore
will link to the namedModule
instance after registering. After the destroyment of aModule
instance, theStore
will unlink to that automatically; after the destroyment of theStore
, the allModule
instances theStore
linked to will unlink to thatStore
automatically.
WasmEdge VM changes
The VM
APIs are basically not changed, except the ImportObject
related APIs.
The following is the example of WASI initialization in WasmEdge 0.9.1
C API:
WasmEdge_ConfigureContext *ConfCxt = WasmEdge_ConfigureCreate();
WasmEdge_ConfigureAddHostRegistration(ConfCxt, WasmEdge_HostRegistration_Wasi);
WasmEdge_VMContext *VMCxt = WasmEdge_VMCreate(ConfCxt, NULL);
/* The following API can retrieve the pre-registration import objects from the VM context. */
/* This API will return `NULL` if the corresponding pre-registration is not set into the configuration. */
WasmEdge_ImportObjectContext *WasiObject =
WasmEdge_VMGetImportModuleContext(VMCxt, WasmEdge_HostRegistration_Wasi);
/* Initialize the WASI. */
WasmEdge_ImportObjectInitWASI(WasiObject, /* ... ignored */ );
/* ... */
WasmEdge_VMDelete(VMCxt);
WasmEdge_ConfigureDelete(ConfCxt);
Developers can change to use the WasmEdge 0.10.0
C API as follows, with only replacing the WasmEdge_ImportObjectContext
into WasmEdge_ModuleInstanceContext
:
WasmEdge_ConfigureContext *ConfCxt = WasmEdge_ConfigureCreate();
WasmEdge_ConfigureAddHostRegistration(ConfCxt, WasmEdge_HostRegistration_Wasi);
WasmEdge_VMContext *VMCxt = WasmEdge_VMCreate(ConfCxt, NULL);
/* The following API can retrieve the pre-registration module instances from the VM context. */
/* This API will return `NULL` if the corresponding pre-registration is not set into the configuration. */
WasmEdge_ModuleInstanceContext *WasiModule =
WasmEdge_VMGetImportModuleContext(VMCxt, WasmEdge_HostRegistration_Wasi);
/* Initialize the WASI. */
WasmEdge_ModuleInstanceInitWASI(WasiModule, /* ... ignored */ );
/* ... */
WasmEdge_VMDelete(VMCxt);
WasmEdge_ConfigureDelete(ConfCxt);
The VM
provides a new API for getting the current instantiated anonymous Module
instance.
For example, if developer want to get the exported Global
instance:
/* Assume that a WASM module is instantiated in `VMCxt`, and exports the "global_i32". */
WasmEdge_StoreContext *StoreCxt = WasmEdge_VMGetStoreContext(VMCxt);
WasmEdge_String GlobName = WasmEdge_StringCreateByCString("global_i32");
WasmEdge_GlobalInstanceContext *GlobCxt = WasmEdge_StoreFindGlobal(StoreCxt, GlobName);
WasmEdge_StringDelete(GlobName);
After the WasmEdge 0.10.0
C API, developers can use the WasmEdge_VMGetActiveModule()
to get the module instance:
/* Assume that a WASM module is instantiated in `VMCxt`, and exports the "global_i32". */
const WasmEdge_ModuleInstanceContext *ModCxt = WasmEdge_VMGetActiveModule(VMCxt);
/* The example of retrieving the global instance. */
WasmEdge_String GlobName = WasmEdge_StringCreateByCString("global_i32");
WasmEdge_GlobalInstanceContext *GlobCxt = WasmEdge_ModuleInstanceFindGlobal(ModCxt, GlobName);
WasmEdge_StringDelete(GlobName);
WasmEdge Executor changes
Executor
helps to instantiate a WASM module, register a WASM module into Store
with module name, register the host modules with host functions, or invoke functions.
-
WASM module instantiation
In WasmEdge
0.9.1
version, developers can instantiate a WASM module by theExecutor
API:WasmEdge_ASTModuleContext *ASTCxt; /* * Assume that `ASTCxt` is a loaded WASM from file or buffer and has passed the validation. * Assume that `ExecCxt` is a `WasmEdge_ExecutorContext`. * Assume that `StoreCxt` is a `WasmEdge_StoreContext`. */ WasmEdge_Result Res = WasmEdge_ExecutorInstantiate(ExecCxt, StoreCxt, ASTCxt); if (!WasmEdge_ResultOK(Res)) { printf("Instantiation phase failed: %s\n", WasmEdge_ResultGetMessage(Res)); }
Then the WASM module is instantiated into an anonymous module instance and handled by the
Store
. If a new WASM module is instantiated by this API, the old instantiated module instance will be cleaned. After the WasmEdge0.10.0
version, the instantiated anonymous module will be outputed and handled by caller, and not only 1 anonymous module instance can be instantiated. Developers have the responsibility to destroy the outputed module instances.WasmEdge_ASTModuleContext *ASTCxt1, *ASTCxt2; /* * Assume that `ASTCxt1` and `ASTCxt2` are loaded WASMs from different files or buffers, * and have both passed the validation. * Assume that `ExecCxt` is a `WasmEdge_ExecutorContext`. * Assume that `StoreCxt` is a `WasmEdge_StoreContext`. */ WasmEdge_ModuleInstanceContext *ModCxt1 = NULL; WasmEdge_ModuleInstanceContext *ModCxt2 = NULL; WasmEdge_Result Res = WasmEdge_ExecutorInstantiate(ExecCxt, &ModCxt1, StoreCxt, ASTCxt1); if (!WasmEdge_ResultOK(Res)) { printf("Instantiation phase failed: %s\n", WasmEdge_ResultGetMessage(Res)); } Res = WasmEdge_ExecutorInstantiate(ExecCxt, &ModCxt2, StoreCxt, ASTCxt2); if (!WasmEdge_ResultOK(Res)) { printf("Instantiation phase failed: %s\n", WasmEdge_ResultGetMessage(Res)); }
-
WASM module registration with module name
When instantiating and registering a WASM module with module name, developers can use the
WasmEdge_ExecutorRegisterModule()
API before WasmEdge0.9.1
.WasmEdge_ASTModuleContext *ASTCxt; /* * Assume that `ASTCxt` is a loaded WASM from file or buffer and has passed the validation. * Assume that `ExecCxt` is a `WasmEdge_ExecutorContext`. * Assume that `StoreCxt` is a `WasmEdge_StoreContext`. */ /* Register the WASM module into store with the export module name "mod". */ WasmEdge_String ModName = WasmEdge_StringCreateByCString("mod"); Res = WasmEdge_ExecutorRegisterModule(ExecCxt, StoreCxt, ASTCxt, ModName); WasmEdge_StringDelete(ModName); if (!WasmEdge_ResultOK(Res)) { printf("WASM registration failed: %s\n", WasmEdge_ResultGetMessage(Res)); }
The same feature is implemented in WasmEdge
0.10.0
, but in different APIWasmEdge_ExecutorRegister()
:WasmEdge_ASTModuleContext *ASTCxt; /* * Assume that `ASTCxt` is a loaded WASM from file or buffer and has passed the validation. * Assume that `ExecCxt` is a `WasmEdge_ExecutorContext`. * Assume that `StoreCxt` is a `WasmEdge_StoreContext`. */ /* Register the WASM module into store with the export module name "mod". */ WasmEdge_String ModName = WasmEdge_StringCreateByCString("mod"); /* The output module instance. */ WasmEdge_ModuleInstanceContext *ModCxt = NULL; Res = WasmEdge_ExecutorRegister(ExecCxt, &ModCxt, StoreCxt, ASTCxt, ModName); WasmEdge_StringDelete(ModName); if (!WasmEdge_ResultOK(Res)) { printf("WASM registration failed: %s\n", WasmEdge_ResultGetMessage(Res)); }
Developers have the responsibility to destroy the outputed module instances.
-
Host module registration
In WasmEdge
0.9.1
, developers can create aWasmEdge_ImportObjectContext
and register intoStore
./* Create the import object with the export module name. */ WasmEdge_String ModName = WasmEdge_StringCreateByCString("module"); WasmEdge_ImportObjectContext *ImpObj = WasmEdge_ImportObjectCreate(ModName); WasmEdge_StringDelete(ModName); /* * ... * Add the host functions, tables, memories, and globals into the import object. */ /* The import module context has already contained the export module name. */ Res = WasmEdge_ExecutorRegisterImport(ExecCxt, StoreCxt, ImpObj); if (!WasmEdge_ResultOK(Res)) { printf("Import object registration failed: %s\n", WasmEdge_ResultGetMessage(Res)); }
After WasmEdge
0.10.0
, developers should use theWasmEdge_ModuleInstanceContext
instead:/* Create the module instance with the export module name. */ WasmEdge_String ModName = WasmEdge_StringCreateByCString("module"); WasmEdge_ModuleInstanceContext *ModCxt = WasmEdge_ModuleInstanceCreate(ModName); WasmEdge_StringDelete(ModName); /* * ... * Add the host functions, tables, memories, and globals into the module instance. */ /* The module instance context has already contained the export module name. */ Res = WasmEdge_ExecutorRegisterImport(ExecCxt, StoreCxt, ModCxt); if (!WasmEdge_ResultOK(Res)) { printf("Module instance registration failed: %s\n", WasmEdge_ResultGetMessage(Res)); }
Developers have the responsibility to destroy the created module instances.
-
WASM function invokation
This example uses the fibonacci.wasm, and the corresponding WAT file is at fibonacci.wat. In WasmEdge
0.9.1
version, developers can invoke a WASM function with the export function name:/* Create the store context. The store context holds the instances. */ WasmEdge_StoreContext *StoreCxt = WasmEdge_StoreCreate(); /* Result. */ WasmEdge_Result Res; /* Create the loader context. The configure context can be NULL. */ WasmEdge_LoaderContext *LoadCxt = WasmEdge_LoaderCreate(NULL); /* Create the validator context. The configure context can be NULL. */ WasmEdge_ValidatorContext *ValidCxt = WasmEdge_ValidatorCreate(NULL); /* Create the executor context. The configure context and the statistics context can be NULL. */ WasmEdge_ExecutorContext *ExecCxt = WasmEdge_ExecutorCreate(NULL, NULL); /* Load the WASM file or the compiled-WASM file and convert into the AST module context. */ WasmEdge_ASTModuleContext *ASTCxt = NULL; Res = WasmEdge_LoaderParseFromFile(LoadCxt, &ASTCxt, "fibonacci.wasm"); if (!WasmEdge_ResultOK(Res)) { printf("Loading phase failed: %s\n", WasmEdge_ResultGetMessage(Res)); return -1; } /* Validate the WASM module. */ Res = WasmEdge_ValidatorValidate(ValidCxt, ASTCxt); if (!WasmEdge_ResultOK(Res)) { printf("Validation phase failed: %s\n", WasmEdge_ResultGetMessage(Res)); return -1; } /* Instantiate the WASM module into the store context. */ Res = WasmEdge_ExecutorInstantiate(ExecCxt, StoreCxt, ASTCxt); if (!WasmEdge_ResultOK(Res)) { printf("Instantiation phase failed: %s\n", WasmEdge_ResultGetMessage(Res)); return -1; } /* Invoke the function which is exported with the function name "fib". */ WasmEdge_String FuncName = WasmEdge_StringCreateByCString("fib"); WasmEdge_Value Params[1] = { WasmEdge_ValueGenI32(18) }; WasmEdge_Value Returns[1]; Res = WasmEdge_ExecutorInvoke(ExecCxt, StoreCxt, FuncName, Params, 1, Returns, 1); if (WasmEdge_ResultOK(Res)) { printf("Get the result: %d\n", WasmEdge_ValueGetI32(Returns[0])); } else { printf("Execution phase failed: %s\n", WasmEdge_ResultGetMessage(Res)); return -1; } WasmEdge_ASTModuleDelete(ASTCxt); WasmEdge_LoaderDelete(LoadCxt); WasmEdge_ValidatorDelete(ValidCxt); WasmEdge_ExecutorDelete(ExecCxt); WasmEdge_StoreDelete(StoreCxt);
After the WasmEdge
0.10.0
, developers should retrieve theFunction
instance by function name first./* * ... * Ignore the unchanged steps before validation. Please refer to the sample code above. */ WasmEdge_ModuleInstanceContext *ModCxt = NULL; /* Instantiate the WASM module. */ Res = WasmEdge_ExecutorInstantiate(ExecCxt, &ModCxt1, StoreCxt, ASTCxt); if (!WasmEdge_ResultOK(Res)) { printf("Instantiation phase failed: %s\n", WasmEdge_ResultGetMessage(Res)); return -1; } /* Retrieve the function instance by name. */ WasmEdge_String FuncName = WasmEdge_StringCreateByCString("fib"); WasmEdge_FunctionInstanceContext *FuncCxt = WasmEdge_ModuleInstanceFindFunction(ModCxt, FuncName); WasmEdge_StringDelete(FuncName); /* Invoke the function. */ WasmEdge_Value Params[1] = { WasmEdge_ValueGenI32(18) }; WasmEdge_Value Returns[1]; Res = WasmEdge_ExecutorInvoke(ExecCxt, FuncCxt, Params, 1, Returns, 1); if (WasmEdge_ResultOK(Res)) { printf("Get the result: %d\n", WasmEdge_ValueGetI32(Returns[0])); } else { printf("Execution phase failed: %s\n", WasmEdge_ResultGetMessage(Res)); return -1; } WasmEdge_ModuleInstanceDelete(ModCxt); WasmEdge_ASTModuleDelete(ASTCxt); WasmEdge_LoaderDelete(LoadCxt); WasmEdge_ValidatorDelete(ValidCxt); WasmEdge_ExecutorDelete(ExecCxt); WasmEdge_StoreDelete(StoreCxt);
Instances retrievement
This example uses the fibonacci.wasm, and the corresponding WAT file is at fibonacci.wat.
Before the WasmEdge 0.9.1
versions, developers can retrieve all exported instances of named or anonymous modules from Store
:
/* Create the store context. The store context holds the instances. */
WasmEdge_StoreContext *StoreCxt = WasmEdge_StoreCreate();
/* Result. */
WasmEdge_Result Res;
/* Create the loader context. The configure context can be NULL. */
WasmEdge_LoaderContext *LoadCxt = WasmEdge_LoaderCreate(NULL);
/* Create the validator context. The configure context can be NULL. */
WasmEdge_ValidatorContext *ValidCxt = WasmEdge_ValidatorCreate(NULL);
/* Create the executor context. The configure context and the statistics context can be NULL. */
WasmEdge_ExecutorContext *ExecCxt = WasmEdge_ExecutorCreate(NULL, NULL);
/* Load the WASM file or the compiled-WASM file and convert into the AST module context. */
WasmEdge_ASTModuleContext *ASTCxt = NULL;
Res = WasmEdge_LoaderParseFromFile(LoadCxt, &ASTCxt, "fibonacci.wasm");
if (!WasmEdge_ResultOK(Res)) {
printf("Loading phase failed: %s\n", WasmEdge_ResultGetMessage(Res));
return -1;
}
/* Validate the WASM module. */
Res = WasmEdge_ValidatorValidate(ValidCxt, ASTCxt);
if (!WasmEdge_ResultOK(Res)) {
printf("Validation phase failed: %s\n", WasmEdge_ResultGetMessage(Res));
return -1;
}
/* Example: register and instantiate the WASM module with the module name "module_fib". */
WasmEdge_String ModName = WasmEdge_StringCreateByCString("module_fib");
Res = WasmEdge_ExecutorRegisterModule(ExecCxt, StoreCxt, ASTCxt, ModName);
if (!WasmEdge_ResultOK(Res)) {
printf("Instantiation phase failed: %s\n", WasmEdge_ResultGetMessage(Res));
return -1;
}
/* Example: Instantiate the WASM module into the store context. */
Res = WasmEdge_ExecutorInstantiate(ExecCxt, StoreCxt, ASTCxt);
if (!WasmEdge_ResultOK(Res)) {
printf("Instantiation phase failed: %s\n", WasmEdge_ResultGetMessage(Res));
return -1;
}
WasmEdge_StringDelete(ModName);
/* Now, developers can retrieve the exported instances from the store. */
/* Take the exported functions as example. This WASM exports the function "fib". */
WasmEdge_String FuncName = WasmEdge_StringCreateByCString("fib");
WasmEdge_FunctionInstanceContext *FoundFuncCxt;
/* Find the function "fib" from the instantiated anonymous module. */
FoundFuncCxt = WasmEdge_StoreFindFunction(StoreCxt, FuncName);
/* Find the function "fib" from the registered module "module_fib". */
ModName = WasmEdge_StringCreateByCString("module_fib");
FoundFuncCxt = WasmEdge_StoreFindFunctionRegistered(StoreCxt, ModName, FuncName);
WasmEdge_StringDelete(ModName);
WasmEdge_StringDelete(FuncName);
WasmEdge_ASTModuleDelete(ASTCxt);
WasmEdge_LoaderDelete(LoadCxt);
WasmEdge_ValidatorDelete(ValidCxt);
WasmEdge_ExecutorDelete(ExecCxt);
WasmEdge_StoreDelete(StoreCxt);
After the WasmEdge 0.10.0
, developers can instantiate several anonymous Module
instances, and should retrieve the exported instances from named or anonymous Module
instances:
/* Create the store context. The store context is the object to link the modules for imports and exports. */
WasmEdge_StoreContext *StoreCxt = WasmEdge_StoreCreate();
/* Result. */
WasmEdge_Result Res;
/* Create the loader context. The configure context can be NULL. */
WasmEdge_LoaderContext *LoadCxt = WasmEdge_LoaderCreate(NULL);
/* Create the validator context. The configure context can be NULL. */
WasmEdge_ValidatorContext *ValidCxt = WasmEdge_ValidatorCreate(NULL);
/* Create the executor context. The configure context and the statistics context can be NULL. */
WasmEdge_ExecutorContext *ExecCxt = WasmEdge_ExecutorCreate(NULL, NULL);
/* Load the WASM file or the compiled-WASM file and convert into the AST module context. */
WasmEdge_ASTModuleContext *ASTCxt = NULL;
Res = WasmEdge_LoaderParseFromFile(LoadCxt, &ASTCxt, "fibonacci.wasm");
if (!WasmEdge_ResultOK(Res)) {
printf("Loading phase failed: %s\n", WasmEdge_ResultGetMessage(Res));
return -1;
}
/* Validate the WASM module. */
Res = WasmEdge_ValidatorValidate(ValidCxt, ASTCxt);
if (!WasmEdge_ResultOK(Res)) {
printf("Validation phase failed: %s\n", WasmEdge_ResultGetMessage(Res));
return -1;
}
/* Example: register and instantiate the WASM module with the module name "module_fib". */
WasmEdge_ModuleInstanceContext *NamedModCxt = NULL;
WasmEdge_String ModName = WasmEdge_StringCreateByCString("module_fib");
Res = WasmEdge_ExecutorRegister(ExecCxt, &NamedModCxt, StoreCxt, ASTCxt, ModName);
if (!WasmEdge_ResultOK(Res)) {
printf("Instantiation phase failed: %s\n", WasmEdge_ResultGetMessage(Res));
return -1;
}
/* Example: Instantiate the WASM module and get the output module instance. */
WasmEdge_ModuleInstanceContext *ModCxt = NULL;
Res = WasmEdge_ExecutorInstantiate(ExecCxt, &ModCxt, StoreCxt, ASTCxt);
if (!WasmEdge_ResultOK(Res)) {
printf("Instantiation phase failed: %s\n", WasmEdge_ResultGetMessage(Res));
return -1;
}
WasmEdge_StringDelete(ModName);
/* Now, developers can retrieve the exported instances from the module instaces. */
/* Take the exported functions as example. This WASM exports the function "fib". */
WasmEdge_String FuncName = WasmEdge_StringCreateByCString("fib");
WasmEdge_FunctionInstanceContext *FoundFuncCxt;
/* Find the function "fib" from the instantiated anonymous module. */
FoundFuncCxt = WasmEdge_ModuleInstanceFindFunction(ModCxt, FuncName);
/* Find the function "fib" from the registered module "module_fib". */
FoundFuncCxt = WasmEdge_ModuleInstanceFindFunction(NamedModCxt, FuncName);
/* Or developers can get the named module instance from the store: */
ModName = WasmEdge_StringCreateByCString("module_fib");
const WasmEdge_ModuleInstanceContext *ModCxtGot = WasmEdge_StoreFindModule(StoreCxt, ModName);
WasmEdge_StringDelete(ModName);
FoundFuncCxt = WasmEdge_ModuleInstanceFindFunction(ModCxtGot, FuncName);
WasmEdge_StringDelete(FuncName);
WasmEdge_ModuleInstanceDelete(NamedModCxt);
WasmEdge_ModuleInstanceDelete(ModCxt);
WasmEdge_ASTModuleDelete(ASTCxt);
WasmEdge_LoaderDelete(LoadCxt);
WasmEdge_ValidatorDelete(ValidCxt);
WasmEdge_ExecutorDelete(ExecCxt);
WasmEdge_StoreDelete(StoreCxt);
Host functions
The difference of host functions are the replacement of WasmEdge_ImportObjectContext
.
/* Host function body definition. */
WasmEdge_Result Add(void *Data, WasmEdge_MemoryInstanceContext *MemCxt,
const WasmEdge_Value *In, WasmEdge_Value *Out) {
int32_t Val1 = WasmEdge_ValueGetI32(In[0]);
int32_t Val2 = WasmEdge_ValueGetI32(In[1]);
Out[0] = WasmEdge_ValueGenI32(Val1 + Val2);
return WasmEdge_Result_Success;
}
/* Create the import object. */
WasmEdge_String ExportName = WasmEdge_StringCreateByCString("module");
WasmEdge_ImportObjectContext *ImpObj = WasmEdge_ImportObjectCreate(ExportName);
WasmEdge_StringDelete(ExportName);
/* Create and add a function instance into the import object. */
enum WasmEdge_ValType ParamList[2] = { WasmEdge_ValType_I32, WasmEdge_ValType_I32 };
enum WasmEdge_ValType ReturnList[1] = { WasmEdge_ValType_I32 };
WasmEdge_FunctionTypeContext *HostFType =
WasmEdge_FunctionTypeCreate(ParamList, 2, ReturnList, 1);
WasmEdge_FunctionInstanceContext *HostFunc =
WasmEdge_FunctionInstanceCreate(HostFType, Add, NULL, 0);
/*
* The third parameter is the pointer to the additional data object.
* Developers should guarantee the life cycle of the data, and it can be
* `NULL` if the external data is not needed.
*/
WasmEdge_FunctionTypeDelete(HostFType);
WasmEdge_String FuncName = WasmEdge_StringCreateByCString("add");
WasmEdge_ImportObjectAddFunction(ImpObj, FuncName, HostFunc);
WasmEdge_StringDelete(FuncName);
/*
* The import objects should be deleted.
* Developers should __NOT__ destroy the instances added into the import object contexts.
*/
WasmEdge_ImportObjectDelete(ImpObj);
Developers can use the WasmEdge_ModuleInstanceContext
to upgrade to WasmEdge 0.10.0
easily.
/* Host function body definition. */
WasmEdge_Result Add(void *Data, WasmEdge_MemoryInstanceContext *MemCxt,
const WasmEdge_Value *In, WasmEdge_Value *Out) {
int32_t Val1 = WasmEdge_ValueGetI32(In[0]);
int32_t Val2 = WasmEdge_ValueGetI32(In[1]);
Out[0] = WasmEdge_ValueGenI32(Val1 + Val2);
return WasmEdge_Result_Success;
}
/* Create a module instance. */
WasmEdge_String ExportName = WasmEdge_StringCreateByCString("module");
WasmEdge_ModuleInstanceContext *HostModCxt = WasmEdge_ModuleInstanceCreate(ExportName);
WasmEdge_StringDelete(ExportName);
/* Create and add a function instance into the module instance. */
enum WasmEdge_ValType ParamList[2] = { WasmEdge_ValType_I32, WasmEdge_ValType_I32 };
enum WasmEdge_ValType ReturnList[1] = { WasmEdge_ValType_I32 };
WasmEdge_FunctionTypeContext *HostFType =
WasmEdge_FunctionTypeCreate(ParamList, 2, ReturnList, 1);
WasmEdge_FunctionInstanceContext *HostFunc =
WasmEdge_FunctionInstanceCreate(HostFType, Add, NULL, 0);
/*
* The third parameter is the pointer to the additional data object.
* Developers should guarantee the life cycle of the data, and it can be
* `NULL` if the external data is not needed.
*/
WasmEdge_FunctionTypeDelete(HostFType);
WasmEdge_String FuncName = WasmEdge_StringCreateByCString("add");
WasmEdge_ModuleInstanceAddFunction(HostModCxt, FuncName, HostFunc);
WasmEdge_StringDelete(FuncName);
/*
* The module instance should be deleted.
* Developers should __NOT__ destroy the instances added into the module instance contexts.
*/
WasmEdge_ModuleInstanceDelete(HostModCxt);
WasmEdge Go SDK
The followings are the guides to working with the WasmEdge Go API. You can embed the WasmEdge into your go application through the WasmEdge Go API.
Getting Started
The WasmEdge-go requires golang version >= 1.16. Please check your golang version before installation. You can download golang here.
$ go version
go version go1.16.5 linux/amd64
Meantime, please make sure you have installed the WasmEdge shared library with the same WasmEdge-go
release version.
curl -sSf https://raw.githubusercontent.com/WasmEdge/WasmEdge/master/utils/install.sh | bash -s -- -v 0.10.0
If you need the TensorFlow
or Image
extension for WasmEdge-go
, please install the WasmEdge
with extensions:
curl -sSf https://raw.githubusercontent.com/WasmEdge/WasmEdge/master/utils/install.sh | bash -s -- -v 0.10.0 -e tensorflow,image
Noticed that the TensorFlow
and Image
extensions are only for the Linux
platforms.
Install the WasmEdge-go
package and build in your Go project directory:
go get github.com/second-state/WasmEdge-go/wasmedge@v0.10.0
go build
WasmEdge-go Extensions
By default, the WasmEdge-go
only turns on the basic runtime.
WasmEdge-go
has the following extensions:
-
TensorFlow
-
This extension supports the host functions in WasmEdge-tensorflow.
-
To install the
tensorflow
extension, please use the-e tensorflow
flag in the WasmEdge installer command. -
For using this extension, the tag
tensorflow
when building is required:go build -tags tensorflow
-
-
Image
-
This extension supports the host functions in WasmEdge-image.
-
To install the
image
extension, please use the-e image
flag in the WasmEdge installer command. -
For using this extension, the tag
image
when building is required:go build -tags image
-
You can also turn on the multiple extensions when building:
go build -tags image,tensorflow
For examples, please refer to the example repository.
WasmEdge AOT Compiler in Go
The go_WasmAOT example demonstrates how to compile a WASM file into a native binary (AOT compile) from within a Go application.
Examples
- Embed a standalone Wasm app
- Embed a Wasm function
- Pass complex parameters to Wasm functions
- Embed a Tensorflow inference function
- Embed a bindgen function
Embed a standalone WASM app
The WasmEdge Go SDK can embed standalone WebAssembly applications — ie a Rust application with a main()
function compiled into WebAssembly.
Our demo Rust application reads from a file. Note that the WebAssembly program's input and output data are now passed by the STDIN and STDOUT.
use std::env; use std::fs::File; use std::io::{self, BufRead}; fn main() { // Get the argv. let args: Vec<String> = env::args().collect(); if args.len() <= 1 { println!("Rust: ERROR - No input file name."); return; } // Open the file. println!("Rust: Opening input file \"{}\"...", args[1]); let file = match File::open(&args[1]) { Err(why) => { println!("Rust: ERROR - Open file \"{}\" failed: {}", args[1], why); return; }, Ok(file) => file, }; // Read lines. let reader = io::BufReader::new(file); let mut texts:Vec<String> = Vec::new(); for line in reader.lines() { if let Ok(text) = line { texts.push(text); } } println!("Rust: Read input file \"{}\" succeeded.", args[1]); // Get stdin to print lines. println!("Rust: Please input the line number to print the line of file."); let stdin = io::stdin(); for line in stdin.lock().lines() { let input = line.unwrap(); match input.parse::<usize>() { Ok(n) => if n > 0 && n <= texts.len() { println!("{}", texts[n - 1]); } else { println!("Rust: ERROR - Line \"{}\" is out of range.", n); }, Err(e) => println!("Rust: ERROR - Input \"{}\" is not an integer: {}", input, e), } } println!("Rust: Process end."); }
Compile the application into WebAssembly.
$ cd rust_readfile
$ cargo build --target wasm32-wasi
# The output file will be target/wasm32-wasi/debug/rust_readfile.wasm
The Go source code to run the WebAssembly function in WasmEdge is as follows.
package main
import (
"os"
"github.com/second-state/WasmEdge-go/wasmedge"
)
func main() {
wasmedge.SetLogErrorLevel()
var conf = wasmedge.NewConfigure(wasmedge.REFERENCE_TYPES)
conf.AddConfig(wasmedge.WASI)
var vm = wasmedge.NewVMWithConfig(conf)
var wasi = vm.GetImportModule(wasmedge.WASI)
wasi.InitWasi(
os.Args[1:], // The args
os.Environ(), // The envs
[]string{".:."}, // The mapping directories
)
// Instantiate wasm. _start refers to the main() function
vm.RunWasmFile(os.Args[1], "_start")
vm.Release()
conf.Release()
}
Next, let's build the Go application with the WasmEdge Go SDK.
go get github.com/second-state/WasmEdge-go/wasmedge@v0.10.0
go build
Run the Golang application.
$ ./read_file rust_readfile/target/wasm32-wasi/debug/rust_readfile.wasm file.txt
Rust: Opening input file "file.txt"...
Rust: Read input file "file.txt" succeeded.
Rust: Please input the line number to print the line of file.
# Input "5" and press Enter.
5
# The output will be the 5th line of `file.txt`:
abcDEF___!@#$%^
# To terminate the program, send the EOF (Ctrl + D).
^D
# The output will print the terminate message:
Rust: Process end.
More examples can be found at the WasmEdge-go-examples GitHub repo.
Embed a Wasm function
The WasmEdge Go SDK allows WebAssembly functions to be embedded into a Go host app. You can use the Go SDK API to pass call parameters to the embedded WebAssembly functions, and then capture the return values. However, the WebAssembly spec only supports a few simple data types out of the box. It does not support types such as string and array. In order to pass rich types in Go to WebAssembly, we could hand-code memory pointers (see here), or use an automated tool to manage the data exchange.
The wasmedge-bindgen project provides Rust macros for functions to accept and return complex data types, and then for Go functions to call such Rust functions running in WasmEdge. The full source code for the demo in this chapter is available here.
Rust function compiled into WebAssembly
In the Rust project, all you need is to annotate your functions with a [wasmedge_bindgen]
macro.
Those annotated functions will be automatically instrumented by the Rust compiler and turned into WebAssembly functions that can be called from the wasmedge-bindgen
GO SDK.
In the example below, we have several Rust functions that take complex call parameters and return complex values.
#![allow(unused)] fn main() { use wasmedge_bindgen::*; use wasmedge_bindgen_macro::*; use num_integer::lcm; use sha3::{Digest, Sha3_256, Keccak256}; use serde::{Serialize, Deserialize}; #[derive(Serialize, Deserialize, Debug)] struct Point { x: f32, y: f32 } #[derive(Serialize, Deserialize, Debug)] struct Line { points: Vec<Point>, valid: bool, length: f32, desc: String } #[wasmedge_bindgen] pub fn create_line(p1: String, p2: String, desc: String) -> Result<Vec<u8>, String> { let point1: Point = serde_json::from_str(p1.as_str()).unwrap(); let point2: Point = serde_json::from_str(p2.as_str()).unwrap(); let length = ((point1.x - point2.x) * (point1.x - point2.x) + (point1.y - point2.y) * (point1.y - point2.y)).sqrt(); let valid = if length == 0.0 { false } else { true }; let line = Line { points: vec![point1, point2], valid: valid, length: length, desc: desc }; return Ok(serde_json::to_vec(&line).unwrap()); } #[wasmedge_bindgen] pub fn say(s: String) -> Result<Vec<u8>, String> { let r = String::from("hello "); return Ok((r + s.as_str()).as_bytes().to_vec()); } #[wasmedge_bindgen] pub fn obfusticate(s: String) -> Result<Vec<u8>, String> { let r: String = (&s).chars().map(|c| { match c { 'A' ..= 'M' | 'a' ..= 'm' => ((c as u8) + 13) as char, 'N' ..= 'Z' | 'n' ..= 'z' => ((c as u8) - 13) as char, _ => c } }).collect(); Ok(r.as_bytes().to_vec()) } #[wasmedge_bindgen] pub fn lowest_common_multiple(a: i32, b: i32) -> Result<Vec<u8>, String> { let r = lcm(a, b); return Ok(r.to_string().as_bytes().to_vec()); } #[wasmedge_bindgen] pub fn sha3_digest(v: Vec<u8>) -> Result<Vec<u8>, String> { return Ok(Sha3_256::digest(&v).as_slice().to_vec()); } #[wasmedge_bindgen] pub fn keccak_digest(s: Vec<u8>) -> Result<Vec<u8>, String> { return Ok(Keccak256::digest(&s).as_slice().to_vec()); } }
You can build the WebAssembly bytecode file using standard Cargo
commands.
cd rust_bindgen_funcs
cargo build --target wasm32-wasi --release
# The output WASM will be target/wasm32-wasi/release/rust_bindgen_funcs_lib.wasm.
cp target/wasm32-wasi/release/rust_bindgen_funcs_lib.wasm ../
cd ../
Go host application
In the Go host application, you can create and set up the WasmEdge VM using the WasmEdge Go SDK.
However, instead of calling vm.Instantiate()
, you should now call bindgen.Instantiate(vm)
to instantiate the VM and return a bindgen
object.
func main() {
// Expected Args[0]: program name (./bindgen_funcs)
// Expected Args[1]: wasm file (rust_bindgen_funcs_lib.wasm))
wasmedge.SetLogErrorLevel()
var conf = wasmedge.NewConfigure(wasmedge.WASI)
var vm = wasmedge.NewVMWithConfig(conf)
var wasi = vm.GetImportModule(wasmedge.WASI)
wasi.InitWasi(
os.Args[1:], // The args
os.Environ(), // The envs
[]string{".:."}, // The mapping preopens
)
vm.LoadWasmFile(os.Args[1])
vm.Validate()
// Instantiate the bindgen and vm
bg := bindgen.Instantiate(vm)
Next, you can call any [wasmedge_bindgen]
annotated functions in the VM via the bindgen
object.
// create_line: string, string, string -> string (inputs are JSON stringified)
res, err := bg.Execute("create_line", "{\"x\":2.5,\"y\":7.8}", "{\"x\":2.5,\"y\":5.8}", "A thin red line")
if err == nil {
fmt.Println("Run bindgen -- create_line:", string(res))
} else {
fmt.Println("Run bindgen -- create_line FAILED", err)
}
// say: string -> string
res, err = bg.Execute("say", "bindgen funcs test")
if err == nil {
fmt.Println("Run bindgen -- say:", string(res))
} else {
fmt.Println("Run bindgen -- say FAILED")
}
// obfusticate: string -> string
res, err = bg.Execute("obfusticate", "A quick brown fox jumps over the lazy dog")
if err == nil {
fmt.Println("Run bindgen -- obfusticate:", string(res))
} else {
fmt.Println("Run bindgen -- obfusticate FAILED")
}
// lowest_common_multiple: i32, i32 -> i32
res, err = bg.Execute("lowest_common_multiple", int32(123), int32(2))
if err == nil {
num, _ := strconv.ParseInt(string(res), 10, 32)
fmt.Println("Run bindgen -- lowest_common_multiple:", num)
} else {
fmt.Println("Run bindgen -- lowest_common_multiple FAILED")
}
// sha3_digest: array -> array
res, err = bg.Execute("sha3_digest", []byte("This is an important message"))
if err == nil {
fmt.Println("Run bindgen -- sha3_digest:", res)
} else {
fmt.Println("Run bindgen -- sha3_digest FAILED")
}
// keccak_digest: array -> array
res, err = bg.Execute("keccak_digest", []byte("This is an important message"))
if err == nil {
fmt.Println("Run bindgen -- keccak_digest:", res)
} else {
fmt.Println("Run bindgen -- keccak_digest FAILED")
}
bg.Release()
vm.Release()
conf.Release()
}
Finally, you can build and run the Go host application.
go build
./bindgen_funcs rust_bindgen_funcs_lib.wasm
The standard output of this example will be the following.
Run bindgen -- create_line: {"points":[{"x":1.5,"y":3.8},{"x":2.5,"y":5.8}],"valid":true,"length":2.2360682,"desc":"A thin red line"}
Run bindgen -- say: hello bindgen funcs test
Run bindgen -- obfusticate: N dhvpx oebja sbk whzcf bire gur ynml qbt
Run bindgen -- lowest_common_multiple: 246
Run bindgen -- sha3_digest: [87 27 231 209 189 105 251 49 159 10 211 250 15 159 154 181 43 218 26 141 56 199 25 45 60 10 20 163 54 211 195 203]
Run bindgen -- keccak_digest: [126 194 241 200 151 116 227 33 216 99 159 22 107 3 177 169 216 191 114 156 174 193 32 159 246 228 245 133 52 75 55 27]
Pass complex parameters to Wasm functions
An issue with the WebAssembly spec is that it only supports a very limited number of data types. If you want to embed a WebAssembly function with complex call parameters or return values, you will need to manage memory pointers both on Go SDK and WebAssembly function sides. Such complex call parameters and return values include dynamic memory structures such as strings and byte arrays. In this section, we will discuss several examples.
- Pass strings to Rust functions
- Pass strings to TinyGo functions
- Pass bytes to Rust functions
- Pass bytes to TinyGo functions
Pass strings to Rust functions
In this example, we will demonstrate how to call a Rust-based WebAssembly function from a Go app. Specially, we will discuss how to pass string data.
An alternative approach to pass and return complex values to Rust functions in WebAssembly is to use the
wasm-bindgen
compiler tool. You can learn more here.
The Rust function takes a memory pointer for the string, and constructs the Rust string itself.
#![allow(unused)] fn main() { use std::ffi::{CStr, CString}; use std::mem; use std::os::raw::{c_char, c_void}; #[no_mangle] pub extern fn allocate(size: usize) -> *mut c_void { let mut buffer = Vec::with_capacity(size); let pointer = buffer.as_mut_ptr(); mem::forget(buffer); pointer as *mut c_void } #[no_mangle] pub extern fn deallocate(pointer: *mut c_void, capacity: usize) { unsafe { let _ = Vec::from_raw_parts(pointer, 0, capacity); } } #[no_mangle] pub extern fn greet(subject: *mut c_char) -> *mut c_char { let subject = unsafe { CStr::from_ptr(subject).to_bytes().to_vec() }; let mut output = b"Hello, ".to_vec(); output.extend(&subject); output.extend(&[b'!']); unsafe { CString::from_vec_unchecked(output) }.into_raw() } }
Use standard Rust compiler tools to compile the Rust source code into a WebAssembly bytecode application.
cd rust_memory_greet
cargo build --target wasm32-wasi
# The output WASM will be `target/wasm32-wasi/debug/rust_memory_greet_lib.wasm`.
The Go SDK application must call allocate
from the WasmEdge VM to get a pointer to the string parameter.
It will then call the greet
function in Rust with the pointer.
After the function returns, the Go application will call deallocate
to free the memory space.
package main
import (
"fmt"
"os"
"strings"
"github.com/second-state/WasmEdge-go/wasmedge"
)
func main() {
wasmedge.SetLogErrorLevel()
conf := wasmedge.NewConfigure(wasmedge.WASI)
store := wasmedge.NewStore()
vm := wasmedge.NewVMWithConfigAndStore(conf, store)
wasi := vm.GetImportModule(wasmedge.WASI)
wasi.InitWasi(
os.Args[1:],
os.Environ(),
[]string{".:."},
)
err := vm.LoadWasmFile(os.Args[1])
if err != nil {
fmt.Println("failed to load wasm")
}
vm.Validate()
vm.Instantiate()
subject := "WasmEdge"
lengthOfSubject := len(subject)
// Allocate memory for the subject, and get a pointer to it.
// Include a byte for the NULL terminator we add below.
allocateResult, _ := vm.Execute("allocate", int32(lengthOfSubject+1))
inputPointer := allocateResult[0].(int32)
// Write the subject into the memory.
mem := store.FindMemory("memory")
memData, _ := mem.GetData(uint(inputPointer), uint(lengthOfSubject+1))
copy(memData, subject)
// C-string terminates by NULL.
memData[lengthOfSubject] = 0
// Run the `greet` function. Given the pointer to the subject.
greetResult, _ := vm.Execute("greet", inputPointer)
outputPointer := greetResult[0].(int32)
pageSize := mem.GetPageSize()
// Read the result of the `greet` function.
memData, _ = mem.GetData(uint(0), uint(pageSize * 65536))
nth := 0
var output strings.Builder
for {
if memData[int(outputPointer) + nth] == 0 {
break
}
output.WriteByte(memData[int(outputPointer) + nth])
nth++
}
lengthOfOutput := nth
fmt.Println(output.String())
// Deallocate the subject, and the output.
vm.Execute("deallocate", inputPointer, int32(lengthOfSubject+1))
vm.Execute("deallocate", outputPointer, int32(lengthOfOutput+1))
vm.Release()
store.Release()
conf.Release()
}
To build the Go SDK example, run the following commands.
go get github.com/second-state/WasmEdge-go/wasmedge@v0.10.0
go build greet_memory.go
Now you can use the Go application to run the WebAssembly plug-in compiled from Rust.
$ ./greet_memory rust_memory_greet_lib.wasm
Hello, WasmEdge!
Pass strings to TinyGo functions
In this example, we will demonstrate how to call a TinyGo-based WebAssembly function from a Go app.
The TinyGo function takes a memory pointer for the string, and constructs the TinyGo string itself.
The empty
main()
is needed to the compiled WebAssembly program to set up WASI properly.
package main
import (
"strings"
"unsafe"
)
func main() {}
// export greet
func greet(subject *int32) *byte {
nth := 0
var subjectStr strings.Builder
pointer := uintptr(unsafe.Pointer(subject))
for {
s := *(*int32)(unsafe.Pointer(pointer + uintptr(nth)))
if s == 0 {
break;
}
subjectStr.WriteByte(byte(s))
nth++
}
output := subjectStr.String()
output = "Hello, " + output + "!"
return &(([]byte)(output)[0])
}
Use the TinyGo compiler tools to compile the Go source code into a WebAssembly bytecode application.
tinygo build -o greet.wasm -target wasi greet.go
The Go SDK application must call malloc
from the WasmEdge VM to get a pointer to the string parameter.
It will then call the greet
function in TinyGo with the pointer.
After the function returns, the Go application will call free
to free the memory space.
package main
import (
"fmt"
"os"
"strings"
"github.com/second-state/WasmEdge-go/wasmedge"
)
func main() {
wasmedge.SetLogErrorLevel()
conf := wasmedge.NewConfigure(wasmedge.WASI)
store := wasmedge.NewStore()
vm := wasmedge.NewVMWithConfigAndStore(conf, store)
wasi := vm.GetImportModule(wasmedge.WASI)
wasi.InitWasi(
os.Args[1:],
os.Environ(),
[]string{".:."},
)
err := vm.LoadWasmFile(os.Args[1])
if err != nil {
fmt.Println("failed to load wasm")
}
vm.Validate()
vm.Instantiate()
subject := "WasmEdge"
lengthOfSubject := len(subject)
// Allocate memory for the subject, and get a pointer to it.
// Include a byte for the NULL terminator we add below.
allocateResult, _ := vm.Execute("malloc", int32(lengthOfSubject+1))
inputPointer := allocateResult[0].(int32)
// Write the subject into the memory.
mem := store.FindMemory("memory")
memData, _ := mem.GetData(uint(inputPointer), uint(lengthOfSubject+1))
copy(memData, subject)
// C-string terminates by NULL.
memData[lengthOfSubject] = 0
// Run the `greet` function. Given the pointer to the subject.
greetResult, _ := vm.Execute("greet", inputPointer)
outputPointer := greetResult[0].(int32)
pageSize := mem.GetPageSize()
// Read the result of the `greet` function.
memData, _ = mem.GetData(uint(0), uint(pageSize * 65536))
nth := 0
var output strings.Builder
for {
if memData[int(outputPointer) + nth] == 0 {
break
}
output.WriteByte(memData[int(outputPointer) + nth])
nth++
}
fmt.Println(output.String())
// Deallocate the subject, and the output.
vm.Execute("free", inputPointer)
vm.Execute("free", outputPointer)
vm.Release()
store.Release()
conf.Release()
}
To build the Go SDK example, run the following commands.
go get github.com/second-state/WasmEdge-go/wasmedge@v0.10.0
go build greet_memory.go
Now you can use the Go application to run the WebAssembly plug-in compiled from TinyGo.
$ ./greet_memory greet.wasm
Hello, WasmEdge!
Pass bytes to Rust functions
In this example, we will demonstrate how to call Rust-based WebAssembly functions and pass arrays to and from a Go app.
An alternative approach to pass and return complex values to Rust functions in WebAssembly is to use the
wasm-bindgen
compiler tool. You can learn more here.
The fib_array()
function takes a array as a call parameter and fill it with a fibonacci sequence of numbers. Alternatively, the fib_array_return_memory()
function returns a array of fibonacci sequence of numbers.
For the array in the call parameter, the Rust function fib_array()
takes a memory pointer and constructs the Rust Vec
using from_raw_parts
. For the array return value, the Rust function fib_array_return_memory()
simply returns the pointer.
#![allow(unused)] fn main() { use std::mem; use std::os::raw::{c_void, c_int}; #[no_mangle] pub extern fn allocate(size: usize) -> *mut c_void { let mut buffer = Vec::with_capacity(size); let pointer = buffer.as_mut_ptr(); mem::forget(buffer); pointer as *mut c_void } #[no_mangle] pub extern fn deallocate(pointer: *mut c_void, capacity: usize) { unsafe { let _ = Vec::from_raw_parts(pointer, 0, capacity); } } #[no_mangle] pub extern fn fib_array(n: i32, p: *mut c_int) -> i32 { unsafe { let mut arr = Vec::<i32>::from_raw_parts(p, 0, (4*n) as usize); for i in 0..n { if i < 2 { arr.push(i); } else { arr.push(arr[(i - 1) as usize] + arr[(i - 2) as usize]); } } let r = arr[(n - 1) as usize]; mem::forget(arr); r } } #[no_mangle] pub extern fn fib_array_return_memory(n: i32) -> *mut c_int { let mut arr = Vec::with_capacity((4 * n) as usize); let pointer = arr.as_mut_ptr(); for i in 0..n { if i < 2 { arr.push(i); } else { arr.push(arr[(i - 1) as usize] + arr[(i - 2) as usize]); } } mem::forget(arr); pointer } }
Use standard Rust compiler tools to compile the Rust source code into a WebAssembly bytecode application.
cd rust_access_memory
cargo build --target wasm32-wasi
# The output WASM will be target/wasm32-wasi/debug/rust_access_memory_lib.wasm.
The Go SDK application must call allocate
from the WasmEdge VM to get a pointer to the array.
It will then call the fib_array()
function in Rust and pass in the pointer.
After the functions return, the Go application will use the WasmEdge store
API to construct an array from the pointer in the call parameter (fib_array()
) or in the return value (fib_array_return_memory()
).
The Go app will eventually call deallocate
to free the memory space.
package main
import (
"fmt"
"os"
"unsafe"
"github.com/second-state/WasmEdge-go/wasmedge"
)
func main() {
wasmedge.SetLogErrorLevel()
conf := wasmedge.NewConfigure(wasmedge.WASI)
store := wasmedge.NewStore()
vm := wasmedge.NewVMWithConfigAndStore(conf, store)
wasi := vm.GetImportModule(wasmedge.WASI)
wasi.InitWasi(
os.Args[1:],
os.Environ(),
[]string{".:."},
)
err := vm.LoadWasmFile(os.Args[1])
if err != nil {
fmt.Println("failed to load wasm")
}
vm.Validate()
vm.Instantiate()
n := int32(10)
p, err := vm.Execute("allocate", 4 * n)
if err != nil {
fmt.Println("allocate failed:", err)
}
fib, err := vm.Execute("fib_array", n, p[0])
if err != nil {
fmt.Println("fib_rray failed:", err)
} else {
fmt.Println("fib_array() returned:", fib[0])
fmt.Printf("fib_array memory at: %p\n", unsafe.Pointer((uintptr)(p[0].(int32))))
mem := store.FindMemory("memory")
if mem != nil {
// int32 occupies 4 bytes
fibArray, err := mem.GetData(uint(p[0].(int32)), uint(n * 4))
if err == nil && fibArray != nil {
fmt.Println("fibArray:", fibArray)
}
}
}
fibP, err := vm.Execute("fib_array_return_memory", n)
if err != nil {
fmt.Println("fib_array_return_memory failed:", err)
} else {
fmt.Printf("fib_array_return_memory memory at: %p\n", unsafe.Pointer((uintptr)(fibP[0].(int32))))
mem := store.FindMemory("memory")
if mem != nil {
// int32 occupies 4 bytes
fibArrayReturnMemory, err := mem.GetData(uint(fibP[0].(int32)), uint(n * 4))
if err == nil && fibArrayReturnMemory != nil {
fmt.Println("fibArrayReturnMemory:", fibArrayReturnMemory)
}
}
}
_, err = vm.Execute("deallocate", p[0].(int32), 4 * n)
if err != nil {
fmt.Println("free failed:", err)
}
exitcode := wasi.WasiGetExitCode()
if exitcode != 0 {
fmt.Println("Go: Running wasm failed, exit code:", exitcode)
}
vm.Release()
store.Release()
conf.Release()
}
To build the Go SDK example, run the following commands.
go get github.com/second-state/WasmEdge-go/wasmedge@v0.10.0
go build run.go
Now you can use the Go application to run the WebAssembly plug-in compiled from Rust.
$ ./run rust_access_memory_lib.wasm
fib_array() returned: 34
fib_array memory at: 0x102d80
fibArray: [0 0 0 0 1 0 0 0 1 0 0 0 2 0 0 0 3 0 0 0 5 0 0 0 8 0 0 0 13 0 0 0 21 0 0 0 34 0 0 0]
fib_array_return_memory memory at: 0x105430
fibArrayReturnMemory: [0 0 0 0 1 0 0 0 1 0 0 0 2 0 0 0 3 0 0 0 5 0 0 0 8 0 0 0 13 0 0 0 21 0 0 0 34 0 0 0]
Pass bytes to TinyGo functions
In this example, we will demonstrate how to call TinyGo-based WebAssembly functions and pass arrays to and from a Go app.
The fibArray
function takes a array as a call parameter and fill it with
a fibonacci sequence of numbers. Alternatively, the fibArrayReturnMemory
function returns
a array of fibonacci sequence of numbers.
package main
import (
"fmt"
"unsafe"
)
func main() {
println("in main")
n := int32(10)
arr := make([]int32, n)
arrP := &arr[0]
fmt.Printf("call fibArray(%d, %p) = %d\n", n, arrP, fibArray(n, arrP))
fmt.Printf("call fibArrayReturnMemory(%d) return %p\n", n, fibArrayReturnMemory(n))
}
// export fibArray
func fibArray(n int32, p *int32) int32 {
arr := unsafe.Slice(p, n)
for i := int32(0); i < n; i++ {
switch {
case i < 2:
arr[i] = i
default:
arr[i] = arr[i-1] + arr[i-2]
}
}
return arr[n-1]
}
// export fibArrayReturnMemory
func fibArrayReturnMemory(n int32) *int32 {
arr := make([]int32, n)
for i := int32(0); i < n; i++ {
switch {
case i < 2:
arr[i] = i
default:
arr[i] = arr[i-1] + arr[i-2]
}
}
return &arr[0]
}
Use the TinyGo compiler tools to compile the Go source code into a WebAssembly bytecode application.
tinygo build -o fib.wasm -target wasi fib.go
The Go SDK application must call malloc
from the WasmEdge VM to get a pointer to the array.
It will then call the fibArray()
function in TinyGo with the pointer.
After the functions return, the Go app uses the WasmEdge SDK's store
API to construct an array from the pointer in the call parameter (fibArray()
) or in the return value (fibArrayReturnMemory()
).
The Go application will eventually call free
to free the memory space.
package main
import (
"fmt"
"os"
"unsafe"
"github.com/second-state/WasmEdge-go/wasmedge"
)
func main() {
wasmedge.SetLogErrorLevel()
conf := wasmedge.NewConfigure(wasmedge.WASI)
store := wasmedge.NewStore()
vm := wasmedge.NewVMWithConfigAndStore(conf, store)
wasi := vm.GetImportModule(wasmedge.WASI)
wasi.InitWasi(
os.Args[1:],
os.Environ(),
[]string{".:."},
)
err := vm.LoadWasmFile(os.Args[1])
if err != nil {
fmt.Println("failed to load wasm")
}
vm.Validate()
vm.Instantiate()
n := int32(10)
p, err := vm.Execute("malloc", n)
if err != nil {
fmt.Println("malloc failed:", err)
}
fib, err := vm.Execute("fibArray", n, p[0])
if err != nil {
fmt.Println("fibArray failed:", err)
} else {
fmt.Println("fibArray() returned:", fib[0])
fmt.Printf("fibArray memory at: %p\n", unsafe.Pointer((uintptr)(p[0].(int32))))
mem := store.FindMemory("memory")
if mem != nil {
// int32 occupies 4 bytes
fibArray, err := mem.GetData(uint(p[0].(int32)), uint(n * 4))
if err == nil && fibArray != nil {
fmt.Println("fibArray:", fibArray)
}
}
}
fibP, err := vm.Execute("fibArrayReturnMemory", n)
if err != nil {
fmt.Println("fibArrayReturnMemory failed:", err)
} else {
fmt.Printf("fibArrayReturnMemory memory at: %p\n", unsafe.Pointer((uintptr)(fibP[0].(int32))))
mem := store.FindMemory("memory")
if mem != nil {
// int32 occupies 4 bytes
fibArrayReturnMemory, err := mem.GetData(uint(fibP[0].(int32)), uint(n * 4))
if err == nil && fibArrayReturnMemory != nil {
fmt.Println("fibArrayReturnMemory:", fibArrayReturnMemory)
}
}
}
_, err = vm.Execute("free", p...)
if err != nil {
fmt.Println("free failed:", err)
}
exitcode := wasi.WasiGetExitCode()
if exitcode != 0 {
fmt.Println("Go: Running wasm failed, exit code:", exitcode)
}
vm.Release()
store.Release()
conf.Release()
}
To build the Go SDK example, run the following commands.
go get github.com/second-state/WasmEdge-go/wasmedge@v0.10.0
go build run.go
Now you can use the Go application to run the WebAssembly plug-in compiled from TinyGo.
$ ./run fib.wasm
fibArray() returned: 34
fibArray memory at: 0x14d3c
fibArray: [0 0 0 0 1 0 0 0 1 0 0 0 2 0 0 0 3 0 0 0 5 0 0 0 8 0 0 0 13 0 0 0 21 0 0 0 34 0 0 0]
fibArrayReturnMemory memory at: 0x14d4c
fibArrayReturnMemory: [0 0 0 0 1 0 0 0 1 0 0 0 2 0 0 0 3 0 0 0 5 0 0 0 8 0 0 0 13 0 0 0 21 0 0 0 34 0 0 0]
Tensorflow
In this section, we will show you how to create a Tensorflow inference function in Rust for image classification, and then embed it into a Go application. The project source code is available here.
Rust function compiled into WebAssembly
The Rust function for image classification is available here. It utilizes the WasmEdge Tensorflow extension API as well as the wasmedge_bindgen for passing call parameters.
#![allow(unused)] fn main() { #[wasmedge_bindgen] fn infer(image_data: Vec<u8>) -> Result<Vec<u8>, String> { ... ... let flat_img = image::imageops::thumbnail(&img, 192, 192); let model_data: &[u8] = include_bytes!("lite-model_aiy_vision_classifier_food_V1_1.tflite"); let labels = include_str!("aiy_food_V1_labelmap.txt"); let mut session = wasmedge_tensorflow_interface::Session::new( model_data, wasmedge_tensorflow_interface::ModelType::TensorFlowLite, ); session .add_input("input", &flat_img, &[1, 192, 192, 3]) .run(); let res_vec: Vec<u8> = session.get_output("MobilenetV1/Predictions/Softmax"); ... ... } }
You can use the standard Cargo
command to build it into a WebAssembly function.
cd rust_tflite_food
cargo build --target wasm32-wasi --release
cp target/wasm32-wasi/release/rust_tflite_food_lib.wasm ../
cd ../
You can use our AOT compiler wasmedgec
to instrument the WebAssembly file to make it run much faster. Learn more.
wasmedgec rust_tflite_food_lib.wasm rust_tflite_food_lib.wasm
Go host app
The Go host app source code shows how to instantiate a WasmEdge runtime with the Tensorflow extension, and how to pass the image data to the Rust function in WasmEdge to run the inference.
func main() {
// Expected Args[0]: program name (./tflite_food)
// Expected Args[1]: wasm file (rust_tflite_food_lib.wasm)
// Expected Args[2]: input image name (food.jpg)
wasmedge.SetLogErrorLevel()
// Set Tensorflow not to print debug info
os.Setenv("TF_CPP_MIN_LOG_LEVEL", "3")
os.Setenv("TF_CPP_MIN_VLOG_LEVEL", "3")
var conf = wasmedge.NewConfigure(wasmedge.WASI)
var vm = wasmedge.NewVMWithConfig(conf)
var wasi = vm.GetImportModule(wasmedge.WASI)
wasi.InitWasi(
os.Args[1:], // The args
os.Environ(), // The envs
[]string{".:."}, // The mapping preopens
)
// Register WasmEdge-tensorflow
var tfmod = wasmedge.NewTensorflowModule()
var tflitemod = wasmedge.NewTensorflowLiteModule()
vm.RegisterModule(tfmod)
vm.RegisterModule(tflitemod)
// Load and validate the wasm
vm.LoadWasmFile(os.Args[1])
vm.Validate()
// Instantiate the bindgen and vm
bg := bindgen.Instantiate(vm)
img, _ := ioutil.ReadFile(os.Args[2])
if res, err := bg.Execute("infer", img); err != nil {
fmt.Println(err)
} else {
fmt.Println(string(res))
}
bg.Release()
vm.Release()
conf.Release()
tfmod.Release()
tflitemod.Release()
}
Build and run
You must have WasmEdge with its tensorflow extension installed on your machine. Checkout the install guide for details.
The following command builds the Go host application with the WasmEdge Go SDK and its tensorflow extension.
go build -tags tensorflow
Now you can run the Go application. It calls the WebAssembly function in WasmEdge to run inference on the input image.
./tflite_food rust_tflite_food_lib.wasm food.jpg
The results are as follows.
Go: Args: [./tflite_food rust_tflite_food_lib.wasm food.jpg]
It is very likely a Hot dog in the picture
Embed a bindgen function
The
wasm_bindgen
approach discussed in this chapter is deprecated. We encourage you to check out the wasmedge_bindgen approach or to pass memory pointers directly instead.
In this example, we will demonstrate how to call a few simple WebAssembly functions from a Go app. The functions are written in Rust, and require complex call parameters and return values. The #[wasm_bindgen]
macro is needed for the compiler tools to auto-generate the correct code to pass call parameters from Go to WebAssembly.
The WebAssembly spec only supports a few simple data types out of the box. It does not support types such as string and array. In order to pass rich types in Go to WebAssembly, the compiler needs to convert them to simple integers. For example, it converts a string into an integer memory address and an integer length. The wasm_bindgen
tool, embedded in rustwasmc, does this conversion automatically.
At this time, we require Rust compiler version 1.50 or less in order for WebAssembly functions to work with WasmEdge's Go API. We will catch up to the latest Rust compiler version once the Interface Types spec is finalized and supported.
#![allow(unused)] fn main() { use wasm_bindgen::prelude::*; use num_integer::lcm; use sha3::{Digest, Sha3_256, Keccak256}; #[wasm_bindgen] pub fn say(s: &str) -> String { let r = String::from("hello "); return r + s; } #[wasm_bindgen] pub fn obfusticate(s: String) -> String { (&s).chars().map(|c| { match c { 'A' ..= 'M' | 'a' ..= 'm' => ((c as u8) + 13) as char, 'N' ..= 'Z' | 'n' ..= 'z' => ((c as u8) - 13) as char, _ => c } }).collect() } #[wasm_bindgen] pub fn lowest_common_multiple(a: i32, b: i32) -> i32 { let r = lcm(a, b); return r; } #[wasm_bindgen] pub fn sha3_digest(v: Vec<u8>) -> Vec<u8> { return Sha3_256::digest(&v).as_slice().to_vec(); } #[wasm_bindgen] pub fn keccak_digest(s: &[u8]) -> Vec<u8> { return Keccak256::digest(s).as_slice().to_vec(); } }
First, we use the rustwasmc tool to compile the Rust source code into WebAssembly bytecode functions using Rust 1.50 or less.
$ rustup default 1.50.0
$ cd rust_bindgen_funcs
$ rustwasmc build
# The output WASM will be pkg/rust_bindgen_funcs_lib_bg.wasm
The Go source code to run the WebAssembly function in WasmEdge is as follows. The ExecuteBindgen()
function calls the WebAssembly function and passes the call parameters using the #[wasm_bindgen]
convention.
package main
import (
"fmt"
"os"
"github.com/second-state/WasmEdge-go/wasmedge"
)
func main() {
// Expected Args[0]: program name (./bindgen_funcs)
// Expected Args[1]: wasm or wasm-so file (rust_bindgen_funcs_lib_bg.wasm))
wasmedge.SetLogErrorLevel()
var conf = wasmedge.NewConfigure(wasmedge.WASI)
var vm = wasmedge.NewVMWithConfig(conf)
var wasi = vm.GetImportModule(wasmedge.WASI)
wasi.InitWasi(
os.Args[1:], // The args
os.Environ(), // The envs
[]string{".:."}, // The mapping directories
)
// Instantiate wasm
vm.LoadWasmFile(os.Args[1])
vm.Validate()
vm.Instantiate()
// Run bindgen functions
var res interface{}
var err error
res, err = vm.ExecuteBindgen("say", wasmedge.Bindgen_return_array, []byte("bindgen funcs test"))
if err == nil {
fmt.Println("Run bindgen -- say:", string(res.([]byte)))
}
res, err = vm.ExecuteBindgen("obfusticate", wasmedge.Bindgen_return_array, []byte("A quick brown fox jumps over the lazy dog"))
if err == nil {
fmt.Println("Run bindgen -- obfusticate:", string(res.([]byte)))
}
res, err = vm.ExecuteBindgen("lowest_common_multiple", wasmedge.Bindgen_return_i32, int32(123), int32(2))
if err == nil {
fmt.Println("Run bindgen -- lowest_common_multiple:", res.(int32))
}
res, err = vm.ExecuteBindgen("sha3_digest", wasmedge.Bindgen_return_array, []byte("This is an important message"))
if err == nil {
fmt.Println("Run bindgen -- sha3_digest:", res.([]byte))
}
res, err = vm.ExecuteBindgen("keccak_digest", wasmedge.Bindgen_return_array, []byte("This is an important message"))
if err == nil {
fmt.Println("Run bindgen -- keccak_digest:", res.([]byte))
}
vm.Release()
conf.Release()
}
Next, let's build the Go application with the WasmEdge Go SDK.
go get github.com/second-state/WasmEdge-go/wasmedge@v0.10.0
go build
Run the Go application and it will run the WebAssembly functions embedded in the WasmEdge runtime.
$ ./bindgen_funcs rust_bindgen_funcs/pkg/rust_bindgen_funcs_lib_bg.wasm
Run bindgen -- say: hello bindgen funcs test
Run bindgen -- obfusticate: N dhvpx oebja sbk whzcf bire gur ynml qbt
Run bindgen -- lowest_common_multiple: 246
Run bindgen -- sha3_digest: [87 27 231 209 189 105 251 49 159 10 211 250 15 159 154 181 43 218 26 141 56 199 25 45 60 10 20 163 54 211 195 203]
Run bindgen -- keccak_digest: [126 194 241 200 151 116 227 33 216 99 159 22 107 3 177 169 216 191 114 156 174 193 32 159 246 228 245 133 52 75 55 27]
WasmEdge Go v0.10.0 API references
The followings are the guides to working with the WasmEdge-Go SDK.
This document is for the newest v0.10.0
version. For the stable v0.9.1
version, please refer to the document here.
Developers can refer here to upgrade to v0.10.0.
Table of Contents
Getting Started
The WasmEdge-go requires golang version >= 1.16. Please check your golang version before installation. Developers can download golang here.
$ go version
go version go1.16.5 linux/amd64
WasmEdge Installation
Developers must install the WasmEdge shared library with the same WasmEdge-go
release or pre-release version.
curl -sSf https://raw.githubusercontent.com/WasmEdge/WasmEdge/master/utils/install.sh | bash -s -- -v 0.10.0
For the developers need the TensorFlow
or Image
extension for WasmEdge-go
, please install the WasmEdge
with extensions:
curl -sSf https://raw.githubusercontent.com/WasmEdge/WasmEdge/master/utils/install.sh | bash -s -- -e tf,image -v 0.10.0
Noticed that the TensorFlow
and Image
extensions are only for the Linux
platforms.
After installation, developers can use the source
command to update the include and linking searching path.
Get WasmEdge-go
After the WasmEdge installation, developers can get the WasmEdge-go
package and build it in your Go project directory.
go get github.com/second-state/WasmEdge-go/wasmedge@v0.10.0
go build
WasmEdge-go Extensions
By default, the WasmEdge-go
only turns on the basic runtime.
WasmEdge-go
has the following extensions (on the Linux platforms only):
-
Tensorflow
-
This extension supports the host functions in WasmEdge-tensorflow.
-
The
TensorFlow
extension when installingWasmEdge
is required. Please installWasmEdge
with the-e tensorflow
command. -
For using this extension, the tag
tensorflow
when building is required:go build -tags tensorflow
-
-
Image
-
This extension supports the host functions in WasmEdge-image.
-
The
Image
extension when installingWasmEdge
is required. Please installWasmEdge
with the-e image
command. -
For using this extension, the tag
image
when building is required:go build -tags image
-
Users can also turn on the multiple extensions when building:
go build -tags image,tensorflow
Example Repository
Developers can refer to the example repository for the WasmEdge-Go examples.
Example of Embedding A Function with wasmedge-bindgen
In this example, we will demonstrate how to call a few simple WebAssembly functions with wasmedge-bindgen from a Golang app. The functions are written in Rust, and require complex call parameters and return values.
While the WebAssembly only supports a few simple data types out of the box. It does not support types such as string and array. In order to pass rich types in Golang to WebAssembly, the compiler needs to convert them to simple integers. For example, it converts a string into an integer memory address and an integer length. The #[wasmedge_bindgen]
macro does this conversion automatically, combining it with Golang's wasmedge-bindgen
package to auto-generate the correct code to pass call parameters from Golang to WebAssembly.
#![allow(unused)] fn main() { use wasmedge_bindgen::*; use wasmedge_bindgen_macro::*; use num_integer::lcm; use sha3::{Digest, Sha3_256, Keccak256}; use serde::{Serialize, Deserialize}; #[derive(Serialize, Deserialize, Debug)] struct Point { x: f32, y: f32 } #[derive(Serialize, Deserialize, Debug)] struct Line { points: Vec<Point>, valid: bool, length: f32, desc: String } #[wasmedge_bindgen] pub fn create_line(p1: String, p2: String, desc: String) -> String { let point1: Point = serde_json::from_str(p1.as_str()).unwrap(); let point2: Point = serde_json::from_str(p2.as_str()).unwrap(); let length = ((point1.x - point2.x) * (point1.x - point2.x) + (point1.y - point2.y) * (point1.y - point2.y)).sqrt(); let valid = if length == 0.0 { false } else { true }; let line = Line { points: vec![point1, point2], valid: valid, length: length, desc: desc }; return serde_json::to_string(&line).unwrap(); } #[wasmedge_bindgen] pub fn say(s: String) -> String { let r = String::from("hello "); return r + s.as_str(); } #[wasmedge_bindgen] pub fn obfusticate(s: String) -> String { (&s).chars().map(|c| { match c { 'A' ..= 'M' | 'a' ..= 'm' => ((c as u8) + 13) as char, 'N' ..= 'Z' | 'n' ..= 'z' => ((c as u8) - 13) as char, _ => c } }).collect() } #[wasmedge_bindgen] pub fn lowest_common_multiple(a: i32, b: i32) -> i32 { return lcm(a, b); } #[wasmedge_bindgen] pub fn sha3_digest(v: Vec<u8>) -> Vec<u8> { return Sha3_256::digest(&v).as_slice().to_vec(); } #[wasmedge_bindgen] pub fn keccak_digest(s: Vec<u8>) -> Vec<u8> { return Keccak256::digest(&s).as_slice().to_vec(); } }
First, compile the Rust source code into WebAssembly bytecode functions.
rustup target add wasm32-wasi
cd rust_bindgen_funcs
cargo build --target wasm32-wasi --release
# The output WASM will be target/wasm32-wasi/release/rust_bindgen_funcs_lib.wasm
The Golang source code to run the WebAssembly function in WasmEdge is as follows. The bg.Execute()
function calls the WebAssembly function and passes the parameters with the wasmedge-bindgen
supporting.
package main
import (
"fmt"
"os"
"github.com/second-state/WasmEdge-go/wasmedge"
bindgen "github.com/second-state/wasmedge-bindgen/host/go"
)
func main() {
// Expected Args[0]: program name (./bindgen_funcs)
// Expected Args[1]: wasm file (rust_bindgen_funcs_lib.wasm))
// Set not to print debug info
wasmedge.SetLogErrorLevel()
// Create configure
var conf = wasmedge.NewConfigure(wasmedge.WASI)
// Create VM with configure
var vm = wasmedge.NewVMWithConfig(conf)
// Init WASI
var wasi = vm.GetImportModule(wasmedge.WASI)
wasi.InitWasi(
os.Args[1:], // The args
os.Environ(), // The envs
[]string{".:."}, // The mapping preopens
)
// Load and validate the wasm
vm.LoadWasmFile(os.Args[1])
vm.Validate()
// Instantiate the bindgen and vm
bg := bindgen.Instantiate(vm)
// create_line: string, string, string -> string (inputs are JSON stringified)
res, err := bg.Execute("create_line", "{\"x\":2.5,\"y\":7.8}", "{\"x\":2.5,\"y\":5.8}", "A thin red line")
if err == nil {
fmt.Println("Run bindgen -- create_line:", res[0].(string))
} else {
fmt.Println("Run bindgen -- create_line FAILED", err)
}
// say: string -> string
res, err = bg.Execute("say", "bindgen funcs test")
if err == nil {
fmt.Println("Run bindgen -- say:", res[0].(string))
} else {
fmt.Println("Run bindgen -- say FAILED")
}
// obfusticate: string -> string
res, err = bg.Execute("obfusticate", "A quick brown fox jumps over the lazy dog")
if err == nil {
fmt.Println("Run bindgen -- obfusticate:", res[0].(string))
} else {
fmt.Println("Run bindgen -- obfusticate FAILED")
}
// lowest_common_multiple: i32, i32 -> i32
res, err = bg.Execute("lowest_common_multiple", int32(123), int32(2))
if err == nil {
fmt.Println("Run bindgen -- lowest_common_multiple:", res[0].(int32))
} else {
fmt.Println("Run bindgen -- lowest_common_multiple FAILED")
}
// sha3_digest: array -> array
res, err = bg.Execute("sha3_digest", []byte("This is an important message"))
if err == nil {
fmt.Println("Run bindgen -- sha3_digest:", res[0].([]byte))
} else {
fmt.Println("Run bindgen -- sha3_digest FAILED")
}
// keccak_digest: array -> array
res, err = bg.Execute("keccak_digest", []byte("This is an important message"))
if err == nil {
fmt.Println("Run bindgen -- keccak_digest:", res[0].([]byte))
} else {
fmt.Println("Run bindgen -- keccak_digest FAILED")
}
bg.Release()
vm.Release()
conf.Release()
}
Next, build the Golang application with the WasmEdge Golang SDK.
go get github.com/second-state/WasmEdge-go/wasmedge@v0.10.0
go get github.com/second-state/wasmedge-bindgen@v0.1.12
go build
Run the Golang application and it will run the WebAssembly functions embedded in the WasmEdge runtime.
$ ./bindgen_funcs rust_bindgen_funcs/target/wasm32-wasi/release/rust_bindgen_funcs_lib.wasm
Run bindgen -- create_line: {"points":[{"x":2.5,"y":7.8},{"x":2.5,"y":5.8}],"valid":true,"length":2.0,"desc":"A thin red line"}
Run bindgen -- say: hello bindgen funcs test
Run bindgen -- obfusticate: N dhvpx oebja sbk whzcf bire gur ynml qbt
Run bindgen -- lowest_common_multiple: 246
Run bindgen -- sha3_digest: [87 27 231 209 189 105 251 49 159 10 211 250 15 159 154 181 43 218 26 141 56 199 25 45 60 10 20 163 54 211 195 203]
Run bindgen -- keccak_digest: [126 194 241 200 151 116 227 33 216 99 159 22 107 3 177 169 216 191 114 156 174 193 32 159 246 228 245 133 52 75 55 27]
Example of Embedding A Full WASI Program
Note: You can use the latest Rust compiler to create a standalone WasmEdge application with a main.rs
functions and then embed it into a Golang application.
Besides functions, the WasmEdge Golang SDK can also embed standalone WebAssembly applications — i.e. a Rust application with a main()
function compiled into WebAssembly.
Our demo Rust application reads from a file.
use std::env; use std::fs::File; use std::io::{self, BufRead}; fn main() { // Get the argv. let args: Vec<String> = env::args().collect(); if args.len() <= 1 { println!("Rust: ERROR - No input file name."); return; } // Open the file. println!("Rust: Opening input file \"{}\"...", args[1]); let file = match File::open(&args[1]) { Err(why) => { println!("Rust: ERROR - Open file \"{}\" failed: {}", args[1], why); return; }, Ok(file) => file, }; // Read lines. let reader = io::BufReader::new(file); let mut texts:Vec<String> = Vec::new(); for line in reader.lines() { if let Ok(text) = line { texts.push(text); } } println!("Rust: Read input file \"{}\" succeeded.", args[1]); // Get stdin to print lines. println!("Rust: Please input the line number to print the line of file."); let stdin = io::stdin(); for line in stdin.lock().lines() { let input = line.unwrap(); match input.parse::<usize>() { Ok(n) => if n > 0 && n <= texts.len() { println!("{}", texts[n - 1]); } else { println!("Rust: ERROR - Line \"{}\" is out of range.", n); }, Err(e) => println!("Rust: ERROR - Input \"{}\" is not an integer: {}", input, e), } } println!("Rust: Process end."); }
Use the rustwasmc
tool to compile the application into WebAssembly.
cd rust_readfile
rustwasmc build
# The output file will be at `pkg/rust_readfile.wasm`.
Or you can compile the application into WebAssembly directly by cargo
:
cd rust_readfile
# Need to add the `wasm32-wasi` target.
rustup target add wasm32-wasi
cargo build --release --target=wasm32-wasi
# The output wasm will be at `target/wasm32-wasi/release/rust_readfile.wasm`.
The Golang source code to run the WebAssembly function in WasmEdge is as follows.
package main
import (
"os"
"github.com/second-state/WasmEdge-go/wasmedge"
)
func main() {
wasmedge.SetLogErrorLevel()
var conf = wasmedge.NewConfigure(wasmedge.REFERENCE_TYPES)
conf.AddConfig(wasmedge.WASI)
var vm = wasmedge.NewVMWithConfig(conf)
var wasi = vm.GetImportModule(wasmedge.WASI)
wasi.InitWasi(
os.Args[1:], // The args
os.Environ(), // The envs
[]string{".:."}, // The mapping directories
)
// Instantiate and run WASM "_start" function, which refers to the main() function
vm.RunWasmFile(os.Args[1], "_start")
vm.Release()
conf.Release()
}
Next, build the Golang application with the WasmEdge Golang SDK.
go get github.com/second-state/WasmEdge-go/wasmedge@v0.10.0
go build
Run the Golang application.
$ ./read_file rust_readfile/pkg/rust_readfile.wasm file.txt
Rust: Opening input file "file.txt"...
Rust: Read input file "file.txt" succeeded.
Rust: Please input the line number to print the line of file.
# Input "5" and press Enter.
5
# The output will be the 5th line of `file.txt`:
abcDEF___!@#$%^
# To terminate the program, send the EOF (Ctrl + D).
^D
# The output will print the terminate message:
Rust: Process end.
For more examples, please refer to the example repository.
WasmEdge-go Basics
In this partition, we will introduce the utilities and concepts of WasmEdge-go APIs and data structures.
Version
The Version
related APIs provide developers to check for the installed WasmEdge shared library version.
import "github.com/second-state/WasmEdge-go/wasmedge"
verstr := wasmedge.GetVersion() // Will be `string` of WasmEdge version.
vermajor := wasmedge.GetVersionMajor() // Will be `uint` of WasmEdge major version number.
verminor := wasmedge.GetVersionMinor() // Will be `uint` of WasmEdge minor version number.
verpatch := wasmedge.GetVersionPatch() // Will be `uint` of WasmEdge patch version number.
Logging Settings
The wasmedge.SetLogErrorLevel()
and wasmedge.SetLogDebugLevel()
APIs can set the logging system to debug level or error level. By default, the error level is set, and the debug info is hidden.
Value Types
In WasmEdge-go, the APIs will automatically do the conversion for the built-in types, and implement the data structure for the reference types.
-
Number types:
i32
,i64
,f32
, andf64
- Convert the
uint32
andint32
toi32
automatically when passing a value into WASM. - Convert the
uint64
andint64
toi64
automatically when passing a value into WASM. - Convert the
uint
andint
toi32
automatically when passing a value into WASM in 32-bit system. - Convert the
uint
andint
toi64
automatically when passing a value into WASM in 64-bit system. - Convert the
float32
tof32
automatically when passing a value into WASM. - Convert the
float64
tof64
automatically when passing a value into WASM. - Convert the
i32
from WASM toint32
when getting a result. - Convert the
i64
from WASM toint64
when getting a result. - Convert the
f32
from WASM tofloat32
when getting a result. - Convert the
f64
from WASM tofloat64
when getting a result.
- Convert the
-
Number type:
v128
for theSIMD
proposalDevelopers should use the
wasmedge.NewV128()
to generate av128
value, and use thewasmedge.GetV128()
to get the value.val := wasmedge.NewV128(uint64(1234), uint64(5678)) high, low := val.GetVal() // `high` will be uint64(1234), `low` will be uint64(5678)
-
Reference types:
FuncRef
andExternRef
for theReference-Types
proposalvar funccxt *wasmedge.Function = ... // Create or get function object. funcref := wasmedge.NewFuncRef(funccxt) // Create a `FuncRef` with the function object. num := 1234 // `num` is a `int`. externref := wasmedge.NewExternRef(&num) // Create an `ExternRef` which reference to the `num`. num = 5678 // Modify the `num` to 5678. numref := externref.GetRef().(*int) // Get the original reference from the `ExternRef`. fmt.Println(*numref) // Will print `5678`. numref.Release() // Should call the `Release` method.
Results
The Result
object specifies the execution status. Developers can use the Error()
function to get the error message.
// Assume that `vm` is a `wasmedge.VM` object.
res, err = vm.Execute(...) // Ignore the detail of parameters.
// Assume that `res, err` are the return values for executing a function with `vm`.
if err != nil {
fmt.Println("Error message:", err.Error())
}
Contexts And Their Life Cycles
The objects, such as VM
, Store
, and Function
, etc., are composed of Context
s in the WasmEdge shared library.
All of the contexts can be created by calling the corresponding New
APIs, developers should also call the corresponding Release
functions of the contexts to release the resources.
Noticed that it's not necessary to call the Release
functions for the contexts which are retrieved from other contexts but not created from the New
APIs.
// Create a Configure.
conf := wasmedge.NewConfigure()
// Release the `conf` immediately.
conf.Release()
The details of other contexts will be introduced later.
WASM Data Structures
The WASM data structures are used for creating instances or can be queried from instance contexts. The details of instances creation will be introduced in the Instances.
-
Limit
The
Limit
struct presents the minimum and maximum value data structure.lim1 := wasmedge.NewLimit(12) fmt.Println(lim1.HasMax()) // Will print `false`. fmt.Println(lim1.GetMin()) // Will print `12`. lim2 := wasmedge.NewLimitWithMax(15, 50) fmt.Println(lim2.HasMax()) // Will print `true`. fmt.Println(lim2.GetMin()) // Will print `15`. fmt.Println(lim2.GetMax()) // Will print `50`.
-
Function type context
The
FunctionType
is an object holds the function type context and used for theFunction
creation, checking the value types of aFunction
instance, or getting the function type with function name from VM. Developers can use theFunctionType
APIs to get the parameter or return value types information.functype := wasmedge.NewFunctionType( []wasmedge.ValType{ wasmedge.ValType_ExternRef, wasmedge.ValType_I32, wasmedge.ValType_I64, }, []wasmedge.ValType{ wasmedge.ValType_F32, wasmedge.ValType_F64, }) plen := functype.GetParametersLength() // `plen` will be 3. rlen := functype.GetReturnsLength() // `rlen` will be 2. plist := functype.GetParameters() // `plist` will be `[]wasmedge.ValType{wasmedge.ValType_ExternRef, wasmedge.ValType_I32, wasmedge.ValType_I64}`. rlist := functype.GetReturns() // `rlist` will be `[]wasmedge.ValType{wasmedge.ValType_F32, wasmedge.ValType_F64}`. functype.Release()
-
Table type context
The
TableType
is an object holds the table type context and used forTable
instance creation or getting information fromTable
instances.lim := wasmedge.NewLimit(12) tabtype := wasmedge.NewTableType(wasmedge.RefType_ExternRef, lim) rtype := tabtype.GetRefType() // `rtype` will be `wasmedge.RefType_ExternRef`. getlim := tabtype.GetLimit() // `getlim` will be the same value as `lim`. tabtype.Release()
-
Memory type context
The
MemoryType
is an object holds the memory type context and used forMemory
instance creation or getting information fromMemory
instances.lim := wasmedge.NewLimit(1) memtype := wasmedge.NewMemoryType(lim) getlim := memtype.GetLimit() // `getlim` will be the same value as `lim`. memtype.Release()
-
Global type context
The
GlobalType
is an object holds the global type context and used forGlobal
instance creation or getting information fromGlobal
instances.globtype := wasmedge.NewGlobalType(wasmedge.ValType_F64, wasmedge.ValMut_Var) vtype := globtype.GetValType() // `vtype` will be `wasmedge.ValType_F64`. vmut := globtype.GetMutability() // `vmut` will be `wasmedge.ValMut_Var`. globtype.Release()
-
Import type context
The
ImportType
is an object holds the import type context and used for getting the imports information from a AST Module. Developers can get the external type (function
,table
,memory
, orglobal
), import module name, and external name from anImportType
object. The details about queryingImportType
objects will be introduced in the AST Module.var ast *wasmedge.AST = ... // Assume that `ast` is returned by the `Loader` for the result of loading a WASM file. imptypelist := ast.ListImports() // Assume that `imptypelist` is an array listed from the `ast` for the imports. for i, imptype := range imptypelist { exttype := imptype.GetExternalType() // The `exttype` must be one of `wasmedge.ExternType_Function`, `wasmedge.ExternType_Table`, // wasmedge.ExternType_Memory`, or `wasmedge.ExternType_Global`. modname := imptype.GetModuleName() extname := imptype.GetExternalName() // Get the module name and external name of the imports. extval := imptype.GetExternalValue() // The `extval` is the type of `interface{}` which indicates one of `*wasmedge.FunctionType`, // `*wasmedge.TableType`, `*wasmedge.MemoryType`, or `*wasmedge.GlobalType`. }
-
Export type context
The
ExportType
is an object holds the export type context is used for getting the exports information from a AST Module. Developers can get the external type (function
,table
,memory
, orglobal
) and external name from anExport Type
context. The details about queryingExportType
objects will be introduced in the AST Module.var ast *wasmedge.AST = ... // Assume that `ast` is returned by the `Loader` for the result of loading a WASM file. exptypelist := ast.ListExports() // Assume that `exptypelist` is an array listed from the `ast` for the exports. for i, exptype := range exptypelist { exttype := exptype.GetExternalType() // The `exttype` must be one of `wasmedge.ExternType_Function`, `wasmedge.ExternType_Table`, // wasmedge.ExternType_Memory`, or `wasmedge.ExternType_Global`. extname := exptype.GetExternalName() // Get the external name of the exports. extval := exptype.GetExternalValue() // The `extval` is the type of `interface{}` which indicates one of `*wasmedge.FunctionType`, // `*wasmedge.TableType`, `*wasmedge.MemoryType`, or `*wasmedge.GlobalType`. }
Configurations
The configuration object, wasmedge.Configure
, manages the configurations for Loader
, Validator
, Executor
, VM
, and Compiler
.
Developers can adjust the settings about the proposals, VM host pre-registrations (such as WASI
), and AOT compiler options, and then apply the Configure
object to create other runtime objects.
-
Proposals
WasmEdge supports turning on or off the WebAssembly proposals. This configuration is effective in any contexts created with the
Configure
object.const ( IMPORT_EXPORT_MUT_GLOBALS = Proposal(C.WasmEdge_Proposal_ImportExportMutGlobals) NON_TRAP_FLOAT_TO_INT_CONVERSIONS = Proposal(C.WasmEdge_Proposal_NonTrapFloatToIntConversions) SIGN_EXTENSION_OPERATORS = Proposal(C.WasmEdge_Proposal_SignExtensionOperators) MULTI_VALUE = Proposal(C.WasmEdge_Proposal_MultiValue) BULK_MEMORY_OPERATIONS = Proposal(C.WasmEdge_Proposal_BulkMemoryOperations) REFERENCE_TYPES = Proposal(C.WasmEdge_Proposal_ReferenceTypes) SIMD = Proposal(C.WasmEdge_Proposal_SIMD) TAIL_CALL = Proposal(C.WasmEdge_Proposal_TailCall) ANNOTATIONS = Proposal(C.WasmEdge_Proposal_Annotations) MEMORY64 = Proposal(C.WasmEdge_Proposal_Memory64) THREADS = Proposal(C.WasmEdge_Proposal_Threads) EXCEPTION_HANDLING = Proposal(C.WasmEdge_Proposal_ExceptionHandling) FUNCTION_REFERENCES = Proposal(C.WasmEdge_Proposal_FunctionReferences) )
Developers can add or remove the proposals into the
Configure
object.// By default, the following proposals have turned on initially: // * IMPORT_EXPORT_MUT_GLOBALS // * NON_TRAP_FLOAT_TO_INT_CONVERSIONS // * SIGN_EXTENSION_OPERATORS // * MULTI_VALUE // * BULK_MEMORY_OPERATIONS // * REFERENCE_TYPES // * SIMD // For the current WasmEdge version, the following proposals are supported: // * TAIL_CALL // * MULTI_MEMORIES // * THREADS conf := wasmedge.NewConfigure() // Developers can also pass the proposals as parameters: // conf := wasmedge.NewConfigure(wasmedge.SIMD, wasmedge.BULK_MEMORY_OPERATIONS) conf.AddConfig(wasmedge.SIMD) conf.RemoveConfig(wasmedge.REFERENCE_TYPES) is_bulkmem := conf.HasConfig(wasmedge.BULK_MEMORY_OPERATIONS) // The `is_bulkmem` will be `true`. conf.Release()
-
Host registrations
This configuration is used for the
VM
context to turn on theWASI
orwasmedge_process
supports and only effective inVM
objects.const ( WASI = HostRegistration(C.WasmEdge_HostRegistration_Wasi) WasmEdge_PROCESS = HostRegistration(C.WasmEdge_HostRegistration_WasmEdge_Process) )
The details will be introduced in the preregistrations of VM context.
conf := wasmedge.NewConfigure() // Developers can also pass the proposals as parameters: // conf := wasmedge.NewConfigure(wasmedge.WASI) conf.AddConfig(wasmedge.WASI) conf.Release()
-
Maximum memory pages
Developers can limit the page size of memory instances by this configuration. When growing the page size of memory instances in WASM execution and exceeding the limited size, the page growing will fail. This configuration is only effective in the
Executor
andVM
objects.conf := wasmedge.NewConfigure() pagesize := conf.GetMaxMemoryPage() // By default, the maximum memory page size in each memory instances is 65536. conf.SetMaxMemoryPage(1234) pagesize := conf.GetMaxMemoryPage() // `pagesize` will be 1234. conf.Release()
-
AOT compiler options
The AOT compiler options configure the behavior about optimization level, output format, dump IR, and generic binary.
const ( // Disable as many optimizations as possible. CompilerOptLevel_O0 = CompilerOptimizationLevel(C.WasmEdge_CompilerOptimizationLevel_O0) // Optimize quickly without destroying debuggability. CompilerOptLevel_O1 = CompilerOptimizationLevel(C.WasmEdge_CompilerOptimizationLevel_O1) // Optimize for fast execution as much as possible without triggering significant incremental compile time or code size growth. CompilerOptLevel_O2 = CompilerOptimizationLevel(C.WasmEdge_CompilerOptimizationLevel_O2) // Optimize for fast execution as much as possible. CompilerOptLevel_O3 = CompilerOptimizationLevel(C.WasmEdge_CompilerOptimizationLevel_O3) // Optimize for small code size as much as possible without triggering significant incremental compile time or execution time slowdowns. CompilerOptLevel_Os = CompilerOptimizationLevel(C.WasmEdge_CompilerOptimizationLevel_Os) // Optimize for small code size as much as possible. CompilerOptLevel_Oz = CompilerOptimizationLevel(C.WasmEdge_CompilerOptimizationLevel_Oz) ) const ( // Native dynamic library format. CompilerOutputFormat_Native = CompilerOutputFormat(C.WasmEdge_CompilerOutputFormat_Native) // WebAssembly with AOT compiled codes in custom section. CompilerOutputFormat_Wasm = CompilerOutputFormat(C.WasmEdge_CompilerOutputFormat_Wasm) )
These configurations are only effective in
Compiler
contexts.conf := wasmedge.NewConfigure() // By default, the optimization level is O3. conf.SetCompilerOptimizationLevel(wasmedge.CompilerOptLevel_O2) // By default, the output format is universal WASM. conf.SetCompilerOutputFormat(wasmedge.CompilerOutputFormat_Native) // By default, the dump IR is `false`. conf.SetCompilerDumpIR(true) // By default, the generic binary is `false`. conf.SetCompilerGenericBinary(true) conf.Release()
-
Statistics options
The statistics options configure the behavior about instruction counting, cost measuring, and time measuring in both runtime and AOT compiler. These configurations are effective in
Compiler
,VM
, andExecutor
objects.conf := wasmedge.NewConfigure() // By default, the intruction counting is `false` when running a compiled-WASM or a pure-WASM. conf.SetStatisticsInstructionCounting(true) // By default, the cost measurement is `false` when running a compiled-WASM or a pure-WASM. conf.SetStatisticsTimeMeasuring(true) // By default, the time measurement is `false` when running a compiled-WASM or a pure-WASM. conf.SetStatisticsCostMeasuring(true) conf.Release()
WasmEdge VM
In this partition, we will introduce the functions of wasmedge.VM
object and show examples of executing WASM functions.
WASM Execution Example With VM Object
The following shows the example of running the WASM for getting the Fibonacci. This example uses the fibonacci.wasm, and the corresponding WAT file is at fibonacci.wat.
(module
(export "fib" (func $fib))
(func $fib (param $n i32) (result i32)
(if
(i32.lt_s (get_local $n)(i32.const 2))
(return (i32.const 1))
)
(return
(i32.add
(call $fib (i32.sub (get_local $n)(i32.const 2)))
(call $fib (i32.sub (get_local $n)(i32.const 1)))
)
)
)
)
-
Run WASM functions rapidly
Create a new Go project first:
mkdir wasmedge_test && cd wasmedge_test go mod init wasmedge_test
Assume that the WASM file
fibonacci.wasm
is copied into the currentwasmedge_test
directory, and create and edit the Go filemain.go
as following:package main import ( "fmt" "github.com/second-state/WasmEdge-go/wasmedge" ) func main() { // Set the logging level. wasmedge.SetLogErrorLevel() // Create the configure context and add the WASI support. // This step is not necessary unless you need WASI support. conf := wasmedge.NewConfigure(wasmedge.WASI) // Create VM with the configure. vm := wasmedge.NewVMWithConfig(conf) res, err := vm.RunWasmFile("fibonacci.wasm", "fib", uint32(21)) if err == nil { fmt.Println("Get fibonacci[21]:", res[0].(int32)) } else { fmt.Println("Run failed:", err.Error()) } vm.Release() conf.Release() }
Then you can build and run the Golang application with the WasmEdge Golang SDK: (the 21 Fibonacci number is 17711 in 0-based index)
$ go get github.com/second-state/WasmEdge-go/wasmedge@v0.10.0 $ go build $ ./wasmedge_test Get fibonacci[21]: 17711
-
Instantiate and run WASM functions manually
Besides the above example, developers can run the WASM functions step-by-step with
VM
object APIs:package main import ( "fmt" "github.com/second-state/WasmEdge-go/wasmedge" ) func main() { // Set the logging level. wasmedge.SetLogErrorLevel() // Create VM. vm := wasmedge.NewVM() var err error var res []interface{} // Step 1: Load WASM file. err = vm.LoadWasmFile("fibonacci.wasm") if err != nil { fmt.Println("Load WASM from file FAILED:", err.Error()) return } // Step 2: Validate the WASM module. err = vm.Validate() if err != nil { fmt.Println("Validation FAILED:", err.Error()) return } // Step 3: Instantiate the WASM module. err = vm.Instantiate() // Developers can load, validate, and instantiate another WASM module // to replace the instantiated one. In this case, the old module will // be cleared, but the registered modules are still kept. if err != nil { fmt.Println("Instantiation FAILED:", err.Error()) return } // Step 4: Execute WASM functions. Parameters: (funcname, args...) res, err = vm.Execute("fib", uint32(25)) // Developers can execute functions repeatedly after instantiation. if err == nil { fmt.Println("Get fibonacci[25]:", res[0].(int32)) } else { fmt.Println("Run failed:", err.Error()) } vm.Release() }
Then you can build and run: (the 25th Fibonacci number is 121393 in 0-based index)
$ go build $ ./wasmedge_test Get fibonacci[25]: 121393
The following graph explains the status of the
VM
object.|========================| |------->| VM: Initiated | | |========================| | | | LoadWasm | | | v | |========================| |--------| VM: Loaded |<-------| | |========================| | | | ^ | | Validate | | Cleanup | LoadWasm | | v | LoadWasm | |========================| | |--------| VM: Validated | | | |========================| | | | ^ | | Instantiate | | | | RegisterModule | | v | | | |========================| | |--------| VM: Instantiated |--------| |========================| | ^ | | -------------- Instantiate, Execute, ExecuteRegistered, ExecuteBindgen, ExecuteBindgenRegistered
The status of the
VM
context would beInited
when created. After loading WASM successfully, the status will beLoaded
. After validating WASM successfully, the status will beValidated
. After instantiating WASM successfully, the status will beInstantiated
, and developers can invoke functions. Developers can register WASM or import objects in any status, but they should instantiate WASM again. Developers can also load WASM in any status, and they should validate and instantiate the WASM module before function invocation. When in theInstantiated
status, developers can instantiate the WASM module again to reset the old WASM runtime structures.
VM Creations
The VM
creation APIs accepts the Configure
object and the Store
object.
Noticed that if the VM
created with the outside Store
object, the VM
will execute WASM on that Store
object. If the Store
object is set into multiple VM
objects, it may causes data conflict when in execution.
The details of the Store
object will be introduced in Store.
conf := wasmedge.NewConfigure()
store := wasmedge.NewStore()
// Create a VM with default configure and store.
vm := wasmedge.NewVM()
vm.Release()
// Create a VM with the specified configure and default store.
vm = wasmedge.NewVMWithConfig(conf)
vm.Release()
// Create a VM with the default configure and specified store.
vm = wasmedge.NewVMWithStore(store)
vm.Release()
// Create a VM with the specified configure and store.
vm = wasmedge.NewVMWithConfigAndStore(conf, store)
vm.Release()
conf.Release()
store.Release()
Preregistrations
WasmEdge provides the following built-in pre-registrations.
-
WASI (WebAssembly System Interface)
Developers can turn on the WASI support for VM in the
Configure
object.conf := wasmedge.NewConfigure(wasmedge.WASI) // Or you can set the `wasmedge.WASI` into the configure object through `(*Configure).AddConfig`. vm := wasmedge.NewVMWithConfig(conf) vm.Release() // The following API can retrieve the pre-registration import objects from the VM object. // This API will return `nil` if the corresponding pre-registration is not set into the configuration. wasiconf := conf.GetImportModule(wasmedge.WASI) // Initialize the WASI. wasiconf.InitWasi(/* ... ignored */) conf.Release()
And also can create the WASI import object from API. The details will be introduced in the Host Functions and the Host Module Registrations.
-
This pre-registration is for the process interface for WasmEdge on
Rust
sources. After turning on this pre-registration, the VM will support thewasmedge_process
host functions.conf := wasmedge.NewConfigure(wasmedge.WasmEdge_PROCESS) vm := wasmedge.NewVMWithConfig(conf) vm.Release() // The following API can retrieve the pre-registration import objects from the VM object. // This API will return `nil` if the corresponding pre-registration is not set into the configuration. procconf := conf.GetImportModule(wasmedge.WasmEdge_PROCESS) // Initialize the WasmEdge_Process. procconf.InitWasmEdgeProcess(/* ... ignored */) conf.Release()
And also can create the WasmEdge_Process import object from API. The details will be introduced in the Host Functions and the Host Module Registrations.
Host Module Registrations
Host functions are functions outside WebAssembly and passed to WASM modules as imports.
In WasmEdge-go, the host functions are composed into host modules as Module
objects with module names.
Please refer to the Host Functions in WasmEdge Runtime for the details.
In this chapter, we show the example for registering the host modules into a VM
object.
vm := wasmedge.NewVM()
// You can also create and register the WASI host modules by this API.
wasiobj := wasmedge.NewWasiModule(/* ... ignored ... */)
res := vm.RegisterModule(wasiobj)
// The result status should be checked.
vm.Release()
// The created import objects should be released.
wasiobj.Release()
WASM Registrations And Executions
In WebAssembly, the instances in WASM modules can be exported and can be imported by other WASM modules. WasmEdge VM provides APIs for developers to register and export any WASM modules, and execute the functions or host functions in the registered WASM modules.
-
Register the WASM modules with exported module names
Unless the import objects have already contained the module names, every WASM module should be named uniquely when registering. The following shows the example.
Create a new Go project first:
mkdir wasmedge_test && cd wasmedge_test go mod init wasmedge_test
Assume that the WASM file
fibonacci.wasm
is copied into the current directory. Then create and edit the Go filemain.go
as following:package main import "github.com/second-state/WasmEdge-go/wasmedge" func main() { // Create VM. vm := wasmedge.NewVM() var err error err = vm.RegisterWasmFile("module_name", "fibonacci.wasm") // Developers can register the WASM module from `[]byte` with the // `(*VM).RegisterWasmBuffer` function, or from `AST` object with // the `(*VM).RegisterAST` function. // The result status should be checked. The error will occur if the // WASM module instantiation failed or the module name conflicts. vm.Release() }
-
Execute the functions in registered WASM modules
Edit the Go file
main.go
as following:package main import ( "fmt" "github.com/second-state/WasmEdge-go/wasmedge" ) func main() { // Create VM. vm := wasmedge.NewVM() var res []interface{} var err error // Register the WASM module from file into VM with the module name "mod". err = vm.RegisterWasmFile("mod", "fibonacci.wasm") // Developers can register the WASM module from `[]byte` with the // `(*VM).RegisterWasmBuffer` function, or from `AST` object with // the `(*VM).RegisterAST` function. if err != nil { fmt.Println("WASM registration failed:", err.Error()) return } // The function "fib" in the "fibonacci.wasm" was exported with the module // name "mod". As the same as host functions, other modules can import the // function `"mod" "fib"`. // Execute WASM functions in registered modules. // Unlike the execution of functions, the registered functions can be // invoked without `(*VM).Instantiate` because the WASM module was // instantiated when registering. // Developers can also invoke the host functions directly with this API. res, err = vm.ExecuteRegistered("mod", "fib", int32(25)) if err == nil { fmt.Println("Get fibonacci[25]:", res[0].(int32)) } else { fmt.Println("Run failed:", err.Error()) } vm.Release() }
Then you can build and run: (the 25th Fibonacci number is 121393 in 0-based index)
$ go get github.com/second-state/WasmEdge-go/wasmedge@v0.10.0 $ go build $ ./wasmedge_test Get fibonacci[25]: 121393
Instance Tracing
Sometimes the developers may have requirements to get the instances of the WASM runtime.
The VM
object supplies the APIs to retrieve the instances.
-
Store
If the
VM
object is created without assigning aStore
object, theVM
context will allocate and own aStore
.vm := wasmedge.NewVM() store := vm.GetStore() // The object should __NOT__ be deleted by calling `(*Store).Release`. vm.Release()
Developers can also create the
VM
object with aStore
object. In this case, developers should guarantee that theStore
object cannot be released before theVM
object. Please refer to the Store Objects for the details about theStore
APIs.store := wasmedge.NewStore() vm := wasmedge.NewVMWithStore(store) storemock := vm.GetStore() // The internal store context of the `store` and the `storemock` are the same. vm.Release() store.Release()
-
List exported functions
After the WASM module instantiation, developers can use the
(*VM).Execute
function to invoke the exported WASM functions. For this purpose, developers may need information about the exported WASM function list. Please refer to the Instances in runtime for the details about the function types.Assume that a new Go project is created as following:
mkdir wasmedge_test && cd wasmedge_test go mod init wasmedge_test
Then assume that the WASM file
fibonacci.wasm
is copied into the current directory, and create and edit a Go filemain.go
:package main import ( "fmt" "github.com/second-state/WasmEdge-go/wasmedge" ) func main() { // Create VM. vm := wasmedge.NewVM() // Step 1: Load WASM file. err := vm.LoadWasmFile("fibonacci.wasm") if err != nil { fmt.Println("Load WASM from file FAILED:", err.Error()) return } // Step 2: Validate the WASM module. err = vm.Validate() if err != nil { fmt.Println("Validation FAILED:", err.Error()) return } // Step 3: Instantiate the WASM module. err = vm.Instantiate() if err != nil { fmt.Println("Instantiation FAILED:", err.Error()) return } // List the exported functions for the names and function types. funcnames, functypes := vm.GetFunctionList() for _, fname := range funcnames { fmt.Println("Exported function name:", fname) } for _, ftype := range functypes { // `ftype` is the `FunctionType` object of the same index in the `funcnames` array. // Developers should __NOT__ call the `ftype.Release()`. } vm.Release() }
Then you can build and run: (the only exported function in
fibonacci.wasm
isfib
)$ go get github.com/second-state/WasmEdge-go/wasmedge@v0.10.0 $ go build $ ./wasmedge_test Exported function name: fib
If developers want to get the exported function names in the registered WASM modules, please retrieve the
Store
object from theVM
object and refer to the APIs of Store Contexts to list the registered functions by the module name. -
Get function types
The
VM
object provides APIs to find the function type by function name. Please refer to the Instances in runtime for the details about the function types.// Assume that a WASM module is instantiated in `vm` which is a `wasmedge.VM` object. functype := vm.GetFunctionType("fib") // Developers can get the function types of functions in the registered modules via the // `(*VM).GetFunctionTypeRegistered` API with the functon name and the module name. // If the function is not found, these APIs will return `nil`. // Developers should __NOT__ call the `(*FunctionType).Release` function of the returned object.
-
Get the active module
After the WASM module instantiation, an anonymous module is instantiated and owned by the
VM
object. Developers may need to retrieve it to get the instances beyond the module. Then developers can use the(*VM).GetActiveModule()
API to get that anonymous module instance. Please refer to the Module instance for the details about the module instance APIs.// Assume that a WASM module is instantiated in `vm` which is a `wasmedge.VM` object. mod := vm.GetActiveModule() // If there's no WASM module instantiated, this API will return `nil`. // Developers should __NOT__ call the `(*Module).Release` function of the returned module instance.
WasmEdge Runtime
In this partition, we will introduce the objects of WasmEdge runtime manually.
WASM Execution Example Step-By-Step
Besides the WASM execution through the VM
object rapidly, developers can execute the WASM functions or instantiate WASM modules step-by-step with the Loader
, Validator
, Executor
, and Store
objects.
Assume that a new Go project is created as following:
mkdir wasmedge_test && cd wasmedge_test
go mod init wasmedge_test
Then assume that the WASM file fibonacci.wasm
is copied into the current directory, and create and edit a Go file main.go
:
package main
import (
"fmt"
"github.com/second-state/WasmEdge-go/wasmedge"
)
func main() {
// Set the logging level to debug to print the statistics info.
wasmedge.SetLogDebugLevel()
// Create the configure object. This is not necessary if developers use the default configuration.
conf := wasmedge.NewConfigure()
// Turn on the runtime instruction counting and time measuring.
conf.SetStatisticsInstructionCounting(true)
conf.SetStatisticsTimeMeasuring(true)
// Create the statistics object. This is not necessary if the statistics in runtime is not needed.
stat := wasmedge.NewStatistics()
// Create the store object. The store object is the WASM runtime structure core.
store := wasmedge.NewStore()
var err error
var res []interface{}
var ast *wasmedge.AST
var mod *wasmedge.Module
// Create the loader object.
// For loader creation with default configuration, you can use `wasmedge.NewLoader()` instead.
loader := wasmedge.NewLoaderWithConfig(conf)
// Create the validator object.
// For validator creation with default configuration, you can use `wasmedge.NewValidator()` instead.
validator := wasmedge.NewValidatorWithConfig(conf)
// Create the executor object.
// For executor creation with default configuration and without statistics, you can use `wasmedge.NewExecutor()` instead.
executor := wasmedge.NewExecutorWithConfigAndStatistics(conf, stat)
// Load the WASM file or the compiled-WASM file and convert into the AST module object.
ast, err = loader.LoadFile("fibonacci.wasm")
if err != nil {
fmt.Println("Load WASM from file FAILED:", err.Error())
return
}
// Validate the WASM module.
err = validator.Validate(ast)
if err != nil {
fmt.Println("Validation FAILED:", err.Error())
return
}
// Instantiate the WASM module and get the output module instance.
mod, err = executor.Instantiate(store, ast)
if err != nil {
fmt.Println("Instantiation FAILED:", err.Error())
return
}
// Try to list the exported functions of the instantiated WASM module.
funcnames := mod.ListFunction()
for _, fname := range funcnames {
fmt.Println("Exported function name:", fname)
}
// Invoke the WASM function.
funcinst := mod.FindFunction("fib")
if funcinst == nil {
fmt.Println("Run FAILED: Function name `fib` not found")
return
}
res, err = executor.Invoke(store, funcinst, int32(30))
if err == nil {
fmt.Println("Get fibonacci[30]:", res[0].(int32))
} else {
fmt.Println("Run FAILED:", err.Error())
}
// Resources deallocations.
conf.Release()
stat.Release()
ast.Release()
loader.Release()
validator.Release()
executor.Release()
store.Release()
mod.Release()
}
Then you can build and run: (the 18th Fibonacci number is 1346269 in 30-based index)
$ go get github.com/second-state/WasmEdge-go/wasmedge@v0.10.0
$ go build
$ ./wasmedge_test
Exported function name: fib
[2021-11-24 18:53:01.451] [debug] Execution succeeded.
[2021-11-24 18:53:01.452] [debug]
==================== Statistics ====================
Total execution time: 556372295 ns
Wasm instructions execution time: 556372295 ns
Host functions execution time: 0 ns
Executed wasm instructions count: 28271634
Gas costs: 0
Instructions per second: 50814237
Get fibonacci[30]: 1346269
Loader
The Loader
object loads the WASM binary from files or buffers.
Both the WASM and the compiled-WASM from the WasmEdge AOT Compiler are supported.
var buf []byte
// ... Read the WASM code to the `buf`.
// Developers can adjust settings in the configure object.
conf := wasmedge.NewConfigure()
// Create the loader object.
// For loader creation with default configuration, you can use `wasmedge.NewLoader()` instead.
loader := wasmedge.NewLoaderWithConfig(conf)
conf.Release()
// Load WASM or compiled-WASM from the file.
ast, err := loader.LoadFile("fibonacci.wasm")
if err != nil {
fmt.Println("Load WASM from file FAILED:", err.Error())
} else {
// The output AST object should be released.
ast.Release()
}
// Load WASM or compiled-WASM from the buffer
ast, err = loader.LoadBuffer(buf)
if err != nil {
fmt.Println("Load WASM from buffer FAILED:", err.Error())
} else {
// The output AST object should be released.
ast.Release()
}
loader.Release()
Validator
The Validator
object can validate the WASM module.
Every WASM module should be validated before instantiation.
// ...
// Assume that the `ast` is the output `*wasmedge.AST` object from the loader context.
// Assume that the `conf` is the `*wasmedge.Configure` object.
// Create the validator context.
// For validator creation with default configuration, you can use `wasmedge.NewValidator()` instead.
validator := wasmedge.NewValidatorWithConfig(conf)
err := validator.Validate(ast)
if err != nil {
fmt.Println("Validation FAILED:", err.Error())
}
validator.Release()
Executor
The Executor
object is the executor for both WASM and compiled-WASM.
This object should work base on the Store
object. For the details of the Store
object, please refer to the next chapter.
-
Instantiate and register an
AST
object as a namedModule
instanceAs the same of registering host modules or importing WASM modules in
VM
objects, developers can instantiate and register anAST
objects into theStore
context as a namedModule
instance by theExecutor
APIs. After the registration, the resultModule
instance is exported with the given module name and can be linked when instantiating another module. For the details about theModule
instances APIs, please refer to the Instances.// ... // Assume that the `ast` is the output `*wasmedge.AST` object from the loader // and has passed the validation. // Assume that the `conf` is the `*wasmedge.Configure` object. // Create the statistics object. This step is not necessary if the statistics // is not needed. stat := wasmedge.NewStatistics() // Create the executor object. // For executor creation with default configuration and without statistics, // you can use `wasmedge.NewExecutor()` instead. executor := wasmedge.NewExecutorWithConfigAndStatistics(conf, stat) // Create the store object. The store is the WASM runtime structure core. store := wasmedge.NewStore() // Register the loaded WASM `ast` into store with the export module name "mod". mod, res := executor.Register(store, ast, "mod") if err != nil { fmt.Println("WASM registration FAILED:", err.Error()) return } // ... // Resources deallocations. executor.Release() stat.Release() store.Release() mod.Release()
-
Register an existing
Module
instance and export the module nameBesides instantiating and registering an
AST
object, developers can register an existingModule
instance into the store with exporting the module name (which is in theModule
instance already). This case occurs when developers create aModule
instance for the host functions and want to register it for linking. For the details about the construction of host functions inModule
instances, please refer to the Host Functions.// ... // Assume that the `ast` is the output `*wasmedge.AST` object from the loader // and has passed the validation. // Assume that the `conf` is the `*wasmedge.Configure` object. // Create the statistics object. This step is not necessary if the statistics // is not needed. stat := wasmedge.NewStatistics() // Create the executor object. // For executor creation with default configuration and without statistics, // you can use `wasmedge.NewExecutor()` instead. executor := wasmedge.NewExecutorWithConfigAndStatistics(conf, stat) // Create the store object. The store is the WASM runtime structure core. store := wasmedge.NewStore() // Create a module instance for host functions. mod := wasmedge.NewModule("mod") // ... // Create and add the host functions, tables, memories, and globals into the module instance. // ... // Register the module instance into store with the exported module name. // The export module name is in the module instance already. res := executor.RegisterImport(store, mod) if err != nil { fmt.Println("WASM registration FAILED:", err.Error()) return } // ... // Resources deallocations. executor.Release() stat.Release() store.Release() mod.Release()
-
Instantiate an
AST
object to an anonymousModule
instanceWASM or compiled-WASM modules should be instantiated before the function invocation. Before instantiating a WASM module, please check the import section for ensuring the imports are registered into the
Store
object for linking.// ... // Assume that the `ast` is the output `*wasmedge.AST` object from the loader // and has passed the validation. // Assume that the `conf` is the `*wasmedge.Configure` object. // Create the statistics object. This step is not necessary if the statistics // is not needed. stat := wasmedge.NewStatistics() // Create the executor object. // For executor creation with default configuration and without statistics, // you can use `wasmedge.NewExecutor()` instead. executor := wasmedge.NewExecutorWithConfigAndStatistics(conf, stat) // Create the store object. The store is the WASM runtime structure core. store := wasmedge.NewStore() // Instantiate the WASM module. mod, err := executor.Instantiate(stpre, ast) if err != nil { fmt.Println("WASM instantiation FAILED:", err.Error()) return } executor.Release() stat.Release() store.Release() mod.Release()
-
Invoke functions
After registering or instantiating and get the result
Module
instance, developers can retrieve the exportedFunction
instances from theModule
instance for invocation. For the details about theModule
instances APIs, please refer to the Instances. Please refer to the example above for theFunction
instance invocation with the(*Executor).Invoke
API.
AST Module
The AST
object presents the loaded structure from a WASM file or buffer. Developer will get this object after loading a WASM file or buffer from Loader.
Before instantiation, developers can also query the imports and exports of an AST
object.
ast := ...
// Assume that a WASM is loaded into an `*wasmedge.AST` object from loader.
// List the imports.
imports := ast.ListImports()
for _, import := range imports {
fmt.Println("Import:", import.GetModuleName(), import.GetExternalName())
}
// List the exports.
exports := ast.ListExports()
for _, export := range exports {
fmt.Println("Export:", export.GetExternalName())
}
ast.Release()
Store
Store is the runtime structure for the representation of all global state that can be manipulated by WebAssembly programs.
The Store
object in WasmEdge is an object to provide the instance exporting and importing when instantiating WASM modules.
Developers can retrieve the named modules from the Store
context.
store := wasmedge.NewStore()
// ...
// Register a WASM module via the executor object.
// ...
// Try to list the registered WASM modules.
modnames := store.ListModule()
// ...
// Find named module by name.
mod := store.FindModule("module")
// If the module with name not found, the `mod` will be `nil`.
store.Release()
Instances
The instances are the runtime structures of WASM. Developers can retrieve the Module
instances from the Store
contexts, and retrieve the other instances from the Module
instances.
A single instance can be allocated by its creation function. Developers can construct instances into an Module
instance for registration. Please refer to the Host Functions for details.
The instances created by their creation functions should be destroyed by developers, EXCEPT they are added into an Module
instance.
-
Module instance
After instantiating or registering an
AST
object, developers will get aModule
instance as the result, and have the responsibility to release it when not in use. AModule
instance can also be created for the host module. Please refer to the host function for the details.Module
instance provides APIs to list and find the exported instances in the module.// ... // Instantiate a WASM module via the executor object and get the `mod` as the output module instance. // ... // List the exported instance of the instantiated WASM module. // Take the function instances for example here. funcnames := mod.ListFunction() // Try to find the exported instance of the instantiated WASM module. // Take the function instances for example here. funcinst := mod.FindFunction("fib") // `funcinst` will be `nil` if the function not found. // The returned instance is owned by the module instance and should __NOT__ be released.
-
Function instance
Host functions are functions outside WebAssembly and passed to WASM modules as imports. In WasmEdge, developers can create the
Function
objects for host functions and add them into anModule
instance for registering into aVM
or aStore
. Developers can retrieve theFunction Type
from theFunction
objects through the API. For the details of theHost Function
guide, please refer to the next chapter.funcobj := ... // `funcobj` is the `*wasmedge.Function` retrieved from the module instance. functype := funcobj.GetFunctionType() // The `funcobj` retrieved from the module instance should __NOT__ be released. // The `functype` retrieved from the `funcobj` should __NOT__ be released. // For the function object creation, please refer to the `Host Function` guide.
-
Table instance
In WasmEdge, developers can create the
Table
objects and add them into anImportObject
object for registering into aVM
or aStore
. TheTable
objects supply APIs to control the data in table instances.lim := wasmedge.NewLimitWithMax(10, 20) // Create the table type with limit and the `FuncRef` element type. tabtype := wasmedge.NewTableType(wasmedge.RefType_FuncRef, lim) // Create the table instance with table type. tabinst := wasmedge.NewTable(tabtype) // Delete the table type. tabtype.Release() gottabtype := tabinst.GetTableType() // The `gottabtype` got from table instance is owned by the `tabinst` // and should __NOT__ be released. reftype := gottabtype.GetRefType() // The `reftype` will be `wasmedge.RefType_FuncRef`. var gotdata interface{} data := wasmedge.NewFuncRef(5) err := tabinst.SetData(data, 3) // Set the function index 5 to the table[3]. // The following line will get an "out of bounds table access" error // because the position (13) is out of the table size (10): // err = tabinst.SetData(data, 13) gotdata, err = tabinst.GetData(3) // Get the FuncRef value of the table[3]. // The following line will get an "out of bounds table access" error // because the position (13) is out of the table size (10): // gotdata, err = tabinst.GetData(13) tabsize := tabinst.GetSize() // `tabsize` will be 10. err = tabinst.Grow(6) // Grow the table size of 6, the table size will be 16. // The following line will get an "out of bounds table access" error // because the size (16 + 6) will reach the table limit (20): // err = tabinst.Grow(6) tabinst.Release()
-
Memory instance
In WasmEdge, developers can create the
Memory
objects and add them into anImportObject
object for registering into aVM
or aStore
. TheMemory
objects supply APIs to control the data in memory instances.lim := wasmedge.NewLimitWithMax(1, 5) // Create the memory type with limit. The memory page size is 64KiB. memtype := wasmedge.NewMemoryType(lim) // Create the memory instance with memory type. meminst := wasmedge.NewMemory(memtype) // Delete the memory type. memtype.Release() data := []byte("A quick brown fox jumps over the lazy dog") err := meminst.SetData(data, 0x1000, 10) // Set the data[0:9] to the memory[4096:4105]. // The following line will get an "out of bounds memory access" error // because [65535:65544] is out of 1 page size (65536): // err = meminst.SetData(data, 0xFFFF, 10) var gotdata []byte gotdata, err = meminst.GetData(0x1000, 10) // Get the memory[4096:4105]. The `gotdata` will be `[]byte("A quick br"). // The following line will get an "out of bounds memory access" error // because [65535:65544] is out of 1 page size (65536): // gotdata, err = meminst.Getdata(0xFFFF, 10) pagesize := meminst.GetPageSize() // `pagesize` will be 1. err = meminst.GrowPage(2) // Grow the page size of 2, the page size of the memory instance will be 3. // The following line will get an "out of bounds memory access" error // because the size (3 + 3) will reach the memory limit (5): // err = meminst.GetPageSize(3) meminst.Release()
-
Global instance
In WasmEdge, developers can create the
Global
objects and add them into anImportObject
object for registering into aVM
or aStore
. TheGlobal
objects supply APIs to control the value in global instances.// Create the global type with value type and mutation. globtype := wasmedge.NewGlobalType(wasmedge.ValType_I64, wasmedge.ValMut_Var) // Create the global instance with value and global type. globinst := wasmedge.NewGlobal(globtype, uint64(1000)) // Delete the global type. globtype.Release() gotglobtype := globinst.GetGlobalType() // The `gotglobtype` got from global instance is owned by the `globinst` // and should __NOT__ be released. valtype := gotglobtype.GetValType() // The `valtype` will be `wasmedge.ValType_I64`. valmut := gotglobtype.GetMutability() // The `valmut` will be `wasmedge.ValMut_Var`. globinst.SetValue(uint64(888)) // Set the value u64(888) to the global. // This function will do nothing if the value type mismatched or the // global mutability is `wasmedge.ValMut_Const`. gotval := globinst.GetValue() // The `gotbal` will be `interface{}` which the type is `uint64` and // the value is 888. globinst.Release()
Host Functions
Host functions are functions outside WebAssembly and passed to WASM modules as imports.
In WasmEdge-go, developers can create the Function
, Memory
, Table
, and Global
objects and add them into an ImportObject
object for registering into a VM
or a Store
.
-
Host function allocation
Developers can define Go functions with the following function signature as the host function body:
type hostFunctionSignature func( data interface{}, mem *Memory, params []interface{}) ([]interface{}, Result)
The example of an
add
host function to add 2i32
values:func host_add(data interface{}, mem *wasmedge.Memory, params []interface{}) ([]interface{}, wasmedge.Result) { // add: i32, i32 -> i32 res := params[0].(int32) + params[1].(int32) // Set the returns returns := make([]interface{}, 1) returns[0] = res // Return return returns, wasmedge.Result_Success }
Then developers can create
Function
object with the host function body and function type:// Create a function type: {i32, i32} -> {i32}. functype := wasmedge.NewFunctionType( []wasmedge.ValType{wasmedge.ValType_I32, wasmedge.ValType_I32}, []wasmedge.ValType{wasmedge.ValType_I32}, ) // Create a function context with the function type and host function body. // The third parameter is the pointer to the additional data. // Developers should guarantee the life cycle of the data, and it can be // `nil` if the external data is not needed. // The last parameter can be 0 if developers do not need the cost measuring. func_add := wasmedge.NewFunction(functype, host_add, nil, 0) // If the function object is not added into an module instance object, it should be released. func_add.Release() functype.Release()
-
Construct a module instance with host instances
Besides creating a
Module
instance by registering or instantiating a WASM module, developers can create aModule
instance with a module name and add theFunction
,Memory
,Table
, andGlobal
instances into it with their exporting names.// Host function body definition. func host_add(data interface{}, mem *wasmedge.Memory, params []interface{}) ([]interface{}, wasmedge.Result) { // add: i32, i32 -> i32 res := params[0].(int32) + params[1].(int32) // Set the returns returns := make([]interface{}, 1) returns[0] = res // Return return returns, wasmedge.Result_Success } // Create a module instance with the module name "module". mod := wasmedge.NewModule("module") // Create and add a function instance into the module instance with export name "add". functype := wasmedge.NewFunctionType( []wasmedge.ValType{wasmedge.ValType_I32, wasmedge.ValType_I32}, []wasmedge.ValType{wasmedge.ValType_I32}, ) hostfunc := wasmedge.NewFunction(functype, host_add, nil, 0) functype.Release() mod.AddFunction("add", hostfunc) // Create and add a table instance into the module instance with export name "table". tabtype := wasmedge.NewTableType(wasmedge.RefType_FuncRef ,wasmedge.NewLimitWithMax(10, 20)) hosttab := wasmedge.NewTable(tabtype) tabtype.Release() mod.AddTable("table", hosttab) // Create and add a memory instance into the module instance with export name "memory". memtype := wasmedge.NewMemoryType(wasmedge.NewLimitWithMax(1, 2)) hostmem := wasmedge.NewMemory(memtype) memtype.Release() mod.AddMemory("memory", hostmem) // Create and add a global instance into the module instance with export name "global". globtype := wasmedge.NewGlobalType(wasmedge.ValType_I32, wasmedge.ValMut_Var) hostglob := wasmedge.NewGlobal(globtype, uint32(666)) globtype.Release() mod.AddGlobal("global", hostglob) // The module instances should be released. // Developers should __NOT__ release the instances added into the module instance objects. mod.Release()
-
Specified module instance
wasmedge.NewWasiModule()
API can create and initialize theWASI
module instance.wasmedge.NewWasmEdgeProcessModule()
API can create and initialize thewasmedge_process
module instance. Developers can create these module instance objects and register them into theStore
orVM
objects rather than adjust the settings in theConfigure
objects.wasiobj := wasmedge.NewWasiModule( os.Args[1:], // The args os.Environ(), // The envs []string{".:."}, // The mapping preopens ) procobj := wasmedge.NewWasmEdgeProcessModule( []string{"ls", "echo"}, // The allowed commands false, // Not to allow all commands ) // Register the WASI and WasmEdge_Process into the VM object. vm := wasmedge.NewVM() vm.RegisterImport(wasiobj) vm.RegisterImport(procobj) // ... Execute some WASM functions. // Get the WASI exit code. exitcode := wasiobj.WasiGetExitCode() // The `exitcode` will be 0 if the WASI function "_start" execution has no error. // Otherwise, it will return with the related exit code. vm.Release() // The import objects should be deleted. wasiobj.Release() procobj.Release()
-
Example
Create a new Go project first:
mkdir wasmedge_test && cd wasmedge_test go mod init wasmedge_test
Assume that there is a simple WASM from the WAT as following:
(module (type $t0 (func (param i32 i32) (result i32))) (import "extern" "func-add" (func $f-add (type $t0))) (func (export "addTwo") (param i32 i32) (result i32) local.get 0 local.get 1 call $f-add) )
Create and edit the Go file
main.go
as following:package main import ( "fmt" "github.com/second-state/WasmEdge-go/wasmedge" ) // Host function body definition. func host_add(data interface{}, mem *wasmedge.Memory, params []interface{}) ([]interface{}, wasmedge.Result) { // add: i32, i32 -> i32 res := params[0].(int32) + params[1].(int32) // Set the returns returns := make([]interface{}, 1) returns[0] = res // Return return returns, wasmedge.Result_Success } func main() { // Create the VM object. vm := wasmedge.NewVM() // The WASM module buffer. wasmbuf := []byte{ /* WASM header */ 0x00, 0x61, 0x73, 0x6D, 0x01, 0x00, 0x00, 0x00, /* Type section */ 0x01, 0x07, 0x01, /* function type {i32, i32} -> {i32} */ 0x60, 0x02, 0x7F, 0x7F, 0x01, 0x7F, /* Import section */ 0x02, 0x13, 0x01, /* module name: "extern" */ 0x06, 0x65, 0x78, 0x74, 0x65, 0x72, 0x6E, /* extern name: "func-add" */ 0x08, 0x66, 0x75, 0x6E, 0x63, 0x2D, 0x61, 0x64, 0x64, /* import desc: func 0 */ 0x00, 0x00, /* Function section */ 0x03, 0x02, 0x01, 0x00, /* Export section */ 0x07, 0x0A, 0x01, /* export name: "addTwo" */ 0x06, 0x61, 0x64, 0x64, 0x54, 0x77, 0x6F, /* export desc: func 0 */ 0x00, 0x01, /* Code section */ 0x0A, 0x0A, 0x01, /* code body */ 0x08, 0x00, 0x20, 0x00, 0x20, 0x01, 0x10, 0x00, 0x0B, } // Create the module instance with the module name "extern". impmod := wasmedge.NewModule("extern") // Create and add a function instance into the module instance with export name "func-add". functype := wasmedge.NewFunctionType( []wasmedge.ValType{wasmedge.ValType_I32, wasmedge.ValType_I32}, []wasmedge.ValType{wasmedge.ValType_I32}, ) hostfunc := wasmedge.NewFunction(functype, host_add, nil, 0) functype.Release() impmod.AddFunction("func-add", hostfunc) // Register the module instance into VM. vm.RegisterImport(impmod) res, err := vm.RunWasmBuffer(wasmbuf, "addTwo", uint32(1234), uint32(5678)) if err == nil { fmt.Println("Get the result:", res[0].(int32)) } else { fmt.Println("Error message:", err.Error()) } impmod.Release() vm.Release() }
Then you can build and run the Golang application with the WasmEdge Golang SDK:
$ go get github.com/second-state/WasmEdge-go/wasmedge@v0.10.0 $ go build $ ./wasmedge_test Get the result: 6912
-
Host Data Example
Developers can set a external data object to the
Function
object, and access to the object in the function body. Assume that edit the Go filemain.go
above:package main import ( "fmt" "github.com/second-state/WasmEdge-go/wasmedge" ) // Host function body definition. func host_add(data interface{}, mem *wasmedge.Memory, params []interface{}) ([]interface{}, wasmedge.Result) { // add: i32, i32 -> i32 res := params[0].(int32) + params[1].(int32) // Set the returns returns := make([]interface{}, 1) returns[0] = res // Also set the result to the data. *data.(*int32) = res // Return return returns, wasmedge.Result_Success } func main() { // Create the VM object. vm := wasmedge.NewVM() // The WASM module buffer. wasmbuf := []byte{ /* WASM header */ 0x00, 0x61, 0x73, 0x6D, 0x01, 0x00, 0x00, 0x00, /* Type section */ 0x01, 0x07, 0x01, /* function type {i32, i32} -> {i32} */ 0x60, 0x02, 0x7F, 0x7F, 0x01, 0x7F, /* Import section */ 0x02, 0x13, 0x01, /* module name: "extern" */ 0x06, 0x65, 0x78, 0x74, 0x65, 0x72, 0x6E, /* extern name: "func-add" */ 0x08, 0x66, 0x75, 0x6E, 0x63, 0x2D, 0x61, 0x64, 0x64, /* import desc: func 0 */ 0x00, 0x00, /* Function section */ 0x03, 0x02, 0x01, 0x00, /* Export section */ 0x07, 0x0A, 0x01, /* export name: "addTwo" */ 0x06, 0x61, 0x64, 0x64, 0x54, 0x77, 0x6F, /* export desc: func 0 */ 0x00, 0x01, /* Code section */ 0x0A, 0x0A, 0x01, /* code body */ 0x08, 0x00, 0x20, 0x00, 0x20, 0x01, 0x10, 0x00, 0x0B, } // The additional data to set into the host function. var data int32 = 0 // Create the module instance with the module name "extern". impmod := wasmedge.NewImportObject("extern") // Create and add a function instance into the module instance with export name "func-add". functype := wasmedge.NewFunctionType( []wasmedge.ValType{wasmedge.ValType_I32, wasmedge.ValType_I32}, []wasmedge.ValType{wasmedge.ValType_I32}, ) hostfunc := wasmedge.NewFunction(functype, host_add, &data, 0) functype.Release() impmod.AddFunction("func-add", hostfunc) // Register the module instance into VM. vm.RegisterImport(impmod) res, err := vm.RunWasmBuffer(wasmbuf, "addTwo", uint32(1234), uint32(5678)) if err == nil { fmt.Println("Get the result:", res[0].(int32)) } else { fmt.Println("Error message:", err.Error()) } fmt.Println("Data value:", data) impmod.Release() vm.Release() }
Then you can build and run the Golang application with the WasmEdge Golang SDK:
$ go get github.com/second-state/WasmEdge-go/wasmedge@v0.10.0 $ go build $ ./wasmedge_test Get the result: 6912 Data value: 6912
WasmEdge AOT Compiler
In this partition, we will introduce the WasmEdge AOT compiler and the options in Go. WasmEdge runs the WASM files in interpreter mode, and WasmEdge also supports the AOT (ahead-of-time) mode running without modifying any code. The WasmEdge AOT (ahead-of-time) compiler compiles the WASM files for running in AOT mode which is much faster than interpreter mode. Developers can compile the WASM files into the compiled-WASM files in shared library format for universal WASM format for the AOT mode execution.
Compilation Example
The go_WasmAOT example provide a tool for compiling a WASM file.
Compiler Options
Developers can set options for AOT compilers such as optimization level and output format:
const (
// Disable as many optimizations as possible.
CompilerOptLevel_O0 = CompilerOptimizationLevel(C.WasmEdge_CompilerOptimizationLevel_O0)
// Optimize quickly without destroying debuggability.
CompilerOptLevel_O1 = CompilerOptimizationLevel(C.WasmEdge_CompilerOptimizationLevel_O1)
// Optimize for fast execution as much as possible without triggering significant incremental compile time or code size growth.
CompilerOptLevel_O2 = CompilerOptimizationLevel(C.WasmEdge_CompilerOptimizationLevel_O2)
// Optimize for fast execution as much as possible.
CompilerOptLevel_O3 = CompilerOptimizationLevel(C.WasmEdge_CompilerOptimizationLevel_O3)
// Optimize for small code size as much as possible without triggering significant incremental compile time or execution time slowdowns.
CompilerOptLevel_Os = CompilerOptimizationLevel(C.WasmEdge_CompilerOptimizationLevel_Os)
// Optimize for small code size as much as possible.
CompilerOptLevel_Oz = CompilerOptimizationLevel(C.WasmEdge_CompilerOptimizationLevel_Oz)
)
const (
// Native dynamic library format.
CompilerOutputFormat_Native = CompilerOutputFormat(C.WasmEdge_CompilerOutputFormat_Native)
// WebAssembly with AOT compiled codes in custom section.
CompilerOutputFormat_Wasm = CompilerOutputFormat(C.WasmEdge_CompilerOutputFormat_Wasm)
)
Please refer to the AOT compiler options configuration for details.
WasmEdge Go v0.9.1 API Documentation
The followings are the guides to working with the WasmEdge-Go SDK at WasmEdge version 0.9.1
and WasmEdge-Go version v0.9.2
.
Please install WasmEdge 0.9.1 to use this Go package.
WasmEdge-Go v0.9.1 is retracted. Please use WasmEdge-Go v0.9.2 instead.
Developers can refer here to upgrade to v0.10.0.
Table of Contents
Getting Started
The WasmEdge-go requires golang version >= 1.15. Please check your golang version before installation. Developers can download golang here.
$ go version
go version go1.16.5 linux/amd64
WasmEdge Installation
Developers must install the WasmEdge shared library with the same WasmEdge-go
release or pre-release version.
curl -sSf https://raw.githubusercontent.com/WasmEdge/WasmEdge/master/utils/install.sh | bash -s -- -v 0.9.1
For the developers need the TensorFlow
or Image
extension for WasmEdge-go
, please install the WasmEdge
with extensions:
curl -sSf https://raw.githubusercontent.com/WasmEdge/WasmEdge/master/utils/install.sh | bash -s -- -e tf,image -v 0.9.1
Noticed that the TensorFlow
and Image
extensions are only for the Linux
platforms.
After installation, developers can use the source
command to update the include and linking searching path.
Get WasmEdge-go
After the WasmEdge installation, developers can get the WasmEdge-go
package and build it in your Go project directory.
go get github.com/second-state/WasmEdge-go/wasmedge@v0.9.2
go build
WasmEdge-go Extensions
By default, the WasmEdge-go
only turns on the basic runtime.
WasmEdge-go
has the following extensions (on the Linux platforms only):
-
Tensorflow
-
This extension supports the host functions in WasmEdge-tensorflow.
-
The
TensorFlow
extension when installingWasmEdge
is required. Please installWasmEdge
with the-e tensorflow
command. -
For using this extension, the tag
tensorflow
when building is required:go build -tags tensorflow
-
-
Image
-
This extension supports the host functions in WasmEdge-image.
-
The
Image
extension when installingWasmEdge
is required. Please installWasmEdge
with the-e image
command. -
For using this extension, the tag
image
when building is required:go build -tags image
-
Users can also turn on the multiple extensions when building:
go build -tags image,tensorflow
Example of Embedding A Function with wasmedge-bindgen
In this example, we will demonstrate how to call a few simple WebAssembly functions with wasmedge-bindgen from a Golang app. The functions are written in Rust, and require complex call parameters and return values.
While the WebAssembly only supports a few simple data types out of the box. It does not support types such as string and array. In order to pass rich types in Golang to WebAssembly, the compiler needs to convert them to simple integers. For example, it converts a string into an integer memory address and an integer length. The #[wasmedge_bindgen]
macro does this conversion automatically, combining it with Golang's wasmedge-bindgen
package to auto-generate the correct code to pass call parameters from Golang to WebAssembly.
#![allow(unused)] fn main() { use wasmedge_bindgen::*; use wasmedge_bindgen_macro::*; use num_integer::lcm; use sha3::{Digest, Sha3_256, Keccak256}; use serde::{Serialize, Deserialize}; #[derive(Serialize, Deserialize, Debug)] struct Point { x: f32, y: f32 } #[derive(Serialize, Deserialize, Debug)] struct Line { points: Vec<Point>, valid: bool, length: f32, desc: String } #[wasmedge_bindgen] pub fn create_line(p1: String, p2: String, desc: String) -> String { let point1: Point = serde_json::from_str(p1.as_str()).unwrap(); let point2: Point = serde_json::from_str(p2.as_str()).unwrap(); let length = ((point1.x - point2.x) * (point1.x - point2.x) + (point1.y - point2.y) * (point1.y - point2.y)).sqrt(); let valid = if length == 0.0 { false } else { true }; let line = Line { points: vec![point1, point2], valid: valid, length: length, desc: desc }; return serde_json::to_string(&line).unwrap(); } #[wasmedge_bindgen] pub fn say(s: String) -> String { let r = String::from("hello "); return r + s.as_str(); } #[wasmedge_bindgen] pub fn obfusticate(s: String) -> String { (&s).chars().map(|c| { match c { 'A' ..= 'M' | 'a' ..= 'm' => ((c as u8) + 13) as char, 'N' ..= 'Z' | 'n' ..= 'z' => ((c as u8) - 13) as char, _ => c } }).collect() } #[wasmedge_bindgen] pub fn lowest_common_multiple(a: i32, b: i32) -> i32 { return lcm(a, b); } #[wasmedge_bindgen] pub fn sha3_digest(v: Vec<u8>) -> Vec<u8> { return Sha3_256::digest(&v).as_slice().to_vec(); } #[wasmedge_bindgen] pub fn keccak_digest(s: Vec<u8>) -> Vec<u8> { return Keccak256::digest(&s).as_slice().to_vec(); } }
First, compile the Rust source code into WebAssembly bytecode functions.
rustup target add wasm32-wasi
cd rust_bindgen_funcs
cargo build --target wasm32-wasi --release
# The output WASM will be target/wasm32-wasi/release/rust_bindgen_funcs_lib.wasm
The Golang source code to run the WebAssembly function in WasmEdge is as follows. The bg.Execute()
function calls the WebAssembly function and passes the parameters with the wasmedge-bindgen
supporting.
package main
import (
"fmt"
"os"
"github.com/second-state/WasmEdge-go/wasmedge"
bindgen "github.com/second-state/wasmedge-bindgen/host/go"
)
func main() {
// Expected Args[0]: program name (./bindgen_funcs)
// Expected Args[1]: wasm file (rust_bindgen_funcs_lib.wasm))
// Set not to print debug info
wasmedge.SetLogErrorLevel()
// Create configure
var conf = wasmedge.NewConfigure(wasmedge.WASI)
// Create VM with configure
var vm = wasmedge.NewVMWithConfig(conf)
// Init WASI
var wasi = vm.GetImportObject(wasmedge.WASI)
wasi.InitWasi(
os.Args[1:], // The args
os.Environ(), // The envs
[]string{".:."}, // The mapping preopens
)
// Load and validate the wasm
vm.LoadWasmFile(os.Args[1])
vm.Validate()
// Instantiate the bindgen and vm
bg := bindgen.Instantiate(vm)
// create_line: string, string, string -> string (inputs are JSON stringified)
res, err := bg.Execute("create_line", "{\"x\":2.5,\"y\":7.8}", "{\"x\":2.5,\"y\":5.8}", "A thin red line")
if err == nil {
fmt.Println("Run bindgen -- create_line:", res[0].(string))
} else {
fmt.Println("Run bindgen -- create_line FAILED", err)
}
// say: string -> string
res, err = bg.Execute("say", "bindgen funcs test")
if err == nil {
fmt.Println("Run bindgen -- say:", res[0].(string))
} else {
fmt.Println("Run bindgen -- say FAILED")
}
// obfusticate: string -> string
res, err = bg.Execute("obfusticate", "A quick brown fox jumps over the lazy dog")
if err == nil {
fmt.Println("Run bindgen -- obfusticate:", res[0].(string))
} else {
fmt.Println("Run bindgen -- obfusticate FAILED")
}
// lowest_common_multiple: i32, i32 -> i32
res, err = bg.Execute("lowest_common_multiple", int32(123), int32(2))
if err == nil {
fmt.Println("Run bindgen -- lowest_common_multiple:", res[0].(int32))
} else {
fmt.Println("Run bindgen -- lowest_common_multiple FAILED")
}
// sha3_digest: array -> array
res, err = bg.Execute("sha3_digest", []byte("This is an important message"))
if err == nil {
fmt.Println("Run bindgen -- sha3_digest:", res[0].([]byte))
} else {
fmt.Println("Run bindgen -- sha3_digest FAILED")
}
// keccak_digest: array -> array
res, err = bg.Execute("keccak_digest", []byte("This is an important message"))
if err == nil {
fmt.Println("Run bindgen -- keccak_digest:", res[0].([]byte))
} else {
fmt.Println("Run bindgen -- keccak_digest FAILED")
}
bg.Release()
vm.Release()
conf.Release()
}
Next, build the Golang application with the WasmEdge Golang SDK.
go get github.com/second-state/WasmEdge-go/wasmedge@v0.9.2
go get github.com/second-state/wasmedge-bindgen@v0.1.12
go build
Run the Golang application and it will run the WebAssembly functions embedded in the WasmEdge runtime.
$ ./bindgen_funcs rust_bindgen_funcs/target/wasm32-wasi/release/rust_bindgen_funcs_lib.wasm
Run bindgen -- create_line: {"points":[{"x":2.5,"y":7.8},{"x":2.5,"y":5.8}],"valid":true,"length":2.0,"desc":"A thin red line"}
Run bindgen -- say: hello bindgen funcs test
Run bindgen -- obfusticate: N dhvpx oebja sbk whzcf bire gur ynml qbt
Run bindgen -- lowest_common_multiple: 246
Run bindgen -- sha3_digest: [87 27 231 209 189 105 251 49 159 10 211 250 15 159 154 181 43 218 26 141 56 199 25 45 60 10 20 163 54 211 195 203]
Run bindgen -- keccak_digest: [126 194 241 200 151 116 227 33 216 99 159 22 107 3 177 169 216 191 114 156 174 193 32 159 246 228 245 133 52 75 55 27]
Example of Embedding A Full WASI Program
Note: You can use the latest Rust compiler to create a standalone WasmEdge application with a main.rs
functions and then embed it into a Golang application.
Besides functions, the WasmEdge Golang SDK can also embed standalone WebAssembly applications — i.e. a Rust application with a main()
function compiled into WebAssembly.
Our demo Rust application reads from a file.
use std::env; use std::fs::File; use std::io::{self, BufRead}; fn main() { // Get the argv. let args: Vec<String> = env::args().collect(); if args.len() <= 1 { println!("Rust: ERROR - No input file name."); return; } // Open the file. println!("Rust: Opening input file \"{}\"...", args[1]); let file = match File::open(&args[1]) { Err(why) => { println!("Rust: ERROR - Open file \"{}\" failed: {}", args[1], why); return; }, Ok(file) => file, }; // Read lines. let reader = io::BufReader::new(file); let mut texts:Vec<String> = Vec::new(); for line in reader.lines() { if let Ok(text) = line { texts.push(text); } } println!("Rust: Read input file \"{}\" succeeded.", args[1]); // Get stdin to print lines. println!("Rust: Please input the line number to print the line of file."); let stdin = io::stdin(); for line in stdin.lock().lines() { let input = line.unwrap(); match input.parse::<usize>() { Ok(n) => if n > 0 && n <= texts.len() { println!("{}", texts[n - 1]); } else { println!("Rust: ERROR - Line \"{}\" is out of range.", n); }, Err(e) => println!("Rust: ERROR - Input \"{}\" is not an integer: {}", input, e), } } println!("Rust: Process end."); }
Use the rustwasmc
tool to compile the application into WebAssembly.
cd rust_readfile
rustwasmc build
# The output file will be at `pkg/rust_readfile.wasm`.
Or you can compile the application into WebAssembly directly by cargo
:
cd rust_readfile
# Need to add the `wasm32-wasi` target.
rustup target add wasm32-wasi
cargo build --release --target=wasm32-wasi
# The output wasm will be at `target/wasm32-wasi/release/rust_readfile.wasm`.
The Golang source code to run the WebAssembly function in WasmEdge is as follows.
package main
import (
"os"
"github.com/second-state/WasmEdge-go/wasmedge"
)
func main() {
wasmedge.SetLogErrorLevel()
var conf = wasmedge.NewConfigure(wasmedge.REFERENCE_TYPES)
conf.AddConfig(wasmedge.WASI)
var vm = wasmedge.NewVMWithConfig(conf)
var wasi = vm.GetImportObject(wasmedge.WASI)
wasi.InitWasi(
os.Args[1:], // The args
os.Environ(), // The envs
[]string{".:."}, // The mapping directories
)
// Instantiate and run WASM "_start" function, which refers to the main() function
vm.RunWasmFile(os.Args[1], "_start")
vm.Release()
conf.Release()
}
Next, build the Golang application with the WasmEdge Golang SDK.
go get github.com/second-state/WasmEdge-go/wasmedge@v0.9.2
go build
Run the Golang application.
$ ./read_file rust_readfile/pkg/rust_readfile.wasm file.txt
Rust: Opening input file "file.txt"...
Rust: Read input file "file.txt" succeeded.
Rust: Please input the line number to print the line of file.
# Input "5" and press Enter.
5
# The output will be the 5th line of `file.txt`:
abcDEF___!@#$%^
# To terminate the program, send the EOF (Ctrl + D).
^D
# The output will print the terminate message:
Rust: Process end.
For more examples, please refer to the example repository.
WasmEdge-go Basics
In this partition, we will introduce the utilities and concepts of WasmEdge-go APIs and data structures.
Version
The Version
related APIs provide developers to check for the installed WasmEdge shared library version.
import "github.com/second-state/WasmEdge-go/wasmedge"
verstr := wasmedge.GetVersion() // Will be `string` of WasmEdge version.
vermajor := wasmedge.GetVersionMajor() // Will be `uint` of WasmEdge major version number.
verminor := wasmedge.GetVersionMinor() // Will be `uint` of WasmEdge minor version number.
verpatch := wasmedge.GetVersionPatch() // Will be `uint` of WasmEdge patch version number.
Logging Settings
The wasmedge.SetLogErrorLevel()
and wasmedge.SetLogDebugLevel()
APIs can set the logging system to debug level or error level. By default, the error level is set, and the debug info is hidden.
Value Types
In WasmEdge-go, the APIs will automatically do the conversion for the built-in types, and implement the data structure for the reference types.
-
Number types:
i32
,i64
,f32
, andf64
- Convert the
uint32
andint32
toi32
automatically when passing a value into WASM. - Convert the
uint64
andint64
toi64
automatically when passing a value into WASM. - Convert the
uint
andint
toi32
automatically when passing a value into WASM in 32-bit system. - Convert the
uint
andint
toi64
automatically when passing a value into WASM in 64-bit system. - Convert the
float32
tof32
automatically when passing a value into WASM. - Convert the
float64
tof64
automatically when passing a value into WASM. - Convert the
i32
from WASM toint32
when getting a result. - Convert the
i64
from WASM toint64
when getting a result. - Convert the
f32
from WASM tofloat32
when getting a result. - Convert the
f64
from WASM tofloat64
when getting a result.
- Convert the
-
Number type:
v128
for theSIMD
proposalDevelopers should use the
wasmedge.NewV128()
to generate av128
value, and use thewasmedge.GetV128()
to get the value.val := wasmedge.NewV128(uint64(1234), uint64(5678)) high, low := val.GetVal() // `high` will be uint64(1234), `low` will be uint64(5678)
-
Reference types:
FuncRef
andExternRef
for theReference-Types
proposalfuncref := wasmedge.NewFuncRef(10) // Create a `FuncRef` with function index 10. num := 1234 // `num` is a `int`. externref := wasmedge.NewExternRef(&num) // Create an `ExternRef` which reference to the `num`. num = 5678 // Modify the `num` to 5678. numref := externref.GetRef().(*int) // Get the original reference from the `ExternRef`. fmt.Println(*numref) // Will print `5678`. numref.Release() // Should call the `Release` method.
Results
The Result
object specifies the execution status. Developers can use the Error()
function to get the error message.
// Assume that `vm` is a `wasmedge.VM` object.
res, err = vm.Execute(...) // Ignore the detail of parameters.
// Assume that `res, err` are the return values for executing a function with `vm`.
if err != nil {
fmt.Println("Error message:", err.Error())
}
Contexts And Their Life Cycles
The objects, such as VM
, Store
, and Function
, etc., are composed of Context
s in the WasmEdge shared library.
All of the contexts can be created by calling the corresponding New
APIs, developers should also call the corresponding Release
functions of the contexts to release the resources.
Noticed that it's not necessary to call the Release
functions for the contexts which are retrieved from other contexts but not created from the New
APIs.
// Create a Configure.
conf := wasmedge.NewConfigure()
// Release the `conf` immediately.
conf.Release()
The details of other contexts will be introduced later.
WASM Data Structures
The WASM data structures are used for creating instances or can be queried from instance contexts. The details of instances creation will be introduced in the Instances.
-
Limit
The
Limit
struct presents the minimum and maximum value data structure.lim1 := wasmedge.NewLimit(12) fmt.Println(lim1.HasMax()) // Will print `false`. fmt.Println(lim1.GetMin()) // Will print `12`. lim2 := wasmedge.NewLimitWithMax(15, 50) fmt.Println(lim2.HasMax()) // Will print `true`. fmt.Println(lim2.GetMin()) // Will print `15`. fmt.Println(lim2.GetMax()) // Will print `50`.
-
Function type context
The
FunctionType
is an object holds the function type context and used for theFunction
creation, checking the value types of aFunction
instance, or getting the function type with function name from VM. Developers can use theFunctionType
APIs to get the parameter or return value types information.functype := wasmedge.NewFunctionType( []wasmedge.ValType{ wasmedge.ValType_ExternRef, wasmedge.ValType_I32, wasmedge.ValType_I64, }, []wasmedge.ValType{ wasmedge.ValType_F32, wasmedge.ValType_F64, }) plen := functype.GetParametersLength() // `plen` will be 3. rlen := functype.GetReturnsLength() // `rlen` will be 2. plist := functype.GetParameters() // `plist` will be `[]wasmedge.ValType{wasmedge.ValType_ExternRef, wasmedge.ValType_I32, wasmedge.ValType_I64}`. rlist := functype.GetReturns() // `rlist` will be `[]wasmedge.ValType{wasmedge.ValType_F32, wasmedge.ValType_F64}`. functype.Release()
-
Table type context
The
TableType
is an object holds the table type context and used forTable
instance creation or getting information fromTable
instances.lim := wasmedge.NewLimit(12) tabtype := wasmedge.NewTableType(wasmedge.RefType_ExternRef, lim) rtype := tabtype.GetRefType() // `rtype` will be `wasmedge.RefType_ExternRef`. getlim := tabtype.GetLimit() // `getlim` will be the same value as `lim`. tabtype.Release()
-
Memory type context
The
MemoryType
is an object holds the memory type context and used forMemory
instance creation or getting information fromMemory
instances.lim := wasmedge.NewLimit(1) memtype := wasmedge.NewMemoryType(lim) getlim := memtype.GetLimit() // `getlim` will be the same value as `lim`. memtype.Release()
-
Global type context
The
GlobalType
is an object holds the global type context and used forGlobal
instance creation or getting information fromGlobal
instances.globtype := wasmedge.NewGlobalType(wasmedge.ValType_F64, wasmedge.ValMut_Var) vtype := globtype.GetValType() // `vtype` will be `wasmedge.ValType_F64`. vmut := globtype.GetMutability() // `vmut` will be `wasmedge.ValMut_Var`. globtype.Release()
-
Import type context
The
ImportType
is an object holds the import type context and used for getting the imports information from a AST Module. Developers can get the external type (function
,table
,memory
, orglobal
), import module name, and external name from anImportType
object. The details about queryingImportType
objects will be introduced in the AST Module.var ast *wasmedge.AST = ... // Assume that `ast` is returned by the `Loader` for the result of loading a WASM file. imptypelist := ast.ListImports() // Assume that `imptypelist` is an array listed from the `ast` for the imports. for i, imptype := range imptypelist { exttype := imptype.GetExternalType() // The `exttype` must be one of `wasmedge.ExternType_Function`, `wasmedge.ExternType_Table`, // wasmedge.ExternType_Memory`, or `wasmedge.ExternType_Global`. modname := imptype.GetModuleName() extname := imptype.GetExternalName() // Get the module name and external name of the imports. extval := imptype.GetExternalValue() // The `extval` is the type of `interface{}` which indicates one of `*wasmedge.FunctionType`, // `*wasmedge.TableType`, `*wasmedge.MemoryType`, or `*wasmedge.GlobalType`. }
-
Export type context
The
ExportType
is an object holds the export type context is used for getting the exports information from a AST Module. Developers can get the external type (function
,table
,memory
, orglobal
) and external name from anExport Type
context. The details about queryingExportType
objects will be introduced in the AST Module.var ast *wasmedge.AST = ... // Assume that `ast` is returned by the `Loader` for the result of loading a WASM file. exptypelist := ast.ListExports() // Assume that `exptypelist` is an array listed from the `ast` for the exports. for i, exptype := range exptypelist { exttype := exptype.GetExternalType() // The `exttype` must be one of `wasmedge.ExternType_Function`, `wasmedge.ExternType_Table`, // wasmedge.ExternType_Memory`, or `wasmedge.ExternType_Global`. extname := exptype.GetExternalName() // Get the external name of the exports. extval := exptype.GetExternalValue() // The `extval` is the type of `interface{}` which indicates one of `*wasmedge.FunctionType`, // `*wasmedge.TableType`, `*wasmedge.MemoryType`, or `*wasmedge.GlobalType`. }
Configurations
The configuration object, wasmedge.Configure
, manages the configurations for Loader
, Validator
, Executor
, VM
, and Compiler
.
Developers can adjust the settings about the proposals, VM host pre-registrations (such as WASI
), and AOT compiler options, and then apply the Configure
object to create other runtime objects.
-
Proposals
WasmEdge supports turning on or off the WebAssembly proposals. This configuration is effective in any contexts created with the
Configure
object.const ( IMPORT_EXPORT_MUT_GLOBALS = Proposal(C.WasmEdge_Proposal_ImportExportMutGlobals) NON_TRAP_FLOAT_TO_INT_CONVERSIONS = Proposal(C.WasmEdge_Proposal_NonTrapFloatToIntConversions) SIGN_EXTENSION_OPERATORS = Proposal(C.WasmEdge_Proposal_SignExtensionOperators) MULTI_VALUE = Proposal(C.WasmEdge_Proposal_MultiValue) BULK_MEMORY_OPERATIONS = Proposal(C.WasmEdge_Proposal_BulkMemoryOperations) REFERENCE_TYPES = Proposal(C.WasmEdge_Proposal_ReferenceTypes) SIMD = Proposal(C.WasmEdge_Proposal_SIMD) TAIL_CALL = Proposal(C.WasmEdge_Proposal_TailCall) ANNOTATIONS = Proposal(C.WasmEdge_Proposal_Annotations) MEMORY64 = Proposal(C.WasmEdge_Proposal_Memory64) THREADS = Proposal(C.WasmEdge_Proposal_Threads) EXCEPTION_HANDLING = Proposal(C.WasmEdge_Proposal_ExceptionHandling) FUNCTION_REFERENCES = Proposal(C.WasmEdge_Proposal_FunctionReferences) )
Developers can add or remove the proposals into the
Configure
object.// By default, the following proposals have turned on initially: // * IMPORT_EXPORT_MUT_GLOBALS // * NON_TRAP_FLOAT_TO_INT_CONVERSIONS // * SIGN_EXTENSION_OPERATORS // * MULTI_VALUE // * BULK_MEMORY_OPERATIONS // * REFERENCE_TYPES // * SIMD conf := wasmedge.NewConfigure() // Developers can also pass the proposals as parameters: // conf := wasmedge.NewConfigure(wasmedge.SIMD, wasmedge.BULK_MEMORY_OPERATIONS) conf.AddConfig(wasmedge.SIMD) conf.RemoveConfig(wasmedge.REFERENCE_TYPES) is_bulkmem := conf.HasConfig(wasmedge.BULK_MEMORY_OPERATIONS) // The `is_bulkmem` will be `true`. conf.Release()
-
Host registrations
This configuration is used for the
VM
context to turn on theWASI
orwasmedge_process
supports and only effective inVM
objects.const ( WASI = HostRegistration(C.WasmEdge_HostRegistration_Wasi) WasmEdge_PROCESS = HostRegistration(C.WasmEdge_HostRegistration_WasmEdge_Process) )
The details will be introduced in the preregistrations of VM context.
conf := wasmedge.NewConfigure() // Developers can also pass the proposals as parameters: // conf := wasmedge.NewConfigure(wasmedge.WASI) conf.AddConfig(wasmedge.WASI) conf.Release()
-
Maximum memory pages
Developers can limit the page size of memory instances by this configuration. When growing the page size of memory instances in WASM execution and exceeding the limited size, the page growing will fail. This configuration is only effective in the
Executor
andVM
objects.conf := wasmedge.NewConfigure() pagesize := conf.GetMaxMemoryPage() // By default, the maximum memory page size in each memory instances is 65536. conf.SetMaxMemoryPage(1234) pagesize := conf.GetMaxMemoryPage() // `pagesize` will be 1234. conf.Release()
-
AOT compiler options
The AOT compiler options configure the behavior about optimization level, output format, dump IR, and generic binary.
const ( // Disable as many optimizations as possible. CompilerOptLevel_O0 = CompilerOptimizationLevel(C.WasmEdge_CompilerOptimizationLevel_O0) // Optimize quickly without destroying debuggability. CompilerOptLevel_O1 = CompilerOptimizationLevel(C.WasmEdge_CompilerOptimizationLevel_O1) // Optimize for fast execution as much as possible without triggering significant incremental compile time or code size growth. CompilerOptLevel_O2 = CompilerOptimizationLevel(C.WasmEdge_CompilerOptimizationLevel_O2) // Optimize for fast execution as much as possible. CompilerOptLevel_O3 = CompilerOptimizationLevel(C.WasmEdge_CompilerOptimizationLevel_O3) // Optimize for small code size as much as possible without triggering significant incremental compile time or execution time slowdowns. CompilerOptLevel_Os = CompilerOptimizationLevel(C.WasmEdge_CompilerOptimizationLevel_Os) // Optimize for small code size as much as possible. CompilerOptLevel_Oz = CompilerOptimizationLevel(C.WasmEdge_CompilerOptimizationLevel_Oz) ) const ( // Native dynamic library format. CompilerOutputFormat_Native = CompilerOutputFormat(C.WasmEdge_CompilerOutputFormat_Native) // WebAssembly with AOT compiled codes in custom section. CompilerOutputFormat_Wasm = CompilerOutputFormat(C.WasmEdge_CompilerOutputFormat_Wasm) )
These configurations are only effective in
Compiler
contexts.conf := wasmedge.NewConfigure() // By default, the optimization level is O3. conf.SetCompilerOptimizationLevel(wasmedge.CompilerOptLevel_O2) // By default, the output format is universal WASM. conf.SetCompilerOutputFormat(wasmedge.CompilerOutputFormat_Native) // By default, the dump IR is `false`. conf.SetCompilerDumpIR(true) // By default, the generic binary is `false`. conf.SetCompilerGenericBinary(true) conf.Release()
-
Statistics options
The statistics options configure the behavior about instruction counting, cost measuring, and time measuring in both runtime and AOT compiler. These configurations are effective in
Compiler
,VM
, andExecutor
objects.conf := wasmedge.NewConfigure() // By default, the intruction counting is `false` when running a compiled-WASM or a pure-WASM. conf.SetStatisticsInstructionCounting(true) // By default, the cost measurement is `false` when running a compiled-WASM or a pure-WASM. conf.SetStatisticsTimeMeasuring(true) // By default, the time measurement is `false` when running a compiled-WASM or a pure-WASM. conf.SetStatisticsCostMeasuring(true) conf.Release()
WasmEdge VM
In this partition, we will introduce the functions of wasmedge.VM
object and show examples of executing WASM functions.
WASM Execution Example With VM Object
The following shows the example of running the WASM for getting the Fibonacci. This example uses the fibonacci.wasm, and the corresponding WAT file is at fibonacci.wat.
(module
(export "fib" (func $fib))
(func $fib (param $n i32) (result i32)
(if
(i32.lt_s (get_local $n)(i32.const 2))
(return (i32.const 1))
)
(return
(i32.add
(call $fib (i32.sub (get_local $n)(i32.const 2)))
(call $fib (i32.sub (get_local $n)(i32.const 1)))
)
)
)
)
-
Run WASM functions rapidly
Create a new Go project first:
mkdir wasmedge_test && cd wasmedge_test go mod init wasmedge_test
Assume that the WASM file
fibonacci.wasm
is copied into the currentwasmedge_test
directory, and create and edit the Go filemain.go
as following:package main import ( "fmt" "github.com/second-state/WasmEdge-go/wasmedge" ) func main() { // Set the logging level. wasmedge.SetLogErrorLevel() // Create the configure context and add the WASI support. // This step is not necessary unless you need WASI support. conf := wasmedge.NewConfigure(wasmedge.WASI) // Create VM with the configure. vm := wasmedge.NewVMWithConfig(conf) res, err := vm.RunWasmFile("fibonacci.wasm", "fib", uint32(21)) if err == nil { fmt.Println("Get fibonacci[21]:", res[0].(int32)) } else { fmt.Println("Run failed:", err.Error()) } vm.Release() conf.Release() }
Then you can build and run the Golang application with the WasmEdge Golang SDK: (the 21 Fibonacci number is 17711 in 0-based index)
$ go get github.com/second-state/WasmEdge-go/wasmedge@v0.9.2 $ go build $ ./wasmedge_test Get fibonacci[21]: 17711
-
Instantiate and run WASM functions manually
Besides the above example, developers can run the WASM functions step-by-step with
VM
object APIs:package main import ( "fmt" "github.com/second-state/WasmEdge-go/wasmedge" ) func main() { // Set the logging level. wasmedge.SetLogErrorLevel() // Create VM. vm := wasmedge.NewVM() var err error var res []interface{} // Step 1: Load WASM file. err = vm.LoadWasmFile("fibonacci.wasm") if err != nil { fmt.Println("Load WASM from file FAILED:", err.Error()) return } // Step 2: Validate the WASM module. err = vm.Validate() if err != nil { fmt.Println("Validation FAILED:", err.Error()) return } // Step 3: Instantiate the WASM module. err = vm.Instantiate() // Developers can load, validate, and instantiate another WASM module // to replace the instantiated one. In this case, the old module will // be cleared, but the registered modules are still kept. if err != nil { fmt.Println("Instantiation FAILED:", err.Error()) return } // Step 4: Execute WASM functions. Parameters: (funcname, args...) res, err = vm.Execute("fib", uint32(25)) // Developers can execute functions repeatedly after instantiation. if err == nil { fmt.Println("Get fibonacci[25]:", res[0].(int32)) } else { fmt.Println("Run failed:", err.Error()) } vm.Release() }
Then you can build and run: (the 25th Fibonacci number is 121393 in 0-based index)
$ go build $ ./wasmedge_test Get fibonacci[25]: 121393
The following graph explains the status of the
VM
object.|========================| |------->| VM: Initiated | | |========================| | | | LoadWasm | | | v | |========================| |--------| VM: Loaded |<-------| | |========================| | | | ^ | | Validate | | Cleanup | LoadWasm | | v | LoadWasm | |========================| | |--------| VM: Validated | | | |========================| | | | ^ | | Instantiate | | | | RegisterModule | | v | | | |========================| | |--------| VM: Instantiated |--------| |========================| | ^ | | -------------- Instantiate, Execute, ExecuteRegistered, ExecuteBindgen, ExecuteBindgenRegistered
The status of the
VM
context would beInited
when created. After loading WASM successfully, the status will beLoaded
. After validating WASM successfully, the status will beValidated
. After instantiating WASM successfully, the status will beInstantiated
, and developers can invoke functions. Developers can register WASM or import objects in any status, but they should instantiate WASM again. Developers can also load WASM in any status, and they should validate and instantiate the WASM module before function invocation. When in theInstantiated
status, developers can instantiate the WASM module again to reset the old WASM runtime structures.
VM Creations
The VM
creation APIs accepts the Configure
object and the Store
object.
Noticed that if the VM
created with the outside Store
object, the VM
will execute WASM on that Store
object. If the Store
object is set into multiple VM
objects, it may causes data conflict when in execution.
The details of the Store
object will be introduced in Store.
conf := wasmedge.NewConfigure()
store := wasmedge.NewStore()
// Create a VM with default configure and store.
vm := wasmedge.NewVM()
vm.Release()
// Create a VM with the specified configure and default store.
vm = wasmedge.NewVMWithConfig(conf)
vm.Release()
// Create a VM with the default configure and specified store.
vm = wasmedge.NewVMWithStore(store)
vm.Release()
// Create a VM with the specified configure and store.
vm = wasmedge.NewVMWithConfigAndStore(conf, store)
vm.Release()
conf.Release()
store.Release()
Preregistrations
WasmEdge provides the following built-in pre-registrations.
-
WASI (WebAssembly System Interface)
Developers can turn on the WASI support for VM in the
Configure
object.conf := wasmedge.NewConfigure(wasmedge.WASI) // Or you can set the `wasmedge.WASI` into the configure object through `(*Configure).AddConfig`. vm := wasmedge.NewVMWithConfig(conf) vm.Release() // The following API can retrieve the pre-registration import objects from the VM object. // This API will return `nil` if the corresponding pre-registration is not set into the configuration. wasiconf := conf.GetImportObject(wasmedge.WASI) // Initialize the WASI. wasiconf.InitWasi(/* ... ignored */) conf.Release()
And also can create the WASI import object from API. The details will be introduced in the Host Functions and the Host Module Registrations.
-
This pre-registration is for the process interface for WasmEdge on
Rust
sources. After turning on this pre-registration, the VM will support thewasmedge_process
host functions.conf := wasmedge.NewConfigure(wasmedge.WasmEdge_PROCESS) vm := wasmedge.NewVMWithConfig(conf) vm.Release() // The following API can retrieve the pre-registration import objects from the VM object. // This API will return `nil` if the corresponding pre-registration is not set into the configuration. procconf := conf.GetImportObject(wasmedge.WasmEdge_PROCESS) // Initialize the WasmEdge_Process. procconf.InitWasmEdgeProcess(/* ... ignored */) conf.Release()
And also can create the WasmEdge_Process import object from API. The details will be introduced in the Host Functions and the Host Module Registrations.
Host Module Registrations
Host functions are functions outside WebAssembly and passed to WASM modules as imports.
In WasmEdge-go, the host functions are composed into host modules as ImportObject
objects with module names.
Please refer to the Host Functions in WasmEdge Runtime for the details.
In this chapter, we show the example for registering the host modules into a VM
object.
vm := wasmedge.NewVM()
// You can also create and register the WASI host modules by this API.
wasiobj := wasmedge.NewWasiImportObject(/* ... ignored ... */)
res := vm.RegisterImport(wasiobj)
// The result status should be checked.
vm.Release()
// The created import objects should be released.
wasiobj.Release()
WASM Registrations And Executions
In WebAssembly, the instances in WASM modules can be exported and can be imported by other WASM modules. WasmEdge VM provides APIs for developers to register and export any WASM modules, and execute the functions or host functions in the registered WASM modules.
-
Register the WASM modules with exported module names
Unless the import objects have already contained the module names, every WASM module should be named uniquely when registering. The following shows the example.
Create a new Go project first:
mkdir wasmedge_test && cd wasmedge_test go mod init wasmedge_test
Assume that the WASM file
fibonacci.wasm
is copied into the current directory. Then create and edit the Go filemain.go
as following:package main import "github.com/second-state/WasmEdge-go/wasmedge" func main() { // Create VM. vm := wasmedge.NewVM() var err error err = vm.RegisterWasmFile("module_name", "fibonacci.wasm") // Developers can register the WASM module from `[]byte` with the // `(*VM).RegisterWasmBuffer` function, or from `AST` object with // the `(*VM).RegisterAST` function. // The result status should be checked. The error will occur if the // WASM module instantiation failed or the module name conflicts. vm.Release() }
-
Execute the functions in registered WASM modules
Edit the Go file
main.go
as following:package main import ( "fmt" "github.com/second-state/WasmEdge-go/wasmedge" ) func main() { // Create VM. vm := wasmedge.NewVM() var res []interface{} var err error // Register the WASM module from file into VM with the module name "mod". err = vm.RegisterWasmFile("mod", "fibonacci.wasm") // Developers can register the WASM module from `[]byte` with the // `(*VM).RegisterWasmBuffer` function, or from `AST` object with // the `(*VM).RegisterAST` function. if err != nil { fmt.Println("WASM registration failed:", err.Error()) return } // The function "fib" in the "fibonacci.wasm" was exported with the module // name "mod". As the same as host functions, other modules can import the // function `"mod" "fib"`. // Execute WASM functions in registered modules. // Unlike the execution of functions, the registered functions can be // invoked without `(*VM).Instantiate` because the WASM module was // instantiated when registering. // Developers can also invoke the host functions directly with this API. res, err = vm.ExecuteRegistered("mod", "fib", int32(25)) if err == nil { fmt.Println("Get fibonacci[25]:", res[0].(int32)) } else { fmt.Println("Run failed:", err.Error()) } vm.Release() }
Then you can build and run: (the 25th Fibonacci number is 121393 in 0-based index)
$ go get github.com/second-state/WasmEdge-go/wasmedge@v0.9.2 $ go build $ ./wasmedge_test Get fibonacci[25]: 121393
Instance Tracing
Sometimes the developers may have requirements to get the instances of the WASM runtime.
The VM
object supplies the APIs to retrieve the instances.
-
Store
If the
VM
object is created without assigning aStore
object, theVM
context will allocate and own aStore
.vm := wasmedge.NewVM() store := vm.GetStore() // The object should __NOT__ be deleted by calling `(*Store).Release`. vm.Release()
Developers can also create the
VM
object with aStore
object. In this case, developers should guarantee that theStore
object cannot be released before theVM
object. Please refer to the Store Objects for the details about theStore
APIs.store := wasmedge.NewStore() vm := wasmedge.NewVMWithStore(store) storemock := vm.GetStore() // The internal store context of the `store` and the `storemock` are the same. vm.Release() store.Release()
-
List exported functions
After the WASM module instantiation, developers can use the
(*VM).Execute
function to invoke the exported WASM functions. For this purpose, developers may need information about the exported WASM function list. Please refer to the Instances in runtime for the details about the function types.Assume that a new Go project is created as following:
mkdir wasmedge_test && cd wasmedge_test go mod init wasmedge_test
Then assume that the WASM file
fibonacci.wasm
is copied into the current directory, and create and edit a Go filemain.go
:package main import ( "fmt" "github.com/second-state/WasmEdge-go/wasmedge" ) func main() { // Create VM. vm := wasmedge.NewVM() // Step 1: Load WASM file. err := vm.LoadWasmFile("fibonacci.wasm") if err != nil { fmt.Println("Load WASM from file FAILED:", err.Error()) return } // Step 2: Validate the WASM module. err = vm.Validate() if err != nil { fmt.Println("Validation FAILED:", err.Error()) return } // Step 3: Instantiate the WASM module. err = vm.Instantiate() if err != nil { fmt.Println("Instantiation FAILED:", err.Error()) return } // List the exported functions for the names and function types. funcnames, functypes := vm.GetFunctionList() for _, fname := range funcnames { fmt.Println("Exported function name:", fname) } for _, ftype := range functypes { // `ftype` is the `FunctionType` object of the same index in the `funcnames` array. // Developers should __NOT__ call the `ftype.Release()`. } vm.Release() }
Then you can build and run: (the only exported function in
fibonacci.wasm
isfib
)$ go get github.com/second-state/WasmEdge-go/wasmedge@v0.9.2 $ go build $ ./wasmedge_test Exported function name: fib
If developers want to get the exported function names in the registered WASM modules, please retrieve the
Store
object from theVM
object and refer to the APIs of Store Contexts to list the registered functions by the module name. -
Get function types
The
VM
object provides APIs to find the function type by function name. Please refer to the Instances in runtime for the details about the function types.// Assume that a WASM module is instantiated in `vm` which is a `wasmedge.VM` object. functype := vm.GetFunctionType("fib") // Developers can get the function types of functions in the registered modules via the // `(*VM).GetFunctionTypeRegistered` API with the functon name and the module name. // If the function is not found, these APIs will return `nil`. // Developers should __NOT__ call the `(*FunctionType).Release` function of the returned object.
WasmEdge Runtime
In this partition, we will introduce the objects of WasmEdge runtime manually.
WASM Execution Example Step-By-Step
Besides the WASM execution through the VM
object rapidly, developers can execute the WASM functions or instantiate WASM modules step-by-step with the Loader
, Validator
, Executor
, and Store
objects.
Assume that a new Go project is created as following:
mkdir wasmedge_test && cd wasmedge_test
go mod init wasmedge_test
Then assume that the WASM file fibonacci.wasm
is copied into the current directory, and create and edit a Go file main.go
:
package main
import (
"fmt"
"github.com/second-state/WasmEdge-go/wasmedge"
)
func main() {
// Set the logging level to debug to print the statistics info.
wasmedge.SetLogDebugLevel()
// Create the configure object. This is not necessary if developers use the default configuration.
conf := wasmedge.NewConfigure()
// Turn on the runtime instruction counting and time measuring.
conf.SetStatisticsInstructionCounting(true)
conf.SetStatisticsTimeMeasuring(true)
// Create the statistics object. This is not necessary if the statistics in runtime is not needed.
stat := wasmedge.NewStatistics()
// Create the store object. The store object is the WASM runtime structure core.
store := wasmedge.NewStore()
var err error
var res []interface{}
var ast *wasmedge.AST
// Create the loader object.
// For loader creation with default configuration, you can use `wasmedge.NewLoader()` instead.
loader := wasmedge.NewLoaderWithConfig(conf)
// Create the validator object.
// For validator creation with default configuration, you can use `wasmedge.NewValidator()` instead.
validator := wasmedge.NewValidatorWithConfig(conf)
// Create the executor object.
// For executor creation with default configuration and without statistics, you can use `wasmedge.NewExecutor()` instead.
executor := wasmedge.NewExecutorWithConfigAndStatistics(conf, stat)
// Load the WASM file or the compiled-WASM file and convert into the AST module object.
ast, err = loader.LoadFile("fibonacci.wasm")
if err != nil {
fmt.Println("Load WASM from file FAILED:", err.Error())
return
}
// Validate the WASM module.
err = validator.Validate(ast)
if err != nil {
fmt.Println("Validation FAILED:", err.Error())
return
}
// Instantiate the WASM module into the Store object.
err = executor.Instantiate(store, ast)
if err != nil {
fmt.Println("Instantiation FAILED:", err.Error())
return
}
// Try to list the exported functions of the instantiated WASM module.
funcnames := store.ListFunction()
for _, fname := range funcnames {
fmt.Println("Exported function name:", fname)
}
// Invoke the WASM function.
res, err = executor.Invoke(store, "fib", int32(30))
if err == nil {
fmt.Println("Get fibonacci[30]:", res[0].(int32))
} else {
fmt.Println("Run failed:", err.Error())
}
// Resources deallocations.
conf.Release()
stat.Release()
ast.Release()
loader.Release()
validator.Release()
executor.Release()
store.Release()
}
Then you can build and run: (the 18th Fibonacci number is 1346269 in 30-based index)
$ go get github.com/second-state/WasmEdge-go/wasmedge@v0.9.2
$ go build
$ ./wasmedge_test
Exported function name: fib
[2021-11-24 18:53:01.451] [debug] Execution succeeded.
[2021-11-24 18:53:01.452] [debug]
==================== Statistics ====================
Total execution time: 556372295 ns
Wasm instructions execution time: 556372295 ns
Host functions execution time: 0 ns
Executed wasm instructions count: 28271634
Gas costs: 0
Instructions per second: 50814237
Get fibonacci[30]: 1346269
Loader
The Loader
object loads the WASM binary from files or buffers.
Both the WASM and the compiled-WASM from the WasmEdge AOT Compiler are supported.
var buf []byte
// ... Read the WASM code to the `buf`.
// Developers can adjust settings in the configure object.
conf := wasmedge.NewConfigure()
// Create the loader object.
// For loader creation with default configuration, you can use `wasmedge.NewLoader()` instead.
loader := wasmedge.NewLoaderWithConfig(conf)
conf.Release()
// Load WASM or compiled-WASM from the file.
ast, err := loader.LoadFile("fibonacci.wasm")
if err != nil {
fmt.Println("Load WASM from file FAILED:", err.Error())
} else {
// The output AST object should be released.
ast.Release()
}
// Load WASM or compiled-WASM from the buffer
ast, err = loader.LoadBuffer(buf)
if err != nil {
fmt.Println("Load WASM from buffer FAILED:", err.Error())
} else {
// The output AST object should be released.
ast.Release()
}
loader.Release()
Validator
The Validator
object can validate the WASM module.
Every WASM module should be validated before instantiation.
// ...
// Assume that the `ast` is the output `*wasmedge.AST` object from the loader context.
// Assume that the `conf` is the `*wasmedge.Configure` object.
// Create the validator context.
// For validator creation with default configuration, you can use `wasmedge.NewValidator()` instead.
validator := wasmedge.NewValidatorWithConfig(conf)
err := validator.Validate(ast)
if err != nil {
fmt.Println("Validation FAILED:", err.Error())
}
validator.Release()
Executor
The Executor
object is the executor for both WASM and compiled-WASM.
This object should work base on the Store
object. For the details of the Store
object, please refer to the next chapter.
-
Register modules
As the same of registering host modules or importing WASM modules in
VM
objects, developers can registerImportObject
orAST
objects into theStore
object by theExecutor
APIs. For the details of import objects, please refer to the Host Functions.// ... // Assume that the `ast` is the output `*wasmedge.AST` object from the loader // and has passed the validation. // Assume that the `conf` is the `*wasmedge.Configure` object. // Create the statistics object. This step is not necessary if the statistics // is not needed. stat := wasmedge.NewStatistics() // Create the executor object. // For executor creation with default configuration and without statistics, // you can use `wasmedge.NewExecutor()` instead. executor := wasmedge.NewExecutorWithConfigAndStatistics(conf, stat) // Create the store object. The store is the WASM runtime structure core. store := wasmedge.NewStore() // Register the loaded WASM `ast` into store with the export module name "mod". res := executor.RegisterModule(store, ast, "mod") if err != nil { fmt.Println("WASM registration FAILED:", err.Error()) return } // Assume that the `impobj` is the `*wasmedge.ImportObject` for host functions. impobj := ... err = executor.RegisterImport(store, impobj) if err != nil { fmt.Println("Import object registration FAILED:", err.Error()) return } executor.Release() stat.Release() store.Release() impobj.Release()
-
Instantiate modules
WASM or compiled-WASM modules should be instantiated before the function invocation. Note that developers can only instantiate one module into the
Store
object, and in that case, the old instantiated module will be cleaned. Before instantiating a WASM module, please check the import section for ensuring the imports are registered into theStore
object.// ... // Assume that the `ast` is the output `*wasmedge.AST` object from the loader // and has passed the validation. // Assume that the `conf` is the `*wasmedge.Configure` object. // Create the statistics object. This step is not necessary if the statistics // is not needed. stat := wasmedge.NewStatistics() // Create the executor object. // For executor creation with default configuration and without statistics, // you can use `wasmedge.NewExecutor()` instead. executor := wasmedge.NewExecutorWithConfigAndStatistics(conf, stat) // Create the store object. The store is the WASM runtime structure core. store := wasmedge.NewStore() // Instantiate the WASM module. err := executor.Instantiate(stpre, ast) if err != nil { fmt.Println("WASM instantiation FAILED:", err.Error()) return } executor.Release() stat.Release() store.Release()
-
Invoke functions
As the same as function invocation via the
VM
object, developers can invoke the functions of the instantiated or registered modules. The APIs,(*Executor).Invoke
and(*Executor).InvokeRegistered
, are similar as the APIs of theVM
object. Please refer to the VM context workflows for details.
AST Module
The AST
object presents the loaded structure from a WASM file or buffer. Developer will get this object after loading a WASM file or buffer from Loader.
Before instantiation, developers can also query the imports and exports of an AST
object.
ast := ...
// Assume that a WASM is loaded into an `*wasmedge.AST` object from loader.
// List the imports.
imports := ast.ListImports()
for _, import := range imports {
fmt.Println("Import:", import.GetModuleName(), import.GetExternalName())
}
// List the exports.
exports := ast.ListExports()
for _, export := range exports {
fmt.Println("Export:", export.GetExternalName())
}
ast.Release()
Store
Store is the runtime structure for the representation of all instances of Function
s, Table
s, Memory
s, and Global
s that have been allocated during the lifetime of the abstract machine.
The Store
object in WasmEdge-go provides APIs to list the exported instances with their names or find the instances by exported names. For adding instances into Store
objects, please instantiate or register WASM modules or ImportObject
objects via the Executor
APIs.
-
List instances
store := wasmedge.NewStore() // ... // Instantiate a WASM module via the `*wasmedge.Executor` object. // ... // Try to list the exported functions of the instantiated WASM module. // Take the function instances for example here. funcnames := store.ListFunction() for _, name := range funcnames { fmt.Println("Exported function name:", name) } store.Release()
Developers can list the function instance exported names of the registered modules via the
(*Store).ListFunctionRegistered()
API with the module name. -
Find instances
store := wasmedge.NewStore() // ... // Instantiate a WASM module via the `*wasmedge.Executor` object. // ... // Try to find the exported functions of the instantiated WASM module. // Take the function instances for example here. funcobj := store.FindFunction("fib") // `funcobj` will be `nil` if the function not found. store.Release()
Developers can retrieve the exported function instances of the registered modules via the
(*Store).FindFunctionRegistered
API with the module name. -
List registered modules
With the module names, developers can list the exported instances of the registered modules with their names.
store := wasmedge.NewStore() // ... // Instantiate a WASM module via the `*wasmedge.Executor` object. // ... // Try to list the registered WASM modules. modnames := store.ListModule() for _, name := range modnames { fmt.Println("Registered module names:", name) } store.Release()
Instances
The instances are the runtime structures of WASM. Developers can retrieve the instances from the Store
objects.
The Store
objects will allocate instances when a WASM module or an ImportObject
is registered or instantiated through the Executor
.
A single instance can be allocated by its creation function. Developers can construct instances into an ImportObject
for registration. Please refer to the Host Functions for details.
The instances created by their creation functions should be destroyed, EXCEPT they are added into an ImportObject
object.
-
Function instance
Host functions are functions outside WebAssembly and passed to WASM modules as imports. In WasmEdge, developers can create the
Function
objects for host functions and add them into anImportObject
object for registering into aVM
or aStore
. For both host functions and the functions get fromStore
, developers can retrieve theFunctionType
from theFunction
objects. For the details of theHost Function
guide, please refer to the next chapter.funcinst := ... // `funcobj` is the `*wasmedge.Function` retrieved from the store object. functype := funcobj.GetFunctionType() // The `funcobj` retrieved from the store object should __NOT__ be released. // The `functype` retrieved from the `funcobj` should __NOT__ be released.
-
Table instance
In WasmEdge, developers can create the
Table
objects and add them into anImportObject
object for registering into aVM
or aStore
. TheTable
objects supply APIs to control the data in table instances.lim := wasmedge.NewLimitWithMax(10, 20) // Create the table type with limit and the `FuncRef` element type. tabtype := wasmedge.NewTableType(wasmedge.RefType_FuncRef, lim) // Create the table instance with table type. tabinst := wasmedge.NewTable(tabtype) // Delete the table type. tabtype.Release() gottabtype := tabinst.GetTableType() // The `gottabtype` got from table instance is owned by the `tabinst` // and should __NOT__ be released. reftype := gottabtype.GetRefType() // The `reftype` will be `wasmedge.RefType_FuncRef`. var gotdata interface{} data := wasmedge.NewFuncRef(5) err := tabinst.SetData(data, 3) // Set the function index 5 to the table[3]. // The following line will get an "out of bounds table access" error // because the position (13) is out of the table size (10): // err = tabinst.SetData(data, 13) gotdata, err = tabinst.GetData(3) // Get the FuncRef value of the table[3]. // The following line will get an "out of bounds table access" error // because the position (13) is out of the table size (10): // gotdata, err = tabinst.GetData(13) tabsize := tabinst.GetSize() // `tabsize` will be 10. err = tabinst.Grow(6) // Grow the table size of 6, the table size will be 16. // The following line will get an "out of bounds table access" error // because the size (16 + 6) will reach the table limit (20): // err = tabinst.Grow(6) tabinst.Release()
-
Memory instance
In WasmEdge, developers can create the
Memory
objects and add them into anImportObject
object for registering into aVM
or aStore
. TheMemory
objects supply APIs to control the data in memory instances.lim := wasmedge.NewLimitWithMax(1, 5) // Create the memory type with limit. The memory page size is 64KiB. memtype := wasmedge.NewMemoryType(lim) // Create the memory instance with memory type. meminst := wasmedge.NewMemory(memtype) // Delete the memory type. memtype.Release() data := []byte("A quick brown fox jumps over the lazy dog") err := meminst.SetData(data, 0x1000, 10) // Set the data[0:9] to the memory[4096:4105]. // The following line will get an "out of bounds memory access" error // because [65535:65544] is out of 1 page size (65536): // err = meminst.SetData(data, 0xFFFF, 10) var gotdata []byte gotdata, err = meminst.GetData(0x1000, 10) // Get the memory[4096:4105]. The `gotdata` will be `[]byte("A quick br"). // The following line will get an "out of bounds memory access" error // because [65535:65544] is out of 1 page size (65536): // gotdata, err = meminst.Getdata(0xFFFF, 10) pagesize := meminst.GetPageSize() // `pagesize` will be 1. err = meminst.GrowPage(2) // Grow the page size of 2, the page size of the memory instance will be 3. // The following line will get an "out of bounds memory access" error // because the size (3 + 3) will reach the memory limit (5): // err = meminst.GetPageSize(3) meminst.Release()
-
Global instance
In WasmEdge, developers can create the
Global
objects and add them into anImportObject
object for registering into aVM
or aStore
. TheGlobal
objects supply APIs to control the value in global instances.// Create the global type with value type and mutation. globtype := wasmedge.NewGlobalType(wasmedge.ValType_I64, wasmedge.ValMut_Var) // Create the global instance with value and global type. globinst := wasmedge.NewGlobal(globtype, uint64(1000)) // Delete the global type. globtype.Release() gotglobtype := globinst.GetGlobalType() // The `gotglobtype` got from global instance is owned by the `globinst` // and should __NOT__ be released. valtype := gotglobtype.GetValType() // The `valtype` will be `wasmedge.ValType_I64`. valmut := gotglobtype.GetMutability() // The `valmut` will be `wasmedge.ValMut_Var`. globinst.SetValue(uint64(888)) // Set the value u64(888) to the global. // This function will do nothing if the value type mismatched or the // global mutability is `wasmedge.ValMut_Const`. gotval := globinst.GetValue() // The `gotbal` will be `interface{}` which the type is `uint64` and // the value is 888. globinst.Release()
Host Functions
Host functions are functions outside WebAssembly and passed to WASM modules as imports.
In WasmEdge-go, developers can create the Function
, Memory
, Table
, and Global
objects and add them into an ImportObject
object for registering into a VM
or a Store
.
-
Host function allocation
Developers can define Go functions with the following function signature as the host function body:
type hostFunctionSignature func( data interface{}, mem *Memory, params []interface{}) ([]interface{}, Result)
The example of an
add
host function to add 2i32
values:func host_add(data interface{}, mem *wasmedge.Memory, params []interface{}) ([]interface{}, wasmedge.Result) { // add: i32, i32 -> i32 res := params[0].(int32) + params[1].(int32) // Set the returns returns := make([]interface{}, 1) returns[0] = res // Return return returns, wasmedge.Result_Success }
Then developers can create
Function
object with the host function body and function type:// Create a function type: {i32, i32} -> {i32}. functype := wasmedge.NewFunctionType( []wasmedge.ValType{wasmedge.ValType_I32, wasmedge.ValType_I32}, []wasmedge.ValType{wasmedge.ValType_I32}, ) // Create a function context with the function type and host function body. // The third parameter is the pointer to the additional data. // Developers should guarantee the life cycle of the data, and it can be // `nil` if the external data is not needed. // The last parameter can be 0 if developers do not need the cost measuring. func_add := wasmedge.NewFunction(functype, host_add, nil, 0) // If the function object is not added into an import object object, it should be released. func_add.Release() functype.Release()
-
Import object object
The
ImportObject
object holds an exporting module name and the instances. Developers can add theFunction
,Memory
,Table
, andGlobal
instances with their exporting names.// Host function body definition. func host_add(data interface{}, mem *wasmedge.Memory, params []interface{}) ([]interface{}, wasmedge.Result) { // add: i32, i32 -> i32 res := params[0].(int32) + params[1].(int32) // Set the returns returns := make([]interface{}, 1) returns[0] = res // Return return returns, wasmedge.Result_Success } // Create the import object with the module name "module". impobj := wasmedge.NewImportObject("module") // Create and add a function instance into the import object with export name "add". functype := wasmedge.NewFunctionType( []wasmedge.ValType{wasmedge.ValType_I32, wasmedge.ValType_I32}, []wasmedge.ValType{wasmedge.ValType_I32}, ) hostfunc := wasmedge.NewFunction(functype, host_add, nil, 0) functype.Release() impobj.AddFunction("add", hostfunc) // Create and add a table instance into the import object with export name "table". tabtype := wasmedge.NewTableType(wasmedge.RefType_FuncRef ,wasmedge.NewLimitWithMax(10, 20)) hosttab := wasmedge.NewTable(tabtype) tabtype.Release() impobj.AddTable("table", hosttab) // Create and add a memory instance into the import object with export name "memory". memtype := wasmedge.NewMemoryType(wasmedge.NewLimitWithMax(1, 2)) hostmem := wasmedge.NewMemory(memtype) memtype.Release() impobj.AddMemory("memory", hostmem) // Create and add a global instance into the import object with export name "global". globtype := wasmedge.NewGlobalType(wasmedge.ValType_I32, wasmedge.ValMut_Var) hostglob := wasmedge.NewGlobal(globtype, uint32(666)) globtype.Release() impobj.AddGlobal("global", hostglob) // The import objects should be released. // Developers should __NOT__ release the instances added into the import object objects. impobj.Release()
-
Specified import object
wasmedge.NewWasiImportObject()
API can create and initialize theWASI
import object.wasmedge.NewWasmEdgeProcessImportObject()
API can create and initialize thewasmedge_process
import object. Developers can create these import object objects and register them into theStore
orVM
objects rather than adjust the settings in theConfigure
objects.wasiobj := wasmedge.NewWasiImportObject( os.Args[1:], // The args os.Environ(), // The envs []string{".:."}, // The mapping preopens ) procobj := wasmedge.NewWasmEdgeProcessImportObject( []string{"ls", "echo"}, // The allowed commands false, // Not to allow all commands ) // Register the WASI and WasmEdge_Process into the VM object. vm := wasmedge.NewVM() vm.RegisterImport(wasiobj) vm.RegisterImport(procobj) // ... Execute some WASM functions. // Get the WASI exit code. exitcode := wasiobj.WasiGetExitCode() // The `exitcode` will be 0 if the WASI function "_start" execution has no error. // Otherwise, it will return with the related exit code. vm.Release() // The import objects should be deleted. wasiobj.Release() procobj.Release()
-
Example
Create a new Go project first:
mkdir wasmedge_test && cd wasmedge_test go mod init wasmedge_test
Assume that there is a simple WASM from the WAT as following:
(module (type $t0 (func (param i32 i32) (result i32))) (import "extern" "func-add" (func $f-add (type $t0))) (func (export "addTwo") (param i32 i32) (result i32) local.get 0 local.get 1 call $f-add) )
Create and edit the Go file
main.go
as following:package main import ( "fmt" "github.com/second-state/WasmEdge-go/wasmedge" ) // Host function body definition. func host_add(data interface{}, mem *wasmedge.Memory, params []interface{}) ([]interface{}, wasmedge.Result) { // add: i32, i32 -> i32 res := params[0].(int32) + params[1].(int32) // Set the returns returns := make([]interface{}, 1) returns[0] = res // Return return returns, wasmedge.Result_Success } func main() { // Create the VM object. vm := wasmedge.NewVM() // The WASM module buffer. wasmbuf := []byte{ /* WASM header */ 0x00, 0x61, 0x73, 0x6D, 0x01, 0x00, 0x00, 0x00, /* Type section */ 0x01, 0x07, 0x01, /* function type {i32, i32} -> {i32} */ 0x60, 0x02, 0x7F, 0x7F, 0x01, 0x7F, /* Import section */ 0x02, 0x13, 0x01, /* module name: "extern" */ 0x06, 0x65, 0x78, 0x74, 0x65, 0x72, 0x6E, /* extern name: "func-add" */ 0x08, 0x66, 0x75, 0x6E, 0x63, 0x2D, 0x61, 0x64, 0x64, /* import desc: func 0 */ 0x00, 0x00, /* Function section */ 0x03, 0x02, 0x01, 0x00, /* Export section */ 0x07, 0x0A, 0x01, /* export name: "addTwo" */ 0x06, 0x61, 0x64, 0x64, 0x54, 0x77, 0x6F, /* export desc: func 0 */ 0x00, 0x01, /* Code section */ 0x0A, 0x0A, 0x01, /* code body */ 0x08, 0x00, 0x20, 0x00, 0x20, 0x01, 0x10, 0x00, 0x0B, } // Create the import object with the module name "extern". impobj := wasmedge.NewImportObject("extern") // Create and add a function instance into the import object with export name "func-add". functype := wasmedge.NewFunctionType( []wasmedge.ValType{wasmedge.ValType_I32, wasmedge.ValType_I32}, []wasmedge.ValType{wasmedge.ValType_I32}, ) hostfunc := wasmedge.NewFunction(functype, host_add, nil, 0) functype.Release() impobj.AddFunction("func-add", hostfunc) // Register the import object into VM. vm.RegisterImport(impobj) res, err := vm.RunWasmBuffer(wasmbuf, "addTwo", uint32(1234), uint32(5678)) if err == nil { fmt.Println("Get the result:", res[0].(int32)) } else { fmt.Println("Error message:", err.Error()) } impobj.Release() vm.Release() }
Then you can build and run the Golang application with the WasmEdge Golang SDK:
$ go get github.com/second-state/WasmEdge-go/wasmedge@v0.9.2 $ go build $ ./wasmedge_test Get the result: 6912
-
Host Data Example
Developers can set a external data object to the function object, and access to the object in the function body. Assume that edit the Go file
main.go
above:package main import ( "fmt" "github.com/second-state/WasmEdge-go/wasmedge" ) // Host function body definition. func host_add(data interface{}, mem *wasmedge.Memory, params []interface{}) ([]interface{}, wasmedge.Result) { // add: i32, i32 -> i32 res := params[0].(int32) + params[1].(int32) // Set the returns returns := make([]interface{}, 1) returns[0] = res // Also set the result to the data. *data.(*int32) = res // Return return returns, wasmedge.Result_Success } func main() { // Create the VM object. vm := wasmedge.NewVM() // The WASM module buffer. wasmbuf := []byte{ /* WASM header */ 0x00, 0x61, 0x73, 0x6D, 0x01, 0x00, 0x00, 0x00, /* Type section */ 0x01, 0x07, 0x01, /* function type {i32, i32} -> {i32} */ 0x60, 0x02, 0x7F, 0x7F, 0x01, 0x7F, /* Import section */ 0x02, 0x13, 0x01, /* module name: "extern" */ 0x06, 0x65, 0x78, 0x74, 0x65, 0x72, 0x6E, /* extern name: "func-add" */ 0x08, 0x66, 0x75, 0x6E, 0x63, 0x2D, 0x61, 0x64, 0x64, /* import desc: func 0 */ 0x00, 0x00, /* Function section */ 0x03, 0x02, 0x01, 0x00, /* Export section */ 0x07, 0x0A, 0x01, /* export name: "addTwo" */ 0x06, 0x61, 0x64, 0x64, 0x54, 0x77, 0x6F, /* export desc: func 0 */ 0x00, 0x01, /* Code section */ 0x0A, 0x0A, 0x01, /* code body */ 0x08, 0x00, 0x20, 0x00, 0x20, 0x01, 0x10, 0x00, 0x0B, } // The additional data to set into the host function. var data int32 = 0 // Create the import object with the module name "extern". impobj := wasmedge.NewImportObject("extern") // Create and add a function instance into the import object with export name "func-add". functype := wasmedge.NewFunctionType( []wasmedge.ValType{wasmedge.ValType_I32, wasmedge.ValType_I32}, []wasmedge.ValType{wasmedge.ValType_I32}, ) hostfunc := wasmedge.NewFunction(functype, host_add, &data, 0) functype.Release() impobj.AddFunction("func-add", hostfunc) // Register the import object into VM. vm.RegisterImport(impobj) res, err := vm.RunWasmBuffer(wasmbuf, "addTwo", uint32(1234), uint32(5678)) if err == nil { fmt.Println("Get the result:", res[0].(int32)) } else { fmt.Println("Error message:", err.Error()) } fmt.Println("Data value:", data) impobj.Release() vm.Release() }
Then you can build and run the Golang application with the WasmEdge Golang SDK:
$ go get github.com/second-state/WasmEdge-go/wasmedge@v0.9.2 $ go build $ ./wasmedge_test Get the result: 6912 Data value: 6912
WasmEdge AOT Compiler
In this partition, we will introduce the WasmEdge AOT compiler and the options in Go. WasmEdge runs the WASM files in interpreter mode, and WasmEdge also supports the AOT (ahead-of-time) mode running without modifying any code. The WasmEdge AOT (ahead-of-time) compiler compiles the WASM files for running in AOT mode which is much faster than interpreter mode. Developers can compile the WASM files into the compiled-WASM files in shared library format for universal WASM format for the AOT mode execution.
Compilation Example
The go_WasmAOT example provide a tool for compiling a WASM file.
Compiler Options
Developers can set options for AOT compilers such as optimization level and output format:
const (
// Disable as many optimizations as possible.
CompilerOptLevel_O0 = CompilerOptimizationLevel(C.WasmEdge_CompilerOptimizationLevel_O0)
// Optimize quickly without destroying debuggability.
CompilerOptLevel_O1 = CompilerOptimizationLevel(C.WasmEdge_CompilerOptimizationLevel_O1)
// Optimize for fast execution as much as possible without triggering significant incremental compile time or code size growth.
CompilerOptLevel_O2 = CompilerOptimizationLevel(C.WasmEdge_CompilerOptimizationLevel_O2)
// Optimize for fast execution as much as possible.
CompilerOptLevel_O3 = CompilerOptimizationLevel(C.WasmEdge_CompilerOptimizationLevel_O3)
// Optimize for small code size as much as possible without triggering significant incremental compile time or execution time slowdowns.
CompilerOptLevel_Os = CompilerOptimizationLevel(C.WasmEdge_CompilerOptimizationLevel_Os)
// Optimize for small code size as much as possible.
CompilerOptLevel_Oz = CompilerOptimizationLevel(C.WasmEdge_CompilerOptimizationLevel_Oz)
)
const (
// Native dynamic library format.
CompilerOutputFormat_Native = CompilerOutputFormat(C.WasmEdge_CompilerOutputFormat_Native)
// WebAssembly with AOT compiled codes in custom section.
CompilerOutputFormat_Wasm = CompilerOutputFormat(C.WasmEdge_CompilerOutputFormat_Wasm)
)
Please refer to the AOT compiler options configuration for details.
Upgrade to WasmEdge-Go v0.10.0
Due to the WasmEdge-Go API breaking changes, this document shows the guideline of programming with WasmEdge-Go API to upgrade from the v0.9.2
to the v0.10.0
version.
Due to the v0.9.1
is retracted, we use the version v0.9.2
here.
Concepts
-
Merged the
ImportObject
into theModule
.The
ImportObject
struct which is for the host functions is merged intoModule
. Developers can use the related APIs to construct host modules.wasmedge.NewImportObject()
is changed towasmedge.NewModule()
.(*wasmedge.ImportObject).Release()
is changed to(*wasmedge.Module).Release()
.(*wasmedge.ImportObject).AddFunction()
is changed to(*wasmedge.Module).AddFunction()
.(*wasmedge.ImportObject).AddTable()
is changed to(*wasmedge.Module).AddTable()
.(*wasmedge.ImportObject).AddMemory()
is changed to(*wasmedge.Module).AddMemory()
.(*wasmedge.ImportObject).AddGlobal()
is changed to(*wasmedge.Module).AddGlobal()
.(*wasmedge.ImportObject).NewWasiImportObject()
is changed to(*wasmedge.Module).NewWasiModule()
.(*wasmedge.ImportObject).NewWasmEdgeProcessImportObject()
is changed to(*wasmedge.Module).NewWasmEdgeProcessModule()
.(*wasmedge.ImportObject).InitWASI()
is changed to(*wasmedge.Module).InitWASI()
.(*wasmedge.ImportObject).InitWasmEdgeProcess()
is changed to(*wasmedge.Module).InitWasmEdgeProcess()
.(*wasmedge.ImportObject).WasiGetExitCode()
is changed to(*wasmedge.Module).WasiGetExitCode
.(*wasmedge.VM).RegisterImport()
is changed to(*wasmedge.VM).RegisterModule()
.(*wasmedge.VM).GetImportObject()
is changed to(*wasmedge.VM).GetImportModule()
.
For the new host function examples, please refer to the example below.
-
Used the pointer to
Function
instead of the index in theFuncRef
value type.For the better performance and security, the
FuncRef
related APIs used the*wasmedge.Function
for the parameters and returns.wasmedge.NewFuncRef()
is changed to use the*Function
as it's argument.- Added
(wasmedge.FuncRef).GetRef()
to retrieve the*Function
.
-
Supported multiple anonymous WASM module instantiation.
In the version before
v0.9.2
, WasmEdge only supports 1 anonymous WASM module to be instantiated at one time. If developers instantiate a new WASM module, the old one will be replaced. After thev0.10.0
version, developers can instantiate multiple anonymous WASM module byExecutor
and get theModule
instance. But for the source code using theVM
APIs, the behavior is not changed. For the new examples of instantiating multiple anonymous WASM modules, please refer to the example below. -
Behavior changed of
Store
.The
Function
,Table
,Memory
, andGlobal
instances retrievement from theStore
is moved to theModule
instance. TheStore
only manage the module linking when instantiation and the named module searching after thev0.10.0
version.(*wasmedge.Store).ListFunction()
and(*wasmedge.Store).ListFunctionRegistered()
is replaced by(*wasmedge.Module).ListFunction()
.(*wasmedge.Store).ListTable()
and(*wasmedge.Store).ListTableRegistered()
is replaced by(*wasmedge.Module).ListTable()
.(*wasmedge.Store).ListMemory()
and(*wasmedge.Store).ListMemoryRegistered()
is replaced by(*wasmedge.Module).ListMemory()
.(*wasmedge.Store).ListGlobal()
and(*wasmedge.Store).ListGlobalRegistered()
is replaced by(*wasmedge.Module).ListGlobal()
.(*wasmedge.Store).FindFunction()
and(*wasmedge.Store).FindFunctionRegistered()
is replaced by(*wasmedge.Module).FindFunction()
.(*wasmedge.Store).FindTable()
and(*wasmedge.Store).FindTableRegistered()
is replaced by(*wasmedge.Module).FindTable()
.(*wasmedge.Store).FindMemory()
and(*wasmedge.Store).FindMemoryRegistered()
is replaced by(*wasmedge.Module).FindMemory()
.(*wasmedge.Store).FindGlobal()
and(*wasmedge.Store).FindGlobalRegistered()
is replaced by(*wasmedge.Module).FindGlobal()
.
For the new examples of retrieving instances, please refer to the example below.
-
The
Module
-based resource management.Except the creation of
Module
instance for the host functons, theExecutor
will output aModule
instance after instantiation. No matter the anonymous or named modules, developers have the responsibility to destroy them by(*wasmedge.Module).Release()
API. TheStore
will link to the namedModule
instance after registering. After the destroyment of aModule
instance, theStore
will unlink to that automatically; after the destroyment of theStore
, the allModule
instances theStore
linked to will unlink to thatStore
automatically.
WasmEdge-Go VM changes
The VM
APIs are basically not changed, except the ImportObject
related APIs.
The following is the example of WASI initialization in WasmEdge-Go v0.9.2
:
conf := wasmedge.NewConfigure(wasmedge.WASI)
vm := wasmedge.NewVMWithConfig(conf)
// The following API can retrieve the pre-registration import objects from the VM object.
// This API will return `nil` if the corresponding pre-registration is not set into the configuration.
wasiobj := vm.GetImportObject(wasmedge.WASI)
// Initialize the WASI.
wasiobj.InitWasi(
os.Args[1:], // The args
os.Environ(), // The envs
[]string{".:."}, // The mapping preopens
)
// ...
vm.Release()
conf.Release()
Developers can change to use the WasmEdge-Go v0.10.0
as follows, with only replacing the ImportObject
into Module
:
conf := wasmedge.NewConfigure(wasmedge.WASI)
vm := wasmedge.NewVMWithConfig(conf)
// The following API can retrieve the pre-registration module instances from the VM object.
// This API will return `nil` if the corresponding pre-registration is not set into the configuration.
wasiobj := vm.GetImportModule(wasmedge.WASI)
// Initialize the WASI.
wasiobj.InitWasi(
os.Args[1:], // The args
os.Environ(), // The envs
[]string{".:."}, // The mapping preopens
)
// ...
vm.Release()
conf.Release()
The VM
provides a new API for getting the current instantiated anonymous Module
instance.
For example, if developer want to get the exported Global
instance:
// Assume that a WASM module is instantiated in `vm`, and exports the "global_i32".
store := vm.GetStore()
globinst := store.FindGlobal("global_i32")
After the WasmEdge-Go v0.10.0
, developers can use the (*wasmedge.VM).GetActiveModule()
to get the module instance:
// Assume that a WASM module is instantiated in `vm`, and exports the "global_i32".
mod := vm.GetActiveModule()
// The example of retrieving the global instance.
globinst := mod.FindGlobal("global_i32")
WasmEdge Executor changes
Executor
helps to instantiate a WASM module, register a WASM module into Store
with module name, register the host modules with host functions, or invoke functions.
-
WASM module instantiation
In WasmEdge-Go
v0.9.2
version, developers can instantiate a WASM module by theExecutor
API:var ast *wasmedge.AST // Assume that `ast` is a loaded WASM from file or buffer and has passed the validation. // Assume that `executor` is a `*wasmedge.Executor`. // Assume that `store` is a `*wasmedge.Store`. err := executor.Instantiate(store, ast) if err != nil { fmt.Println("Instantiation FAILED:", err.Error()) }
Then the WASM module is instantiated into an anonymous module instance and handled by the
Store
. If a new WASM module is instantiated by this API, the old instantiated module instance will be cleaned. After the WasmEdge-Gov0.10.0
version, the instantiated anonymous module will be outputed and handled by caller, and not only 1 anonymous module instance can be instantiated. Developers have the responsibility to release the outputed module instances.var ast1 *wasmedge.AST var ast2 *wasmedge.AST // Assume that `ast1` and `ast2` are loaded WASMs from different files or buffers, // and have both passed the validation. // Assume that `executor` is a `*wasmedge.Executor`. // Assume that `store` is a `*wasmedge.Store`. mod1, err1 := executor.Instantiate(store, ast1) if err1 != nil { fmt.Println("Instantiation FAILED:", err1.Error()) } mod2, err2 := executor.Instantiate(store, ast2) if err2 != nil { fmt.Println("Instantiation FAILED:", err2.Error()) } mod1.Release() mod2.Release()
-
WASM module registration with module name
When instantiating and registering a WASM module with module name, developers can use the
(*wasmedge.Executor).RegisterModule()
API before WasmEdge-Gov0.9.2
.var ast *wasmedge.AST // Assume that `ast` is a loaded WASM from file or buffer and has passed the validation. // Assume that `executor` is a `*wasmedge.Executor`. // Assume that `store` is a `*wasmedge.Store`. // Register the WASM module into store with the export module name "mod". err := executor.RegisterModule(store, ast, "mod") if err != nil { fmt.Println("WASM registration FAILED:", err.Error()) }
The same feature is implemented in WasmEdge-Go
v0.10.0
, but in different API(*wasmedge.Executor).Register()
:var ast *wasmedge.AST // Assume that `ast` is a loaded WASM from file or buffer and has passed the validation. // Assume that `executor` is a `*wasmedge.Executor`. // Assume that `store` is a `*wasmedge.Store`. // Register the WASM module into store with the export module name "mod". mod, err := executor.Register(store, ast, "mod") if err != nil { fmt.Println("WASM registration FAILED:", err.Error()) } mod.Release()
Developers have the responsibility to release the outputed module instances.
-
Host module registration
In WasmEdge-Go
v0.9.2
, developers can create anImportObject
and register intoStore
.// Create the import object with the export module name. impobj := wasmedge.NewImportObject("module") // ... // Add the host functions, tables, memories, and globals into the import object. // The import object has already contained the export module name. err := executor.RegisterImport(store, impobj) if err != nil { fmt.Println("Import object registration FAILED:", err.Error()) }
After WasmEdge-Go
v0.10.0
, developers should use theModule
instance instead:// Create the module instance with the export module name. impmod := wasmedge.NewModule("module") // ... // Add the host functions, tables, memories, and globals into the module instance. // The module instance has already contained the export module name. err := executor.RegisterImport(store, impmod) if err != nil { fmt.Println("Module instance registration FAILED:", err.Error()) }
Developers have the responsibility to release the created module instances.
-
WASM function invokation
This example uses the fibonacci.wasm, and the corresponding WAT file is at fibonacci.wat. In WasmEdge-Go
v0.9.2
version, developers can invoke a WASM function with the export function name:// Create the store object. The store object holds the instances. store := wasmedge.NewStore() // Error. var err error // AST object. var ast *wasmedge.AST // Return values. var res []interface{} // Create the loader object. loader := wasmedge.NewLoader() // Create the validator object. validator := wasmedge.NewValidator() // Create the executor object. executor := wasmedge.NewExecutor() // Load the WASM file or the compiled-WASM file and convert into the AST object. ast, err = loader.LoadFile("fibonacci.wasm") if err != nil { fmt.Println("Load WASM from file FAILED:", err.Error()) return } // Validate the WASM module. err = validator.Validate(ast) if err != nil { fmt.Println("Validation FAILED:", err.Error()) return } // Instantiate the WASM module into the Store object. err = executor.Instantiate(store, ast) if err != nil { fmt.Println("Instantiation FAILED:", err.Error()) return } // Invoke the function which is exported with the function name "fib". res, err = executor.Invoke(store, "fib", int32(30)) if err == nil { fmt.Println("Get fibonacci[30]:", res[0].(int32)) } else { fmt.Println("Run failed:", err.Error()) } ast.Release() loader.Release() validator.Release() executor.Release() store.Release()
After the WasmEdge-Go
v0.10.0
, developers should retrieve theFunction
instance by function name first.// ... // Ignore the unchanged steps before validation. Please refer to the sample code above. var mod *wasmedge.Module // Instantiate the WASM module and get the output module instance. mod, err = executor.Instantiate(store, ast) if err != nil { fmt.Println("Instantiation FAILED:", err.Error()) return } // Retrieve the function instance by name. funcinst := mod.FindFunction("fib") if funcinst == nil { fmt.Println("Run FAILED: Function name `fib` not found") return } res, err = executor.Invoke(store, funcinst, int32(30)) if err == nil { fmt.Println("Get fibonacci[30]:", res[0].(int32)) } else { fmt.Println("Run FAILED:", err.Error()) } ast.Release() mod.Release() loader.Release() validator.Release() executor.Release() store.Release()
Instances retrievement
This example uses the fibonacci.wasm, and the corresponding WAT file is at fibonacci.wat.
Before the WasmEdge-Go v0.9.2
versions, developers can retrieve all exported instances of named or anonymous modules from Store
:
// Create the store object. The store object holds the instances.
store := wasmedge.NewStore()
// Error.
var err error
// AST object.
var ast *wasmedge.AST
// Create the loader object.
loader := wasmedge.NewLoader()
// Create the validator object.
validator := wasmedge.NewValidator()
// Create the executor object.
executor := wasmedge.NewExecutor()
// Load the WASM file or the compiled-WASM file and convert into the AST object.
ast, err = loader.LoadFile("fibonacci.wasm")
if err != nil {
fmt.Println("Load WASM from file FAILED:", err.Error())
return
}
// Validate the WASM module.
err = validator.Validate(ast)
if err != nil {
fmt.Println("Validation FAILED:", err.Error())
return
}
// Example: register and instantiate the WASM module with the module name "module_fib".
err = executor.RegisterModule(store, ast, "module_fib")
if err != nil {
fmt.Println("Instantiation FAILED:", err.Error())
return
}
// Example: Instantiate the WASM module into the Store object.
err = executor.Instantiate(store, ast)
if err != nil {
fmt.Println("Instantiation FAILED:", err.Error())
return
}
// Now, developers can retrieve the exported instances from the store.
// Take the exported functions as example. This WASM exports the function "fib".
// Find the function "fib" from the instantiated anonymous module.
func1 := store.FindFunction("fib")
// Find the function "fib" from the registered module "module_fib".
func2 := store.FindFunctionRegistered("module_fib", "fib")
ast.Release()
store.Release()
loader.Release()
validator.Release()
executor.Release()
After the WasmEdge-Go v0.10.0
, developers can instantiate several anonymous Module
instances, and should retrieve the exported instances from named or anonymous Module
instances:
// Create the store object. The store is the object to link the modules for imports and exports.
store := wasmedge.NewStore()
// Error.
var err error
// AST object.
var ast *wasmedge.AST
// Module instances.
var namedmod *wasmedge.Module
var anonymousmod *wasmedge.Module
// Create the loader object.
loader := wasmedge.NewLoader()
// Create the validator object.
validator := wasmedge.NewValidator()
// Create the executor object.
executor := wasmedge.NewExecutor()
// Load the WASM file or the compiled-WASM file and convert into the AST object.
ast, err = loader.LoadFile("fibonacci.wasm")
if err != nil {
fmt.Println("Load WASM from file FAILED:", err.Error())
return
}
// Validate the WASM module.
err = validator.Validate(ast)
if err != nil {
fmt.Println("Validation FAILED:", err.Error())
return
}
// Example: register and instantiate the WASM module with the module name "module_fib".
namedmod, err = executor.Register(store, ast, "module_fib")
if err != nil {
fmt.Println("Instantiation FAILED:", err.Error())
return
}
// Example: Instantiate the WASM module and get the output module instance.
anonymousmod, err = executor.Instantiate(store, ast)
if err != nil {
fmt.Println("Instantiation FAILED:", err.Error())
return
}
// Now, developers can retrieve the exported instances from the module instaces.
// Take the exported functions as example. This WASM exports the function "fib".
// Find the function "fib" from the instantiated anonymous module.
func1 := anonymousmod.FindFunction("fib")
// Find the function "fib" from the registered module "module_fib".
func2 := namedmod.FindFunction("fib")
// Or developers can get the named module instance from the store:
gotmod := store.FindModule("module_fib")
func3 := gotmod.FindFunction("fib")
namedmod.Release()
anonymousmod.Release()
ast.Release()
store.Release()
loader.Release()
validator.Release()
executor.Release()
Host functions
The difference of host functions are the replacement of ImportObject
struct.
// Host function body definition.
func host_add(data interface{}, mem *wasmedge.Memory, params []interface{}) ([]interface{}, wasmedge.Result) {
// add: i32, i32 -> i32
res := params[0].(int32) + params[1].(int32)
// Set the returns
returns := make([]interface{}, 1)
returns[0] = res
// Return
return returns, wasmedge.Result_Success
}
// ...
// Create an import object with the module name "module".
impobj := wasmedge.NewImportObject("module")
// Create and add a function instance into the import object with export name "add".
functype := wasmedge.NewFunctionType(
[]wasmedge.ValType{wasmedge.ValType_I32, wasmedge.ValType_I32},
[]wasmedge.ValType{wasmedge.ValType_I32},
)
hostfunc := wasmedge.NewFunction(functype, host_add, nil, 0)
// The third parameter is the pointer to the additional data object.
// Developers should guarantee the life cycle of the data, and it can be `nil`
// if the external data is not needed.
functype.Release()
impobj.AddFunction("add", hostfunc)
// The import object should be released.
// Developers should __NOT__ release the instances added into the import objects.
impobj.Release()
Developers can use the Module
struct to upgrade to WasmEdge v0.10.0
easily.
// Host function body definition.
func host_add(data interface{}, mem *wasmedge.Memory, params []interface{}) ([]interface{}, wasmedge.Result) {
// add: i32, i32 -> i32
res := params[0].(int32) + params[1].(int32)
// Set the returns
returns := make([]interface{}, 1)
returns[0] = res
// Return
return returns, wasmedge.Result_Success
}
// ...
// Create a module instance with the module name "module".
mod := wasmedge.NewModule("module")
// Create and add a function instance into the module instance with export name "add".
functype := wasmedge.NewFunctionType(
[]wasmedge.ValType{wasmedge.ValType_I32, wasmedge.ValType_I32},
[]wasmedge.ValType{wasmedge.ValType_I32},
)
hostfunc := wasmedge.NewFunction(functype, host_add, nil, 0)
// The third parameter is the pointer to the additional data object.
// Developers should guarantee the life cycle of the data, and it can be `nil`
// if the external data is not needed.
functype.Release()
mod.AddFunction("add", hostfunc)
// The module instances should be released.
// Developers should __NOT__ release the instances added into the module instance objects.
mod.Release()
Node.js SDK
In this tutorial, I will show you how to incorporate WebAssembly functions, written in Rust, into Node.js applications on the server via the WasmEdge Node.js SDK. This approach combines Rust's performance, WebAssembly's security and portability, and JavaScript's ease-of-use. A typical application works like this.
- The host application is a Node.js web application written in JavaScript. It makes WebAssembly function calls.
- The WebAssembly bytecode program is written in Rust. It runs inside the WasmEdge Runtime, and is called from the Node.js web application.
Fork this Github repository to start coding!
Prerequisites
To set up a high-performance Node.js environment with Rust and WebAssembly, you will need the following:
- A modern Linux distribution, such as Ubuntu Server 20.04 LTS
- Rust language
- Node.js
- The WasmEdge Runtime for Node.js
- The rustwasmc compiler toolchain
Docker
The easiest way to get started is to use Docker to build a dev environment. Just clone this template project to your computer and run the following Docker commands.
# Get the code
git clone https://github.com/second-state/wasmedge-nodejs-starter
cd wasmedge-nodejs-starter
# Run Docker container
docker pull wasmedge/appdev_x86_64:0.8.2
docker run -p 3000:3000 --rm -it -v $(pwd):/app wasmedge/appdev_x86_64:0.8.2
# In docker
cd /app
That's it! You are now ready to compile and run the code.
Manual setup without Docker
The commands are as follows.
# Install Rust
curl --proto '=https' --tlsv1.2 -sSf https://sh.rustup.rs | sh
source $HOME/.cargo/env
rustup override set 1.50.0
# Install Node.js and npm
curl -sL https://deb.nodesource.com/setup_14.x | bash
sudo apt-get install -y nodejs npm
# Install rustwasmc toolchain
npm install -g rustwasmc # Append --unsafe-perm if permission denied
# OS dependencies for WasmEdge
sudo apt-get update
sudo apt-get -y upgrade
sudo apt install -y build-essential curl wget git vim libboost-all-dev llvm-dev liblld-10-dev
# Install the nodejs addon for WasmEdge
npm install wasmedge-core
npm install wasmedge-extensions
The WasmEdge Runtime depends on the latest version of
libstdc++
. Ubuntu 20.04 LTS already has the latest libraries. If you are running an older Linux distribution, you have several options to upgrade.
Next, clone the example source code repository.
git clone https://github.com/second-state/wasmedge-nodejs-starter
cd wasmedge-nodejs-starter
Hello World
The first example is a hello world to show you how various parts of the application fit together.
WebAssembly program in Rust
In this example, our Rust program appends the input string after “hello”. Below is the content of the Rust program src/lib.rs
. You can define multiple external functions in this library file, and all of them will be available to the host JavaScript app via WebAssembly. Just remember to annotate each function with #[wasm_bindgen]
so that rustwasmc knows to generate the correct JavaScript to Rust interface for it when you build it.
#![allow(unused)] fn main() { use wasm_bindgen::prelude::*; #[wasm_bindgen] pub fn say(s: String) -> String { let r = String::from("hello "); return r + &s; } }
Next, you can compile the Rust source code into WebAssembly bytecode and generate the accompanying JavaScript module for the Node.js host environment.
rustwasmc build
The result are files in the pkg/
directory. the .wasm
file is the WebAssembly bytecode program, and the .js
files are for the JavaScript module.
The Node.js host application
Next, go to the node
folder and examine the JavaScript program app.js
. With the generated wasmedge_nodejs_starter_lib.js
module, it is very easy to write JavaScript to call WebAssembly functions. Below is the node application app.js
. It simply imports the say()
function from the generated module. The node application takes the name
parameter from incoming an HTTP GET request, and responds with “hello name
”.
const { say } = require('../pkg/wasmedge_nodejs_starter_lib.js');
const http = require('http');
const url = require('url');
const hostname = '127.0.0.1';
const port = 3000;
const server = http.createServer((req, res) => {
const queryObject = url.parse(req.url,true).query;
res.statusCode = 200;
res.setHeader('Content-Type', 'text/plain');
res.end(say(queryObject['name']));
});
server.listen(port, hostname, () => {
console.log(`Server running at http://${hostname}:${port}/`);
});
Start the Node.js application server as follows.
$ node node/app.js
Server running at http://127.0.0.1:3000/
Then, you can test it from another terminal window.
$ curl http://127.0.0.1:3000/?name=Wasm
hello Wasm
A complete web application
The next example shows a web application that computes the roots for quadratic equations. Please checkout the full source code here.
The user enters the values for a
, b
, c
on the web form, and the web application calls the web service at /solve
to compute the roots for the quadratic equation.
a*X^2 + b*X + c = 0
The roots for X
are displayed in the area below the input form.
The HTML file contains the client side JavaScript to submit the web form to /solve
, and put result into the #roots
HTML element on the page.
$(function() {
var options = {
target: '#roots',
url: "/solve",
type: "post"
};
$('#solve').ajaxForm(options);
});
The Node.js application behind the /solve
URL endpoint is as follows. It reads the data from the input form, passes them into the solve
function as an array, and puts the return value in the HTTP response.
app.post('/solve', function (req, res) {
var a = parseFloat(req.body.a);
var b = parseFloat(req.body.b);
var c = parseFloat(req.body.c);
res.send(solve([a, b, c]))
})
The solve
function is written in Rust and runs inside the WasmEdge Runtime. While the call arguments in the JavaScript side is an array of values, the Rust function receives a JSON object that encapsulates the array. In the Rust code, we first decode the JSON, perform the computation, and return the result values in a JSON string.
#![allow(unused)] fn main() { #[wasm_bindgen] pub fn solve(params: &str) -> String { let ps: (f32, f32, f32) = serde_json::from_str(¶ms).unwrap(); let discriminant: f32 = (ps.1 * ps.1) - (4. * ps.0 * ps.2); let mut solution: (f32, f32) = (0., 0.); if discriminant >= 0. { solution.0 = (((-1.) * ps.1) + discriminant.sqrt()) / (2. * ps.0); solution.1 = (((-1.) * ps.1) - discriminant.sqrt()) / (2. * ps.0); return serde_json::to_string(&solution).unwrap(); } else { return String::from("not real numbers"); } } }
Let's try it.
rustwasmc build
npm install express # The application requires the Express framework in Node.js
node node/server.js
From the web browser, go to http://ip-addr:8080/
to access this application. Note: If you are using Docker, make sure that the Docker container port 8080 is mapped to the host port 8080.
That’s it for the quadratic equation example.
More examples
Besides passing string values between Rust and JavaScript, the rustwasmc
tool supports the following data types.
- Rust call parameters can be any combo of
i32
,String
,&str
,Vec<u8>
, and&[u8]
- Return value can be
i32
orString
orVec<u8>
or void - For complex data types, such as structs, you could use JSON strings to pass data.
With JSON support, you can call Rust functions with any number of input parameters and return any number of return values of any type.
The Rust program src/lib.rs
in the functions example demonstrates how to pass in call arguments in various supported types, and return values.
#![allow(unused)] fn main() { #[wasm_bindgen] pub fn obfusticate(s: String) -> String { (&s).chars().map(|c| { match c { 'A' ..= 'M' | 'a' ..= 'm' => ((c as u8) + 13) as char, 'N' ..= 'Z' | 'n' ..= 'z' => ((c as u8) - 13) as char, _ => c } }).collect() } #[wasm_bindgen] pub fn lowest_common_denominator(a: i32, b: i32) -> i32 { let r = lcm(a, b); return r; } #[wasm_bindgen] pub fn sha3_digest(v: Vec<u8>) -> Vec<u8> { return Sha3_256::digest(&v).as_slice().to_vec(); } #[wasm_bindgen] pub fn keccak_digest(s: &[u8]) -> Vec<u8> { return Keccak256::digest(s).as_slice().to_vec(); } }
Perhaps the most interesting is the create_line()
function. It takes two JSON strings, each representing a Point
struct, and returns a JSON string representing a Line
struct. Notice that both the Point
and Line
structs are annotated with Serialize
and Deserialize
so that the Rust compiler automatically generates necessary code to support their conversion to and from JSON strings.
#![allow(unused)] fn main() { use wasm_bindgen::prelude::*; use serde::{Serialize, Deserialize}; #[derive(Serialize, Deserialize, Debug)] struct Point { x: f32, y: f32 } #[derive(Serialize, Deserialize, Debug)] struct Line { points: Vec<Point>, valid: bool, length: f32, desc: String } #[wasm_bindgen] pub fn create_line (p1: &str, p2: &str, desc: &str) -> String { let point1: Point = serde_json::from_str(p1).unwrap(); let point2: Point = serde_json::from_str(p2).unwrap(); let length = ((point1.x - point2.x) * (point1.x - point2.x) + (point1.y - point2.y) * (point1.y - point2.y)).sqrt(); let valid = if length == 0.0 { false } else { true }; let line = Line { points: vec![point1, point2], valid: valid, length: length, desc: desc.to_string() }; return serde_json::to_string(&line).unwrap(); } #[wasm_bindgen] pub fn say(s: &str) -> String { let r = String::from("hello "); return r + s; } }
Next, let's examine the JavaScript program app.js
. It shows how to call the Rust functions. As you can see String
and &str
are simply strings in JavaScript, i32
are numbers, and Vec<u8>
or &[8]
are JavaScript Uint8Array
. JavaScript objects need to go through JSON.stringify()
or JSON.parse()
before being passed into or returned from Rust functions.
const { say, obfusticate, lowest_common_denominator, sha3_digest, keccak_digest, create_line } = require('./functions_lib.js');
var util = require('util');
const encoder = new util.TextEncoder();
console.hex = (d) => console.log((Object(d).buffer instanceof ArrayBuffer ? new Uint8Array(d.buffer) : typeof d === 'string' ? (new util.TextEncoder('utf-8')).encode(d) : new Uint8ClampedArray(d)).reduce((p, c, i, a) => p + (i % 16 === 0 ? i.toString(16).padStart(6, 0) + ' ' : ' ') + c.toString(16).padStart(2, 0) + (i === a.length - 1 || i % 16 === 15 ? ' '.repeat((15 - i % 16) * 3) + Array.from(a).splice(i - i % 16, 16).reduce((r, v) => r + (v > 31 && v < 127 || v > 159 ? String.fromCharCode(v) : '.'), ' ') + '\n' : ''), ''));
console.log( say("WasmEdge") );
console.log( obfusticate("A quick brown fox jumps over the lazy dog") );
console.log( lowest_common_denominator(123, 2) );
console.hex( sha3_digest(encoder.encode("This is an important message")) );
console.hex( keccak_digest(encoder.encode("This is an important message")) );
var p1 = {x:1.5, y:3.8};
var p2 = {x:2.5, y:5.8};
var line = JSON.parse(create_line(JSON.stringify(p1), JSON.stringify(p2), "A thin red line"));
console.log( line );
After running rustwasmc
to build the Rust library, running app.js
in Node.js environment produces the following output.
$ rustwasmc build
... Building the wasm file and JS shim file in pkg/ ...
$ node node/app.js
hello WasmEdge
N dhvpx oebja sbk whzcf bire gur ynml qbt
246
000000 57 1b e7 d1 bd 69 fb 31 9f 0a d3 fa 0f 9f 9a b5 W.çѽiû1..Óú...µ
000010 2b da 1a 8d 38 c7 19 2d 3c 0a 14 a3 36 d3 c3 cb +Ú..8Ç.-<..£6ÓÃË
000000 7e c2 f1 c8 97 74 e3 21 d8 63 9f 16 6b 03 b1 a9 ~ÂñÈ.tã!Øc..k.±©
000010 d8 bf 72 9c ae c1 20 9f f6 e4 f5 85 34 4b 37 1b Ø¿r.®Á .öäõ.4K7.
{ points: [ { x: 1.5, y: 3.8 }, { x: 2.5, y: 5.8 } ],
valid: true,
length: 2.2360682,
desc: 'A thin red line' }
WasmEdge Rust SDK
Introduction
WasmEdge
supports embedding into Rust applications via WasmEdge Rust SDK. WasmEdge Rust SDK consists of three crates:
-
wasmedge-sdk crate. It defines a group of safe, ergonomic high-level APIs, which are used to build up business applications.
-
wasmedge-sys crate. It defines a group of low-level Rust APIs, which simply wrap WasmEdge C-API and provide the safe counterparts. It is not recommended to use it directly to build up application.
-
wasmedge-types crate. The data structures that are commonly used in
wasmedge-sdk
andwasmedge-sys
are defined in this crate.
Versioning Table
The following table provides the versioning information about each release of wasmedge-sdk
crate and its dependencies.
| wasmedge-sdk | WasmEdge lib | wasmedge-sys | wasmedge-types| | :-----------: | :----------------------------------------------------------------: | :-----------: | :-----------: | | 0.1.0 | 0.10.0 | 0.7 | 0.1 |
wasmedge-sdk
crate
To use wasmedge-sdk
in your project, you should finish the followign two steps before building your project:
-
First, deploy
WasmEdge
library on your local system.You can reference the versiong table and download
WasmEdge
library from WasmEdge Releases Page. After download theWasmEdge
library, you can choose one of the following three ways to specify the locations of the required files:-
By default location
For those who do not want to define environment variables, you can put the downloaded
WasmEdge
binary package in the default location$HOME/.wasmedge/
. The directory structure of the default location should looks like below:// $HOME/.wasmedge/ on Ubuntu-20.04 . ├── bin │ ├── wasmedge │ └── wasmedgec ├── include │ └── wasmedge │ ├── dense_enum_map.h │ ├── enum.inc │ ├── enum_configure.h │ ├── enum_errcode.h │ ├── enum_types.h │ ├── int128.h │ ├── spare_enum_map.h │ ├── version.h │ └── wasmedge.h └── lib64 ├── libwasmedge_c.so └── wasmedge └── libwasmedgePluginWasmEdgeProcess.so 5 directories, 13 files
// $HOME/.wasmedge/ on macOS-12 . ├── bin │ ├── wasmedge │ └── wasmedgec ├── include │ └── wasmedge │ ├── dense_enum_map.h │ ├── enum.inc │ ├── enum_configure.h │ ├── enum_errcode.h │ ├── enum_types.h │ ├── int128.h │ ├── spare_enum_map.h │ ├── version.h │ └── wasmedge.h └── lib └── libwasmedge_c.dylib 4 directories, 12 files
-
By specifying
WASMEDGE_INCLUDE_DIR
andWASMEDGE_LIB_DIR
.-
WASMEDGE_INCLUDE_DIR
is used to specify the directory in which the header files are. -
WASMEDGE_LIB_DIR
is used to specify the directory in which thewasmedge_c
library is. -
For example, suppose that you have already downloaded the
Wasmedge-0.10.0
binary package from WasmEdge Releases and placed it into a local directory, for example,~/workspace/me/
. The directory structure of the released package should looks like below:root@0a877562f39e:~/workspace/me/WasmEdge-0.10.0-Linux# tree . . ├── bin │ ├── wasmedge │ └── wasmedgec ├── include │ └── wasmedge │ ├── dense_enum_map.h │ ├── enum.inc │ ├── enum_configure.h │ ├── enum_errcode.h │ ├── enum_types.h │ ├── int128.h │ ├── spare_enum_map.h │ ├── version.h │ └── wasmedge.h └── lib64 ├── libwasmedge_c.so └── wasmedge └── libwasmedgePluginWasmEdgeProcess.so 5 directories, 13 files
Then set
WASMEDGE_INCLUDE_DIR
andWASMEDGE_LIB_DIR
environment variables to specify theinclude
andlib
(here islib64
) directories.root@0a877562f39e:~/workspace/me/WasmEdge/bindings/rust/wasmedge-sys# export WASMEDGE_INCLUDE_DIR=/root/workspace/me/WasmEdge-0.10.0-Linux/include/wasmedge root@0a877562f39e:~/workspace/me/WasmEdge/bindings/rust/wasmedge-sys# export WASMEDGE_LIB_DIR=/root/workspace/me/WasmEdge-0.10.0-Linux/lib64
-
-
By specifying
WASMEDGE_BUILD_DIR
You can choose this way if you'd like to use the latest code in the
master
branch of theWasmEdge
github repo. For example,-
Suppose that you
git clone
WasmEdge repo in your local directory, for example,~/workspace/me/WasmEdge
, and follow the instructions to build WasmEdge native library. After that, you should find the generatedinclude
andlib
directories in~/workspace/me/WasmEdge/build
. -
Then, set
WASMEDGE_BUILD_DIR
environment variable to specify thebuild
directory.root@0a877562f39e:~/workspace/me/WasmEdge# export WASMEDGE_BUILD_DIR=/root/workspace/me/WasmEdge/build
-
-
-
Second, after deploy the
WasmEdge
library on your local system, copy/paste the following code into theCargo.toml
file of your project. Now, you can usecargo build
command to build your project.
[dependencies]
wasmedge-sdk = "0.1"
wasmedge-sys
crate
wasmedge-sys
serves as a wraper layer of WasmEdge
C-API, and provides a group of safe low-level Rust interfaces. For those who are interested in using wasmedge-sys
in their projects, you should also deploy the WasmEdge
library on your local system as described in the wasmedge-sdk crate section. Then, copy/paste the following code in the Cargo.toml
file of your project.
[dependencies]
wasmedge-sys = "0.7"
For Windows users, duo to issue 1527, the current version of wasmedge-sys
does not support standalone
mode on Windows platform. Please choose to use our docker image. We'll fix the issue as soon as possible.
For those who want to build wasmedge-sys
from source in terminal, just go to the wasmedge-sys
directory and type cargo build --features standalone
command that will compile the wasmedge-sys
crate in standalone
mode.
Docker image
For those who would like to dev in Docker environment, you can reference the Use Docker section of this book, which details how to use Docker for WasmEdge
application development.
Windows Users
Duo to issue 1527, WasmEdger Rust bindings can not be used directly on Windows platform for now. Please choose to use our docker image. We'll fix the issue as soon as possible.
Examples
For helping you get familiar with WasmEdge Rust bindings, the following quick examples demonstrate how to use the APIs defined in wasmedge-sdk
and wasmedge-sys
, respectively. In addition, we'll add more examples continuously. Please file an issue here and let us know if you have any problems with the API usage.
wasmedge-sdk
Examples
wasmedge-sys
Examples
Hello World
In this example, we'll use a wasm module, in which a function run
is exported and it will call a function say_hello
from an import module named env
. The imported function say_hello
has no inputs and outputs, and only prints a greeting message out.
N.B. In this example, wasmedge-sdk v0.1.1
, wasmedge-sys v0.7.1
and wasmedge-types v0.1.3
are used.
Let's start off by getting all imports right away so you can follow along
#![allow(unused)] fn main() { // please add this feature if you're using rust of version < 1.63 // #![feature(explicit_generic_args_with_impl_trait)] use wasmedge_sdk::{params, Executor, ImportObjectBuilder, Module, Store}; use wasmedge_sys::WasmValue; use wasmedge_types::wat2wasm; }
Step 1: Define a native function and Create an ImportObject
First, let's define a native function named say_hello_world
that prints out Hello, World!
.
#![allow(unused)] fn main() { fn say_hello_world(_inputs: Vec<WasmValue>) -> Result<Vec<WasmValue>, u8> { println!("Hello, world!"); Ok(vec![]) } }
To use the native function as an import function in the WasmEdge
runtime, we need an ImportObject
. wasmedge-sdk
defines a ImportObjectBuilder, which provides a group of chaining methods used to create an ImportObject
. Let's see how to do it.
#![allow(unused)] fn main() { // create an import module let import = ImportObjectBuilder::new() .with_func::<(), ()>("say_hello", say_hello_world)? .build("env")?; }
Now, we have an import module named env
which holds a host function say_hello
. As you may notice, the names we used for the import module and the host function are exactly the same as the ones appearing in the wasm module. You can find the wasm module in Step 2.
Step 2: Load a wasm module
Now, let's load a wasm module. wasmedge-sdk
defines two methods in Module
:
-
from_file loads a wasm module from a file, and meanwhile, validates the loaded wasm module.
-
from_bytes loads a wasm module from an array of in-memory bytes, and meanwhile, validates the loaded wasm module.
Here we choose Module::from_bytes
method to load our wasm module from an array of in-memory bytes.
#![allow(unused)] fn main() { let wasm_bytes = wat2wasm( br#" (module ;; First we define a type with no parameters and no results. (type $no_args_no_rets_t (func (param) (result))) ;; Then we declare that we want to import a function named "env" "say_hello" with ;; that type signature. (import "env" "say_hello" (func $say_hello (type $no_args_no_rets_t))) ;; Finally we create an entrypoint that calls our imported function. (func $run (type $no_args_no_rets_t) (call $say_hello)) ;; And mark it as an exported function named "run". (export "run" (func $run))) "#, )?; // loads a wasm module from the given in-memory bytes and returns a compiled module let module = Module::from_bytes(None, &wasm_bytes)?; }
Step 3: Register import module and compiled module
To register a compiled module, we need to check if it has dependency on some import modules. In the wasm module this statement (import "env" "say_hello" (func $say_hello (type $no_args_no_rets_t)))
tells us that it depends on an import module named env
. Therefore, we need to register the import module first before registering the compiled wasm module.
#![allow(unused)] fn main() { // create an executor let mut executor = Executor::new(None, None)?; // create a store let mut store = Store::new()?; // register the import module into the store store.register_import_module(&mut executor, &import)?; // register the compiled module into the store and get an module instance let extern_instance = store.register_named_module(&mut executor, "extern", &module)?; }
In the code above we use Executor and Store to register the import module and the compiled module. wasmedge-sdk
also provides alternative APIs to do the same thing: Vm::register_import_module and Vm::register_module_from_bytes.
Step 4: Run the exported function
Now we are ready to run the exported function.
#![allow(unused)] fn main() { // get the exported function "run" let run = extern_instance .func("run") .ok_or_else(|| anyhow::Error::msg("Not found exported function named 'run'."))?; // run host function run.call(&mut executor, params!())?; }
In this example we created an instance of Executor
, hence, we have two choices to call a function instance:
Any one of these two methods requires that you have to get a function instance.
In addition, Vm defines a group of methods which can invoke host function in different ways. For details, please reference Vm.
The complete example can be found here.
Memory Manipulation
In this example, we'll present how to manipulate the linear memory with the APIs defined in wasmedge_sdk::Memory.
N.B. In this example, wasmedge-sdk v0.1.1
, wasmedge-sys v0.7.1
and wasmedge-types v0.1.3
are used.
Wasm module
Before talk about the code, let's first see the wasm module we use in this example. In the wasm module, a linear memory of 1-page (64KiB) size is defined; in addition, three functions are exported from this module: get_at
, set_at
, and mem_size
.
(module
(type $mem_size_t (func (result i32)))
(type $get_at_t (func (param i32) (result i32)))
(type $set_at_t (func (param i32) (param i32)))
# A memory with initial size of 1 page
(memory $mem 1)
(func $get_at (type $get_at_t) (param $idx i32) (result i32)
(i32.load (local.get $idx)))
(func $set_at (type $set_at_t) (param $idx i32) (param $val i32)
(i32.store (local.get $idx) (local.get $val)))
(func $mem_size (type $mem_size_t) (result i32)
(memory.size))
# Exported functions
(export "get_at" (func $get_at))
(export "set_at" (func $set_at))
(export "mem_size" (func $mem_size))
(export "memory" (memory $mem)))
Next, we'll demonstrate how to manipulate the linear memory by calling the exported functions.
Load and Register Module
Let's start off by getting all imports right away so you can follow along
#![allow(unused)] fn main() { // please add this feature if you're using rust of version < 1.63 // #![feature(explicit_generic_args_with_impl_trait)] use wasmedge_sdk::{params, Executor, ImportObjectBuilder, Module, Store}; use wasmedge_sys::WasmValue; use wasmedge_types::wat2wasm; }
To load a Module
, wasmedge-sdk
defines two methods:
-
from_file loads a wasm module from a file, and meanwhile, validates the loaded wasm module.
-
from_bytes loads a wasm module from an array of in-memory bytes, and meanwhile, validates the loaded wasm module.
Here we use Module::from_bytes
method to load our wasm module from an array of in-memory bytes.
#![allow(unused)] fn main() { let wasm_bytes = wat2wasm( r#" (module (type $mem_size_t (func (result i32))) (type $get_at_t (func (param i32) (result i32))) (type $set_at_t (func (param i32) (param i32))) (memory $mem 1) (func $get_at (type $get_at_t) (param $idx i32) (result i32) (i32.load (local.get $idx))) (func $set_at (type $set_at_t) (param $idx i32) (param $val i32) (i32.store (local.get $idx) (local.get $val))) (func $mem_size (type $mem_size_t) (result i32) (memory.size)) (export "get_at" (func $get_at)) (export "set_at" (func $set_at)) (export "mem_size" (func $mem_size)) (export "memory" (memory $mem))) "# .as_bytes(), )?; // loads a wasm module from the given in-memory bytes let module = Module::from_bytes(None, &wasm_bytes)?; }
The module returned by Module::from_bytes
is a compiled module, also called AST Module in WasmEdge terminology. To use it in WasmEdge runtime environment, we need to instantiate the AST module. We use Store::register_named_module API to achieve the goal.
#![allow(unused)] fn main() { // create an executor let mut executor = Executor::new(None, None)?; // create a store let mut store = Store::new()?; // register the module into the store let extern_instance = store.register_named_module(&mut executor, "extern", &module)?; }
In the code above, we register the AST module into a Store
, in which the module is instantiated, and as a result, a module instance named extern
is returned.
Memory
In the previous section, we get an instance by registering a compiled module into the runtime environment. Now we retrieve the memory instance from the module instance, and make use of the APIs defined in Memory to manipulate the linear memory.
#![allow(unused)] fn main() { // get the exported memory instance let mut memory = extern_instance .memory("memory") .ok_or_else(|| anyhow::anyhow!("failed to get memory instance named 'memory'"))?; // check memory size assert_eq!(memory.size(), 1); assert_eq!(memory.data_size(), 65536); // grow memory size memory.grow(2)?; // check the size (in pages) and the data size (in bytes) assert_eq!(memory.size(), 3); assert_eq!(memory.data_size(), 3 * 65536); // get the exported functions: "set_at" and "get_at" let set_at = extern_instance .func("set_at") .ok_or_else(|| anyhow::Error::msg("Not found exported function named 'set_at'."))?; let get_at = extern_instance .func("get_at") .ok_or_else(|| anyhow::Error::msg("Not found exported function named 'get_at`."))?; // set val at mem_addr by calling "set_at" let mem_addr = 0x2220; let val = 0xFEFEFFE; set_at.call(&mut executor, params!(mem_addr, val))?; // get the value at mem_addr by calling "get_at" let returns = get_at.call(&mut executor, params!(mem_addr))?; assert_eq!(returns[0].to_i32(), val); // call the exported function named "set_at" let page_size = 0x1_0000; let mem_addr = (page_size * 2) - std::mem::size_of_val(&val) as i32; let val = 0xFEA09; set_at.call(&mut executor, params!(mem_addr, val))?; // call the exported function named "get_at" let returns = get_at.call(&mut executor, params!(mem_addr))?; assert_eq!(returns[0].to_i32(), val); }
The comments in the code explain the meaning of the code sample above, so we don't describe more.
The complete code of this example can be found here.
Table and FuncRef
In this example, we'll present how to use Table and FuncRef stored in a slot of a Table
instance to implement indirect function invocation.
Prerequisite
In this example we defines a native function real_add
that takes two numbers and returns their sum. This function will be registered as a host function into WasmEdge runtime environment
#![allow(unused)] fn main() { fn real_add(input: Vec<WasmValue>) -> Result<Vec<WasmValue>, u8> { println!("Rust: Entering Rust function real_add"); if input.len() != 2 { return Err(1); } let a = if input[0].ty() == ValType::I32 { input[0].to_i32() } else { return Err(2); }; let b = if input[1].ty() == ValType::I32 { input[1].to_i32() } else { return Err(3); }; let c = a + b; println!("Rust: calcuating in real_add c: {:?}", c); println!("Rust: Leaving Rust function real_add"); Ok(vec![WasmValue::from_i32(c)]) } }
In addition, the following imports are used in this example.
#![allow(unused)] fn main() { use wasmedge_sdk::{ config::{CommonConfigOptions, ConfigBuilder}, params, types::Val, Executor, Func, ImportObjectBuilder, Store, Table, WasmVal, }; use wasmedge_sys::WasmValue; use wasmedge_types::{RefType, TableType, ValType}; }
Register Table instance
The first thing we need to do is to create a Table
instance. After that, we register the table instance along with an import module into the WasmEdge runtime environment. Now let's see the code.
#![allow(unused)] fn main() { // create an executor let config = ConfigBuilder::new(CommonConfigOptions::default()).build()?; let mut executor = Executor::new(Some(&config), None)?; // create a store let mut store = Store::new()?; // create a table instance let result = Table::new(TableType::new(RefType::FuncRef, 10, Some(20))); assert!(result.is_ok()); let table = result.unwrap(); // create an import object let import = ImportObjectBuilder::new() .with_table("my-table", table)? .build("extern")?; // register the import object into the store store.register_import_module(&mut executor, &import)?; }
In the code snippet above, we create a Table
instance with the initial size of 10
and the maximum size of 20. The element type of the Table
instance is reference to function
.
Store a function reference into Table
In the previous steps, we defined a native function real_add
and registered a Table
instance named my-table
into the runtime environment. Now we'll save a reference to read_add
function to a slot of my-table
.
#![allow(unused)] fn main() { // get the exported table instance let mut table = instance .table("my-table") .expect("Not found table instance named 'my-table'"); // create a host function let host_func = Func::wrap::<(i32, i32), i32>(Box::new(real_add))?; // store the reference to host_func at the given index of the table instance table.set(3, Val::FuncRef(Some(host_func.as_ref())))?; }
We save the reference to host_func
into the third slot of my-table
. Next, we can retrieve the function reference from the table instance by index and call the function via its reference.
Call native function via FuncRef
#![allow(unused)] fn main() { // retrieve the function reference at the given index of the table instance let value = table.get(3)?; if let Val::FuncRef(Some(func_ref)) = value { // get the function type by func_ref let func_ty = func_ref.ty()?; // arguments assert_eq!(func_ty.args_len(), 2); let param_tys = func_ty.args().unwrap(); assert_eq!(param_tys, [ValType::I32, ValType::I32]); // returns assert_eq!(func_ty.returns_len(), 1); let return_tys = func_ty.returns().unwrap(); assert_eq!(return_tys, [ValType::I32]); // call the function by func_ref let returns = func_ref.call(&mut executor, params!(1, 2))?; assert_eq!(returns.len(), 1); assert_eq!(returns[0].to_i32(), 3); } }
The complete code of this example can be found here.
Run a WebAssembly function with WasmEdge low-level Rust APIs
Prerequisites
This example uses the following crates:
- wasmedge-sys v0.7.0
- wasmedge-types v0.1.1
Overview
This section demonstrates how to use the Rust APIs of the wasmedge-sys
crate to run a host function.
As you may know, several mainstream programming languages, such as C/C++, Rust, Go, and Python, support compiling their programs into WebAssembly binary. In this demo, we'll introduce how to use the APIs defined in Vm
of wasmedge-sys
crate to call a WebAssembly function which could be coded in any programming language mentioned above.
Example
We use fibonacci.wasm
in this demo, and the contents of the WebAssembly file are presented below. The statement, (export "fib" (func $fib))
, declares an exported function named fib
. This function computes a Fibonacci number with a given i32
number as input. We'll use the function name later to achieve the goal of computing a Fibonacci number.
(module
(export "fib" (func $fib))
(func $fib (param $n i32) (result i32)
(if
(i32.lt_s
(get_local $n)
(i32.const 2)
)
(return
(i32.const 1)
)
)
(return
(i32.add
(call $fib
(i32.sub
(get_local $n)
(i32.const 2)
)
)
(call $fib
(i32.sub
(get_local $n)
(i32.const 1)
)
)
)
)
)
)
Step 1: Create a WasmEdge AST Module
In this step, we'll create a WasmEdge AST Module
instance from a WebAssembly file.
-
First, create a
Loader
context; -
Then, load a specified WebAssebly file ("fibonacci.wasm") via the
from_file
method of theLoader
context. If the process is successful, then a WasmEdgeAST Module
instance is returned.
#![allow(unused)] fn main() { use wasmedge_sys::Loader; use std::path::PathBuf; // create a Loader context let loader = Loader::create(None).expect("fail to create a Loader context"); // load a wasm module from a specified wasm file, and return a WasmEdge AST Module instance let path = PathBuf::from("fibonacci.wasm"); let module = loader.from_file(path).expect("fail to load the WebAssembly file"); }
Step 2: Create a WasmEdge Vm
context
In WasmEdge, a Vm
defines a running environment, in which all varieties of instances and contexts are stored and maintained. In the demo code below, we explicitly create a WasmEdge Store
context, and then use it as one of the inputs in the creation of a Vm
context. If not specify a Store
context explicitly, then Vm
will create a store by itself.
#![allow(unused)] fn main() { use wasmedge_sys::{Config, Store, Vm}; // create a Config context let config = Config::create().expect("fail to create a Config context"); // create a Store context let mut store = Store::create().expect("fail to create a Store context"); // create a Vm context with the given Config and Store let mut vm = Vm::create(Some(config), Some(&mut store)).expect("fail to create a Vm context"); }
Step 3: Invoke the fib
function
In Step 1, we got a module that hosts the target fib
function defined in the WebAssembly. Now, we can call the function via the run_wasm_from_module
method of the Vm
context by passing the exported function name, fib
.
#![allow(unused)] fn main() { use wasmedge_sys::WasmValue; // run a function let returns = vm.run_wasm_from_module(module, "fib", [WasmValue::from_i32(5)]).expect("fail to run the target function in the module"); println!("The result of fib(5) is {}", returns[0].to_i32()); }
This is the final result printing on the screen:
The result of fib(5) is 8
Compute Fibonacci numbers concurrently
Prerequisites
This example uses the following crates:
- wasmedge-sys v0.7.0
- wasmedge-types v0.1.1
Overview
In this example, we will demonstrate how to use the objects and the APIs defined in wasmedge-sys
to compute Fibonacci numbers concurrently.
Example
In the following code, we creates two child threads, thread_a
and thread_b
, which are responsbile for compute Fib(4)
and Fib(5)
by calling the host function fib
, respectively. After that, the main thread computes Fib(6)
by adding the numbers returned by thread_a
and thread_b
.
Step 1: create a Vm context and register the WebAssembly module
#![allow(unused)] fn main() { // create a Config context let mut config = Config::create()?; config.bulk_memory_operations(true); // create a Store context let mut store = Store::create()?; // create a Vm context with the given Config and Store let mut vm = Vm::create(Some(config), Some(&mut store))?; // register a wasm module from a wasm file let file = std::path::PathBuf::from(env!("WASMEDGE_DIR")) .join("bindings/rust/wasmedge-sys/tests/data/fibonacci.wasm"); vm.register_wasm_from_file("extern", file)?; }
Step 2: create two child threads to compute Fib(4)
and Fib(5)
respectively
#![allow(unused)] fn main() { let vm = Arc::new(Mutex::new(vm)); // compute fib(4) by a child thread let vm_cloned = Arc::clone(&vm); let handle_a = thread::spawn(move || { let vm_child_thread = vm_cloned.lock().expect("fail to lock vm"); let returns = vm_child_thread .run_registered_function("extern", "fib", [WasmValue::from_i32(4)]) .expect("fail to compute fib(4)"); let fib4 = returns[0].to_i32(); println!("fib(4) by child thread: {}", fib4); fib4 }); // compute fib(5) by a child thread let vm_cloned = Arc::clone(&vm); let handle_b = thread::spawn(move || { let vm_child_thread = vm_cloned.lock().expect("fail to lock vm"); let returns = vm_child_thread .run_registered_function("extern", "fib", [WasmValue::from_i32(5)]) .expect("fail to compute fib(5)"); let fib5 = returns[0].to_i32(); println!("fib(5) by child thread: {}", fib5); fib5 }); }
Step3: Get the returns from the two child threads, and compute Fib(6)
let fib4 = handle_a.join().unwrap();
let fib5 = handle_b.join().unwrap();
// compute fib(6)
println!("fib(6) = fib(5) + fib(1) = {}", fib5 + fib4);
The final result of the code above should be printed on the screen like below:
fib(4) by child thread: 5
fib(5) by child thread: 8
fib(6) = fib(5) + fib(1) = 13
The complete code in this demo can be found on WasmEdge Github.
Introduction to WasmEdge module instance
Overview
In this section, we will talk about module instance. In wasmedge-sys
crate, four kinds of module instances are defined:
-
Instance
-
An
Instance
represents a runtime module instance which is held by a WasmEdgeStore
context. TheStore
context is either held by a WasmEdgeVm
, or related to a WasmEdgeExecutor
. -
APIs to retrieve an
Instance
.-
If a
Vm
is available, then-
with the
Vm::active_module
API, you can get an anonymous module instance from thisVm
. -
with the
Vm::store_mut
andStore::module
APIs, you can get a named module instance from thisVm
.
-
-
If an
Executor
is available, then-
with the
Executor::register_named_module
API, you can get a named module instance from thisExecutor
. -
with the
Executor::register_active_module
API, you can get an anonymous module instance from thisExecutor
.
-
-
-
-
ImportModule
ImportModule
, also called import module, represents a module instance to be registered into a WasmEdgeVm
orExecutor
.ImportModule
implements theImportObject
trait, meaning that WebAssembly function, table, memory and global instances can be added to an import module, and then be registered and instantiated together when the import module is registered into aVm
orExecutor
.
-
WasiModule
andWasmEdgeProcessModule
-
WasiModule
andWasmEdgeProcessModule
are module instances for WASI and WasmEdgeProcess specification, respectively. They also implement theImportObject
trait. Different fromImportModule
, these two kinds of module instances can not only be created, but be retrieved from aVm
. -
APIs to retrieve
WasiModule
andWasmEdgeProcessModule
.-
If a
Vm
is available, then-
with the
Vm::wasi_module
API, you can get a module instance ofWasiModule
type. -
with the
Vm::wasmedge_process_module
API, you can get aWasmEdgeProcessModule
from thisVm
.
-
-
-
Examples
Example 1
In this example, we'll demonstrate how to use the APIs of Vm
to
-
Create Wasi and WasmEdgeProcess module instances implicitly by using a
Config
while creating aVm
.#![allow(unused)] fn main() { // create a Config context let mut config = Config::create()?; config.bulk_memory_operations(true); assert!(config.bulk_memory_operations_enabled()); config.wasi(true); assert!(config.wasi_enabled()); config.wasmedge_process(true); assert!(config.wasmedge_process_enabled()); // create a Vm context with the given Config and Store let mut vm = Vm::create(Some(config), None)?; }
-
Retrieve the Wasi and WasmEdgeProcess module instances from the
Vm
.#![allow(unused)] fn main() { // get the default Wasi module let wasi_instance = vm.wasi_module_mut()?; assert_eq!(wasi_instance.name(), "wasi_snapshot_preview1"); // get the default WasmEdgeProcess module instance let wasmedge_process_instance = vm.wasmedge_process_module_mut()?; assert_eq!(wasmedge_process_instance.name(), "wasmedge_process"); }
-
Register an import module as a named module into the
Vm
.#![allow(unused)] fn main() { // create ImportModule instance let module_name = "extern_module"; let mut import = ImportModule::create(module_name)?; // a function to import fn real_add(inputs: Vec<WasmValue>) -> Result<Vec<WasmValue>, u8> { if inputs.len() != 2 { return Err(1); } let a = if inputs[0].ty() == ValType::I32 { inputs[0].to_i32() } else { return Err(2); }; let b = if inputs[1].ty() == ValType::I32 { inputs[1].to_i32() } else { return Err(3); }; let c = a + b; Ok(vec![WasmValue::from_i32(c)]) } // add host function let func_ty = FuncType::create(vec![ValType::I32; 2], vec![ValType::I32])?; let host_func = Function::create(&func_ty, Box::new(real_add), 0)?; import.add_func("add", host_func); // add table let table_ty = TableType::create(RefType::FuncRef, 0..=u32::MAX)?; let table = Table::create(&table_ty)?; import.add_table("table", table); // add memory let mem_ty = MemType::create(0..=u32::MAX)?; let memory = Memory::create(&mem_ty)?; import.add_memory("mem", memory); // add global let ty = GlobalType::create(ValType::F32, Mutability::Const)?; let global = Global::create(&ty, WasmValue::from_f32(3.5))?; import.add_global("global", global); // register the import module as a named module vm.register_wasm_from_import(ImportObject::Import(import))?; }
-
Retrieve the internal
Store
instance from theVm
, and retrieve the named module instance from theStore
instance.#![allow(unused)] fn main() { let mut store = vm.store_mut()?; let named_instance = store.module(module_name)?; assert!(named_instance.get_func("add").is_ok()); assert!(named_instance.get_table("table").is_ok()); assert!(named_instance.get_memory("mem").is_ok()); assert!(named_instance.get_global("global").is_ok()); }
-
Register an active module into the
Vm
.#![allow(unused)] fn main() { // read the wasm bytes let wasm_bytes = wat2wasm( br#" (module (export "fib" (func $fib)) (func $fib (param $n i32) (result i32) (if (i32.lt_s (get_local $n) (i32.const 2) ) (return (i32.const 1) ) ) (return (i32.add (call $fib (i32.sub (get_local $n) (i32.const 2) ) ) (call $fib (i32.sub (get_local $n) (i32.const 1) ) ) ) ) ) ) "#, )?; // load a wasm module from a in-memory bytes, and the loaded wasm module works as an anoymous // module (aka. active module in WasmEdge terminology) vm.load_wasm_from_bytes(&wasm_bytes)?; // validate the loaded active module vm.validate()?; // instatiate the loaded active module vm.instantiate()?; // get the active module instance let active_instance = vm.active_module()?; assert!(active_instance.get_func("fib").is_ok()); }
-
Retrieve the active module from the
Vm
.#![allow(unused)] fn main() { // get the active module instance let active_instance = vm.active_module()?; assert!(active_instance.get_func("fib").is_ok()); }
The complete code in this demo can be found on WasmEdge Github.
Example 2
In this example, we'll demonstrate how to use the APIs of Executor
to
-
Create an
Executor
and aStore
.#![allow(unused)] fn main() { // create an Executor context let mut executor = Executor::create(None, None)?; // create a Store context let mut store = Store::create()?; }
-
Register an import module into the
Executor
.#![allow(unused)] fn main() { // read the wasm bytes let wasm_bytes = wat2wasm( br#" (module (export "fib" (func $fib)) (func $fib (param $n i32) (result i32) (if (i32.lt_s (get_local $n) (i32.const 2) ) (return (i32.const 1) ) ) (return (i32.add (call $fib (i32.sub (get_local $n) (i32.const 2) ) ) (call $fib (i32.sub (get_local $n) (i32.const 1) ) ) ) ) ) ) "#, )?; // load module from a wasm file let config = Config::create()?; let loader = Loader::create(Some(config))?; let module = loader.from_bytes(&wasm_bytes)?; // validate module let config = Config::create()?; let validator = Validator::create(Some(config))?; validator.validate(&module)?; // register a wasm module into the store context let module_name = "extern"; let named_instance = executor.register_named_module(&mut store, &module, module_name)?; assert!(named_instance.get_func("fib").is_ok()); }
-
Register an active module into the
Executor
.#![allow(unused)] fn main() { // read the wasm bytes let wasm_bytes = wat2wasm( br#" (module (export "fib" (func $fib)) (func $fib (param $n i32) (result i32) (if (i32.lt_s (get_local $n) (i32.const 2) ) (return (i32.const 1) ) ) (return (i32.add (call $fib (i32.sub (get_local $n) (i32.const 2) ) ) (call $fib (i32.sub (get_local $n) (i32.const 1) ) ) ) ) ) ) "#, )?; // load module from a wasm file let config = Config::create()?; let loader = Loader::create(Some(config))?; let module = loader.from_bytes(&wasm_bytes)?; // validate module let config = Config::create()?; let validator = Validator::create(Some(config))?; validator.validate(&module)?; // register a wasm module as an active module let active_instance = executor.register_active_module(&mut store, &module)?; assert!(active_instance.get_func("fib").is_ok()); }
The complete code in this demo can be found on WasmEdge Github.
Python SDK
Coming soon, or you can help out.
WasmEdge in Kubernetes
Developers can leverage container tools such as Kubernetes, Docker and CRI-O to deploy, manage, and run lightweight WebAssembly applications. In this chapter, we will demonstrate how Kubernetes ecosystem tools work with WasmEdge WebAssembly applications.
Compared with Linux containers, WebAssembly could be 100x faster at startup, have a much smaller memory and disk footprint, and have a better-defined safety sandbox. However, the trade-off is that WebAssembly requires its own language SDKs, and compiler toolchains, making it a more constrained developer environment than Linux containers. WebAssembly is increasingly used in Edge Computing scenarios where it is difficult to deploy Linux containers or when the application performance is vital.
One of the great advantages of Linux application containers is the rich ecosystem of tools. The good news is that you can use the exact same tools to manage WebAssembly applications, enabling Linux containers and WebAssembly apps to run side-by-side in the same system.
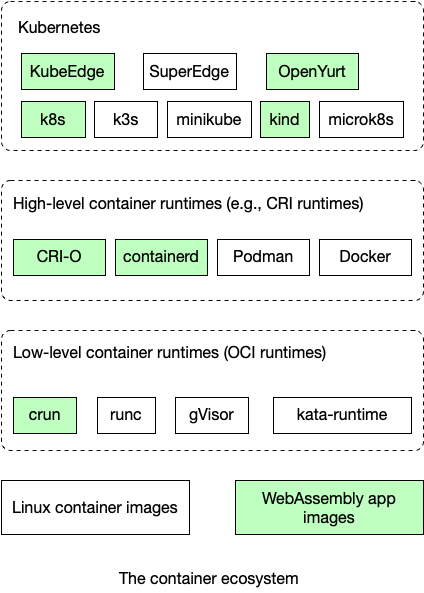
The contents of this chapter are organized as follows.
- Quick start provides simple and scripted tutorials to run WasmEdge-based applications as container images in Kubernetes.
- Demo apps discusses the two demo WasmEdge applications we will run in Kubernetes clusters. Those applications are compiled from Rust source code, packaged as OCI images, and uploaded to Docker Hub.
- Container runtimes covers how to configure low level container runtimes, such as crun, to load and run WebAssembly OCI images.
- CRI runtimes covers how to configure and use high level container runtimes, such as CRI-O and containerd, to load and run WebAssembly OCI images on top of low level container runtimes.
- Kubernetes covers how to configure and use Kubernetes and Kubernetes variations, such as KubeEdge and SuperEdge, to load and run WebAssembly OCI images on top of CRI runtimes.
The goal is to load and run WebAssembly OCI images side by side with Linux OCI images (e.g., today's Docker containers) across the entire Kubernetes stack.
Quick start
We have created Ubuntu-based scripts for you to quickly get started with the following combination of runtimes in a standard Kubernetes setup.
CRI (high level) runtime | OCI (low level) runtime | |
---|---|---|
CRI-O | crun + WasmEdge | Script |
containerd | crun + WasmEdge | Script |
CRI-O and crun
You can use the CRI-O install.sh script to install CRI-O and crun
on Ubuntu 20.04.
wget -qO- https://raw.githubusercontent.com/second-state/wasmedge-containers-examples/main/crio/install.sh | bash
Next, install Kubernetes using the following script.
wget -qO- https://raw.githubusercontent.com/second-state/wasmedge-containers-examples/main/kubernetes_crio/install.sh | bash
The simple_wasi_application.sh script shows how to pull a WebAssembly application from Docker Hub, and then run it as a containerized application in Kubernetes.
wget -qO- https://raw.githubusercontent.com/second-state/wasmedge-containers-examples/main/kubernetes_crio/simple_wasi_application.sh | bash
You should see results from the WebAssembly program printed in the console log. Here is an example.
containerd and crun
You can use the containerd install.sh script to install containerd
and crun
on Ubuntu 20.04.
wget -qO- https://raw.githubusercontent.com/second-state/wasmedge-containers-examples/main/containerd/install.sh | bash
Next, install Kubernetes using the following script.
wget -qO- https://raw.githubusercontent.com/second-state/wasmedge-containers-examples/main/kubernetes_containerd/install.sh | bash
The simple_wasi_application.sh script shows how to pull a WebAssembly application from Docker Hub, and then run it as a containerized application in Kubernetes.
wget -qO- https://raw.githubusercontent.com/second-state/wasmedge-containers-examples/main/kubernetes_containerd/simple_wasi_application.sh | bash
You should see results from the WebAssembly program printed in the console log. Here is an example.
Read on to the rest of this chapter to learn how exactly those runtimes are configured.
Demo apps
In this chapter, we will cover two demo apps. We will build them from Rust source code, build OCI images around them, and then publish the images to Docker Hub.
If you have not done so, please
Next, explore the examples
Since we have already built and published those demo apps on Docker Hub, you could also just go straight to the container runtime sections to use these images.
A simple WebAssembly example
In this article, I will show you how to build a container image for a WebAssembly application. It can then be started and managed by Kubernetes ecosystem tools, such as CRI-O, Docker, crun, and Kubernetes.
Prerequisites
If you simply want a wasm bytecode file to test as a container image, you can skip the building process and just download the wasm file here.
If you have not done so already, follow these simple instructions to install Rust.
Download example code
git clone https://github.com/second-state/wasm-learning
cd wasm-learning/cli/wasi
Build the WASM bytecode
rustup target add wasm32-wasi
cargo build --target wasm32-wasi --release
The wasm bytecode application is in the target/wasm32-wasi/release/wasi_example_main.wasm
file. You can now publish and use it as a container image.
Apply executable permission on the Wasm bytecode
chmod +x target/wasm32-wasi/release/wasi_example_main.wasm
Create Dockerfile
Create a file called Dockerfile
in the target/wasm32-wasi/release/
folder with the following content:
FROM scratch
ADD wasi_example_main.wasm /
CMD ["/wasi_example_main.wasm"]
Create container image with annotations
Please note that adding self-defined annotation is still a new feature in buildah.
The crun
container runtime can start the above WebAssembly-based container image. But it requires the module.wasm.image/variant=compat
annotation on the container image to indicate that it is a WebAssembly application without a guest OS. You can find the details in Official crun repo.
To add module.wasm.image/variant=compat
annotation in the container image, you will need the latest buildah. Currently, Docker does not support this feature. Please follow the install instructions of buildah to build the latest buildah binary.
Build and install the latest buildah on Ubuntu
On Ubuntu zesty and xenial, use these commands to prepare for buildah.
sudo apt-get -y install software-properties-common
export OS="xUbuntu_20.04"
sudo bash -c "echo \"deb https://download.opensuse.org/repositories/devel:/kubic:/libcontainers:/stable/$OS/ /\" > /etc/apt/sources.list.d/devel:kubic:libcontainers:stable.list"
sudo bash -c "curl -L https://download.opensuse.org/repositories/devel:/kubic:/libcontainers:/stable/$OS/Release.key | apt-key add -"
sudo add-apt-repository -y ppa:alexlarsson/flatpak
sudo apt-get -y -qq update
sudo apt-get -y install bats git libapparmor-dev libdevmapper-dev libglib2.0-dev libgpgme-dev libseccomp-dev libselinux1-dev skopeo-containers go-md2man containers-common
sudo apt-get -y install golang-1.16 make
Then, follow these steps to build and install buildah on Ubuntu.
mkdir -p ~/buildah
cd ~/buildah
export GOPATH=`pwd`
git clone https://github.com/containers/buildah ./src/github.com/containers/buildah
cd ./src/github.com/containers/buildah
PATH=/usr/lib/go-1.16/bin:$PATH make
cp bin/buildah /usr/bin/buildah
buildah --help
Create and publish a container image with buildah
In the target/wasm32-wasi/release/
folder, do the following.
$ sudo buildah build --annotation "module.wasm.image/variant=compat" -t wasm-wasi-example .
# make sure docker is install and running
# systemctl status docker
# to make sure regular user can use docker
# sudo usermod -aG docker $USER
# newgrp docker
# You may need to use docker login to create the `~/.docker/config.json` for auth.
$ sudo buildah push --authfile ~/.docker/config.json wasm-wasi-example docker://docker.io/hydai/wasm-wasi-example:with-wasm-annotation
That's it! Now you can try to run it in CRI-O or Kubernetes!
HTTP server example
Let's build a container image for a WebAssembly HTTP service. The HTTP service application is developed in Rust using the WasmEdge networking socket API. Kubernetes could manage the wasm application lifecycle with CRI-O, Docker and Containerd.
Prerequisites
This is a Rust example, which require you to install Rust and WasmEdge before you can Compile and Run the http service.
Download example code
mkdir http_server
cd http_server
wget -q https://raw.githubusercontent.com/second-state/wasmedge_wasi_socket/main/examples/http_server/Cargo.toml
mkdir src
cd src
wget -q https://raw.githubusercontent.com/second-state/wasmedge_wasi_socket/main/examples/http_server/src/main.rs
cd ../
Build the WASM bytecode
rustup target add wasm32-wasi
cargo build --target wasm32-wasi --release
The wasm bytecode application is now should be located in the ./target/wasm32-wasi/release/http_server.wasm
You can now test run it with wasmedge and then publish it as a container image.
Apply executable permission on the Wasm bytecode
chmod +x ./target/wasm32-wasi/release/http_server.wasm
Running the http_server application bytecode with wasmedge
When you run the bytecode with wasmedge and see the result as the following, you are ready to package the bytecode into the container.
$ wasmedge ./target/wasm32-wasi/release/http_server.wasm
new connection at 1234
You can test the server from another terminal window.
$ curl -X POST http://127.0.0.1:1234 -d 'name=WasmEdge'
echo: name=WasmEdge
Create Dockerfile
Create a file called Dockerfile
in the target/wasm32-wasi/release/
folder with the following content:
FROM scratch
ADD http_server.wasm /
CMD ["/http_server.wasm"]
Create container image with annotations
Please note that adding self-defined annotation is still a new feature in buildah.
The crun
container runtime can start the above WebAssembly-based container image. But it requires the module.wasm.image/variant=compat
annotation on the container image to indicate that it is a WebAssembly application without a guest OS. You can find the details in Official crun repo.
To add module.wasm.image/variant=compat
annotation in the container image, you will need the latest buildah. Currently, Docker does not support this feature. Please follow the install instructions of buildah to build the latest buildah binary.
Build and install the latest buildah on Ubuntu
On Ubuntu zesty and xenial, use these commands to prepare for buildah.
sudo apt-get -y install software-properties-common
export OS="xUbuntu_20.04"
sudo bash -c "echo \"deb https://download.opensuse.org/repositories/devel:/kubic:/libcontainers:/stable/$OS/ /\" > /etc/apt/sources.list.d/devel:kubic:libcontainers:stable.list"
sudo bash -c "curl -L https://download.opensuse.org/repositories/devel:/kubic:/libcontainers:/stable/$OS/Release.key | apt-key add -"
sudo add-apt-repository -y ppa:alexlarsson/flatpak
sudo apt-get -y -qq update
sudo apt-get -y install bats git libapparmor-dev libdevmapper-dev libglib2.0-dev libgpgme-dev libseccomp-dev libselinux1-dev skopeo-containers go-md2man containers-common
sudo apt-get -y install golang-1.16 make
Then, follow these steps to build and install buildah on Ubuntu.
mkdir -p ~/buildah
cd ~/buildah
export GOPATH=`pwd`
git clone https://github.com/containers/buildah ./src/github.com/containers/buildah
cd ./src/github.com/containers/buildah
PATH=/usr/lib/go-1.16/bin:$PATH make
cp bin/buildah /usr/bin/buildah
buildah --help
Create and publish a container image with buildah
In the target/wasm32-wasi/release/
folder, do the following.
sudo buildah build --annotation "module.wasm.image/variant=compat" -t http_server .
#
# make sure docker is install and running
# systemctl status docker
# to make sure regular user can use docker
# sudo usermod -aG docker $USER#
# newgrp docker
# You may need to use docker login to create the `~/.docker/config.json` for auth.
#
# docker login
sudo buildah push --authfile ~/.docker/config.json http_server docker://docker.io/avengermojo/http_server:with-wasm-annotation
That's it! Now you can try to run it in CRI-O or Kubernetes!
Container runtimes
The container image can be started by any OCI-compliant container runtime, such as
- crun: a high performance and lightweight container runtime written in C
- runc: a widely used container runtime written in Go
- youki: a OCI-compatible container runtime implementation written in Rust
crun
The crun project has WasmEdge support baked in.
For now, the easiest approach is just built it yourself from source. First, let's make sure that crun
dependencies are installed on your Ubuntu 20.04.
For other Linux distributions, please see here.
sudo apt update
sudo apt install -y make git gcc build-essential pkgconf libtool \
libsystemd-dev libprotobuf-c-dev libcap-dev libseccomp-dev libyajl-dev \
go-md2man libtool autoconf python3 automake
Next, configure, build, and install a crun
binary with WasmEdge support.
git clone https://github.com/containers/crun
cd crun
./autogen.sh
./configure --with-wasmedge
make
sudo make install
runc
Coming soon, or you can help out
youki
Coming soon, or you can help out
CRI runtimes
The high-level container runtime, such as CRI-O and containerd, pulls container images from registries (e.g., Docker Hub), manages them on disk, and launches a lower-level runtime to run container processes. From this chapter, you can check out specific tutorials for CRI-O and containerd.
CRI-O
Quick start
The GitHub repo contains scripts and Github Actions for running our example apps on CRI-O.
- Simple WebAssembly example Quick start | Github Actions | Successful run
- HTTP service example Quick start | Github Actions | Successful run
In the sections below, we will explain the steps in the quick start scripts.
- Install CRI-O
- Configure CRI-O and crun
- Example 1: Simple WebAssembly
- Example 2: HTTP server in WebAssembly
Install CRI-O
Use the following commands to install CRI-O on your system.
export OS="xUbuntu_20.04"
export VERSION="1.21"
apt update
apt install -y libseccomp2 || sudo apt update -y libseccomp2
echo "deb https://download.opensuse.org/repositories/devel:/kubic:/libcontainers:/stable/$OS/ /" > /etc/apt/sources.list.d/devel:kubic:libcontainers:stable.list
echo "deb https://download.opensuse.org/repositories/devel:/kubic:/libcontainers:/stable:/cri-o:/$VERSION/$OS/ /" > /etc/apt/sources.list.d/devel:kubic:libcontainers:stable:cri-o:$VERSION.list
curl -L https://download.opensuse.org/repositories/devel:kubic:libcontainers:stable:cri-o:$VERSION/$OS/Release.key | apt-key add -
curl -L https://download.opensuse.org/repositories/devel:/kubic:/libcontainers:/stable/$OS/Release.key | apt-key add -
apt-get update
apt-get install criu libyajl2
apt-get install cri-o cri-o-runc cri-tools containernetworking-plugins
systemctl start crio
Configure CRI-O to use crun
CRI-O uses the runc
runtime by default and we need to configure it to use crun
instead.
That is done by adding to two configuration files.
Make sure that you have built and installed the
crun
binary with WasmEdge support before starting the following steps.
First, create a /etc/crio/crio.conf
file and add the following lines as its content. It tells CRI-O to use crun
by default.
[crio.runtime]
default_runtime = "crun"
The crun
runtime is in turn defined in the /etc/crio/crio.conf.d/01-crio-runc.conf
file.
[crio.runtime.runtimes.runc]
runtime_path = "/usr/lib/cri-o-runc/sbin/runc"
runtime_type = "oci"
runtime_root = "/run/runc"
# The above is the original content
# Add our crunw runtime here
[crio.runtime.runtimes.crun]
runtime_path = "/usr/bin/crun"
runtime_type = "oci"
runtime_root = "/run/crun"
Next, restart CRI-O to apply the configuration changes.
systemctl restart crio
Run a simple WebAssembly app
Now, we can run a simple WebAssembly program using CRI-O. A separate article explains how to compile, package, and publish the WebAssembly program as a container image to Docker hub. In this section, we will start off pulling this WebAssembly-based container image from Docker hub using CRI-O tools.
sudo crictl pull docker.io/hydai/wasm-wasi-example:with-wasm-annotation
Next, we need to create two simple configuration files that specifies how CRI-O should run this WebAssembly image in a sandbox. We already have those two files container_wasi.json and sandbox_config.json. You can just download them to your local directory as follows.
wget https://raw.githubusercontent.com/second-state/wasmedge-containers-examples/main/crio/sandbox_config.json
wget https://raw.githubusercontent.com/second-state/wasmedge-containers-examples/main/crio/container_wasi.json
Now you can use CRI-O to create a pod and a container using the specified configurations.
# Create the POD. Output will be different from example.
$ sudo crictl runp sandbox_config.json
7992e75df00cc1cf4bff8bff660718139e3ad973c7180baceb9c84d074b516a4
# Set a helper variable for later use.
$ POD_ID=7992e75df00cc1cf4bff8bff660718139e3ad973c7180baceb9c84d074b516a4
# Create the container instance. Output will be different from example.
$ sudo crictl create $POD_ID container_wasi.json sandbox_config.json
# Set a helper variable for later use.
CONTAINER_ID=1d056e4a8a168f0c76af122d42c98510670255b16242e81f8e8bce8bd3a4476f
Starting the container would execute the WebAssembly program. You can see the output in the console.
# List the container, the state should be `Created`
$ sudo crictl ps -a
CONTAINER IMAGE CREATED STATE NAME ATTEMPT POD ID
1d056e4a8a168 hydai/wasm-wasi-example:with-wasm-annotation About a minute ago Created podsandbox1-wasm-wasi 0 7992e75df00cc
# Start the container
$ sudo crictl start $CONTAINER_ID
# Check the container status again.
# If the container is not finishing its job, you will see the Running state
# Because this example is very tiny. You may see Exited at this moment.
$ sudo crictl ps -a
CONTAINER IMAGE CREATED STATE NAME ATTEMPT POD ID
1d056e4a8a168 hydai/wasm-wasi-example:with-wasm-annotation About a minute ago Running podsandbox1-wasm-wasi 0 7992e75df00cc
# When the container is finished. You can see the state becomes Exited.
$ sudo crictl ps -a
CONTAINER IMAGE CREATED STATE NAME ATTEMPT POD ID
1d056e4a8a168 hydai/wasm-wasi-example:with-wasm-annotation About a minute ago Exited podsandbox1-wasm-wasi 0 7992e75df00cc
# Check the container's logs. It should show outputs from the WebAssembly programs
$ sudo crictl logs $CONTAINER_ID
Test 1: Print Random Number
Random number: 960251471
Test 2: Print Random Bytes
Random bytes: [50, 222, 62, 128, 120, 26, 64, 42, 210, 137, 176, 90, 60, 24, 183, 56, 150, 35, 209, 211, 141, 146, 2, 61, 215, 167, 194, 1, 15, 44, 156, 27, 179, 23, 241, 138, 71, 32, 173, 159, 180, 21, 198, 197, 247, 80, 35, 75, 245, 31, 6, 246, 23, 54, 9, 192, 3, 103, 72, 186, 39, 182, 248, 80, 146, 70, 244, 28, 166, 197, 17, 42, 109, 245, 83, 35, 106, 130, 233, 143, 90, 78, 155, 29, 230, 34, 58, 49, 234, 230, 145, 119, 83, 44, 111, 57, 164, 82, 120, 183, 194, 201, 133, 106, 3, 73, 164, 155, 224, 218, 73, 31, 54, 28, 124, 2, 38, 253, 114, 222, 217, 202, 59, 138, 155, 71, 178, 113]
Test 3: Call an echo function
Printed from wasi: This is from a main function
This is from a main function
Test 4: Print Environment Variables
The env vars are as follows.
PATH: /usr/local/sbin:/usr/local/bin:/usr/sbin:/usr/bin:/sbin:/bin
TERM: xterm
HOSTNAME: crictl_host
PATH: /usr/local/sbin:/usr/local/bin:/usr/sbin:/usr/bin:/sbin:/bin
The args are as follows.
/var/lib/containers/storage/overlay/006e7cf16e82dc7052994232c436991f429109edea14a8437e74f601b5ee1e83/merged/wasi_example_main.wasm
50000000
Test 5: Create a file `/tmp.txt` with content `This is in a file`
Test 6: Read the content from the previous file
File content is This is in a file
Test 7: Delete the previous file
Next, you can try to run the app in Kubernetes!
Run a HTTP server app
Finally, we can run a simple WebAssembly-based HTTP micro-service in CRI-O. A separate article explains how to compile, package, and publish the WebAssembly program as a container image to Docker hub. In this section, we will start off pulling this WebAssembly-based container image from Docker hub using CRI-O tools.
sudo crictl pull docker.io/avengermojo/http_server:with-wasm-annotation
Next, we need to create two simple configuration files that specifies how CRI-O should run this WebAssembly image in a sandbox. We already have those two files container_http_server.json and sandbox_config.json. You can just download them to your local directory as follows.
The
sandbox_config.json
file is the same for the simple WASI example and the HTTP server example. The othercontainer_*.json
file is application specific as it contains the application's Docker Hub URL.
wget https://raw.githubusercontent.com/second-state/wasmedge-containers-examples/main/crio/sandbox_config.json
wget https://raw.githubusercontent.com/second-state/wasmedge-containers-examples/main/crio/http_server/container_http_server.json
Now you can use CRI-O to create a pod and a container using the specified configurations.
# Create the POD. Output will be different from example.
$ sudo crictl runp sandbox_config.json
7992e75df00cc1cf4bff8bff660718139e3ad973c7180baceb9c84d074b516a4
# Set a helper variable for later use.
$ POD_ID=7992e75df00cc1cf4bff8bff660718139e3ad973c7180baceb9c84d074b516a4
# Create the container instance. Output will be different from example.
$ sudo crictl create $POD_ID container_http_server.json sandbox_config.json
# Set a helper variable for later use.
CONTAINER_ID=1d056e4a8a168f0c76af122d42c98510670255b16242e81f8e8bce8bd3a4476f
Starting the container would execute the WebAssembly program. You can see the output in the console.
# Start the container
$ sudo crictl start $CONTAINER_ID
# Check the container status. It should be Running.
# If not, wait a few seconds and check again
$ sudo crictl ps -a
CONTAINER IMAGE CREATED STATE NAME ATTEMPT POD ID
4eeddf8613691 avengermojo/http_server:with-wasm-annotation Less than a second ago Running http_server 0 1d84f30e7012e
# Check the container's logs to see the HTTP server is listening at port 1234
$ sudo crictl logs $CONTAINER_ID
new connection at 1234
# Get the IP address assigned to the container
$ sudo crictl inspect $CONTAINER_ID | grep IP.0 | cut -d: -f 2 | cut -d'"' -f 2
10.85.0.2
# Test the HTTP service at that IP address
$ curl -d "name=WasmEdge" -X POST http://10.85.0.2:1234
echo: name=WasmEdge
Next, you can try to run it in Kubernetes!
containerd
Quick start
The GitHub repo contains scripts and Github Actions for running our example apps on containerd.
- Simple WebAssembly example Quick start | Github Actions | Successful run
- HTTP service example Quick start | Github Actions | Successful run
In the sections below, we will explain the steps in the quick start scripts.
Install containerd
Use the following commands to install containerd on your system.
export VERSION="1.5.7"
echo -e "Version: $VERSION"
echo -e "Installing libseccomp2 ..."
sudo apt install -y libseccomp2
echo -e "Installing wget"
sudo apt install -y wget
wget https://github.com/containerd/containerd/releases/download/v${VERSION}/cri-containerd-cni-${VERSION}-linux-amd64.tar.gz
wget https://github.com/containerd/containerd/releases/download/v${VERSION}/cri-containerd-cni-${VERSION}-linux-amd64.tar.gz.sha256sum
sha256sum --check cri-containerd-cni-${VERSION}-linux-amd64.tar.gz.sha256sum
sudo tar --no-overwrite-dir -C / -xzf cri-containerd-cni-${VERSION}-linux-amd64.tar.gz
sudo systemctl daemon-reload
Configure containerd to use crun
as the underlying OCI runtime.
It makes changes to the /etc/containerd/config.toml
file.
sudo mkdir -p /etc/containerd/
sudo bash -c "containerd config default > /etc/containerd/config.toml"
wget https://raw.githubusercontent.com/second-state/wasmedge-containers-examples/main/containerd/containerd_config.diff
sudo patch -d/ -p0 < containerd_config.diff
Start the containerd service.
sudo systemctl start containerd
Next, make sure that you have built and installed the crun
binary with WasmEdge support before running the following examples.
Run a simple WebAssembly app
Now, we can run a simple WebAssembly program using containerd. A separate article explains how to compile, package, and publish the WebAssembly program as a container image to Docker hub. In this section, we will start off pulling this WebAssembly-based container image from Docker hub using containerd tools.
sudo ctr i pull docker.io/hydai/wasm-wasi-example:with-wasm-annotation
Now, you can run the example in just one line with ctr (the containerd cli).
sudo ctr run --rm --runc-binary crun --runtime io.containerd.runc.v2 --label module.wasm.image/variant=compat docker.io/hydai/wasm-wasi-example:with-wasm-annotation wasm-example /wasi_example_main.wasm 50000000
Starting the container would execute the WebAssembly program. You can see the output in the console.
Creating POD ...
Random number: -1678124602
Random bytes: [12, 222, 246, 184, 139, 182, 97, 3, 74, 155, 107, 243, 20, 164, 175, 250, 60, 9, 98, 25, 244, 92, 224, 233, 221, 196, 112, 97, 151, 155, 19, 204, 54, 136, 171, 93, 204, 129, 177, 163, 187, 52, 33, 32, 63, 104, 128, 20, 204, 60, 40, 183, 236, 220, 130, 41, 74, 181, 103, 178, 43, 231, 92, 211, 219, 47, 223, 137, 70, 70, 132, 96, 208, 126, 142, 0, 133, 166, 112, 63, 126, 164, 122, 49, 94, 80, 26, 110, 124, 114, 108, 90, 62, 250, 195, 19, 189, 203, 175, 189, 236, 112, 203, 230, 104, 130, 150, 39, 113, 240, 17, 252, 115, 42, 12, 185, 62, 145, 161, 3, 37, 161, 195, 138, 232, 39, 235, 222]
Printed from wasi: This is from a main function
This is from a main function
The env vars are as follows.
The args are as follows.
/wasi_example_main.wasm
50000000
File content is This is in a file
Next, you can try to run it in Kubernetes!
Run a HTTP server app
Finally, we can run a simple WebAssembly-based HTTP micro-service in containerd. A separate article explains how to compile, package, and publish the WebAssembly program as a container image to Docker hub. In this section, we will start off pulling this WebAssembly-based container image from Docker hub using containerd tools.
sudo ctr i pull docker.io/avengermojo/http_server:with-wasm-annotation
Now, you can run the example in just one line with ctr (the containerd cli). Notice that we are running the container with --net-host
so that the HTTP server inside the WasmEdge container is accessible from the outside shell.
sudo ctr run --rm --net-host --runc-binary crun --runtime io.containerd.runc.v2 --label module.wasm.image/variant=compat docker.io/avengermojo/http_server:with-wasm-annotation http-server-example /http_server.wasm
Starting the container would execute the WebAssembly program. You can see the output in the console.
new connection at 1234
# Test the HTTP service at that IP address
curl -d "name=WasmEdge" -X POST http://127.0.0.1:1234
echo: name=WasmEdge
Next, you can try to run it in Kubernetes!
Kubernetes
Most high-level container runtimes implement Kubernetes' CRI (Container Runtime Interface) spec so that they can be managed by Kubernetes tools. That means you can use Kubernetes tools to manage the WebAssembly app image in pods and namespaces. Check out specific instructions for different flavors of Kubernetes setup in this chapter.
Kubernetes + CRI-O
Quick start
The GitHub repo contains scripts and Github Actions for running our example apps on Kubernetes + CRI-O.
- Simple WebAssembly example Quick start | Github Actions | Successful run
- WebAssembly-based HTTP service Quick start | Github Actions | Successful run
In the rest of this section, we will explain the steps in detail. We will assume that you have already installed and configured CRI-O to work with WasmEdge container images.
Install and start Kubernetes
Run the following commands from a terminal window. It sets up Kubernetes for local development.
# Install go
$ wget https://golang.org/dl/go1.17.1.linux-amd64.tar.gz
$ sudo rm -rf /usr/local/go
sudo tar -C /usr/local -xzf go1.17.1.linux-amd64.tar.gz
source /home/${USER}/.profile
# Clone k8s
git clone https://github.com/kubernetes/kubernetes.git
cd kubernetes
git checkout v1.22.2
# Install etcd with hack script in k8s
sudo CGROUP_DRIVER=systemd CONTAINER_RUNTIME=remote CONTAINER_RUNTIME_ENDPOINT='unix:///var/run/crio/crio.sock' ./hack/install-etcd.sh
export PATH="/home/${USER}/kubernetes/third_party/etcd:${PATH}"
sudo cp third_party/etcd/etcd* /usr/local/bin/
# After run the above command, you can find the following files: /usr/local/bin/etcd /usr/local/bin/etcdctl /usr/local/bin/etcdutl
# Build and run k8s with CRI-O
sudo apt-get install -y build-essential
sudo CGROUP_DRIVER=systemd CONTAINER_RUNTIME=remote CONTAINER_RUNTIME_ENDPOINT='unix:///var/run/crio/crio.sock' ./hack/local-up-cluster.sh
... ...
Local Kubernetes cluster is running. Press Ctrl-C to shut it down.
Do NOT close your terminal window. Kubernetes is running!
Run WebAssembly container images in Kubernetes
Finally, we can run WebAssembly programs in Kubernetes as containers in pods. In this section, we will start from another terminal window and start using the cluster.
export KUBERNETES_PROVIDER=local
sudo cluster/kubectl.sh config set-cluster local --server=https://localhost:6443 --certificate-authority=/var/run/kubernetes/server-ca.crt
sudo cluster/kubectl.sh config set-credentials myself --client-key=/var/run/kubernetes/client-admin.key --client-certificate=/var/run/kubernetes/client-admin.crt
sudo cluster/kubectl.sh config set-context local --cluster=local --user=myself
sudo cluster/kubectl.sh config use-context local
sudo cluster/kubectl.sh
Let's check the status to make sure that the cluster is running.
$ sudo cluster/kubectl.sh cluster-info
# Expected output
Cluster "local" set.
User "myself" set.
Context "local" created.
Switched to context "local".
Kubernetes control plane is running at https://localhost:6443
CoreDNS is running at https://localhost:6443/api/v1/namespaces/kube-system/services/kube-dns:dns/proxy
To further debug and diagnose cluster problems, use 'kubectl cluster-info dump'.
A simple WebAssembly app
A separate article explains how to compile, package, and publish a simple WebAssembly WASI program as a container image to Docker hub. Run the WebAssembly-based image from Docker Hub in the Kubernetes cluster as follows.
sudo cluster/kubectl.sh run -it --rm --restart=Never wasi-demo --image=hydai/wasm-wasi-example:with-wasm-annotation --annotations="module.wasm.image/variant=compat" /wasi_example_main.wasm 50000000
The output from the containerized application is printed into the console.
Random number: 401583443
Random bytes: [192, 226, 162, 92, 129, 17, 186, 164, 239, 84, 98, 255, 209, 79, 51, 227, 103, 83, 253, 31, 78, 239, 33, 218, 68, 208, 91, 56, 37, 200, 32, 12, 106, 101, 241, 78, 161, 16, 240, 158, 42, 24, 29, 121, 78, 19, 157, 185, 32, 162, 95, 214, 175, 46, 170, 100, 212, 33, 27, 190, 139, 121, 121, 222, 230, 125, 251, 21, 210, 246, 215, 127, 176, 224, 38, 184, 201, 74, 76, 133, 233, 129, 48, 239, 106, 164, 190, 29, 118, 71, 79, 203, 92, 71, 68, 96, 33, 240, 228, 62, 45, 196, 149, 21, 23, 143, 169, 163, 136, 206, 214, 244, 26, 194, 25, 101, 8, 236, 247, 5, 164, 117, 40, 220, 52, 217, 92, 179]
Printed from wasi: This is from a main function
This is from a main function
The env vars are as follows.
The args are as follows.
/wasi_example_main.wasm
50000000
File content is This is in a file
pod "wasi-demo-2" deleted
A WebAssembly-based HTTP service
A separate article explains how to compile, package, and publish a simple WebAssembly HTTP service application as a container image to Docker hub. Since the HTTP service container requires networking support provided by Kubernetes, we will use a k8s-http_server.yaml file to specify its exact configuration.
apiVersion: v1
kind: Pod
metadata:
name: http-server
namespace: default
annotations:
module.wasm.image/variant: compat
spec:
hostNetwork: true
containers:
- name: http-server
image: avengermojo/http_server:with-wasm-annotation
command: [ "/http_server.wasm" ]
ports:
- containerPort: 1234
protocol: TCP
livenessProbe:
tcpSocket:
port: 1234
initialDelaySeconds: 3
periodSeconds: 30
Run the WebAssembly-based image from Docker Hub using the above k8s-http_server.yaml
file in the Kubernetes cluster as follows.
sudo ./kubernetes/cluster/kubectl.sh apply -f k8s-http_server.yaml
Use the following command to see the running container applications and their IP addresses.
Since we are using hostNetwork
in the yaml configuration, the HTTP server image is running on the local network with IP address 127.0.0.1
.
$ sudo cluster/kubectl.sh get pod --all-namespaces -o wide
NAMESPACE NAME READY STATUS RESTARTS AGE IP NODE NOMINATED NODE READINESS GATES
default http-server 1/1 Running 1 (26s ago) 60s 127.0.0.1 127.0.0.1 <none> <none>
Now, you can use the curl
command to access the HTTP service.
$ curl -d "name=WasmEdge" -X POST http://127.0.0.1:1234
echo: name=WasmEdge
That's it!
Kubernetes + containerd
Quick start
The GitHub repo contains scripts and Github Actions for running our example apps on Kubernetes + containerd.
- Simple WebAssembly example Quick start | Github Actions | Successful run
- WebAssembly-based HTTP service Quick start | Github Actions | Successful run
In the rest of this section, we will explain the steps in detail. We will assume that you have already installed and configured containerd to work with WasmEdge container images.
Install and start Kubernetes
Run the following commands from a terminal window. It sets up Kubernetes for local development.
# Install go
$ wget https://golang.org/dl/go1.17.1.linux-amd64.tar.gz
$ sudo rm -rf /usr/local/go
$ sudo tar -C /usr/local -xzf go1.17.1.linux-amd64.tar.gz
$ source /home/${USER}/.profile
# Clone k8s
$ git clone https://github.com/kubernetes/kubernetes.git
$ cd kubernetes
$ git checkout v1.22.2
# Install etcd with hack script in k8s
$ sudo CGROUP_DRIVER=systemd CONTAINER_RUNTIME=remote CONTAINER_RUNTIME_ENDPOINT='unix:///var/run/crio/crio.sock' ./hack/install-etcd.sh
$ export PATH="/home/${USER}/kubernetes/third_party/etcd:${PATH}"
$ sudo cp third_party/etcd/etcd* /usr/local/bin/
# After run the above command, you can find the following files: /usr/local/bin/etcd /usr/local/bin/etcdctl /usr/local/bin/etcdutl
# Build and run k8s with containerd
$ sudo apt-get install -y build-essential
$ sudo CGROUP_DRIVER=systemd CONTAINER_RUNTIME=remote CONTAINER_RUNTIME_ENDPOINT='unix:///var/run/crio/crio.sock' ./hack/local-up-cluster.sh
... ...
Local Kubernetes cluster is running. Press Ctrl-C to shut it down.
Do NOT close your terminal window. Kubernetes is running!
Run WebAssembly container images in Kubernetes
Finally, we can run WebAssembly programs in Kubernetes as containers in pods. In this section, we will start from another terminal window and start using the cluster.
export KUBERNETES_PROVIDER=local
sudo cluster/kubectl.sh config set-cluster local --server=https://localhost:6443 --certificate-authority=/var/run/kubernetes/server-ca.crt
sudo cluster/kubectl.sh config set-credentials myself --client-key=/var/run/kubernetes/client-admin.key --client-certificate=/var/run/kubernetes/client-admin.crt
sudo cluster/kubectl.sh config set-context local --cluster=local --user=myself
sudo cluster/kubectl.sh config use-context local
sudo cluster/kubectl.sh
Let's check the status to make sure that the cluster is running.
$ sudo cluster/kubectl.sh cluster-info
# Expected output
Cluster "local" set.
User "myself" set.
Context "local" created.
Switched to context "local".
Kubernetes control plane is running at https://localhost:6443
CoreDNS is running at https://localhost:6443/api/v1/namespaces/kube-system/services/kube-dns:dns/proxy
To further debug and diagnose cluster problems, use 'kubectl cluster-info dump'.
A simple WebAssembly app
A separate article explains how to compile, package, and publish a simple WebAssembly WASI program as a container image to Docker hub. Run the WebAssembly-based image from Docker Hub in the Kubernetes cluster as follows.
sudo cluster/kubectl.sh run -it --rm --restart=Never wasi-demo --image=hydai/wasm-wasi-example:with-wasm-annotation --annotations="module.wasm.image/variant=compat" --overrides='{"kind":"Pod", "apiVersion":"v1", "spec": {"hostNetwork": true}}' /wasi_example_main.wasm 50000000
The output from the containerized application is printed into the console.
Random number: 401583443
Random bytes: [192, 226, 162, 92, 129, 17, 186, 164, 239, 84, 98, 255, 209, 79, 51, 227, 103, 83, 253, 31, 78, 239, 33, 218, 68, 208, 91, 56, 37, 200, 32, 12, 106, 101, 241, 78, 161, 16, 240, 158, 42, 24, 29, 121, 78, 19, 157, 185, 32, 162, 95, 214, 175, 46, 170, 100, 212, 33, 27, 190, 139, 121, 121, 222, 230, 125, 251, 21, 210, 246, 215, 127, 176, 224, 38, 184, 201, 74, 76, 133, 233, 129, 48, 239, 106, 164, 190, 29, 118, 71, 79, 203, 92, 71, 68, 96, 33, 240, 228, 62, 45, 196, 149, 21, 23, 143, 169, 163, 136, 206, 214, 244, 26, 194, 25, 101, 8, 236, 247, 5, 164, 117, 40, 220, 52, 217, 92, 179]
Printed from wasi: This is from a main function
This is from a main function
The env vars are as follows.
The args are as follows.
/wasi_example_main.wasm
50000000
File content is This is in a file
pod "wasi-demo-2" deleted
A WebAssembly-based HTTP service
A separate article explains how to compile, package, and publish a simple WebAssembly HTTP service application as a container image to Docker hub. Run the WebAssembly-based image from Docker Hub in the Kubernetes cluster as follows.
sudo cluster/kubectl.sh run --restart=Never http-server --image=avengermojo/http_server:with-wasm-annotation --annotations="module.wasm.image/variant=compat" --overrides='{"kind":"Pod", "apiVersion":"v1", "spec": {"hostNetwork": true}}'
Since we are using hostNetwork
in the kubectl run
command, the HTTP server image is running on the local network with IP address 127.0.0.1
.
Now, you can use the curl
command to access the HTTP service.
$ curl -d "name=WasmEdge" -X POST http://127.0.0.1:1234
echo: name=WasmEdge
That's it!
Kubernetes in Docker (KinD)
KinD is a Kubernetes distribution that runs inside Docker and is well suited for local development or integration testing. It runs containerd as CRI and runc as OCI Runtime.
Quick start
As prerequisite we need to install KinD first. To do that the quick start guide and the release page can be used to install the latest version of the KinD CLI.
If KinD is installed we can directly start with the example from here:
# Create a "WASM in KinD" Cluster
kind create cluster --image ghcr.io/liquid-reply/kind-crun-wasm:v1.23.0
# Run the example
kubectl run -it --rm --restart=Never wasi-demo --image=hydai/wasm-wasi-example:with-wasm-annotation --annotations="module.wasm.image/variant=compat" /wasi_example_main.wasm 50000000
In the rest of this section, we will explain how to create a KinD node image with wasmedge support.
Build crun
KinD uses the kindest/node image for the control plane and worker nodes. The image contains containerd as CRI and runc as OCI Runtime. To enable WasmEdge support we replace runc with crun.
For the node image we only need the crun binary and not the entire build toolchain. Therefore we use a multistage dockerfile where we create crun in the first step and only copy the crun binary to the node image.
FROM ubuntu:21.10 AS builder
WORKDIR /data
RUN DEBIAN_FRONTEND=noninteractive apt update \
&& DEBIAN_FRONTEND=noninteractive apt install -y curl make git gcc build-essential pkgconf libtool libsystemd-dev libprotobuf-c-dev libcap-dev libseccomp-dev libyajl-dev go-md2man libtool autoconf python3 automake \
&& curl https://raw.githubusercontent.com/WasmEdge/WasmEdge/master/utils/install.sh | bash -s -- -p /usr/local \
&& git clone --single-branch --branch feat/handler_per_container https://github.com/liquid-reply/crun \
&& cd crun \
&& ./autogen.sh \
&& ./configure --with-wasmedge --enable-embedded-yajl\
&& make
...
Now we have a fresh crun
binary with wasmedge enabled under /data/crun/crun
that we can copy from this container in the next step.
Replace crun and configure containerd
Both runc and crun implement the OCI runtime spec and they have the same CLI parametes. Therefore we can just replace the runc binary with our crun-wasmedge binary we created before.
Since crun is using some shared libraries we need to install libyajl, wasmedge and criu to make our crun work.
Now we already have a KinD that uses crun instead of runc. Now we just need two config changes. The first one in the /etc/containerd/config.toml
where we add the pod_annotations
that can be passed to the runtime:
[plugins."io.containerd.grpc.v1.cri".containerd.runtimes.runc]
pod_annotations = ["*.wasm.*", "wasm.*", "module.wasm.image/*", "*.module.wasm.image", "module.wasm.image/variant.*"]
And the second one to the /etc/containerd/cri-base.json
where we remove a hook that causes some issues.
The resulting dockerfile looks as follows:
...
FROM kindest/node:v1.23.0
COPY config.toml /etc/containerd/config.toml
COPY --from=builder /data/crun/crun /usr/local/sbin/runc
COPY --from=builder /usr/local/lib/libwasmedge_c.so /usr/local/lib/libwasmedge_c.so
RUN echo "Installing Packages ..." \
&& bash -c 'cat <<< $(jq "del(.hooks.createContainer)" /etc/containerd/cri-base.json) > /etc/containerd/cri-base.json' \
&& ldconfig
Build and test
Finally we can build a new node-wasmedge
image. To test it, we create a kind cluster from that image and run the simple app example.
docker build -t node-wasmedge .
kind create cluster --image node-wasmedge
# Now you can run the example to validate your cluster
kubectl run -it --rm --restart=Never wasi-demo --image=hydai/wasm-wasi-example:with-wasm-annotation --annotations="module.wasm.image/variant=compat" /wasi_example_main.wasm 50000000
Create a crun demo for KubeEdge
1. Setup Cloud Side (KubeEdge Master Node)
Install Go
$ wget https://golang.org/dl/go1.17.3.linux-amd64.tar.gz
$ tar xzvf go1.17.3.linux-amd64.tar.gz
$ export PATH=/home/${user}/go/bin:$PATH
$ go version
go version go1.17.3 linux/amd64
Install CRI-O
Please see CRI-O Installation Instructions.
# Create the .conf file to load the modules at bootup
cat <<EOF | sudo tee /etc/modules-load.d/crio.conf
overlay
br_netfilter
EOF
sudo modprobe overlay
sudo modprobe br_netfilter
# Set up required sysctl params, these persist across reboots.
cat <<EOF | sudo tee /etc/sysctl.d/99-kubernetes-cri.conf
net.bridge.bridge-nf-call-iptables = 1
net.ipv4.ip_forward = 1
net.bridge.bridge-nf-call-ip6tables = 1
EOF
sudo sysctl --system
export OS="xUbuntu_20.04"
export VERSION="1.21"
cat <<EOF | sudo tee /etc/apt/sources.list.d/devel:kubic:libcontainers:stable.list
deb https://download.opensuse.org/repositories/devel:/kubic:/libcontainers:/stable/$OS/ /
EOF
cat <<EOF | sudo tee /etc/apt/sources.list.d/devel:kubic:libcontainers:stable:cri-o:$VERSION.list
deb http://download.opensuse.org/repositories/devel:/kubic:/libcontainers:/stable:/cri-o:/$VERSION/$OS/ /
EOF
curl -L https://download.opensuse.org/repositories/devel:/kubic:/libcontainers:/stable/$OS/Release.key | sudo apt-key --keyring /etc/apt/trusted.gpg.d/libcontainers.gpg add -
curl -L https://download.opensuse.org/repositories/devel:kubic:libcontainers:stable:cri-o:$VERSION/$OS/Release.key | sudo apt-key --keyring /etc/apt/trusted.gpg.d/libcontainers-cri-o.gpg add -
sudo apt-get update
sudo apt-get install cri-o cri-o-runc
sudo systemctl daemon-reload
sudo systemctl enable crio --now
sudo systemctl status cri-o
output:
$ sudo systemctl status cri-o
● crio.service - Container Runtime Interface for OCI (CRI-O)
Loaded: loaded (/lib/systemd/system/crio.service; enabled; vendor preset: enabled)
Active: active (running) since Mon 2021-12-06 13:46:29 UTC; 16h ago
Docs: https://github.com/cri-o/cri-o
Main PID: 6868 (crio)
Tasks: 14
Memory: 133.2M
CGroup: /system.slice/crio.service
└─6868 /usr/bin/crio
Dec 07 06:04:13 master crio[6868]: time="2021-12-07 06:04:13.694226800Z" level=info msg="Checking image status: k8s.gcr.io/pause:3.4.1" id=1dbb722e-f031-410c-9f45-5d4b5760163e name=/runtime.v1alpha2.ImageServic>
Dec 07 06:04:13 master crio[6868]: time="2021-12-07 06:04:13.695739507Z" level=info msg="Image status: &{0xc00047fdc0 map[]}" id=1dbb722e-f031-410c-9f45-5d4b5760163e name=/runtime.v1alpha2.ImageService/ImageSta>
Dec 07 06:09:13 master crio[6868]: time="2021-12-07 06:09:13.698823984Z" level=info msg="Checking image status: k8s.gcr.io/pause:3.4.1" id=661b754b-48a4-401b-a03f-7f7a553c7eb6 name=/runtime.v1alpha2.ImageServic>
Dec 07 06:09:13 master crio[6868]: time="2021-12-07 06:09:13.703259157Z" level=info msg="Image status: &{0xc0004d98f0 map[]}" id=661b754b-48a4-401b-a03f-7f7a553c7eb6 name=/runtime.v1alpha2.ImageService/ImageSta>
Dec 07 06:14:13 master crio[6868]: time="2021-12-07 06:14:13.707778419Z" level=info msg="Checking image status: k8s.gcr.io/pause:3.4.1" id=8c7e4d36-871a-452e-ab55-707053604077 name=/runtime.v1alpha2.ImageServic>
Dec 07 06:14:13 master crio[6868]: time="2021-12-07 06:14:13.709379469Z" level=info msg="Image status: &{0xc000035030 map[]}" id=8c7e4d36-871a-452e-ab55-707053604077 name=/runtime.v1alpha2.ImageService/ImageSta>
Dec 07 06:19:13 master crio[6868]: time="2021-12-07 06:19:13.713158978Z" level=info msg="Checking image status: k8s.gcr.io/pause:3.4.1" id=827b6315-f145-4f76-b8da-31653d5892a2 name=/runtime.v1alpha2.ImageServic>
Dec 07 06:19:13 master crio[6868]: time="2021-12-07 06:19:13.714030148Z" level=info msg="Image status: &{0xc000162bd0 map[]}" id=827b6315-f145-4f76-b8da-31653d5892a2 name=/runtime.v1alpha2.ImageService/ImageSta>
Dec 07 06:24:13 master crio[6868]: time="2021-12-07 06:24:13.716746612Z" level=info msg="Checking image status: k8s.gcr.io/pause:3.4.1" id=1d53a917-4d98-4723-9ea8-a2951a472cff name=/runtime.v1alpha2.ImageServic>
Dec 07 06:24:13 master crio[6868]: time="2021-12-07 06:24:13.717381882Z" level=info msg="Image status: &{0xc00042ce00 map[]}" id=1d53a917-4d98-4723-9ea8-a2951a472cff name=/runtime.v1alpha2.ImageService/ImageSta>
Install and Creating a cluster with kubeadm for K8s
Please see Creating a cluster with kubeadm.
Install K8s
sudo apt-get update
sudo apt-get install -y apt-transport-https curl
echo "deb [signed-by=/usr/share/keyrings/kubernetes-archive-keyring.gpg] https://apt.kubernetes.io/ kubernetes-xenial main" | sudo tee /etc/apt/sources.list.d/kubernetes.list
sudo apt update
K_VER="1.21.0-00"
sudo apt install -y kubelet=${K_VER} kubectl=${K_VER} kubeadm=${K_VER}
sudo apt-mark hold kubelet kubeadm kubectl
Create a cluster with kubeadm
#kubernetes scheduler requires this setting to be done.
$ sudo swapoff -a
$ sudo vim /etc/fstab
mark contain swapfile of row
$ cat /etc/cni/net.d/100-crio-bridge.conf
{
"cniVersion": "0.3.1",
"name": "crio",
"type": "bridge",
"bridge": "cni0",
"isGateway": true,
"ipMasq": true,
"hairpinMode": true,
"ipam": {
"type": "host-local",
"routes": [
{ "dst": "0.0.0.0/0" },
{ "dst": "1100:200::1/24" }
],
"ranges": [
[{ "subnet": "10.85.0.0/16" }],
[{ "subnet": "1100:200::/24" }]
]
}
}
$ export CIDR=10.85.0.0/16
$ sudo kubeadm init --apiserver-advertise-address=192.168.122.160 --pod-network-cidr=$CIDR --cri-socket=/var/run/crio/crio.sock
$ mkdir -p $HOME/.kube
$ sudo cp -i /etc/kubernetes/admin.conf $HOME/.kube/config
$ sudo chown $(id -u):$(id -g) $HOME/.kube/config
output:
Your Kubernetes control-plane has initialized successfully!
To start using your cluster, you need to run the following as a regular user:
mkdir -p $HOME/.kube
sudo cp -i /etc/kubernetes/admin.conf $HOME/.kube/config
sudo chown $(id -u):$(id -g) $HOME/.kube/config
You should now deploy a Pod network to the cluster.
Run "kubectl apply -f [podnetwork].yaml" with one of the options listed at:
/docs/concepts/cluster-administration/addons/
You can now join any number of machines by running the following on each node
as root:
kubeadm join <control-plane-host>:<control-plane-port> --token <token> --discovery-token-ca-cert-hash sha256:<hash>
To make kubectl work for your non-root user, run these commands, which are also part of the kubeadm init output:
mkdir -p $HOME/.kube
sudo cp -i /etc/kubernetes/admin.conf $HOME/.kube/config
sudo chown $(id -u):$(id -g) $HOME/.kube/config
Setup KubeEdge Master Node
Please see Deploying using Keadm.
IMPORTANT NOTE:
- At least one of kubeconfig or master must be configured correctly, so that it can be used to verify the version and other info of the k8s cluster.
- Please make sure edge node can connect cloud node using local IP of cloud node, or you need to specify public IP of cloud node with --advertise-address flag.
- --advertise-address(only work since 1.3 release) is the address exposed by the cloud side (will be added to the SANs of the CloudCore certificate), the default value is the local IP.
wget https://github.com/kubeedge/kubeedge/releases/download/v1.8.0/keadm-v1.8.0-linux-amd64.tar.gz
tar xzvf keadm-v1.8.0-linux-amd64.tar.gz
cd keadm-v1.8.0-linux-amd64/keadm/
sudo ./keadm init --advertise-address=192.168.122.160 --kube-config=/home/${user}/.kube/config
output:
Kubernetes version verification passed, KubeEdge installation will start...
...
KubeEdge cloudcore is running, For logs visit: /var/log/kubeedge/cloudcore.log
2. Setup Edge Side (KubeEdge Worker Node)
You can use the CRI-O install.sh script to install CRI-O and crun
on Ubuntu 20.04.
wget -qO- https://raw.githubusercontent.com/second-state/wasmedge-containers-examples/main/crio/install.sh | bash
Install Go on Edge Side
$ wget https://golang.org/dl/go1.17.3.linux-amd64.tar.gz
$ tar xzvf go1.17.3.linux-amd64.tar.gz
$ export PATH=/home/${user}/go/bin:$PATH
$ go version
go version go1.17.3 linux/amd64
Get Token From Cloud Side
Run keadm gettoken in cloud side will return the token, which will be used when joining edge nodes.
$ sudo ./keadm gettoken --kube-config=/home/${user}/.kube/config
27a37ef16159f7d3be8fae95d588b79b3adaaf92727b72659eb89758c66ffda2.eyJhbGciOiJIUzI1NiIsInR5cCI6IkpXVCJ9.eyJleHAiOjE1OTAyMTYwNzd9.JBj8LLYWXwbbvHKffJBpPd5CyxqapRQYDIXtFZErgYE
Download Kubeedge and join edge nodes
Please see Setting different container runtime with CRI and Deploying using Keadm.
$ wget https://github.com/kubeedge/kubeedge/releases/download/v1.8.0/keadm-v1.8.0-linux-amd64.tar.gz
$ tar xzvf keadm-v1.8.0-linux-amd64.tar.gz
$ cd keadm-v1.8.0-linux-amd64/keadm/
$ sudo ./keadm join \
--cloudcore-ipport=192.168.122.160:10000 \
--edgenode-name=edge \
--token=b4550d45b773c0480446277eed1358dcd8a02a0c214646a8082d775f9c447d81.eyJhbGciOiJIUzI1NiIsInR5cCI6IkpXVCJ9.eyJleHAiOjE2Mzg4ODUzNzd9.A9WOYJFrgL2swVGnydpb4gMojyvyoNPCXaA4rXGowqU \
--remote-runtime-endpoint=unix:///var/run/crio/crio.sock \
--runtimetype=remote \
--cgroupdriver=systemd
Output:
Host has mosquit+ already installed and running. Hence skipping the installation steps !!!
...
KubeEdge edgecore is running, For logs visit: /var/log/kubeedge/edgecore.log
Get Edge Node Status From Cloud Side
Output:
kubectl get node
NAME STATUS ROLES AGE VERSION
edge Ready agent,edge 10s v1.19.3-kubeedge-v1.8.2
master Ready control-plane,master 68m v1.21.0
3. Enable kubectl logs Feature
Before metrics-server deployed, kubectl logs feature must be activated, please see here.
4. Run a simple WebAssembly app
We can run the WebAssembly-based image from Docker Hub in the Kubernetes cluster.
Cloud Side
$ kubectl run -it --restart=Never wasi-demo --image=hydai/wasm-wasi-example:with-wasm-annotation --annotations="module.wasm.image/variant=compat" /wasi_example_main.wasm 50000000
Random number: -1694733782
Random bytes: [6, 226, 176, 126, 136, 114, 90, 2, 216, 17, 241, 217, 143, 189, 123, 197, 17, 60, 49, 37, 71, 69, 67, 108, 66, 39, 105, 9, 6, 72, 232, 238, 102, 5, 148, 243, 249, 183, 52, 228, 54, 176, 63, 249, 216, 217, 46, 74, 88, 204, 130, 191, 182, 19, 118, 193, 77, 35, 189, 6, 139, 68, 163, 214, 231, 100, 138, 246, 185, 47, 37, 49, 3, 7, 176, 97, 68, 124, 20, 235, 145, 166, 142, 159, 114, 163, 186, 46, 161, 144, 191, 211, 69, 19, 179, 241, 8, 207, 8, 112, 80, 170, 33, 51, 251, 33, 105, 0, 178, 175, 129, 225, 112, 126, 102, 219, 106, 77, 242, 104, 198, 238, 193, 247, 23, 47, 22, 29]
Printed from wasi: This is from a main function
This is from a main function
The env vars are as follows.
The args are as follows.
/wasi_example_main.wasm
50000000
File content is This is in a file
The WebAssembly app of pod successfully deploy to edge node.
$ kubectl describe pod wasi-demo
Name: wasi-demo
Namespace: default
Priority: 0
Node: edge/192.168.122.229
Start Time: Mon, 06 Dec 2021 15:45:34 +0000
Labels: run=wasi-demo
Annotations: module.wasm.image/variant: compat
Status: Succeeded
IP:
IPs: <none>
Containers:
wasi-demo:
Container ID: cri-o://1ae4d0d7f671050331a17e9b61b5436bf97ad35ad0358bef043ab820aed81069
Image: hydai/wasm-wasi-example:with-wasm-annotation
Image ID: docker.io/hydai/wasm-wasi-example@sha256:525aab8d6ae8a317fd3e83cdac14b7883b92321c7bec72a545edf276bb2100d6
Port: <none>
Host Port: <none>
Args:
/wasi_example_main.wasm
50000000
State: Terminated
Reason: Completed
Exit Code: 0
Started: Mon, 06 Dec 2021 15:45:33 +0000
Finished: Mon, 06 Dec 2021 15:45:33 +0000
Ready: False
Restart Count: 0
Environment: <none>
Mounts:
/var/run/secrets/kubernetes.io/serviceaccount from kube-api-access-bhszr (ro)
Conditions:
Type Status
Initialized True
Ready False
PodScheduled True
Volumes:
kube-api-access-bhszr:
Type: Projected (a volume that contains injected data from multiple sources)
TokenExpirationSeconds: 3607
ConfigMapName: kube-root-ca.crt
ConfigMapOptional: <nil>
DownwardAPI: true
QoS Class: BestEffort
Node-Selectors: <none>
Tolerations: node.kubernetes.io/not-ready:NoExecute op=Exists for 300s
node.kubernetes.io/unreachable:NoExecute op=Exists for 300s
Events:
Type Reason Age From Message
---- ------ ---- ---- -------
Edge Side
$ sudo crictl ps -a
CONTAINER IMAGE CREATED STATE NAME ATTEMPT POD ID
1ae4d0d7f6710 0423b8eb71e312b8aaa09a0f0b6976381ff567d5b1e5729bf9b9aa87bff1c9f3 16 minutes ago Exited wasi-demo 0 2bc2ac0c32eda
1e6c7cb6bc731 k8s.gcr.io/kube-proxy@sha256:2a25285ff19f9b4025c8e54dac42bb3cd9aceadc361f2570489b8d723cb77135 18 minutes ago Running kube-proxy 0 8b7e7388ad866
That's it.
5. Demo Run Screen Recording
SuperEdge
Install Superedge
One-click install of edge Kubernetes cluster
- Download the installation package
Choose installation package according to your installation node CPU architecture [amd64, arm64]
arch=amd64 version=v0.6.0 && rm -rf edgeadm-linux-* && wget https://superedge-1253687700.cos.ap-guangzhou.myqcloud.com/$version/$arch/edgeadm-linux-containerd-$arch-$version.tgz && tar -xzvf edgeadm-linux-* && cd edgeadm-linux-$arch-$version && ./edgeadm
- Install edge Kubernetes master node with containerd runtime
./edgeadm init --kubernetes-version=1.18.2 --image-repository superedge.tencentcloudcr.com/superedge --service-cidr=10.96.0.0/12 --pod-network-cidr=192.168.0.0/16 --install-pkg-path ./kube-linux-*.tar.gz --apiserver-cert-extra-sans=<Master Public IP> --apiserver-advertise-address=<Master Intranet IP> --enable-edge=true --runtime=containerd
- Join edge node with containerd runtime
./edgeadm join <Master Public/Intranet IP Or Domain>:Port --token xxxx --discovery-token-ca-cert-hash sha256:xxxxxxxxxx --install-pkg-path <edgeadm kube-* install package address path> --enable-edge=true --runtime=containerd
See the detailed processOne-click install of edge Kubernetes cluster
Other installation, deployment, and administration, see our Tutorial.
Install WasmEdge
Use the simple install script to install WasmEdge on your edge node.
curl -sSf https://raw.githubusercontent.com/WasmEdge/WasmEdge/master/utils/install.sh | bash
Build And install Crun with WasmEdge
The crun project has WasmEdge support baked in. For now, the easiest approach is just to build it yourself from source. First, let's make sure that crun dependencies are installed on your Ubuntu 20.04. For other Linux distributions, please see here.
sudo apt update
sudo apt install -y make git gcc build-essential pkgconf libtool \
libsystemd-dev libprotobuf-c-dev libcap-dev libseccomp-dev libyajl-dev \
go-md2man libtool autoconf python3 automake
Next, configure, build, and install a crun binary with WasmEdge support.
git clone https://github.com/containers/crun
cd crun
./autogen.sh
./configure --with-wasmedge
make
sudo make install
Reconfigure containerd with crun runtime
Superedge containerd node has default config, we should modify the configuration file(/etc/containerd/config.toml) according to the following steps.
Firstly, we generate config.toml.diff
diff file and patch it.
cat > config.toml.diff << EOF
--- /etc/containerd/config.toml 2022-02-14 15:05:40.061562127 +0800
+++ /etc/containerd/config.toml.crun 2022-02-14 15:03:35.846052853 +0800
@@ -24,17 +24,23 @@
max_concurrent_downloads = 10
[plugins.cri.containerd]
- default_runtime_name = "runc"
- [plugins.cri.containerd.runtimes.runc]
+ default_runtime_name = "crun"
+ [plugins.cri.containerd.runtimes.crun]
runtime_type = "io.containerd.runc.v2"
- pod_annotations = []
+ pod_annotations = ["*.wasm.*", "wasm.*", "module.wasm.image/*", "*.module.wasm.image", "module.wasm.image/variant.*"]
container_annotations = []
privileged_without_host_devices = false
- [plugins.cri.containerd.runtimes.runc.options]
- BinaryName = "runc"
+ [plugins.cri.containerd.runtimes.crun.options]
+ BinaryName = "crun"
# cni
[plugins.cri.cni]
bin_dir = "/opt/cni/bin"
conf_dir = "/etc/cni/net.d"
conf_template = ""
+ [plugins."io.containerd.runtime.v1.linux"]
+ no_shim = false
+ runtime = "crun"
+ runtime_root = ""
+ shim = "containerd-shim"
+ shim_debug = false
EOF
sudo patch -d/ -p0 < config.toml.diff
sudo systemctl restart containerd
Create Wasmedge application in Superedge
We can run a wasm image which has been pushed to dockerhub. If you want to learn how to compile, package, and publish the WebAssembly program as a container image to Docker hub, please refer to WasmEdge Book.
cat > wasmedge-app.yaml << EOF
apiVersion: v1
kind: Pod
metadata:
annotations:
module.wasm.image/variant: compat
labels:
run: wasi-demo
name: wasi-demo
spec:
containers:
- args:
- /wasi_example_main.wasm
- "50000000"
image: hydai/wasm-wasi-example:with-wasm-annotation
imagePullPolicy: IfNotPresent
name: wasi-demo
hostNetwork: true
restartPolicy: Never
EOF
kubectl create -f wasmedge-app.yaml
The output will show by executing kubectl logs wasi-demo
command.
Random number: -1643170076
Random bytes: [15, 223, 242, 238, 69, 114, 217, 106, 80, 214, 44, 225, 20, 182, 2, 189, 226, 184, 97, 40, 154, 6, 56, 202, 45, 89, 184, 80, 5, 89, 73, 222, 143, 132, 17, 79, 145, 64, 33, 17, 250, 102, 91, 94, 26, 200, 28, 161, 46, 93, 123, 36, 100, 167, 43, 159, 82, 112, 255, 165, 37, 232, 17, 139, 97, 14, 28, 169, 225, 156, 147, 22, 174, 148, 209, 57, 82, 213, 19, 215, 11, 18, 32, 217, 188, 142, 54, 127, 237, 237, 230, 137, 86, 162, 185, 66, 88, 95, 226, 53, 174, 76, 226, 25, 151, 186, 156, 16, 62, 63, 230, 148, 133, 102, 33, 138, 20, 83, 31, 60, 246, 90, 167, 189, 103, 238, 106, 51]
Printed from wasi: This is from a main function
This is from a main function
The env vars are as follows.
The args are as follows.
/wasi_example_main.wasm
50000000
File content is This is in a file
OpenYurt + containerd + crun
In this article, we will introduce how to run a WasmEdge simple demo app with Containerd over OpenYurt.
Set up an OpenYurt Cluster
Here, we introduce two ways to set up an OpenYurt Cluster.
The first one is to set up an OpenYurt Cluster from scratch, use yurtctl convert
to realize a K8s Cluster conversion to an OpenYurt Cluster.
The second one is to use the ability of OpenYurt Experience Center, which is easy to achieve an OpenYurt Cluster.
Prerequisite
OS/kernel | Private IP/Public IP | |
---|---|---|
Master | Ubuntu 20.04.3 LTS/5.4.0-91-generic | 192.168.3.169/120.55.126.18 |
Node | Ubuntu 20.04.3 LTS/5.4.0-91-generic | 192.168.3.170/121.43.113.152 |
It should be noted that some steps may differ slightly depending on the operating system differences. Please refer to the installation of OpenYurt and crun.
We use yurtctl convert
to convert a K8s Cluster to OpenYurt Cluster, so we should set up a K8s Cluster.
If you use yurtctl init/join
to set up an OpenYurt Cluster, you can skip this step which introduces the process of installing K8s.
Find the difference between yurtctl convert/revert
and yurtctl init/join
, you can refer to the following two articles.
Conversion between OpenYurt and Kubernetes:yurtctl convert/revert
- Close the swap space of the master and node firstly.
sudo swapoff -a
//verify
free -m
- Configure the file /etc/hosts of two nodes as the following.
192.168.3.169 oy-master
120.55.126.18 oy-master
92.168.3.170 oy-node
121.43.113.152 oy-node
- Load the br_netfilter Kernel module and modify the Kernel parameter.
//load the module
sudo modprobe br_netfilter
//verify
lsmod | grep br_netfilter
// create k8s.conf
cat <<EOF | sudo tee /etc/sysctl.d/k8s.conf
net.bridge.bridge-nf-call-ip6tables = 1
net.bridge.bridge-nf-call-iptables = 1
EOF
sudo sysctl --system
- Setup the value of rp-filter (adjusting the value of two parameters in /etc/sysctl.d/10-network-security.conf from 2 to 1 and setting up the value of /proc/sys/net/ipv4/ip_forward to 1)
sudo vi /etc/sysctl.d/10-network-security.conf
echo 1 > /proc/sys/net/ipv4/ip_forward
sudo sysctl --system
Install containerd and modify the default configure of containerd
Use the following commands to install containerd on your edge node which will run a WasmEdge simple demo.
export VERSION="1.5.7"
echo -e "Version: $VERSION"
echo -e "Installing libseccomp2 ..."
sudo apt install -y libseccomp2
echo -e "Installing wget"
sudo apt install -y wget
wget https://github.com/containerd/containerd/releases/download/v${VERSION}/cri-containerd-cni-${VERSION}-linux-amd64.tar.gz
wget https://github.com/containerd/containerd/releases/download/v${VERSION}/cri-containerd-cni-${VERSION}-linux-amd64.tar.gz.sha256sum
sha256sum --check cri-containerd-cni-${VERSION}-linux-amd64.tar.gz.sha256sum
sudo tar --no-overwrite-dir -C / -xzf cri-containerd-cni-${VERSION}-linux-amd64.tar.gz
sudo systemctl daemon-reload
As the crun project support WasmEdge as default, we just need to configure the containerd configuration for runc. So we need to modify the runc parameters in /etc/containerd/config.toml to curn and add pod_annotation.
sudo mkdir -p /etc/containerd/
sudo bash -c "containerd config default > /etc/containerd/config.toml"
wget https://raw.githubusercontent.com/second-state/wasmedge-containers-examples/main/containerd/containerd_config.diff
sudo patch -d/ -p0 < containerd_config.diff
After that, restart containerd to make the configuration take effect.
systemctl start containerd
Install WasmEdge
Use the simple install script to install WasmEdge on your edge node.
curl -sSf https://raw.githubusercontent.com/WasmEdge/WasmEdge/master/utils/install.sh | bash
Build and install crun
We need a crun binary that supports WasmEdge on the edge node. For now, the most straightforward approach is to build it yourself from the source. First, let's ensure that crun dependencies are installed on your Ubuntu 20.04. For other Linux distributions, please see here.
- Dependencies are required for the build
sudo apt update
sudo apt install -y make git gcc build-essential pkgconf libtool \
libsystemd-dev libprotobuf-c-dev libcap-dev libseccomp-dev libyajl-dev \
go-md2man libtool autoconf python3 automake
- Configure, build, and install a crun binary with WasmEdge support.
git clone https://github.com/containers/crun
cd crun
./autogen.sh
./configure --with-wasmedge
make
sudo make install
From scratch set up an OpenYurt Cluster
In this demo, we will use two machines to set up an OpenYurt Cluster. One simulated cloud node is called Master, the other one simulated edge node is called Node. These two nodes form the simplest OpenYurt Cluster, where OpenYurt components run on.
Set up a K8s Cluster
Kubernetes version 1.18.9
$ sudo apt-get update && sudo apt-get install -y ca-certificates curl software-properties-common apt-transport-https
// add K8s source
$ curl -s https://mirrors.aliyun.com/kubernetes/apt/doc/apt-key.gpg | sudo apt-key add -
$ sudo tee /etc/apt/sources.list.d/kubernetes.list <<EOF
$ deb https://mirrors.aliyun.com/kubernetes/apt/ kubernetes-xenial main
// install K8s components 1.18.9
$ sudo apt-get update && sudo apt-get install -y kubelet=1.18.9-00 kubeadm=1.18.9-00 kubectl=1.18.9-00
// Initialize the master node
$ sudo kubeadm init --pod-network-cidr 172.16.0.0/16 \
--apiserver-advertise-address=192.168.3.167 \
--image-repository registry.cn-hangzhou.aliyuncs.com/google_containers
// join the work node
$ kubeadm join 192.168.3.167:6443 --token 3zefbt.99e6denc1cxpk9fg \
--discovery-token-ca-cert-hash sha256:8077d4e7dd6eee64a999d56866ae4336073ed5ffc3f23281d757276b08b9b195
Install yurtctl
Use the following command line to install yurtctl. The yurtctl CLI tool helps install/uninstall OpenYurt and also convert a standard Kubernetes cluster to an OpenYurt cluster.
git clone https://github.com/openyurtio/openyurt.git
cd openyurt
make build WHAT=cmd/yurtctl
Install OpenYurt components
OpenYurt includes several components. YurtHub is the traffic proxy between the components on the node and Kube-apiserver. The YurtHub on the edge will cache the data returned from the cloud. Yurt controller supplements the upstream node controller to support edge computing requirements. TunnelServer connects with the TunnelAgent daemon running in each edge node via a reverse proxy to establish secure network access between the cloud site control plane and the edge nodes that are connected to the intranet. For more detailed information, you could refer to the OpenYurt docs.
yurtctl convert --deploy-yurttunnel --cloud-nodes oy-master --provider kubeadm\
--yurt-controller-manager-image="openyurt/yurt-controller-manager:v0.5.0"\
--yurt-tunnel-agent-image="openyurt/yurt-tunnel-agent:v0.5.0"\
--yurt-tunnel-server-image="openyurt/yurt-tunnel-server:v0.5.0"\
--node-servant-image="openyurt/node-servant:latest"\
--yurthub-image="openyurt/yurthub:v0.5.0"
We need to change the openyurt/node-server-version to latest here: --node-servant-image="openyurt/node-servant:latest"
Actually, OpenYurt components 0.6.0 version is recommended to be installed and proved to be a success to run a WasmEdge demo. How to install OpenYurt:0.6.0, you can see this
Use OpenYurt Experience Center to quickly set up an OpenYurt Cluster
An easier way to set up an OpenYurt Cluster is to use the OpenYurt Experience Center. All you need to do is to sign up for an account for testing, and then you will get an OpenYurt cluster. Next, you could just use yurtctl join
command line to join an edge node. See more OpenYurt Experience Center details here.
Run a simple WebAssembly app
Next, let's run a WebAssembly program through the OpenYurt cluster as a container in the pod. This section will start off pulling this WebAssembly-based container image from Docker hub. If you want to learn how to compile, package, and publish the WebAssembly program as a container image to Docker hub, please refer to WasmEdge Book.
One thing is to note that because the kubectl run (version 1.18.9 ) missed annotations parameters, we need to adjust the command line here. If you are using OpenYurt Experience Center with OpenYurt 0.6.0 and Kubernetes 1.20.11 by default, please refer to the Kubernetes sections in the WasmEdge book to run the wasm app.
// kubectl 1.18.9
$ sudo kubectl run -it --rm --restart=Never wasi-demo --image=hydai/wasm-wasi-example:with-wasm-annotation --overrides='{"kind":"Pod","metadata":{"annotations":{"module.wasm.image/variant":"compat"}} , "apiVersion":"v1", "spec": {"hostNetwork": true}}' /wasi_example_main.wasm 50000000
// kubectl 1.20.11
$ sudo kubectl run -it --rm --restart=Never wasi-demo --image=hydai/wasm-wasi-example:with-wasm-annotation --annotations="module.wasm.image/variant=compat" --overrides='{"kind":"Pod", "apiVersion":"v1", "spec": {"hostNetwork": true}}' /wasi_example_main.wasm 50000000
The output from the containerized application is printed into the console. It is the same for all Kubernetes versions.
Random number: 1123434661
Random bytes: [25, 169, 202, 211, 22, 29, 128, 133, 168, 185, 114, 161, 48, 154, 56, 54, 99, 5, 229, 161, 225, 47, 85, 133, 90, 61, 156, 86, 3, 14, 10, 69, 185, 225, 226, 181, 141, 67, 44, 121, 157, 98, 247, 148, 201, 248, 236, 190, 217, 245, 131, 68, 124, 28, 193, 143, 215, 32, 184, 50, 71, 92, 148, 35, 180, 112, 125, 12, 152, 111, 32, 30, 86, 15, 107, 225, 39, 30, 178, 215, 182, 113, 216, 137, 98, 189, 72, 68, 107, 246, 108, 210, 148, 191, 28, 40, 233, 200, 222, 132, 247, 207, 239, 32, 79, 238, 18, 62, 67, 114, 186, 6, 212, 215, 31, 13, 53, 138, 97, 169, 28, 183, 235, 221, 218, 81, 84, 235]
Printed from wasi: This is from a main function
This is from a main function
The env vars are as follows.
The args are as follows.
/wasi_example_main.wasm
50000000
File content is This is in a file
pod "wasi-demo" deleted
You can now check out the pod status through the Kubernetes command line.
crictl ps -a
You can see the events from scheduling to running the WebAssembly workload in the log.
CONTAINER IMAGE CREATED STATE NAME ATTEMPT POD ID
0c176ed65599a 0423b8eb71e31 8 seconds ago Exited wasi-demo
- WasmEdge GitHub repo: https://github.com/WasmEdge/WasmEdge
- OpenYurt GitHub repo: https://github.com/openyurtio/openyurt
App frameworks and platforms
WasmEdge applications can be plugged into existing application frameworks or platforms. WasmEdge provides a safe and efficient extension mechanism for those frameworks.
In this chapter, we will cover several such framework and platforms.
- Service mesh and frameworks support WasmEdge to run as containers for microservices. We will cover distributed application framework Dapr, service mesh MOSN, and event mesh Apache EventMesh.
- Application frameworks support WasmEdge as an embedded function or plug-in runtime. We will cover streaming data framework YoMo and Go function schedulder / framework Reactr.
- Serverless platforms allows WasmEdge programs to run as serverless functions in their infrastructure. We will cover AWS Lambda, Tencent Serverless Cloud Functions, Vercel Serverless Functions, Netlify Functions, and Second State Functions.
Service mesh and distributed runtimes
WasmEdge could be a lightweight runtime for sidecar microservices and the API proxy as the Docker alternative.
Sidecar microservices
For sidecar frameworks that support multiple application runtimes, we could simply embed WasmEdge applications into the sidecar through its C, Go, Rust, or Node.js SDKs. In addition, WasmEdge applications could be managed directly by container tools and act as sidecar microservices.
- Dapr showcases how to run WasmEdge microservices as Dapr sidecars.
- Apache EventMesh showcases how to run WasmEdge microservices as Apache EventMesh sidecars
Extension for the API proxy
The API proxy is another crucial component in the service mesh. It manages and directs API requests to sidecars in a manner that keeps the system scalable. Developers need to script those proxies to route traffic according to changing infrastructure and ops requirements. Seeing widespread demand for using WebAssembly instead of the LUA scripting language, the community came together and created the proxy-wasm spec. It defines the host interface that WebAssembly runtimes must support to plug into the proxy. WasmEdge supports proxy-wasm now.
- MOSN shows how to use WasmEdge as extensions for MOSN.
- wasm-nginx-module shows how to use WasmEdge run Go/Rust code in OpenResty.
If you have some great ideas on WasmEdge and microservices, feel free to create an issue or PR on the WasmEdge GitHub repo!
Dapr
In this article, I will demonstrate how to use WasmEdge as a sidecar application runtime for Dapr. There are two ways to do this:
- Standalone WasmEdge is the recommended approach is to write a microservice using Rust or JavaScript, and run it in WasmEdge. The WasmEdge application serves web requests and communicates with the sidecar via sockets using the Dapr API. In this case, we can run WasmEdge as a managed container in k8s.
- Alternatively, Embedded WasmEdge is to create a simple microservice in Rust or Go to listen for web requests and communicate with the Dapr sidecar. It passes the request data to a WasmEdge runtime for processing. The business logic of the microservice is a WebAssembly function created and deployed by an application developer.
While the first approach (running the entire microservice in WasmEdge) is much preferred, we are still working on a fully fledged Dapr SDKs for WasmEdge. You can track their progress in GitHub issues -- Rust and JavaScript.
Quick start
First you need to install Dapr and WasmEdge. Go and Rust are optional for the standalone WasmEdge approach. However, they are required for the demo app since it showcases both standalone and embedded WasmEdge approaches.
Fork or clone the demo application from Github. You can use this repo as your own application template.
git clone https://github.com/second-state/dapr-wasm
The demo has 4 Dapr sidecar applications. The web-port project provides a public web service for a static HTML page. This is the application’s UI. From the static HTML page, the user can select a microservice to turn an input image into grayscale. All 3 microsoervices below perform the same function. They are just implemented using different appraoches.
- Standalone WasmEdge approach: The image-api-wasi-socket-rs project provides a standalone WasmEdge sidecar microservice that takes the input image and returns the grayscale image. The microservice is written in Rust and compiled into WebAssembly bytecode to run in WasmEdge.
- Embedded WasmEdge approach #1: The image-api-rs project provides a simple Rust-based microservice. It embeds a WasmEdge function to turn an input image into a grayscale image.
- Embedded WasmEdge approach #2: The image-api-go project provides a simple Go-based microservice. It embeds a WasmEdge function to turn an input image into a grayscale image.
You can follow the instructions in the README to start the sidecar services. Here are commands to build the WebAssembly functions and start the sidecar services. The first set of commands deploy the static web page service and the standalone WasmEdge service written in Rust. It forms a complete application to turn an input image into grayscale.
# Build and start the static HTML web page service for the UI and router for sending the uploaded image to the grayscale microservice
cd web-port
go build
./run_web.sh
cd ../
# Build the standalone image grayscale web service for WasmEdge
cd image-api-wasi-socket-rs
cargo build --target wasm32-wasi
cd ../
# Run the microservice as a Dapr sidecar app
cd image-api-wasi-socket-rs
./run_api_wasi_socket_rs.sh
cd ../
The second set of commands create the alternative microservices for the embedded WasmEdge function.
# Build the grayscale WebAssembly functions, and deploy them to the sidecar projects
cd functions/grayscale
./build.sh
cd ../../
# Build and start the Rust-based microservice for embedding the grayscale WasmEdge function
cd image-api-rs
cargo build --release
./run_api_rs.sh
cd ../
# Build and start the Go-based microservice for embedding the grayscale WasmEdge function
cd image-api-go
go build
./run_api_go.sh
cd ../
Finally, you should be able to see the web UI in your browser.
Recommended: The standalone WasmEdge microservice in Rust
The standalone WasmEdge microservice starts a non-blocking TCP server inside WasmEdge. The TCP server passes incoming requests to handle_client()
, which passes HTTP requests to handle_http()
, which calls grayscale()
to process the image data in the request.
fn main() -> std::io::Result<()> { let port = std::env::var("PORT").unwrap_or(9005.to_string()); println!("new connection at {}", port); let listener = TcpListener::bind(format!("127.0.0.1:{}", port))?; loop { let _ = handle_client(listener.accept()?.0); } } fn handle_client(mut stream: TcpStream) -> std::io::Result<()> { ... ... } fn handle_http(req: Request<Vec<u8>>) -> bytecodec::Result<Response<String>> { ... ... } fn grayscale(image: &[u8]) -> Vec<u8> { let detected = image::guess_format(&image); let mut buf = vec![]; if detected.is_err() { return buf; } let image_format_detected = detected.unwrap(); let img = image::load_from_memory(&image).unwrap(); let filtered = img.grayscale(); match image_format_detected { ImageFormat::Gif => { filtered.write_to(&mut buf, ImageOutputFormat::Gif).unwrap(); } _ => { filtered.write_to(&mut buf, ImageOutputFormat::Png).unwrap(); } }; return buf; }
Work in progress: It will soon interact with the Dapr sidecar through the WasmEdge Dapr SDK in Rust.
Now, you can build the microservice. It is a simple matter of compiling from Rust to WebAssembly.
cd image-api-wasi-socket-rs
cargo build --target wasm32-wasi
Deploy the WasmEdge microservice in Dapr as follows.
dapr run --app-id image-api-wasi-socket-rs \
--app-protocol http \
--app-port 9005 \
--dapr-http-port 3503 \
--components-path ../config \
--log-level debug \
wasmedge ./target/wasm32-wasi/debug/image-api-wasi-socket-rs.wasm
Alternative: The embedded WasmEdge microservices
The embedded WasmEdge approach requires us to create a WebAssembly function for the business logic (image processing) first, and then embed it into simple Dapr microservices.
Rust function for image processing
The Rust function is simple. It uses the wasmedge_bindgen macro to makes it easy to call the function from a Go or Rust host embedding the WebAssembly function. It takes and returns base64 encoded image data for the web.
#![allow(unused)] fn main() { #[wasmedge_bindgen] pub fn grayscale(image_data: String) -> String { let image_bytes = image_data.split(",").map(|x| x.parse::<u8>().unwrap()).collect::<Vec<u8>>(); return grayscale::grayscale_internal(&image_bytes); } }
The Rust function that actually performs the task is as follows.
#![allow(unused)] fn main() { pub fn grayscale_internal(image_data: &[u8]) -> String { let image_format_detected: ImageFormat = image::guess_format(&image_data).unwrap(); let img = image::load_from_memory(&image_data).unwrap(); let filtered = img.grayscale(); let mut buf = vec![]; match image_format_detected { ImageFormat::Gif => { filtered.write_to(&mut buf, ImageOutputFormat::Gif).unwrap(); } _ => { filtered.write_to(&mut buf, ImageOutputFormat::Png).unwrap(); } }; let mut base64_encoded = String::new(); base64::encode_config_buf(&buf, base64::STANDARD, &mut base64_encoded); return base64_encoded.to_string(); } }
The Go host wrapper for microservice
The Go-based microservice embeds the above imaging processing function in WasmEdge. The microservice itself is a web server and utilizes the Dapr Go SDK.
func main() {
s := daprd.NewService(":9003")
if err := s.AddServiceInvocationHandler("/api/image", imageHandlerWASI); err != nil {
log.Fatalf("error adding invocation handler: %v", err)
}
if err := s.Start(); err != nil && err != http.ErrServerClosed {
log.Fatalf("error listenning: %v", err)
}
}
The imageHandlerWASI()
function starts a WasmEdge instance and calls the image processing (grayscale) function in it via wasmedge_bindgen.
Build and deploy the Go microservice to Dapr as follows.
cd image-api-go
go build
dapr run --app-id image-api-go \
--app-protocol http \
--app-port 9003 \
--dapr-http-port 3501 \
--log-level debug \
--components-path ../config \
./image-api-go
The Rust host wrapper for microservice
The Rust-based microservice embeds the above imaging processing function in WasmEdge. The microservice itself is a Tokio and Warp based web server.
#![allow(unused)] fn main() { #[tokio::main] pub async fn run_server(port: u16) { pretty_env_logger::init(); let home = warp::get().map(warp::reply); let image = warp::post() .and(warp::path("api")) .and(warp::path("image")) .and(warp::body::bytes()) .map(|bytes: bytes::Bytes| { let v: Vec<u8> = bytes.iter().map(|&x| x).collect(); let res = image_process_wasmedge_sys(&v); let _encoded = base64::encode(&res); Response::builder() .header("content-type", "image/png") .body(res) }); let routes = home.or(image); let routes = routes.with(warp::cors().allow_any_origin()); let log = warp::log("dapr_wasm"); let routes = routes.with(log); warp::serve(routes).run((Ipv4Addr::UNSPECIFIED, port)).await } }
The image_process_wasmedge_sys()
function starts a WasmEdge instance and calls the image processing (grayscale) function in it via wasmedge_bindgen.
Build and deploy the Rust microservice to Dapr as follows.
cd image-api-rs
cargo build --release
dapr stop image-api-rs
# Change this to your own path for WasmEdge
export LD_LIBRARY_PATH=/home/coder/.wasmedge/lib64/
dapr run --app-id image-api-rs \
--app-protocol http \
--app-port 9004 \
--dapr-http-port 3502 \
--components-path ../config \
--log-level debug \
./target/release/image-api-rs
That's it! Let us know your cool Dapr microservices in WebAssembly!
MOSN
Coming soon.
wasm-nginx-module
The wasm-nginx-module is an Nginx module built upon OpenResty. By implementing the Proxy Wasm ABI, any Wasm program written with Proxy Wasm SDK can be run inside it. Hence, you can write Go or Rust code, compile them into Wasm, then load & execute it in Nginx.
The wasm-nginx-module is already used in APISIX and allows it to run Wasm plugin like Lua plugin.
In order to follow along the tutorials in this chapter, you will need to first build your Nginx with wasm-nginx-module included and WasmEdge shared library installed in the right path.
Once you have Nginx installed, let me show you a real world example - using Wasm to inject custom responses in Nginx.
Inject Custom Response via Go in Nginx, Step by Step
Step 1: Write code based on proxy-wasm-go-sdk
The implementation code (including go.mod
and others) can be found at here.
It should be explained that although the proxy-wasm-go-sdk project carries the Go name, it actually uses tinygo instead of native Go, which has some problems supporting WASI (which you can think of as a non-browser WASM runtime interface), see here for more details.
We also provide a Rust version (including Cargo.toml and others) there.
Step 2: Build the corresponding Wasm file
tinygo build -o ./fault-injection/main.go.wasm -scheduler=none -target=wasi ./fault-injection/main.go
Step 3: Load and execute the Wasm file
Then, start Nginx with the configuration below:
worker_processes 1;
error_log /tmp/error.log warn;
events {
worker_connections 10240;
}
http {
wasm_vm wasmedge;
init_by_lua_block {
local wasm = require("resty.proxy-wasm")
package.loaded.plugin = assert(wasm.load("fault_injection",
"/path/to/fault-injection/main.go.wasm"))
}
server {
listen 1980;
location / {
content_by_lua_block {
local wasm = require("resty.proxy-wasm")
local ctx = assert(wasm.on_configure(package.loaded.plugin,
'{"http_status": 403, "body": "powered by wasm-nginx-module"}'))
assert(wasm.on_http_request_headers(ctx))
}
}
}
}
This configuration loads the Wasm file we just built, executes it with the configuration {"http_status": 403, "body": "powered by wasm-nginx-module"}
.
Step 4: verify the result
After Nginx starts, we can use curl http://127.0.0.1:1980/ -i
to verify the execution result of the Wasm.
It is expected to see the output:
HTTP/1.1 403 Forbidden
...
powered by wasm-nginx-module
Inject Custom Response via Rust in Nginx, Step by Step
Step 1: Write code based on proxy-wasm-rust-sdk
We also provide a Rust version (including Cargo.toml and others) there.
Step 2: Build the corresponding Wasm file
cargo build --target=wasm32-wasi
Step 3: Load and execute the Wasm file
Then, start Nginx with the configuration below:
worker_processes 1;
error_log /tmp/error.log warn;
events {
worker_connections 10240;
}
http {
wasm_vm wasmedge;
init_by_lua_block {
local wasm = require("resty.proxy-wasm")
package.loaded.plugin = assert(wasm.load("fault_injection",
"/path/to/fault-injection/target/wasm32-wasi/debug/fault_injection.wasm"))
}
server {
listen 1980;
location / {
content_by_lua_block {
local wasm = require("resty.proxy-wasm")
local ctx = assert(wasm.on_configure(package.loaded.plugin,
'{"http_status": 403, "body": "powered by wasm-nginx-module"}'))
assert(wasm.on_http_request_headers(ctx))
}
}
}
}
This configuration loads the Wasm file we just built, executes it with the configuration {"http_status": 403, "body": "powered by wasm-nginx-module"}
.
Step 4: verify the result
After Nginx starts, we can use curl http://127.0.0.1:1980/ -i
to verify the execution result of the Wasm.
It is expected to see the output:
HTTP/1.1 403 Forbidden
...
powered by wasm-nginx-module
Apache EventMesh
Coming soon, or you can help out
App frameworks
WasmEdge provides a safe and efficient extension mechanism for applications. Of course, application developers can always use WasmEdge SDKs to embed WebAssembly functions. But some applications and frameworks opt to build their own extension / embedding APIs on top of the WasmEdge SDK, which supports more ergonomic integration with the application's native use cases and programming models.
- YoMo is a data stream processing framework. WasmEdge functions can be plugged into the framework to process data in-stream.
- Reactr is a Go language framework for managing and extending WebAssembly functions for the purpose of easy embedding into other Go applications.
YoMo
YoMo is a programming framework enabling developers to build a distributed cloud system (Geo-Distributed Cloud System). YoMo's communication layer is made on top of the QUIC protocol, which brings high-speed data transmission. In addition, it has a built-in Streaming Serverless "streaming function", which significantly improves the development experience of distributed cloud systems. The distributed cloud system built by YoMo provides an ultra-high-speed communication mechanism between near-field computing power and terminals. It has a wide range of use cases in Metaverse, VR/AR, IoT, etc.
YoMo is written in the Go language. For streaming Serverless, Golang plugins and shared libraries are used to load users' code dynamically, which also have certain limitations for developers. Coupled with Serverless architecture's rigid demand for isolation, this makes WebAssembly an excellent choice for running user-defined functions.
For example, in the process of real-time AI inference in AR/VR devices or smart factories, the camera sends real-time unstructured data to the computing node in the near-field MEC (multi-access edge computing) device through YoMo. YoMo sends the AI computing result to the end device in real-time when the AI inference is completed. Thus, the hosted AI inference function will be automatically executed.
However, a challenge for YoMo is to incorporate and manage handler functions written by multiple outside developers in an edge computing node. It requires runtime isolation for those functions without sacrificing performance. Traditional software container solutions, such as Docker, are not up to the task. They are too heavy and slow to handle real-time tasks.
WebAssembly provides a lightweight and high-performance software container. It is ideally suited as a runtime for YoMo’s data processing handler functions.
In this article, we will show you how to create a Rust function for Tensorflow-based image classification, compile it into WebAssembly, and then use YoMo to run it as a stream data handler. We use WasmEdge as our WebAssembly runtime because it offers the highest performance and flexibility compared with other WebAssembly runtimes. It is the only WebAssembly VM that reliably supports Tensorflow. YoMo manages WasmEdge VM instances and the contained WebAssembly bytecode apps through WasmEdge’s Golang API.
Source code: https://github.com/yomorun/yomo-wasmedge-tensorflow
Checkout the WasmEdge image classification function in action in YoMo
Prerequisite
Obviously, you will need to have Golang installed, but I will assume you already did.
Golang version should be newer than 1.15 for our example to work.
You also need to install the YoMo CLI application. It orchestrates and coordinates data streaming and handler function invocations.
$ go install github.com/yomorun/cli/yomo@latest
$ yomo version
YoMo CLI version: v0.1.3
Next, please install the WasmEdge and its Tensorflow shared libraries. WasmEdge is a leading WebAssembly runtime hosted by the CNCF. We will use it to embed and run WebAssembly programs from YoMo.
curl -sSf https://raw.githubusercontent.com/WasmEdge/WasmEdge/master/utils/install.sh | bash
Finally, since our demo WebAssembly functions are written in Rust, you will also need a Rust compiler.
For the rest of the demo, fork and clone the source code repository.
git clone https://github.com/yomorun/yomo-wasmedge-tensorflow.git
The image classification function
The image classification function to process the YoMo image stream is written in Rust. It utilizes the WasmEdge Tensorflow API to process an input image.
#![allow(unused)] fn main() { #[wasmedge_bindgen] pub fn infer(image_data: Vec<u8>) -> Result<Vec<u8>, String> { let start = Instant::now(); // Load the TFLite model and its meta data (the text label for each recognized object number) let model_data: &[u8] = include_bytes!("lite-model_aiy_vision_classifier_food_V1_1.tflite"); let labels = include_str!("aiy_food_V1_labelmap.txt"); // Pre-process the image to a format that can be used by this model let flat_img = wasmedge_tensorflow_interface::load_jpg_image_to_rgb8(&image_data[..], 192, 192); println!("RUST: Loaded image in ... {:?}", start.elapsed()); // Run the TFLite model using the WasmEdge Tensorflow API let mut session = wasmedge_tensorflow_interface::Session::new(&model_data, wasmedge_tensorflow_interface::ModelType::TensorFlowLite); session.add_input("input", &flat_img, &[1, 192, 192, 3]) .run(); let res_vec: Vec<u8> = session.get_output("MobilenetV1/Predictions/Softmax"); // Find the object index in res_vec that has the greatest probability // Translate the probability into a confidence level // Translate the object index into a label from the model meta data food_name let mut i = 0; let mut max_index: i32 = -1; let mut max_value: u8 = 0; while i < res_vec.len() { let cur = res_vec[i]; if cur > max_value { max_value = cur; max_index = i as i32; } i += 1; } println!("RUST: index {}, prob {}", max_index, max_value); let confidence: String; if max_value > 200 { confidence = "is very likely".to_string(); } else if max_value > 125 { confidence = "is likely".to_string(); } else { confidence = "could be".to_string(); } let ret_str: String; if max_value > 50 { let mut label_lines = labels.lines(); for _i in 0..max_index { label_lines.next(); } let food_name = label_lines.next().unwrap().to_string(); ret_str = format!( "It {} a <a href='https://www.google.com/search?q={}'>{}</a> in the picture", confidence, food_name, food_name ); } else { ret_str = "It does not appears to be a food item in the picture.".to_string(); } println!( "RUST: Finished post-processing in ... {:?}", start.elapsed() ); return Ok(ret_str.as_bytes().to_vec()); } }
You should add wasm32-wasi
target to rust to compile this function into WebAssembly bytecode.
rustup target add wasm32-wasi
cd flow/rust_mobilenet_food
cargo build --target wasm32-wasi --release
# The output WASM will be target/wasm32-wasi/release/rust_mobilenet_food_lib.wasm
# Copy the wasm bytecode file to the flow/ directory
cp target/wasm32-wasi/release/rust_mobilenet_food_lib.wasm ../
To release the best performance of WasmEdge, you should enable the AOT mode by compiling the .wasm
file to the .so
.
wasmedgec rust_mobilenet_food_lib.wasm rust_mobilenet_food_lib.so
Integration with YoMo
On the YoMo side, we use the WasmEdge Golang API to start and run WasmEdge VM for the image classification function. The app.go file in the source code project is as follows.
package main
import (
"crypto/sha1"
"fmt"
"log"
"os"
"sync/atomic"
"github.com/second-state/WasmEdge-go/wasmedge"
bindgen "github.com/second-state/wasmedge-bindgen/host/go"
"github.com/yomorun/yomo"
)
var (
counter uint64
)
const ImageDataKey = 0x10
func main() {
// Connect to Zipper service
sfn := yomo.NewStreamFunction("image-recognition", yomo.WithZipperAddr("localhost:9900"))
defer sfn.Close()
// set only monitoring data
sfn.SetObserveDataID(ImageDataKey)
// set handler
sfn.SetHandler(Handler)
// start
err := sfn.Connect()
if err != nil {
log.Print("❌ Connect to zipper failure: ", err)
os.Exit(1)
}
select {}
}
// Handler process the data in the stream
func Handler(img []byte) (byte, []byte) {
// Initialize WasmEdge's VM
vmConf, vm := initVM()
bg := bindgen.Instantiate(vm)
defer bg.Release()
defer vm.Release()
defer vmConf.Release()
// recognize the image
res, err := bg.Execute("infer", img)
if err == nil {
fmt.Println("GO: Run bindgen -- infer:", string(res))
} else {
fmt.Println("GO: Run bindgen -- infer FAILED")
}
// print logs
hash := genSha1(img)
log.Printf("✅ received image-%d hash %v, img_size=%d \n", atomic.AddUint64(&counter, 1), hash, len(img))
return 0x11, nil
}
// genSha1 generate the hash value of the image
func genSha1(buf []byte) string {
h := sha1.New()
h.Write(buf)
return fmt.Sprintf("%x", h.Sum(nil))
}
// initVM initialize WasmEdge's VM
func initVM() (*wasmedge.Configure, *wasmedge.VM) {
wasmedge.SetLogErrorLevel()
// Set Tensorflow not to print debug info
os.Setenv("TF_CPP_MIN_LOG_LEVEL", "3")
os.Setenv("TF_CPP_MIN_VLOG_LEVEL", "3")
// Create configure
vmConf := wasmedge.NewConfigure(wasmedge.WASI)
// Create VM with configure
vm := wasmedge.NewVMWithConfig(vmConf)
// Init WASI
var wasi = vm.GetImportObject(wasmedge.WASI)
wasi.InitWasi(
os.Args[1:], // The args
os.Environ(), // The envs
[]string{".:."}, // The mapping directories
)
// Register WasmEdge-tensorflow and WasmEdge-image
var tfobj = wasmedge.NewTensorflowImportObject()
var tfliteobj = wasmedge.NewTensorflowLiteImportObject()
vm.RegisterImport(tfobj)
vm.RegisterImport(tfliteobj)
var imgobj = wasmedge.NewImageImportObject()
vm.RegisterImport(imgobj)
// Instantiate wasm
vm.LoadWasmFile("rust_mobilenet_food_lib.so")
vm.Validate()
return vmConf, vm
}
In action
Finally, we can start YoMo and see the entire data processing pipeline in action. Start the YoMo CLI application from the project folder. The yaml file defines port YoMo should listen on and the workflow handler to trigger for incoming data. Note that the flow name image-recognition
matches the name in the aforementioned data handler app.go.
yomo serve -c ./zipper/workflow.yaml
Start the handler function by running the aforementioned app.go program.
cd flow
go run --tags "tensorflow image" app.go
Start a simulated data source by sending a video to YoMo. The video is a series of image frames. The WasmEdge function in app.go will be invoked against every image frame in the video.
# Download a video file
wget -P source 'https://github.com/yomorun/yomo-wasmedge-tensorflow/releases/download/v0.1.0/hot-dog.mp4'
# Stream the video to YoMo
go run ./source/main.go ./source/hot-dog.mp4
You can see the output from the WasmEdge handler function in the console. It prints the names of the objects detected in each image frame in the video.
What's next
In this article, we have seen how to use the WasmEdge Tensorflow API and Golang SDK in YoMo framework to process an image stream in near real-time.
In collaboration with YoMo, we will soon deploy WasmEdge in production in smart factories for a variety of assembly line tasks. WasmEdge is the software runtime for edge computing!
Reactr
Reactr is a fast, performant function scheduling library written in Go. Reactr is designed to be flexible, with the ability to run embedded in your Go applications and first-class support for WebAssembly. Taking advantage of Go's superior concurrency capabilities, Reactr can manage and execute hundreds of WebAssembly runtime instances all at once, making a great framework for server-side applications.
Reactr allows you to run WebAssembly functions in Go. But so does the WasmEdge Go SDK. The unique feature of Reactr is that it provides a rich set of host functions in Go, which support access to networks and databases etc. Reactr then provides Rust (and Swift / AssemblyScript) APIs to call those host functions from within the WebAssembly function.
In this article, we will show you how to use WasmEdge together with Reactr to take advantage of the best of both worlds. WasmEdge is the fastest and most extensible WebAssembly runtime. It is also the fastest in Reactr's official test suite. We will show you how to run Rust functions compiled to WebAssembly as well as JavaScript programs in WasmEdge and Reactr.
WasmEdge provides advanced support for JavaScript including mixing Rust with JavaScript for improved performance.
Prerequisites
You need have Rust, Go, and WasmEdge installed on your system.
The GCC compiler (installed via the build-essential
package) is also needed for WasmEdge.
sudo apt-get update
sudo apt-get -y upgrade
sudo apt install build-essential
curl --proto '=https' --tlsv1.2 -sSf https://sh.rustup.rs | sh
source $HOME/.cargo/env
rustup target add wasm32-wasi
curl -OL https://golang.org/dl/go1.17.5.linux-amd64.tar.gz
sudo tar -C /usr/local -xvf go1.17.5.linux-amd64.tar.gz
export PATH=$PATH:/usr/local/go/bin
wget -qO- https://raw.githubusercontent.com/WasmEdge/WasmEdge/master/utils/install.sh | bash
source $HOME/.wasmedge/env
Hello world
A simple hello world
example for Reactr is available here.
Hello world: Rust function compiled to WebAssembly
Let's first create a simple Rust function to echo hello.
The Rust function HelloEcho::run()
is as follows. It will be exposed to the Go host application through Reactr.
#![allow(unused)] fn main() { use suborbital::runnable::*; struct HelloEcho{} impl Runnable for HelloEcho { fn run(&self, input: Vec<u8>) -> Result<Vec<u8>, RunErr> { let in_string = String::from_utf8(input).unwrap(); Ok(format!("hello {}", in_string).as_bytes().to_vec()) } } }
Let's build the Rust function into a WebAssembly bytecode file.
cd hello-echo
cargo build --target wasm32-wasi --release
cp target/wasm32-wasi/release/hello_echo.wasm ..
cd ..
Hello world: Go host application
Next, lets look into the Go host app that executes the WebAssembly functions.
The runBundle()
function executes the run()
function in the Runnable
struct once.
func runBundle() {
r := rt.New()
doWasm := r.Register("hello-echo", rwasm.NewRunner("./hello_echo.wasm"))
res, err := doWasm([]byte("wasmWorker!")).Then()
if err != nil {
fmt.Println(err)
return
}
fmt.Println(string(res.([]byte)))
}
The runGroup()
function executes the Rust-compiled WebAssembly run()
function multiple times asynchronously in a group, and receives the results as they come in.
func runGroup() {
r := rt.New()
doWasm := r.Register("hello-echo", rwasm.NewRunner("./hello_echo.wasm"))
grp := rt.NewGroup()
for i := 0; i < 100000; i++ {
grp.Add(doWasm([]byte(fmt.Sprintf("world %d", i))))
}
if err := grp.Wait(); err != nil {
fmt.Println(err)
}
}
Finally, let's run the Go host application and see the results printed to the console.
You must use the
-tags wasmedge
flag to take advantage of the performance and extended WebAssembly APIs provided by WasmEdge.
go mod tidy
go run -tags wasmedge main.go
Database query
In this example, we will demonstrate how to use Reactr host functions and APIs to query a PostgreSQL database from your WebAssembly function.
Database query: Install and set up a PostgreSQL database
We will start a PostgreSQL instance through Docker.
docker pull postgres
docker run --name reactr-postgres -p 5432:5432 -e POSTGRES_PASSWORD=12345 -d postgres
Next, let's create a database and populate it with some sample data.
$ docker run -it --rm --network host postgres psql -h 127.0.0.1 -U postgres
postgres=# CREATE DATABASE reactr;
postgres=# \c reactr;
# Create a table:
postgres=# CREATE TABLE users (
uuid varchar(100) CONSTRAINT firstkey PRIMARY KEY,
email varchar(50) NOT NULL,
created_at date,
state char(1),
identifier integer
);
Leave this running and start another terminal window to interact with this PostgreSQL server.
Database query: Rust function compiled to WebAssembly
Let's create a Rust function to access the PostgreSQL database.
The Rust function RsDbtest::run()
is as follows. It will be exposed to the Go host application through Reactr. It uses named queries such as PGInsertUser
and PGSelectUserWithUUID
to operate the database. Those queries are defined in the Go host application, and we will see them later.
#![allow(unused)] fn main() { use suborbital::runnable::*; use suborbital::db; use suborbital::util; use suborbital::db::query; use suborbital::log; use uuid::Uuid; struct RsDbtest{} impl Runnable for RsDbtest { fn run(&self, _: Vec<u8>) -> Result<Vec<u8>, RunErr> { let uuid = Uuid::new_v4().to_string(); let mut args: Vec<query::QueryArg> = Vec::new(); args.push(query::QueryArg::new("uuid", uuid.as_str())); args.push(query::QueryArg::new("email", "connor@suborbital.dev")); match db::insert("PGInsertUser", args) { Ok(_) => log::info("insert successful"), Err(e) => { return Err(RunErr::new(500, e.message.as_str())) } }; let mut args2: Vec<query::QueryArg> = Vec::new(); args2.push(query::QueryArg::new("uuid", uuid.as_str())); match db::update("PGUpdateUserWithUUID", args2.clone()) { Ok(rows) => log::info(format!("update: {}", util::to_string(rows).as_str()).as_str()), Err(e) => { return Err(RunErr::new(500, e.message.as_str())) } } match db::select("PGSelectUserWithUUID", args2.clone()) { Ok(result) => log::info(format!("select: {}", util::to_string(result).as_str()).as_str()), Err(e) => { return Err(RunErr::new(500, e.message.as_str())) } } match db::delete("PGDeleteUserWithUUID", args2.clone()) { Ok(rows) => log::info(format!("delete: {}", util::to_string(rows).as_str()).as_str()), Err(e) => { return Err(RunErr::new(500, e.message.as_str())) } } ... ... } } }
Let's build the Rust function into a WebAssembly bytecode file.
cd rs-db
cargo build --target wasm32-wasi --release
cp target/wasm32-wasi/release/rs_db.wasm ..
cd ..
Database query: Go host application
The Go host app first defines the SQL queries and gives each of them a name. We will then pass those queries to the Reactr runtime as a configuration.
func main() {
dbConnString, exists := os.LookupEnv("REACTR_DB_CONN_STRING")
if !exists {
fmt.Println("skipping as conn string env var not set")
return
}
q1 := rcap.Query{
Type: rcap.QueryTypeInsert,
Name: "PGInsertUser",
VarCount: 2,
Query: `
INSERT INTO users (uuid, email, created_at, state, identifier)
VALUES ($1, $2, NOW(), 'A', 12345)`,
}
q2 := rcap.Query{
Type: rcap.QueryTypeSelect,
Name: "PGSelectUserWithUUID",
VarCount: 1,
Query: `
SELECT * FROM users
WHERE uuid = $1`,
}
q3 := rcap.Query{
Type: rcap.QueryTypeUpdate,
Name: "PGUpdateUserWithUUID",
VarCount: 1,
Query: `
UPDATE users SET state='B' WHERE uuid = $1`,
}
q4 := rcap.Query{
Type: rcap.QueryTypeDelete,
Name: "PGDeleteUserWithUUID",
VarCount: 1,
Query: `
DELETE FROM users WHERE uuid = $1`,
}
config := rcap.DefaultConfigWithDB(vlog.Default(), rcap.DBTypePostgres, dbConnString, []rcap.Query{q1, q2, q3, q4})
r, err := rt.NewWithConfig(config)
if err != nil {
fmt.Println(err)
return
}
... ...
}
Then, we can run the WebAssembly function from Reactr.
func main() {
... ...
doWasm := r.Register("rs-db", rwasm.NewRunner("./rs_db.wasm"))
res, err := doWasm(nil).Then()
if err != nil {
fmt.Println(err)
return
}
fmt.Println(string(res.([]byte)))
}
Finally, let's run the Go host application and see the results printed to the console.
You must use the
-tags wasmedge
flag to take advantage of the performance and extended WebAssembly APIs provided by WasmEdge.
export REACTR_DB_CONN_STRING='postgresql://postgres:12345@127.0.0.1:5432/reactr'
go mod tidy
go run -tags wasmedge main.go
Embed JavaScript in Go
As we mentioned, a key feature of the WasmEdge Runtime is its advanced JavaScript support, which allows JavaScript programs to run in lightweight, high-performance, safe, multi-language, and Kubernetes-managed WasmEdge containers. A simple example of embedded JavaScript function in Reactr is available here.
JavaScript example
The JavaScript example function is very simple. It just returns a string value.
let h = 'hello';
let w = 'wasmedge';
`${h} ${w}`;
JavaScript example: Go host application
The Go host app uses the Reactr API to run WasmEdge's standard JavaScript interpreter rs_embed_js.wasm. You can build your own version of JavaScript interpreter by modifying this Rust project.
Learn more about how to embed JavaScript code in Rust, and how to use Rust to implement JavaScript APIs in WasmEdge.
The Go host application just need to start the job for rs_embed_js.wasm
and pass the JavaScript content to it. The Go application can then capture and print the return value from JavaScript.
func main() {
r := rt.New()
doWasm := r.Register("hello-quickjs", rwasm.NewRunner("./rs_embed_js.wasm"))
code, err := ioutil.ReadFile(os.Args[1])
if err != nil {
fmt.Print(err)
}
res, err := doWasm(code).Then()
if err != nil {
fmt.Println(err)
return
}
fmt.Println(string(res.([]byte)))
}
Run the Go host application as follows.
$ cd quickjs
$ go mod tidy
$ go run -tags wasmedge main.go hello.js
String(JsString(hello wasmedge))
The printed result shows the type information of the string in Rust and Go APIs. You can strip out this information by changing the Rust or Go applications.
JavaScript example: Feature examples
WasmEdge supports many advanced JavaScript features. For the next step, you could try our React SSR example to generate an HTML UI from a Reactr function!
You can just build the dist/main.js
from the React SSR example, and copy it over to this example folder to see it in action!
$ cd quickjs
# copy over the dist/main.js file from the react ssr example
$ go mod tidy
$ go run -tags wasmedge main.go main.js
<div data-reactroot=""><div>This is home</div><div><div>This is page</div></div></div>
UnDefined
Serverless platforms
Our vision for the future is to run WebAssembly as an alternative lightweight runtime side-by-side with Docker and microVMs in cloud native infrastructure. WebAssembly offers much higher performance and consumes much less resources than Docker-like containers or microVMs. However, the public cloud only supports running WebAssembly inside a microVM. Nonetheless, running WebAssembly functions inside a microVM still offers many advantages over running containerized NaCl programs.
Running WebAssembly functions inside Docker-like containers offer advantages over running NaCl programs directly in Docker.
For starters, WebAssembly provides fine-grained runtime isolation for individual functions. A microservice could have multiple functions and support services running inside a Docker-like container. WebAssembly can make the microservice more secure and more stable.
Second, the WebAssembly bytecode is portable. Developers only need to build it once and do not need to worry about changes or updates to the underlying Vercel serverless container (OS and hardware). It also allows developers to reuse the same WebAssembly functions in other cloud environments.
Third, WebAssembly apps are easy to deploy and manage. They have much less platform dependencies and complexities compared with NaCl dynamic libraries and executables.
Finally, the WasmEdge Tensorflow API provides the most ergonomic way to execute Tensorflow models in the Rust programming language. WasmEdge installs the correct combination of Tensorflow dependency libraries, and provides a unified API for developers.
In this section, we will show you how to run WebAssembly serverless functions in public clouds. Each platform has its own code template and contains two examples in Rust, one is the normal image processing, The other one is TensorFlow inference using the WasmEdge TensorFlow SDK.
- Vercel discuss how to leverage WasmEdge to accelerate the Jamstack application deployed on Vercel.
- Netlify discuss how to leverage WasmEdge to accelerate the Jamstack application deployed on Netlify.
- AWS Lambda discuss how to leverage WasmEdge to accelerate the serverless functions deployed on AWS Lambda.
- Tencent discuss how to leverage WasmEdge to accelerate the serverless functions deployed on Tencent cloud.
If you would like to add more WasmEdge examples on public cloud platform,like Google Cloud Functions, feel free to create a PR for WasmEdge and let the community know what you did.
Running WasmEdge from Docker containers deployed on public cloud is an easy way to add high-performance functions to web applications. Going forward an even better approach is to use WasmEdge as the container itself. There will be no Docker and no Node.js to bootstrap WasmEdge. This way, we can reach much higher efficiency for running serverless functions.
- Second State Functions will discuss how to use WasmEdge ad the container itself, since Second State Functions is a serverless platform with pure WebAssembly/WasmEdge.
Rust and WebAssembly Serverless functions in Vercel
In this article, we will show you two serverless functions in Rust and WasmEdge deployed on Vercel. One is the image processing function, the other one is the TensorFlow inference function.
For more insights on why WasmEdge on Vercel, please refer to the article Rust and WebAssembly Serverless Functions in Vercel.
Prerequisite
Since our demo WebAssembly functions are written in Rust, you will need a Rust compiler. Make sure that you install the wasm32-wasi
compiler target as follows, in order to generate WebAssembly bytecode.
rustup target add wasm32-wasi
The demo application front end is written in Next.js, and deployed on Vercel. We will assume that you already have the basic knowledge of how to work with Vercel.
Example 1: Image processing
Our first demo application allows users to upload an image and then invoke a serverless function to turn it into black and white. A live demo deployed on Vercel is available.
Fork the demo application’s GitHub repo to get started. To deploy the application on Vercel, just import the Github repo from Vercel for Github web page.
This repo is a standard Next.js application for the Vercel platform. The backend serverless function is in the api/functions/image_grayscale
folder. The src/main.rs
file contains the Rust program’s source code. The Rust program reads image data from the STDIN
, and then outputs the black-white image to the STDOUT
.
use hex; use std::io::{self, Read}; use image::{ImageOutputFormat, ImageFormat}; fn main() { let mut buf = Vec::new(); io::stdin().read_to_end(&mut buf).unwrap(); let image_format_detected: ImageFormat = image::guess_format(&buf).unwrap(); let img = image::load_from_memory(&buf).unwrap(); let filtered = img.grayscale(); let mut buf = vec![]; match image_format_detected { ImageFormat::Gif => { filtered.write_to(&mut buf, ImageOutputFormat::Gif).unwrap(); }, _ => { filtered.write_to(&mut buf, ImageOutputFormat::Png).unwrap(); }, }; io::stdout().write_all(&buf).unwrap(); io::stdout().flush().unwrap(); }
You can use Rust’s cargo
tool to build the Rust program into WebAssembly bytecode or native code.
cd api/functions/image-grayscale/
cargo build --release --target wasm32-wasi
Copy the build artifacts to the api
folder.
cp target/wasm32-wasi/release/grayscale.wasm ../../
Vercel runs
api/pre.sh
upon setting up the serverless environment. It installs the WasmEdge runtime, and then compiles each WebAssembly bytecode program into a nativeso
library for faster execution.
The api/hello.js
file conforms Vercel serverless specification. It loads the WasmEdge runtime, starts the compiled WebAssembly program in WasmEdge, and passes the uploaded image data via STDIN
. Notice api/hello.js
runs the compiled grayscale.so
file generated by api/pre.sh
for better performance.
const fs = require('fs');
const { spawn } = require('child_process');
const path = require('path');
module.exports = (req, res) => {
const wasmedge = spawn(
path.join(__dirname, 'wasmedge'),
[path.join(__dirname, 'grayscale.so')]);
let d = [];
wasmedge.stdout.on('data', (data) => {
d.push(data);
});
wasmedge.on('close', (code) => {
let buf = Buffer.concat(d);
res.setHeader('Content-Type', req.headers['image-type']);
res.send(buf);
});
wasmedge.stdin.write(req.body);
wasmedge.stdin.end('');
}
That's it. Deploy the repo to Vercel and you now have a Vercel Jamstack app with a high-performance Rust and WebAssembly based serverless backend.
Example 2: AI inference
The second demo application allows users to upload an image and then invoke a serverless function to classify the main subject on the image.
It is in the same GitHub repo as the previous example but in the tensorflow
branch. Note: when you import this GitHub repo on the Vercel website, it will create a preview URL for each branch. The tensorflow
branch would have its own deployment URL.
The backend serverless function for image classification is in the api/functions/image-classification
folder in the tensorflow
branch. The src/main.rs
file contains the Rust program’s source code. The Rust program reads image data from the STDIN
, and then outputs the text output to the STDOUT
. It utilizes the WasmEdge Tensorflow API to run the AI inference.
pub fn main() { // Step 1: Load the TFLite model let model_data: &[u8] = include_bytes!("models/mobilenet_v1_1.0_224/mobilenet_v1_1.0_224_quant.tflite"); let labels = include_str!("models/mobilenet_v1_1.0_224/labels_mobilenet_quant_v1_224.txt"); // Step 2: Read image from STDIN let mut buf = Vec::new(); io::stdin().read_to_end(&mut buf).unwrap(); // Step 3: Resize the input image for the tensorflow model let flat_img = wasmedge_tensorflow_interface::load_jpg_image_to_rgb8(&buf, 224, 224); // Step 4: AI inference let mut session = wasmedge_tensorflow_interface::Session::new(&model_data, wasmedge_tensorflow_interface::ModelType::TensorFlowLite); session.add_input("input", &flat_img, &[1, 224, 224, 3]) .run(); let res_vec: Vec<u8> = session.get_output("MobilenetV1/Predictions/Reshape_1"); // Step 5: Find the food label that responds to the highest probability in res_vec // ... ... let mut label_lines = labels.lines(); for _i in 0..max_index { label_lines.next(); } // Step 6: Generate the output text let class_name = label_lines.next().unwrap().to_string(); if max_value > 50 { println!("It {} a <a href='https://www.google.com/search?q={}'>{}</a> in the picture", confidence.to_string(), class_name, class_name); } else { println!("It does not appears to be any food item in the picture."); } }
You can use the cargo
tool to build the Rust program into WebAssembly bytecode or native code.
cd api/functions/image-classification/
cargo build --release --target wasm32-wasi
Copy the build artifacts to the api
folder.
cp target/wasm32-wasi/release/classify.wasm ../../
Again, the api/pre.sh
script installs WasmEdge runtime and its Tensorflow dependencies in this application. It also compiles the classify.wasm
bytecode program to the classify.so
native shared library at the time of deployment.
The api/hello.js
file conforms Vercel serverless specification. It loads the WasmEdge runtime, starts the compiled WebAssembly program in WasmEdge, and passes the uploaded image data via STDIN
. Notice api/hello.js
runs the compiled classify.so
file generated by api/pre.sh
for better performance.
const fs = require('fs');
const { spawn } = require('child_process');
const path = require('path');
module.exports = (req, res) => {
const wasmedge = spawn(
path.join(__dirname, 'wasmedge-tensorflow-lite'),
[path.join(__dirname, 'classify.so')],
{env: {'LD_LIBRARY_PATH': __dirname}}
);
let d = [];
wasmedge.stdout.on('data', (data) => {
d.push(data);
});
wasmedge.on('close', (code) => {
res.setHeader('Content-Type', `text/plain`);
res.send(d.join(''));
});
wasmedge.stdin.write(req.body);
wasmedge.stdin.end('');
}
You can now deploy your forked repo to Vercel and have a web app for subject classification.
Next, it's your turn to use the vercel-wasm-runtime repo as a template to develop your own Rust serverless functions in Vercel. Looking forward to your great work.
WebAssembly Serverless Functions in Netlify
In this article we will show you two serverless functions in Rust and WasmEdge deployed on Netlify. One is the image processing function, the other one is the TensorFlow inference function.
For more insights on why WasmEdge on Netlify, please refer to the article WebAssembly Serverless Functions in Netlify.
Prerequisite
Since our demo WebAssembly functions are written in Rust, you will need a Rust compiler. Make sure that you install the wasm32-wasi
compiler target as follows, in order to generate WebAssembly bytecode.
rustup target add wasm32-wasi
The demo application front end is written in Next.js, and deployed on Netlify. We will assume that you already have the basic knowledge of how to work with Next.js and Netlify.
Example 1: Image processing
Our first demo application allows users to upload an image and then invoke a serverless function to turn it into black and white. A live demo deployed on Netlify is available.
Fork the demo application’s GitHub repo to get started. To deploy the application on Netlify, just add your github repo to Netlify.
This repo is a standard Next.js application for the Netlify platform. The backend serverless function is in the api/functions/image_grayscale
folder. The src/main.rs
file contains the Rust program’s source code. The Rust program reads image data from the STDIN
, and then outputs the black-white image to the STDOUT
.
use hex; use std::io::{self, Read}; use image::{ImageOutputFormat, ImageFormat}; fn main() { let mut buf = Vec::new(); io::stdin().read_to_end(&mut buf).unwrap(); let image_format_detected: ImageFormat = image::guess_format(&buf).unwrap(); let img = image::load_from_memory(&buf).unwrap(); let filtered = img.grayscale(); let mut buf = vec![]; match image_format_detected { ImageFormat::Gif => { filtered.write_to(&mut buf, ImageOutputFormat::Gif).unwrap(); }, _ => { filtered.write_to(&mut buf, ImageOutputFormat::Png).unwrap(); }, }; io::stdout().write_all(&buf).unwrap(); io::stdout().flush().unwrap(); }
You can use Rust’s cargo
tool to build the Rust program into WebAssembly bytecode or native code.
cd api/functions/image-grayscale/
cargo build --release --target wasm32-wasi
Copy the build artifacts to the api
folder.
cp target/wasm32-wasi/release/grayscale.wasm ../../
The Netlify function runs
api/pre.sh
upon setting up the serverless environment. It installs the WasmEdge runtime, and then compiles each WebAssembly bytecode program into a nativeso
library for faster execution.
The api/hello.js
script loads the WasmEdge runtime, starts the compiled WebAssembly program in WasmEdge, and passes the uploaded image data via STDIN
. Notice api/hello.js
runs the compiled grayscale.so
file generated by api/pre.sh
for better performance.
const fs = require('fs');
const { spawn } = require('child_process');
const path = require('path');
module.exports = (req, res) => {
const wasmedge = spawn(
path.join(__dirname, 'wasmedge'),
[path.join(__dirname, 'grayscale.so')]);
let d = [];
wasmedge.stdout.on('data', (data) => {
d.push(data);
});
wasmedge.on('close', (code) => {
let buf = Buffer.concat(d);
res.setHeader('Content-Type', req.headers['image-type']);
res.send(buf);
});
wasmedge.stdin.write(req.body);
wasmedge.stdin.end('');
}
That's it. Deploy the repo to Netlify and you now have a Netlify Jamstack app with a high-performance Rust and WebAssembly based serverless backend.
Example 2: AI inference
The second demo application allows users to upload an image and then invoke a serverless function to classify the main subject on the image.
It is in the same GitHub repo as the previous example but in the tensorflow
branch. The backend serverless function for image classification is in the api/functions/image-classification
folder in the tensorflow
branch. The src/main.rs
file contains the Rust program’s source code. The Rust program reads image data from the STDIN
, and then outputs the text output to the STDOUT
. It utilizes the WasmEdge Tensorflow API to run the AI inference.
pub fn main() { // Step 1: Load the TFLite model let model_data: &[u8] = include_bytes!("models/mobilenet_v1_1.0_224/mobilenet_v1_1.0_224_quant.tflite"); let labels = include_str!("models/mobilenet_v1_1.0_224/labels_mobilenet_quant_v1_224.txt"); // Step 2: Read image from STDIN let mut buf = Vec::new(); io::stdin().read_to_end(&mut buf).unwrap(); // Step 3: Resize the input image for the tensorflow model let flat_img = wasmedge_tensorflow_interface::load_jpg_image_to_rgb8(&buf, 224, 224); // Step 4: AI inference let mut session = wasmedge_tensorflow_interface::Session::new(&model_data, wasmedge_tensorflow_interface::ModelType::TensorFlowLite); session.add_input("input", &flat_img, &[1, 224, 224, 3]) .run(); let res_vec: Vec<u8> = session.get_output("MobilenetV1/Predictions/Reshape_1"); // Step 5: Find the food label that responds to the highest probability in res_vec // ... ... let mut label_lines = labels.lines(); for _i in 0..max_index { label_lines.next(); } // Step 6: Generate the output text let class_name = label_lines.next().unwrap().to_string(); if max_value > 50 { println!("It {} a <a href='https://www.google.com/search?q={}'>{}</a> in the picture", confidence.to_string(), class_name, class_name); } else { println!("It does not appears to be any food item in the picture."); } }
You can use the cargo
tool to build the Rust program into WebAssembly bytecode or native code.
cd api/functions/image-classification/
cargo build --release --target wasm32-wasi
Copy the build artifacts to the api
folder.
cp target/wasm32-wasi/release/classify.wasm ../../
Again, the api/pre.sh
script installs WasmEdge runtime and its Tensorflow dependencies in this application. It also compiles the classify.wasm
bytecode program to the classify.so
native shared library at the time of deployment.
The api/hello.js
script loads the WasmEdge runtime, starts the compiled WebAssembly program in WasmEdge, and passes the uploaded image data via STDIN
. Notice api/hello.js
runs the compiled classify.so
file generated by api/pre.sh
for better performance.
const fs = require('fs');
const { spawn } = require('child_process');
const path = require('path');
module.exports = (req, res) => {
const wasmedge = spawn(
path.join(__dirname, 'wasmedge-tensorflow-lite'),
[path.join(__dirname, 'classify.so')],
{env: {'LD_LIBRARY_PATH': __dirname}}
);
let d = [];
wasmedge.stdout.on('data', (data) => {
d.push(data);
});
wasmedge.on('close', (code) => {
res.setHeader('Content-Type', `text/plain`);
res.send(d.join(''));
});
wasmedge.stdin.write(req.body);
wasmedge.stdin.end('');
}
You can now deploy your forked repo to Netlify and have a web app for subject classification.
Next, it's your turn to develop Rust serverless functions in Netlify using the netlify-wasm-runtime repo as a template. Looking forward to your great work.
WebAssembly Serverless Functions in AWS Lambda
In this article, we will show you two serverless functions in Rust and WasmEdge deployed on AWS Lambda. One is the image processing function, the other one is the TensorFlow inference function.
For the insight on why WasmEdge on AWS Lambda, please refer to the article WebAssembly Serverless Functions in AWS Lambda
Prerequisites
Since our demo WebAssembly functions are written in Rust, you will need a Rust compiler. Make sure that you install the wasm32-wasi
compiler target as follows, in order to generate WebAssembly bytecode.
rustup target add wasm32-wasi
The demo application front end is written in Next.js, and deployed on AWS Lambda. We will assume that you already have the basic knowledge of how to work with Next.js and Lambda.
Example 1: Image processing
Our first demo application allows users to upload an image and then invoke a serverless function to turn it into black and white. A live demo deployed through GitHub Pages is available.
Fork the demo application’s GitHub repo to get started. To deploy the application on AWS Lambda, follow the guide in the repository README.
Create the function
This repo is a standard Next.js application. The backend serverless function is in the api/functions/image_grayscale
folder. The src/main.rs
file contains the Rust program’s source code. The Rust program reads image data from the STDIN
, and then outputs the black-white image to the STDOUT
.
use hex; use std::io::{self, Read}; use image::{ImageOutputFormat, ImageFormat}; fn main() { let mut buf = Vec::new(); io::stdin().read_to_end(&mut buf).unwrap(); let image_format_detected: ImageFormat = image::guess_format(&buf).unwrap(); let img = image::load_from_memory(&buf).unwrap(); let filtered = img.grayscale(); let mut buf = vec![]; match image_format_detected { ImageFormat::Gif => { filtered.write_to(&mut buf, ImageOutputFormat::Gif).unwrap(); }, _ => { filtered.write_to(&mut buf, ImageOutputFormat::Png).unwrap(); }, }; io::stdout().write_all(&buf).unwrap(); io::stdout().flush().unwrap(); }
You can use Rust’s cargo
tool to build the Rust program into WebAssembly bytecode or native code.
cd api/functions/image-grayscale/
cargo build --release --target wasm32-wasi
Copy the build artifacts to the api
folder.
cp target/wasm32-wasi/release/grayscale.wasm ../../
When we build the docker image,
api/pre.sh
is executed.pre.sh
installs the WasmEdge runtime, and then compiles each WebAssembly bytecode program into a nativeso
library for faster execution.
Create the service script to load the function
The api/hello.js
script loads the WasmEdge runtime, starts the compiled WebAssembly program in WasmEdge, and passes the uploaded image data via STDIN
. Notice that api/hello.js
runs the compiled grayscale.so
file generated by api/pre.sh
for better performance.
const { spawn } = require('child_process');
const path = require('path');
function _runWasm(reqBody) {
return new Promise(resolve => {
const wasmedge = spawn(path.join(__dirname, 'wasmedge'), [path.join(__dirname, 'grayscale.so')]);
let d = [];
wasmedge.stdout.on('data', (data) => {
d.push(data);
});
wasmedge.on('close', (code) => {
let buf = Buffer.concat(d);
resolve(buf);
});
wasmedge.stdin.write(reqBody);
wasmedge.stdin.end('');
});
}
The exports.handler
part of hello.js
exports an async function handler, used to handle different events every time the serverless function is called. In this example, we simply process the image by calling the function above and return the result, but more complicated event-handling behavior may be defined based on your need. We also need to return some Access-Control-Allow
headers to avoid Cross-Origin Resource Sharing (CORS) errors when calling the serverless function from a browser. You can read more about CORS errors here if you encounter them when replicating our example.
exports.handler = async function(event, context) {
var typedArray = new Uint8Array(event.body.match(/[\da-f]{2}/gi).map(function (h) {
return parseInt(h, 16);
}));
let buf = await _runWasm(typedArray);
return {
statusCode: 200,
headers: {
"Access-Control-Allow-Headers" : "Content-Type,X-Amz-Date,Authorization,X-Api-Key,X-Amz-Security-Token",
"Access-Control-Allow-Origin": "*",
"Access-Control-Allow-Methods": "DELETE, GET, HEAD, OPTIONS, PATCH, POST, PUT"
},
body: buf.toString('hex')
};
}
Build the Docker image for Lambda deployment
Now we have the WebAssembly bytecode function and the script to load and connect to the web request. In order to deploy them as a function service on AWS Lambda, you still need to package the whole thing into a Docker image.
We are not going to cover in detail about how to build the Docker image and deploy on AWS Lambda, as there are detailed steps in the Deploy section of the repository README. However, we will highlight some lines in the Dockerfile
for you to avoid some pitfalls.
FROM public.ecr.aws/lambda/nodejs:14
# Change directory to /var/task
WORKDIR /var/task
RUN yum update -y && yum install -y curl tar gzip
# Bundle and pre-compile the wasm files
COPY *.wasm ./
COPY pre.sh ./
RUN chmod +x pre.sh
RUN ./pre.sh
# Bundle the JS files
COPY *.js ./
CMD [ "hello.handler" ]
First, we are building the image from AWS Lambda's Node.js base image. The advantage of using AWS Lambda's base image is that it includes the Lambda Runtime Interface Client (RIC), which we need to implement in our Docker image as it is required by AWS Lambda. The Amazon Linux uses yum
as the package manager.
These base images contain the Amazon Linux Base operating system, the runtime for a given language, dependencies and the Lambda Runtime Interface Client (RIC), which implements the Lambda Runtime API. The Lambda Runtime Interface Client allows your runtime to receive requests from and send requests to the Lambda service.
Second, we need to put our function and all its dependencies in the /var/task
directory. Files in other folders will not be executed by AWS Lambda.
Third, we need to define the default command when we start our container. CMD [ "hello.handler" ]
means that we will call the handler
function in hello.js
whenever our serverless function is called. Recall that we have defined and exported the handler function in the previous steps through exports.handler = ...
in hello.js
.
Optional: test the Docker image locally
Docker images built from AWS Lambda's base images can be tested locally following this guide. Local testing requires AWS Lambda Runtime Interface Emulator (RIE), which is already installed in all of AWS Lambda's base images. To test your image, first, start the Docker container by running:
docker run -p 9000:8080 myfunction:latest
This command sets a function endpoint on your local machine at http://localhost:9000/2015-03-31/functions/function/invocations
.
Then, from a separate terminal window, run:
curl -XPOST "http://localhost:9000/2015-03-31/functions/function/invocations" -d '{}'
And you should get your expected output in the terminal.
If you don't want to use a base image from AWS Lambda, you can also use your own base image and install RIC and/or RIE while building your Docker image. Just follow Create an image from an alternative base image section from this guide.
That's it! After building your Docker image, you can deploy it to AWS Lambda following steps outlined in the repository README. Now your serverless function is ready to rock!
Example 2: AI inference
The second demo application allows users to upload an image and then invoke a serverless function to classify the main subject on the image.
It is in the same GitHub repo as the previous example but in the tensorflow
branch. The backend serverless function for image classification is in the api/functions/image-classification
folder in the tensorflow
branch. The src/main.rs
file contains the Rust program’s source code. The Rust program reads image data from the STDIN
, and then outputs the text output to the STDOUT
. It utilizes the WasmEdge Tensorflow API to run the AI inference.
pub fn main() { // Step 1: Load the TFLite model let model_data: &[u8] = include_bytes!("models/mobilenet_v1_1.0_224/mobilenet_v1_1.0_224_quant.tflite"); let labels = include_str!("models/mobilenet_v1_1.0_224/labels_mobilenet_quant_v1_224.txt"); // Step 2: Read image from STDIN let mut buf = Vec::new(); io::stdin().read_to_end(&mut buf).unwrap(); // Step 3: Resize the input image for the tensorflow model let flat_img = wasmedge_tensorflow_interface::load_jpg_image_to_rgb8(&buf, 224, 224); // Step 4: AI inference let mut session = wasmedge_tensorflow_interface::Session::new(&model_data, wasmedge_tensorflow_interface::ModelType::TensorFlowLite); session.add_input("input", &flat_img, &[1, 224, 224, 3]) .run(); let res_vec: Vec<u8> = session.get_output("MobilenetV1/Predictions/Reshape_1"); // Step 5: Find the food label that responds to the highest probability in res_vec // ... ... let mut label_lines = labels.lines(); for _i in 0..max_index { label_lines.next(); } // Step 6: Generate the output text let class_name = label_lines.next().unwrap().to_string(); if max_value > 50 { println!("It {} a <a href='https://www.google.com/search?q={}'>{}</a> in the picture", confidence.to_string(), class_name, class_name); } else { println!("It does not appears to be any food item in the picture."); } }
You can use the cargo
tool to build the Rust program into WebAssembly bytecode or native code.
cd api/functions/image-classification/
cargo build --release --target wasm32-wasi
Copy the build artifacts to the api
folder.
cp target/wasm32-wasi/release/classify.wasm ../../
Again, the api/pre.sh
script installs WasmEdge runtime and its Tensorflow dependencies in this application. It also compiles the classify.wasm
bytecode program to the classify.so
native shared library at the time of deployment.
The api/hello.js
script loads the WasmEdge runtime, starts the compiled WebAssembly program in WasmEdge, and passes the uploaded image data via STDIN
. Notice api/hello.js
runs the compiled classify.so
file generated by api/pre.sh
for better performance. The handler function is similar to our previous example, and is omitted here.
const { spawn } = require('child_process');
const path = require('path');
function _runWasm(reqBody) {
return new Promise(resolve => {
const wasmedge = spawn(
path.join(__dirname, 'wasmedge-tensorflow-lite'),
[path.join(__dirname, 'classify.so')],
{env: {'LD_LIBRARY_PATH': __dirname}}
);
let d = [];
wasmedge.stdout.on('data', (data) => {
d.push(data);
});
wasmedge.on('close', (code) => {
resolve(d.join(''));
});
wasmedge.stdin.write(reqBody);
wasmedge.stdin.end('');
});
}
exports.handler = ... // _runWasm(reqBody) is called in the handler
You can build your Docker image and deploy the function in the same way as outlined in the previous example. Now you have created a web app for subject classification!
Next, it's your turn to use the aws-lambda-wasm-runtime repo as a template to develop Rust serverless function on AWS Lambda. Looking forward to your great work.
WebAssembly serverless functions on Tencent Cloud
As the main users of Tencent Cloud are from China, so the tutorial is written in Chinese.
We also provide a code template for deploying serverless WebAssembly functions on Tencent Cloud, please check out the tencent-scf-wasm-runtime repo.
Fork the repo and start writing your own rust functions.
Second State Functions
Second State Functions, powered by WasmEdge, supports the Rust language as a first class citizen.
It could
- Handle text-based input and output
- Use Binary data as function input and output
- Mix bytes and strings in function argument and return value
- Use webhooks as function input and output
- Access internet resources via a
http_proxy
API - Running TensorFlow models at native speed via the WasmEdge TensorFlow API
Check out the Second State Functions website for more tutorials.
Operating systems
WasmEdge supports a wide range of operating systems and hardware platforms. It allows WebAssembly bytecode applications to be truly portable across platforms. It runs not only on Linux-like systems, but also on microkernels such as the seL4 system.
WasmEdge now supports:
- Linux
- Windows
- macOS
- seL4
- OpenHarmony(ongoing)
Linux
WasmEdge supports a wide range of Linux distributions dated back to 2007. The official release contains statically linked binaries and libraries for older Linux systems. The table below shows build targets in WasmEdge's official release packages.
tag name | arch | based operating system | LLVM version | ENVs | compatibility | comments |
---|---|---|---|---|---|---|
latest | x86_64 | Ubuntu 20.04 LTS | 12.0.0 | CC=clang, CXX=clang++ | Ubuntu 20.04+ | This is for CI, will always use the latest Ubuntu release |
ubuntu-build-gcc | x86_64 | Ubuntu 20.04 LTS | 12.0.0 | CC=gcc, CXX=g++ | Ubuntu 20.04+ | This is for CI, will always use the latest Ubuntu release |
ubuntu-build-clang | x86_64 | Ubuntu 20.04 LTS | 12.0.0 | CC=clang, CXX=clang++ | Ubuntu 20.04+ | This is for CI, will always use the latest Ubuntu release |
ubuntu2004_x86_64 | x86_64 | Ubuntu 20.04 LTS | 10.0.0 | CC=gcc, CXX=g++ | Ubuntu 20.04+ | This is for developers who familiar with Ubuntu 20.04 LTS release |
ubuntu2104_armv7l | armhf | Ubuntu 21.04 | 12.0.0 | CC=gcc, CXX=g++ | Ubuntu 21.04+ | This is for armhf release |
manylinux2014_x86_64 | x86_64 | CentOS 7, 7.9.2009 | 12.0.0 | CC=gcc, CXX=g++ | Ubuntu 16.04+, CentOS 7+ | This is for developers who familiar with CentOS on x86_64 architecture |
manylinux2014_aarch64 | aarch64 | CentOS 7, 7.9.2009 | 12.0.0 | CC=gcc, CXX=g++ | Ubuntu 16.04+, CentOS 7+ | This is for developers who familiar with CentOS on aarch64 architecture |
manylinux2010_x86_64 | x86_64 | CentOS 6, 6.10 | 12.0.0 | CC=gcc, CXX=g++ | Ubuntu 14.04+, CentOS 6+ | This is for developers who familiar with legacy system on x86_64 architecture, EOL |
manylinux1_x86_64 | x86_64 | CentOS 5, 5.11 | 12.0.0 | CC=gcc, CXX=g++ | Ubuntu 14.04+, CentOS 5+ | This is for developers who familiar with legacy system on x86_64 architecture, EOL |
Windows
WasmEdge provides a standard Windows PowerShell binary build as part of its official release package. You can install it via our standard install script.
Mac
WasmEdge provides both x86 and m1 binary builds for Mac OS X.
Android
The WasmEdge Runtime releases come with pre-built binaries for the Android OS. Why WasmEdge on Android?
- Native speed & sandbox safety for Android apps
- Support multiple dev languages — eg C, Rust, Swift, Go & JS
- Embed 3rd party functions in your android app
- Kubernetes managed android apps
However, the WasmEdge installer does not support Android. The user must download the release files to a computer, and then use the adb
tool to transfer the files to an Android device or simulator. We will show you how to do that.
If you prefer to build WasmEdge Runtime binary on Android for yourself, you can refer to the build WasmEdge for Android document.
- WasmEdge CLI tools for Android
- Call WasmEdge functions from an NDK native app
- Call WasmEdge functions from an Android APK app
WasmEdge CLI tools for Android
In this section, we will show you how to use WasmEdge CLI tools on Android devices. We will showcase a full WasmEdge demo to perform image classification (Tensorflow-based AI inference) on an Android device.
Install Android version of WasmEdge-TensorFlow-Tools
First, install WasmEdge-TensorFlow-Tools pre-release on your Android device. It works with the Android version of TensorFlow-Lite dynamic shared library.
Preparation
Android developer options
Currently, WasmEdge only supports the arm64-v8a architecture on Android devices. You need an arm64-v8a Android simulator or a physical device with developer options turned on. WasmEdge requires Android 6.0 and above.
Android development CLI
In Ubuntu Linux, you can use the apt-get
command to install Android debugging and testing tool adb
. Using the adb shell
command on the Ubuntu dev machine, you can open a CLI shell to execute commands on the connected Android device.
$ sudo apt-get install adb
$ adb devices
* daemon not running; starting now at tcp:5037
* daemon started successfully
List of devices attached
c657c643 device
$ adb shell
sirius:/ $
Install WasmEdge-TensorFlow-Tools packages
Use the following commands on your Ubuntu dev machine to download the WasmEdge-TensorFlow-Tools pre-release packages.
$ wget https://github.com/second-state/WasmEdge-tensorflow-tools/releases/download/0.10.0/WasmEdge-tensorflow-tools-0.10.0-android_aarch64.tar.gz
$ mkdir WasmEdge-tensorflow-tools && tar zxvf WasmEdge-tensorflow-tools-0.10.0-android_aarch64.tar.gz -C WasmEdge-tensorflow-tools
show-tflite-tensor
wasmedge-tensorflow-lite
Install Android version of the TensorFlow-Lite shared library
We provide an Android compatible version of TensorFlow-Lite dynamic shared library in the WasmEdge-Tensorflow-deps package. Download the package to your Ubuntu dev machine as follows.
$ wget https://github.com/second-state/WasmEdge-tensorflow-deps/releases/download/0.10.0/WasmEdge-tensorflow-deps-TFLite-0.10.0-android_aarch64.tar.gz
$ tar zxvf WasmEdge-tensorflow-deps-TFLite-0.10.0-android_aarch64.tar.gz -C WasmEdge-tensorflow-tools
libtensorflowlite_c.so
Next use the adb
tool to push the downloaded WasmEdge-TensorFlow packages onto a connected Android device.
adb push WasmEdge-tensorflow-tools /data/local/tmp
Try it out
Sample application
In this example, we will demonstrate a standard WasmEdge Tensorflow-Lite sample application. It can recognize and classify the bird type from a JPG or PNG picture of a bird. The explanation of the source code can be found here.
git clone https://github.com/second-state/wasm-learning.git
cd wasm-learning/rust/birds_v1
Use the cargo
command to build a Wasm bytecode file from the Rust source code. The Wasm file is located at target/wasm32-wasi/release/birds_v1.wasm
.
rustup target add wasm32-wasi
cargo build --release --target=wasm32-wasi
Push the Wasm bytecode file, tensorflow lite model file, and the test bird picture file onto the Android device using adb
.
adb push target/wasm32-wasi/release/birds_v1.wasm /data/local/tmp/WasmEdge-tensorflow-tools
adb push lite-model_aiy_vision_classifier_birds_V1_3.tflite /data/local/tmp/WasmEdge-tensorflow-tools
adb push bird.jpg /data/local/tmp/WasmEdge-tensorflow-tools
Run the WasmEdge-TensorFlow-Tools
Type adb shell
from the Ubuntu CLI to open a command shell for the connected Android device. Confirm that the tools, programs, and test image are all available on the Android device under the /data/local/tmp/WasmEdge-tensorflow-tools
folder.
$ adb shell
sirius:/ $ cd /data/local/tmp/WasmEdge-tensorflow-tools
sirius:/data/local/tmp/WasmEdge-tensorflow-tools $ ls
bird.jpg lite-model_aiy_vision_classifier_birds_V1_3.tflite
birds_v1.wasm show-tflite-tensor
libtensorflowlite_c.so wasmedge-tensorflow-lite
Load the TensorFlow-Lite dynamic shared library, and use the show-tflite-tensor
CLI tool to examine the Tensorflow Lite model file.
sirius:/data/local/tmp/WasmEdge-tensorflow-tools $ export LD_LIBRARY_PATH=.:$LD_LIBRARY_PATH
sirius:/data/local/tmp/WasmEdge-tensorflow-tools $ chmod 777 show-tflite-tensor
sirius:/data/local/tmp/WasmEdge-tensorflow-tools $ ./show-tflite-tensor lite-model_aiy_vision_classifier_birds_V1_3.tflite
INFO: Initialized TensorFlow Lite runtime.
Input tensor nums: 1
Input tensor name: module/hub_input/images_uint8
dimensions: [1 , 224 , 224 , 3]
data type: UInt8
tensor byte size: 150528
Output tensor nums: 1
Output tensor name: module/prediction
dimensions: [1 , 965]
data type: UInt8
tensor byte size: 965
Use the extended WasmEdge Runtime in wasmedge-tensorflow-lite
to execute the compiled Wasm program on the Android device. It loads the Tensorflow Lite model and bird image, and outputs the bird classification and its confidence.
sirius:/data/local/tmp/WasmEdge-tensorflow-tools $ chmod 777 wasmedge-tensorflow-lite
sirius:/data/local/tmp/WasmEdge-tensorflow-tools $ ./wasmedge-tensorflow-lite --dir .:. birds_v1.wasm lite-model_aiy_vision_classifier_birds_V1_3.tflite bird.jpg
INFO: Initialized TensorFlow Lite runtime.
166 : 0.84705883
The result shows that the bird type is in line 166 of the label file (Sicalis flaveola) and the confidence level is 84.7%.
Call WasmEdge functions from an NDK native app
In this section, we will demonstrate how to build an Android native application using C and the Android SDK. The native application uses the WasmEdge C SDK to embed the WasmEdge Runtime, and call WASM functions through WasmEdge.
Prerequisite
Android
Currently, WasmEdge only supports the arm64-v8a architecture on Android devices. You need an arm64-v8a Android simulator or a physical device with developer options turned on. WasmEdge requires Android 6.0 and above.
Android development CLI
In Ubuntu Linux, you can use the apt-get
command to install Android debugging and testing tool adb
. Using the adb shell
command on the Ubuntu dev machine, you can open a CLI shell to execute commands on the connected Android device.
sudo apt-get install adb
Android NDK
To compile programs with the wasmedge-tensorflow c api, you need to install the Android NDK. In this example, we use the latest LTS version (r23b).
Review of source code
The test.c
uses the wasmedge-tensorflow c api to run a WebAssembly function. The WebAssembly file birds_v1.wasm
is compiled from Rust source code and explained here.
#include <wasmedge/wasmedge.h>
#include <wasmedge/wasmedge-image.h>
#include <wasmedge/wasmedge-tensorflowlite.h>
#include <stdio.h>
int main(int argc, char *argv[]) {
/*
* argv[0]: ./a.out
* argv[1]: WASM file
* argv[2]: tflite model file
* argv[3]: image file
* Usage: ./a.out birds_v1.wasm lite-model_aiy_vision_classifier_birds_V1_3.tflite bird.jpg
*/
/* Create the VM context. */
WasmEdge_ConfigureContext *ConfCxt = WasmEdge_ConfigureCreate();
WasmEdge_ConfigureAddHostRegistration(ConfCxt, WasmEdge_HostRegistration_Wasi);
WasmEdge_VMContext *VMCxt = WasmEdge_VMCreate(ConfCxt, NULL);
WasmEdge_ConfigureDelete(ConfCxt);
/* Create the image and TFLite import objects. */
WasmEdge_ImportObjectContext *ImageImpObj = WasmEdge_Image_ImportObjectCreate();
WasmEdge_ImportObjectContext *TFLiteImpObj = WasmEdge_TensorflowLite_ImportObjectCreate();
WasmEdge_ImportObjectContext *TFDummyImpObj = WasmEdge_Tensorflow_ImportObjectCreateDummy();
/* Register into VM. */
WasmEdge_VMRegisterModuleFromImport(VMCxt, ImageImpObj);
WasmEdge_VMRegisterModuleFromImport(VMCxt, TFLiteImpObj);
WasmEdge_VMRegisterModuleFromImport(VMCxt, TFDummyImpObj);
/* Init WASI. */
const char *Preopens[] = {".:."};
const char *Args[] = {argv[1], argv[2], argv[3]};
WasmEdge_ImportObjectContext *WASIImpObj = WasmEdge_VMGetImportModuleContext(VMCxt, WasmEdge_HostRegistration_Wasi);
WasmEdge_ImportObjectInitWASI(WASIImpObj, Args, 3, NULL, 0, Preopens, 1);
/* Run WASM file. */
WasmEdge_String FuncName = WasmEdge_StringCreateByCString("_start");
WasmEdge_Result Res = WasmEdge_VMRunWasmFromFile(VMCxt, argv[1], FuncName, NULL, 0, NULL, 0);
WasmEdge_StringDelete(FuncName);
/* Check the result. */
if (!WasmEdge_ResultOK(Res)) {
printf("Run WASM failed: %s\n", WasmEdge_ResultGetMessage(Res));
return -1;
}
WasmEdge_ImportObjectDelete(ImageImpObj);
WasmEdge_ImportObjectDelete(TFLiteImpObj);
WasmEdge_ImportObjectDelete(TFDummyImpObj);
WasmEdge_VMDelete(VMCxt);
return 0;
}
Build
Install dependencies
Use the following commands to download WasmEdge for Android on your Ubuntu dev machine.
wget https://github.com/WasmEdge/WasmEdge/releases/download/0.10.0/WasmEdge-0.10.0-android_aarch64.tar.gz
wget https://github.com/second-state/WasmEdge-image/releases/download/0.10.0/WasmEdge-image-0.10.0-android_aarch64.tar.gz
wget https://github.com/second-state/WasmEdge-tensorflow/releases/download/0.10.0/WasmEdge-tensorflowlite-0.10.0-android_aarch64.tar.gz
wget https://github.com/second-state/WasmEdge-tensorflow-deps/releases/download/0.10.0/WasmEdge-tensorflow-deps-TFLite-0.10.0-android_aarch64.tar.gz
tar -zxf WasmEdge-0.10.0-android_aarch64.tar.gz
tar -zxf WasmEdge-image-0.10.0-android_aarch64.tar.gz -C WasmEdge-0.10.0-Android/
tar -zxf WasmEdge-tensorflowlite-0.10.0-android_aarch64.tar.gz -C WasmEdge-0.10.0-Android/
tar -zxf WasmEdge-tensorflow-deps-TFLite-0.10.0-android_aarch64.tar.gz -C WasmEdge-0.10.0-Android/lib/
Compile
The following command compiles the C program to a.out
on your Ubunu dev machine.
(/path/to/ndk)/toolchains/llvm/prebuilt/(HostPlatform)/bin/aarch64-linux-(AndroidApiVersion)-clang test.c -I./WasmEdge-0.10.0-Android/include -L./WasmEdge-0.10.0-Android/lib -lwasmedge-image_c -lwasmedge-tensorflowlite_c -ltensorflowlite_c -lwasmedge_c
Run
Push files onto Android
Install the compiled program, Tensorflow Lite model file, test image file, as well as WasmEdge shared library files for Android, onto the Android device using adb
from your Ubuntu dev machine.
adb push a.out /data/local/tmp
adb push birds_v1.wasm /data/local/tmp
adb push lite-model_aiy_vision_classifier_birds_V1_3.tflite /data/local/tmp
adb push bird.jpg /data/local/tmp
adb push ./WasmEdge-0.10.0-Android/lib /data/local/tmp
Run the example
Now you can run the compiled C program on the Android device via a remote shell command. Run adb shell
from your Ubuntu dev machine.
$ adb shell
sirius:/ $ cd /data/local/tmp
sirius:/data/local/tmp $ export LD_LIBRARY_PATH=/data/local/tmp/lib:$LD_LIBRARY_PATH
sirius:/data/local/tmp $ ./a.out birds_v1.wasm lite-model_aiy_vision_classifier_birds_V1_3.tflite bird.jpg
INFO: Initialized TensorFlow Lite runtime.
166 : 0.84705883
Call WasmEdge functions from an Android APK app
In this section, we will show you how to build a "regular" Android app (i.e., an APK file that can be installed on an Android device). The APK app embeds a WasmEdge Runtime. It can call WebAssembly functions through the embedded WasmEdge. The benefit is that developers can safely embed high-performance functions written in several different languages (e.g., Rust, JS, Grain, TinyGo etc) into a Kotlin application.
Quickstart
The demo project is available here. You can build the project using the Gradle tool or using the Android Stuido IDE.
Building Project with Gradle
- Setup environment variable
ANDROID_HOME=path/to/your/android/sdk
- Run Command
./gradlew assembleRelease
- Sign your APK file with
apksigner
. The apk file is at./app/build/outputs/apk/release
. Theapksigner
utility is at$ANDROID_HOME/build-tools/$VERSION/apksigner
.
Building Project with Android Studio
Open this folder with Android Studio 2020.3.1 or later.
For Release APK, click Menu -> Build -> Generate Signed Bundle/APK
, select APK, setup keystore configuration and wait for build finished.
Review of the source code
The Android UI app is written in Kotlin, and it uses JNI (Java Native Interface) to load a C shared library, which in turn embeds WasmEdge.
Android UI
The Android UI application is located here. It is written in Kotlin using the Android SDK.
class MainActivity : AppCompatActivity() {
lateinit var lib: NativeLib
override fun onCreate(savedInstanceState: Bundle?) {
super.onCreate(savedInstanceState)
setContentView(R.layout.activity_main)
val tv = findViewById<TextView>(R.id.tv_text)
lib = NativeLib(this)
Thread {
val lines = Vector<String>()
val idxArr = arrayOf(20, 25, 28, 30, 32)
for (idx: Int in idxArr) {
lines.add("running fib(${idx}) ...")
runOnUiThread {
tv.text = lines.joinToString("\n")
}
val begin = System.currentTimeMillis()
val retVal = lib.wasmFibonacci(idx)
val end = System.currentTimeMillis()
lines.removeLast()
lines.add("fib(${idx}) -> ${retVal}, ${end - begin}ms")
runOnUiThread {
tv.text = lines.joinToString("\n")
}
}
}.start()
}
}
The native library
The Android UI app calls a NativeLib
Kotlin object to access WasmEdge functions. The NativeLib
source code is available here. It uses JNI (Java Native Interface) to load a C shared library called wasmedge_lib
. It then calls the nativeWasmFibonacci
function in wasmedge_lib
to execute the fibonacci.wasm
WebAssembly bytecode.
class NativeLib(ctx : Context) {
private external fun nativeWasmFibonacci(imageBytes : ByteArray, idx : Int ) : Int
companion object {
init {
System.loadLibrary("wasmedge_lib")
}
}
private var fibonacciWasmImageBytes : ByteArray = ctx.assets.open("fibonacci.wasm").readBytes()
fun wasmFibonacci(idx : Int) : Int{
return nativeWasmFibonacci(fibonacciWasmImageBytes, idx)
}
}
The C shared library
The C shared library source code wasmedge_lib.cpp
is available here. It uses the WasmEdge C SDK to embed a WasmEdge VM and execute the WebAssembly function.
extern "C" JNIEXPORT jint JNICALL
Java_org_wasmedge_native_1lib_NativeLib_nativeWasmFibonacci(
JNIEnv *env, jobject, jbyteArray image_bytes, jint idx) {
jsize buffer_size = env->GetArrayLength(image_bytes);
jbyte *buffer = env->GetByteArrayElements(image_bytes, nullptr);
WasmEdge_ConfigureContext *conf = WasmEdge_ConfigureCreate();
WasmEdge_ConfigureAddHostRegistration(conf, WasmEdge_HostRegistration_Wasi);
WasmEdge_VMContext *vm_ctx = WasmEdge_VMCreate(conf, nullptr);
const WasmEdge_String &func_name = WasmEdge_StringCreateByCString("fib");
std::array<WasmEdge_Value, 1> params{WasmEdge_ValueGenI32(idx)};
std::array<WasmEdge_Value, 1> ret_val{};
const WasmEdge_Result &res = WasmEdge_VMRunWasmFromBuffer(
vm_ctx, (uint8_t *)buffer, buffer_size, func_name, params.data(),
params.size(), ret_val.data(), ret_val.size());
WasmEdge_VMDelete(vm_ctx);
WasmEdge_ConfigureDelete(conf);
WasmEdge_StringDelete(func_name);
env->ReleaseByteArrayElements(image_bytes, buffer, 0);
if (!WasmEdge_ResultOK(res)) {
return -1;
}
return WasmEdge_ValueGetI32(ret_val[0]);
}
The WebAssembly function
The factorial.wat
is a handwritten WebAssembly script to compute factorial numbers. It is compiled into WebAssembly using the WABT tool.
Build dependencies
Android Studio and Gradle use CMake to build the C shared library. The CMakeLists.txt file builds the WasmEdge source into Android shared library files and embeds them into the final APK application. In this case, there is no seperate step to install WasmEdge share libraries onto the Android device.
WasmEdge on seL4
Video demo | Build logs | Build artifact
In this article, we demonstrate how to run WasmEdge on the seL4 RTOS, there are two parts:
- Guest Linux OS on seL4: This is the controller of WasmEdge runtime, which will send wasm program to WasmEdge runner that is a agent on seL4 to execute.
- WasmEdge runner on seL4: This is the wasm program runtime, which will execute the given wasm program from Guest Linux OS.
The figure below illustrates the architecture of the system.
This demo is based on the seL4 simulator on Linux.<